Categories
Health Tips Healthy Home New Home

College Dorm Medications – Pharmacist Recommended

Pharmacist recommended College Dorm Medications

Are you are getting ready to send your teen off to their college dorm? Look no further for some practical pharmacist recommended college dorm medications. These items will make a very helpful medicine and first aid kit. I am a pediatric pharmacist with over 2 decades of experience and I am also a mother of three teens. Obviously I need to caution that I cannot just give blanket recommendations because all medications have some contraindications and potential drug interactions. Always read the product safety information and/or speak directly with your doctor or pharmacist if you are taking other medications or have any health conditions or medication allergies.

Make sure your teen is up to date on immunizations and has a copy of their immunization record and health insurance card. Here is a link to the vaccine recommendations for 19-26 year-olds.

Always send all college dorm medications prescription and non-prescription in the original containers so your teen can read the instructions.

As a pharmacist I usually recommend single ingredient medications. It might save space to include multi-symptom cough and cold medications, but it is not worth the saved space to have you teen taking medications that are not needed. It is also easier to overdose on acetaminophen or ibuprofen with multi-symptom medications. Which is why my pharmacist recommended college dorm medications are nearly all single ingredient medications. I usually buy generic medications because they work just as well as brand name medications. Sometimes I prefer brand name medications due to better flavor.

https://www.pinterest.com/pin/675751119117912532/

Which medications should you bring to your college dorm?

Prescribed Medications

Please make sure your teen has all of their prescribed medications and knows how and where to obtain refills. If your teen is going out of state make sure they are still able to obtain refills in that state. All state laws are different, so make sure you have a plan in place ahead of time. Please also make sure your teen is aware of their medication allergies and what their reaction was to the medication. If your teen is taking any prescribed medications or has any medication allergies or health conditions, check with their doctor or pharmacist if any of the other medication listed are still safe to include in their kit.

Pain/Fever medication

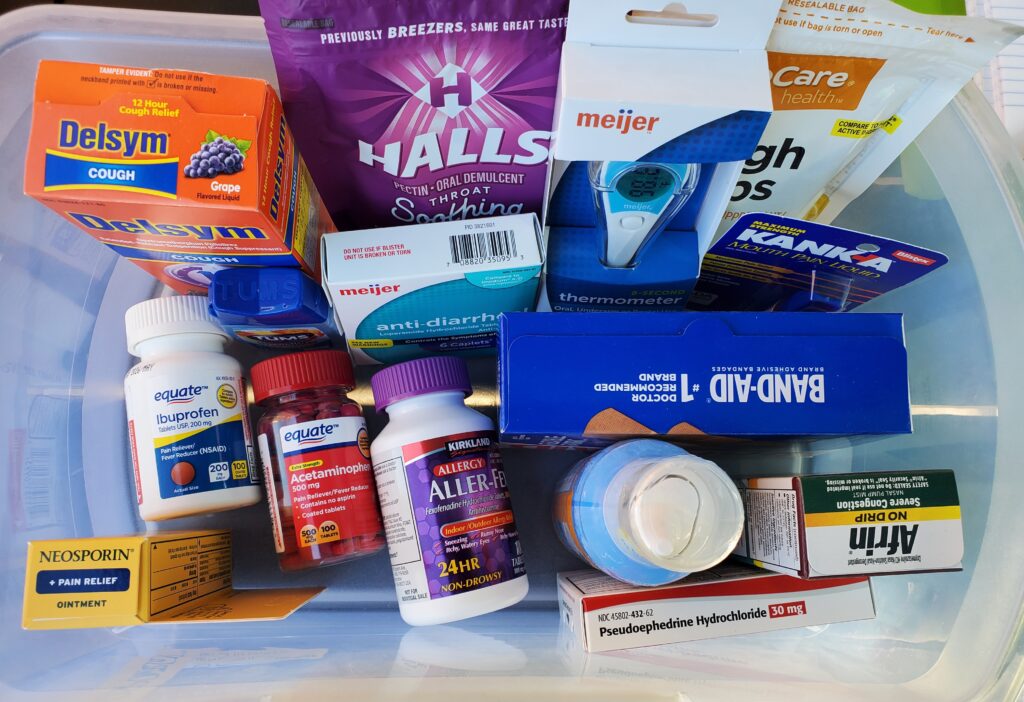
Include a small bottle of Ibuprofen (MOTRIN, ADVIL) and/or acetaminophen (TYLENOL). The bottle size depends on how much how much you expect your teen will need. Ibuprofen and acetaminophen are both good choices for pain or fever. They can both provide relief from a sore throat or headache. Ibuprofen is better for menstural cramps, tooth or bone pain, and is also an anti-inflammatory. It would also be a good idea to include a digital thermometer.

Gastrointestinal medications

Heartburn medication. A small bottle of Tums. Even if your teen does not have trouble with heartburn now, they may start to have problems when they get to choose all of their own food for the first time. College meal plans are sometimes all you can eat, including many dessert options. If they use up their supply and request more, that would be a good time to discuss better food choices and smaller meal sizes.

Diarrhea/Constipation medicine. Travel size Imodium. If they make poor food choices or get sick from close living quarters they will love you forever for including medication for diarrhea. This would not be the medication they will want to walk to the nearest pharmacy to obtain. For constipation I recommend better food choices and exercise as first line treatment for occasional constipation. Fruits, veggies, All-bran, prunes, prune juice, more water, and nice walk. If that doesn’t work, and it’s a new problem, it’s probably due to lack of fiber in their diet. Most college students to do not eat enough fiber in their diet. It would not hurt to include a fiber supplement in the medication kit. If they take the fiber supplement, make sure they are staying hydrated.

Hydration. Diarrhea and vomiting can cause dehydration. Including a few packs of Pedialyte or Liquid IV will help if your teen is dehydrated. Staying hydrated can also reduce the risk of constipation. Check out my other post on how to increase your fluid intake.

Cold and flu medications

Nasal Congestion medicine. I recommend including something for allergies and at least one decongestant. Maybe your teen does not suffer from allergies, but could if they move to a new area. I prefer Zyrtec for allergy symptoms, but Claritin and Allegra are also good choices for a non-sedating antihistamine. I would also include a decongestant incase the congestion is from a cold or flu. In this case pseudoephedrine is my first choice. In some states it can only be purchased from a pharmacist. I would also include a bottle of Afrin nasal spray. This can only be used for three days, six doses. It is dosed 1-2 sprays each nostril every 12 hours. It cannot be used for more than 3 days, but it will be three glorious days of breathing through your nose during the worst of any cold or flu.

Cough medicine. For cough in teens and adults it is okay to use Delsym. There are age restrictions on the purchase of Delsym in some states due to abuse potential. This should not be a problem for most college students because the age to purchase is 18. I still think it is the best over the counter option for cough for teens and adults and I am sending a bottle to college with my teen. I would also include cough drops that have menthol as the main ingredient and some that are just soothing throat drops with pectin as the main ingredient. The menthol drops are best for cough suppression. The pectin drops are better for sore or irritated throat, but can also help a bit with cough.

Topical medications

For cuts and scrapes I recommend triple antibiotic ointment and a package of a variety of sizes of Band-Aids.

For itchy rashes a tube of 1% hydrocortisone cream will be a helpful medication to bring to your dorm room.

Canker sores can be brought on by stress, which is why I recommend including Kanka, a topical anesthetic for mouth sores.

Sleep Aids

I prefer non pharmacological treatment as first line for insomnia. I can understand how sleeping in a new place might be a problem due to noise, stress, or just a new environment. Honestly, I used a box fan to block out the noise when I stayed in a dorm. Earplugs are an inexpensive option that might be helpful. A sleep mask might help if your teen is sensitive to light. Good sleep hygiene would be ideal, but if all else fails it wouldn’t hurt to have a small supply of melatonin. I’d recommend 2.5mg or less as a starting dose.

College dorm medication checklist

Disclaimer: Always check with your teen’s doctor or pharmacist if they have any allergies, medical conditions, or are taking any prescribed medications before including these medications in your college dorm medication kit. This section contains affiliate links.

  1. Prescribed medications
  2. Acetaminophen (Tylenol)
  3. Ibuprofen (Motrin, Advil)
  4. Cough drops (menthol)
  5. Throat Drops (pectin)
  6. Tums
  7. Imodium (loperamide)
  8. Fiber
  9. Pedialyte packets
  10. Non sedating antihistamine (Zyrtec, Claritin or Allegra)
  11. pseudoephedrine
  12. Brand name Afrin nasal spray (oxymetazoline)
  13. Delsym (grape flavor)
  14. Triple antibiotic ointment
  15. 1% hydrocortisone cream
  16. Kanka
  17. Lubricating eye drops (Artificial Tearsnot Visine)
  18. Melatonin
  19. Multiple vitamin
  20. ChapStick
  21. Sunscreen
  22. Insect repellant

Basic First Aid Supplies for College Dorm Checklist

  1. digital thermometer
  2. Variety of Band-Aids
  3. Ice Pack
  4. Scissors
  5. Tweezers
  6. Cotton balls/swabs
  7. Gauze pads
  8. Medical tape
  9. Ace bandage
  10. Tick Key
  11. Alcohol swabs
  12. Gloves

Other College Dorm Needs

Check out our other post for what you need to make your dorm your home. This post includes many items we forgot to pack. Be prepared!

Prime Student 6-month Trial

As an Amazon Associate, I earn from qualified purchases.

Categories
Appetizers Easy meals Recipes Traeger Recipes

Best Leftover Pulled Pork Street Tacos, better than Hello Fresh

Leftover Pulled Pork street tacos
Leftover pulled pork street tacos.

A pulled pork leftover street taco recipe so good it must be shared. I’m a big fan of using my leftovers. It is a great way to save money on groceries. For more info on how to save money on groceries check out my other post.

I made my pulled pork on my Traeger Silverton 620. This is the recipe I used to smoke the pulled pork on my Traeger. I did not add anything to the pulled pork after shredding it. I prefer to allow each person to choose their own BBQ sauce.

What is the best way to use leftover pulled pork?

My favorite way to use my left over pulled pork is by making pulled pork street tacos. I got the idea for this recipe from a Hello Fresh recipe. I gave Hello Fresh a try and really enjoyed it. My family ended up with a couple of new favorite recipes from our trial subscription. This recipe is a creative spin on one of our favorites. It will not work if you have already added BBQ sauce to your pulled pork.

How to prepare leftover pulled pork for pulled pork street tacos.

Put your leftover pulled pork in a frying pan. Toss it around in the pan until warmed evenly. Add sweet soy sauce to coat. I used ABC Sweet Soy Sauce. Add about 1 tablespoon of sweet soy sauce per 1 cup of leftover pulled pork, and mix. If not fully coated add 1 tablespoon of sweet soy sauce and mix, continue adding 1 tablespoon at a time until fully coated but not soupy.

Leftover pulled pork for street tacos
Pulled pork for street tacos.

How to prepare coleslaw for your leftover pulled pork tacos.

I always make coleslaw as a side dish with my pulled pork. personally, I do not like soggy leftover coleslaw so I only dress (add dressing to) what I think my guests will eat. This way any leftover coleslaw mix will last weeks in the refrigerator and I can dress more whenever I feel like eating some. Also, I’m able to switch up the dressing for different recipes such as leftover pulled pork tacos.

Here is my basic coleslaw mix: 1 head of cabbage chopped (I like to use half red and half green), 3-4 carrots peeled and shredded, 1 sweet onion chopped. This mixture will last for 2-3 weeks in your refrigerator. For this leftover pulled pork street taco recipe I use 2-3 cups of my coleslaw mix, 3-4 tablespoons of chopped fresh cilantro, and 3-4 tablespoons of Seasoned rice vinegar. Mix right before serving. If you prefer less crunch, mix 20-30 min before serving and add a little salt.

coleslaw with cilantro for leftover pulled pork street tacos
Coleslaw for pulled pork street tacos.

What other toppings are needed?

For my leftover pulled pork street tacos I also make a quick crema. Just add a tablespoon or two of Sriracha hot sauce to 3 tablespoons of sour cream and mix!

crema for leftover pulled pork street tacos
Crema for pulled pork street tacos.

You can also add some shredded Monterey Jack cheese.

Recipe By Kristin
Course: Dinner Cusine:Aisian Mexican Difficulty:easy

Servings

16 minutes

Preparing Time

20 minutes

Cooking Time

10 minutes

Calories

kcal

INGREDIENTS

  1. 1 head of cabbage chopped (or ½ a head of each green and red cabbage)

  2. 3-4 Carrots peeled and shredded

  3. 1 onion chopped

  4. ¼ cup chopped fresh cilantro

  5. Pinch of salt (optional)

  6. ¼ cup seasoned rice vinegar

  7. 4 cups leftover pulled pork

  8. ½ cup sweet soy sauce (more if needed)

  9. ½ cup sour cream

  10. 1-2 tablespoons sriracha sauce ( more if desired)

  11. 4 ounces grated Monterey jack cheese (optional)

  12. 16 4-inch street taco shells

DIRECTION

  1. Prepare the crema: 

    Mix the sour cream and sriracha.  Add more sriracha if desired. 

  2. Prepare the coleslaw mix. 

    Mix the chopped cabbage, shredded carrots, and onion.  Measure out 4 cups of the mix.  Save the remainder for another use.  Add the cilantro and vinegar.  Mix to coat.  Add salt if you prefer a softer coleslaw, and mix.

  3. Prepare the pulled pork.

    Put the pulled pork in a frying pan and warm it while mixing.  Add the sweet soy sauce.  Mix until coated but not soupy, add extra sauce if needed to coat the pork.  Remove from heat.

  4. Assemble the Tacos.

    Warm the taco shells if desired.  Top with pork, slaw, crema and cheese.

NOTES

    You can store the extra coleslaw mix in your refrigerator for 2-3 weeks.

Categories
Save Money

Beyond Beans and Rice, How to Save Money on Groceries

Many of us focus on budgeting and paying off debt at the beginning of the year. I am a Dave Ramsey fan and have worked his plan for many years. It is a very good plan , and although I did not follow every step exactly as he presents them in his book The Total Money Makeover, I have successfully become debt free. This article is not intended to help you become debt free, just to help you save money on one of your biggest expenses, groceries. Dave pushes for a diet of beans and rice while working his plan. I’m pretty sure he does not mean that you literally have to live on beans and rice alone. Beans and rice are both inexpensive foods that can really stretch a meal. In other words, fill you up for less money. There are plenty of other inexpensive foods that can stretch a meal and other ways to save money on groceries.

Disclaimer: This post may contain affiliate links. I earn commission from qualified purchases at no additional cost to you.

Save money by wasting less

Food waste can be a huge drain on your grocery budget. A study published by the American Journal of Agricultural Economics found that the average American household wastes 31.9% of the food it buys. This works out to be over $150 of wasted food per month per household on average. If you feel you may be wasting too much food it’s definitely worth taking a look at some strategies to help you stop the waste.

How can you reduce household food waste?

Put a list of leftovers on your refrigerator
  1. Use your leftovers! Here is how to save money on groceries. We recently started a list of leftover food on the refrigerator door. We told the kids if we end up throwing away any leftovers we will not be able to get take out for 2 weeks. Using this system we have not thrown away any leftovers in 4 weeks! Download my leftover list below.
  2. Use up your produce. Unfortunately those produce drawers have a way of hiding your fruits and veggies. Out of sight out of mind. I like to keep a few fruits on the counter in a fruit bowl. Most fruits can be kept at room temperature for a few days. If they are in the bowl, they are more likely to be eaten. I also cut up a tray of fruit and leave it on the counter each weekend. It really disappears fast this way. Smoothies are another great way to use up produce quickly. Make sure you have a plan for the produce you buy. Dig through those produce drawers often and make sure you rotate stock.
  3. Use your freezer. Use this chart from foodsaftey.gov for guidelines on how long your food will be safe to eat. Note that the freezer recommendations are for quality only, the site explains that food can be store indefinitely at 0 degrees F or less. So don’t start throwing out food in your freezer based on that chart. If you do not think you will be able to finish a food fast enough, then freeze it if possible.

Save by making things instead of buying premade items:

Hummus is easy to make at home. It is less expensive than the premade product and is so simple especially if you have a mini food processor.

homemade hummus recipe

Make your own foaming hand soap. Just mix hand soap with water to get a lot more soap! All you need is a foaming soap dispenser.

how to make foaming hand soap

Save money by packing your Lunch.

How much can you save by packing your own lunch?

Packing your lunch can be a huge cost savings over buying lunch every day. Only you can determine your actual savings. There are savings estimates out there, but it really depends on what you personally have been spending. You should be able to prepare a meal at home for less than half of the cost of the same meal as take out. For example if you buy a taco salad at a restaurant for $10.00, you could make that same salad at home for less than $5.00. Even if you could manage to save just $5.00 per day, that would be a savings of $25.00 per work week or $1300.00 per year.

Don’t just take your lunch for a ride either. You have to eat what you packed, resist the temptation to order out with your co-workers or choose that favorite dish at the cafeteria. If you end up ordering out and taking your lunch home, you may end up having to waste what you packed. Then you will have paid for 2 lunches!

How do you find the time to pack your lunch?

Make sure you pack your lunch the night before. If you save this task for the morning you will inevitably be running late. If you have children any number of things could distract you from your lunch making task, a forgotten homework assignment, a spill you have to help clean up, a lost shoe, or you name it. Trust me, if you want to save money you need to make your lunch the night before. Teach your kids to do the same.

Why should you pack your kids lunch?

I know what you are thinking. Why would I pack my kids lunch? The school lunch is only $3.00/day. Sure it would be difficult but not impossible to pack a lunch or less that $3.00/day, so why do it?

  1. It teaches responsibility. Kids can learn valuable skills by packing their own lunch. How to make a sandwich or salad. Knife skills for chopping fruit. Even how to add items to a grocery list when they are getting low.
  2. It’s healthier. I know Michelle Obama tried really hard to make school lunches healthier, but they could still use some work. Currently these lunches are free for all and my kids are still packing their lunches at home. My son tolerated the low quality tasteless food the longest. He finally gave up and started packing his own lunch after reading the ingredients on the Uncrustable in his school lunch. He said “It had too much added sugar and 50% of my daily fat. I just can’t continue to eat that food.”
  3. You will waste less food. Leftover dinners make great lunches. We try to use up our leftovers within 4 days. It really helps if every family member helps. If you end up throwing out leftovers because you bought that bargain $3 lunch, you have not saved anything.
  4. You can save money by buying in bulk. It’s easier to buy in bulk if your whole family is packing lunches. Once you open a bulk package of lunchmeat, you should use it up in 3-5 days. If only 1 or 2 people are packing sandwiches, you may end up throwing some of it out.
Easy Mediterranean Lentil Salad Recipe
This easy Mediterranean lentil salad is tasty and packed with protein and …
Easy Whole Wheat Chocolate Zucchini Muffins
Turn some zucchini into a tasty breakfast treat with this delicious whole …
Tropical No Bake High Fiber Energy Balls
These Tropical no bake high fiber energy balls are also a great …
Polish Easter Soup – Barszcz Bialy 4 ways
There are several ways to make Polish Easter soup aka: Barszcz Bialy …

What should you pack for lunch?

  1. Soup or chili. I like to make a big pot of homemade soup or chili every week. Find my favorite soup recipe here. This is a quick and easy chili that makes great leftovers. I use a Corningware meal mug for packing soups. When my kids were younger I always packed their soups in a Thermos Funtainer. We would heat them up in the morning and the soup was still warm at lunch time. This way they could skip the microwave line and had more time to eat.
  2. Leftover Dinner. You have to pack up your leftovers anyway, why not just pack them for lunch. Casseroles and pasta make great leftovers for lunches.
  3. Salads. You can really get creative with salads. Try pasta salad, coleslaw, bean salad, Waldorf salad, or just a traditional lettuce salad. Check out my article about quick and easy packable salads.
  4. Sandwiches. Meat and cheese, PB &J, leftover pulled pork, leftover meatloaf. Have some fun! Get creative.
  5. Try Bento Box lunches. These containers are an excellent alternative to packing everything in Ziplock bags. You will save on plastic bags and benefit the environment while saving money on your food budget. Check out my bento boxed lunch post for some great ideas for kids and adults.

Save money by shopping sales

How do I find time to save?

I know you are probably thinking you don’t have time to shop several stores to get the best prices. I’d like to say that you probably do. Sales are a great way to save money on groceries. There have to be some high use non perishable items in your home. Maybe a particular sauce, or salad dressing. These are the items you want to find the best prices on. For example, I always buy Smuckers natural peanut butter at Walmart. It’s cheaper there than sale prices anywhere else. I don’t stop there every week, I just stop in and buy 3-4 jars when we are getting low. Just a few trips a year. Take the time to find the best deals on you highest use items, this will be worth your time.

Never pay full price.

I never pay full price for pasta, canned soup, BBQ sauce, mayo or any food with a long shelf life. When I grocery shop weekly, I’m mostly there to pick up fresh produce, eggs, and dairy items like milk and yogurt. I only buy meat if it is a really good sale, otherwise I defrost some meat I bought on sale earlier. Lastly, I always pick up a few nonperishable sale items for later use.

Save on Chicken breast during Super Bowl week.

By the way, the week of the Super Bowl is a great time to stock up on chicken breast. Chicken wings are so popular for the game that the rest of the chicken parts are usually marked down for quick sale.

Why coupons are not so great

You were probably expecting an article on saving money on your grocery budget to include a bunch of ways to save with coupons. I’m not saying that I never use coupons or that they will never save you money. I’m just saying that in my experience they have not really been worth the time. It takes a lot of time to search for, clip and sort coupons. Then to keep track of expiration dates. I believe that time could be better spent saving money in other ways like meal prep or managing leftovers.

Most of the time when searching for grocery coupons they tend to be for name brand products I don’t buy. It’s much cheaper to purchase generic items. One study showed that most grocery coupons were for unhealthy food.

There is nothing worse than spending your time clipping a coupon, finding the product in the store, only to find that the store brand equivalent is less expensive than the brand name product even with the coupon. Overall I don’t believe clipping coupons is the best way to save money on groceries, and defiantly not a great way to make healthy choices.

Save money by planning your meals

Meal planning seems like a daunting task, but it’s not. Start by checking the grocery store ad for produce sales. Sales are a great way to save money on groceries. I always start my plans with what ever produce is on sale. If there is a big sale on mushrooms, I’ll plan to make my favorite recipe with mushrooms. Big sale on broccoli and cauliflower, then stir fry will be a great choice. A sale on bell peppers would be a great time for stuffed peppers.

Meal planning is not just about shopping the sales it’s about finding the time to prepare the food. If you know you will be too busy to make dinner on Wednesday night due to soccer practice, then plan that to be a leftover night. There is nothing worse than having a house full of hungry family members and no plan for dinner. These are the nights that will cost you a lot because you will cave under the pressure and order take out. There goes your food budget! Save money on groceries by making the meals on your less busy days. Make sure you defrost your meat, you might even be able to trim the meat ahead of time. Chop a few onions on the weekend, you can use them in recipes and on sandwiches and salads throughout the week.

Save with grocery apps or manager specials.

Save money on groceries by using the Flashfood app to get great deals on marked down produce and meat that is close to expiration. These items can be used right away of frozen for future use, either way the savings is usually at least 50%. Use the referral code KRIS4BP8W to save $5 on your first purchase of $10 or more.

Flashfood bargains
$10 bargain haul from the Flashfood app

If you are driving home from an evening event, stop in any grocery store on your way home. Managers begin to mark down items with a sell by date of the following day within a few hours of closing. You can often find great Manager Specials on meat and deli items that are close to expiration. If you don’t know where to find the manager specials, ask an employee. You’ll be glad you did! If you can’t use the meat before expiration, toss it in the freezer when you get home. Pull it out for an inexpensive meal later!

manager's special

How to stretch your grocery budget with low cost foods

There are some foods that are budget friendly and can be used to feed your family for less. Here are some examples of low cost foods that can help you save money on groceries:

Low cost food #1, Potatoes

There are plenty of recipes that include potatoes. Soups and casseroles like Shepherd’s Pie. If you are trying to save on your grocery budget you can add a couple extra potatoes to these recipes to expand the number of portions. A baked potato can also be a very easy and inexpensive side to any meal.

Shepherd's pie on the smoker
Shepherd’s Pie on the smoker

Find my Shepherd’s pie recipe here.

Low cost food #2, Pasta

Pasta. It is not difficult to find a sale on pasta. This ingredient can easily be added in excess to most recipes to expand your number of portions. It also makes an inexpensive side dish or salad.

better than rachel ray's Italian mac n cheese

Click here, for my favorite pasta recipe.

Low cost food # 3, Zucchini

I stopped growing my own zucchini a few years ago because I noticed that I was having to turn down so much free zucchini from friends, family, and neighbors. I’m sure you have seen a pile of free zucchini on your breakroom table each summer. Just one plant provides more zucchini than most families can consume. Take the free zucchini, make bread or add it to your stir fry or just grill it up next time you make burgers. My favorite zucchini dish is zoodles! You will need to invest in a zoodle maker, but it is worth it to make a delicious pasta dishes with zucchini as noodles. We sauté onions and garlic in olive oil then add the zoodles to the pan. Sauté until warm then add capers and olives. Top with some shredded parmesan and you have a tasty meal or side dish, the bulk of which was free!

Low cost food #4, Eggs

Want to add some inexpensive protein to your meal? Consider adding eggs. I like to keep some hard boiled eggs in my fridge. They make a quick and easy inexpensive breakfast. They are also a great addition to fresh salads. You can also use eggs in fried rice.

Low cost food #5, Cabbage

This is a very inexpensive vegetable and it is so versatile. You can make coleslaw as an inexpensive side dish. Add it to salads, soups, or sandwiches. It can also be a meal itself. It has a very long shelf life, longer than lettuce so it can also help reduce food waste.

Low cost food #6, Beans

Add some beans to your meat. I used to add one can of beans to every one pound of ground beef when I made chili. I have found that I can add an extra can of bean per pound of beef and the chili is still delicious, and I get an extra serving. Here is my chili recipe. Try this tasty bean salad.

Low cost food #7, Rice

This is a very inexpensive ingredient that can be prepared as a meal or side dish. There is seemingly no end to the varieties of ways you can prepare rice. I love fried rice, Spanish rice, and Caribbean rice. You can add it to pretty much any soup and many casseroles.

Low cost food #8, Onions

I’m not suggesting you eat a plain onion as a side dish, well maybe I am. It’s just that onions are very cheap and they are included in many recipes. If you double the onion you could add an extra serving to many dishes, plus make them healthier and more flavorful. If you are grilling, wrap and onion in some foil and throw it on the grill. Grilled onion is a delicious addition to pretty much any grilled meal.

More ways to save money

As an amazon associate, I earn from qualified purchases.

Categories
Health Tips Healthy Home

Five Sneaky Tricks to Increase Your Hydration

According to the CDC the average American adult drinks about 39 ounces of water per day. This is below the recommended amount. If you are like many adults who wish to increase your water intake, read on for five sneaky tricks to increase your fluid intake.

Why should I drink more water?

Water is essential for life. Your body is about 60% water. You need water for temperature regulation, clear thinking, eliminating waste, and proper circulation.

Drinking adequate amounts of water prevents dehydration, keeps your skin healthy, reduces fatigue, prevents constipation, and reduces the risk of kidney stones.

How much water do I need?

The Institute of Medicine of the National Academies recommends that healthy men consume 3.7 Liters ( 125 ounces) and healthy women consume 2.7 Liters or 91 ounces of water each day.

These are just guidelines for adults with average activity. There are other factors that could change your water needs such as physical activity, climate, age, sex, pregnancy and breastfeeding.

Warm climate could increase your fluid intake needs.

How can I increase my hydration?

Increasing your daily fluid intake could be as easy as just setting a goal and finding ways to stick to it. If you don’t really care for drinking plain water than finding ways to flavor it could help. Maybe you just need to find ways to fit drinking more fluids into your daily routine. Read on for some great ways to increase your daily fluid intake.

How to increase your hydration infographic

1.Set a goal to increase your fluid intake

Use an app to keep track of your water consumption goals.

If you already enjoy drinking water you may just need to set a goal and find a way to stick to it. Believe it or not there are plenty of apps out there to help you keep track of your water consumption goals. These apps will be best used with a water bottle with measurement marks on it to help you keep track of your consumption.

2. Flavor your water to help increase your fluid consumption

Tea is a great way to flavor water
Tea is a great way to flavor your water.

If you struggle to drink plain water it may really help if you flavor your water. I like to infuse fruit flavor into my water. My favorite is lemon, but there are plenty of fruits and vegetables that can give your water a pleasant flavor without adding too may calories. I like to use a water pitcher with infuser to add fruit to my water because it keeps the seeds out of my water. It is also easy to clean out and refresh the fruit. If you prefer you could drink iced or hot tea as an alternative to plain water or fruit infused water. It’s best to try decaffeinated teas if possible. I’d recommend trying several teas before you rule this out. There are so many different teas you could try; there has to be at least one you would like.

3. Make drinking water a habit to help increase your hydration.

You can easily increase your fluid intake by making drinking water part of your daily routine. Jim Kwik, author of Limitless has a great example of this in his morning brain enhancing routine. He drinks a tall glass of water every morning to help replace overnight losses from breathing. You could also make it a habit to drink a tall glass of water before each meal. This can also help you to eat less and could improve your weight loss goals.

4. Eat your water to help increase your fluid consumption.

Celery is 95% water.
Celery is 95% water

Simply increasing you consumption of fruits and vegetables could help to increase your overall fluid consumption. Some fruits and vegetables are very high in water. Examples of fruits and vegetables with the high water content are cabbage, celery, watermelon, peaches, bell peppers, cucumbers, lettuce, tomatoes, oranges, cantaloupe, and strawberries. Other foods with high fluid content are yogurt, cottage cheese, and soup. Try adding some of these foods to your diet. You could swap French fries for coleslaw, or swap a sandwich for a salad or soup. Have a breakfast smoothie or try my Immune Boosting granola with yogurt.

Immune-boosting-granola-served-with-yogurt
Immune boosting-granola served with yogurt.

5. Keep water convenient to help increase consumption.

Find a water bottle you love and make sure to take it with you. Make sure it fits into the cup holder in your car. Find one with a handle that is easy to carry, or invest in a water bottle carrier.

Leave a glass of water on your night stand at night. Keep a glass near you at work. Fill a pitcher with plain or fruit infused water and keep it in the refrigerator. Keep a tray of fresh sliced fruit or veggies in your refrigerator.

Prepared veggie tray
Grab and Go veggie tray to keep in your fridge.

As an amazon associate I earn from qualified purchases.

Categories
Casseroles Recipes

Better than Rachel Ray’s Italian Mac ‘n Cheese

It has been 15 years since I first tried Rachel Ray’s Italian Mac ‘n Cheese. A friend from my mom’s group brought me the dish after I had my third child. It was part of a meal train we put together to help out moms for the first couple of weeks after giving birth. Of the meals I received, this one was by far my favorite. I asked my friend for the recipe and for the past 15 years I have been modifying this recipe. I believe I have perfected the recipe now, because it is always a hit at my home. I am now ready to share with you my Better than Rachel Ray’s Italian Mac ‘n Cheese recipe.

Please feel free to compare my recipe with Rachel Ray’s Italian Mac & Cheese. My recipe is better because it has onions and because it has more sauce. The sauce in my recipe is also more flavorful due to the addition of more tomatoes and seasoning.

Easy Mediterranean Lentil Salad Recipe
This easy Mediterranean lentil salad is tasty and packed with protein and …
Easy Whole Wheat Chocolate Zucchini Muffins
Turn some zucchini into a tasty breakfast treat with this delicious whole …
Tropical No Bake High Fiber Energy Balls
These Tropical no bake high fiber energy balls are also a great …
Polish Easter Soup – Barszcz Bialy 4 ways
There are several ways to make Polish Easter soup aka: Barszcz Bialy …

Italian Mac ‘n Cheese Recipe

Ingredients:

1 Pound of Penne pasta

1 Pound bulk Sweet Italian sausage

12 Cremini Mushrooms (1 package), sliced

1 onion, chopped

2 tablespoons olive oil

3 Tablespoons butter

1/2 Cup flour

4 cloves garlic, minced

1 can of each: chicken broth, diced tomatoes and tomato sauce

2 teaspoons Italian seasoning

8 ounces of whipping cream

8 ounces of Italian Blend shredded cheese

1/2 Cup shredded Parmesan cheese

salt and pepper

Directions:

Prepare the pasta according to package directions. Drain and pour into a pyrex baking dish.

Brown the sausage, drain and set aside. Add the olive oil to the pan and sauté the onion until slightly softened. Add the mushrooms, garlic and butter. Toss to evenly coat, add salt, and continue to sauté until the mushrooms begin to soften. Stir in the flour until evenly coated. Slowly add the chicken broth, add a little and stir until the sauce thickens, then add more and stir. Repeat this process until the whole can is incorporated. Add the undrained can of diced tomatoes, tomato sauce, Italian seasoning and pepper. Mix until well combined and return to a simmer. Return the drained sausage to the pan and add half of the shredded Italian blend cheese, mix until melted. Add the whipping cream and mix constantly until the sauce returns to a simmer, then remove from heat.

Pre heat the broiler to high. Pour the sauce over the pasta and mix. Top with remaining Italian blend cheese. Place the dish under the broiler for 3-5 min until the cheese in lightly browned. Serve with parmesan cheese.

If you like the recipe, you may also like my Better than Olive Garden Zuppa Toscana.

As an Amazon Associate, I earn from Qualified Purchases.

Categories
Breakfast recipes Health Tips Healthy Recipes Recipes

Pharmacist Shares Immune Boosting Granola Recipe

Customers are flooding into local pharmacies in search of immune boosting supplements. Many of these immune boosting ingredients can easily be included in your diet. It’s much less expensive to eat your vitamins than to purchase supplements. I’m a pharmacist and I would love to share my recipe for Immune Boosting Granola. Granola is a quick and easy breakfast or snack that can easily be added to any daily meal plan. Add some to you favorite yogurt or just pack it for a quick and easy snack.

Disclaimer: The statements made regarding this recipe have not been evaluated by the Food and Drug Administration. The efficacy of this recipe has not been confirmed by FDA-approved research. This recipe is not intended to diagnose, treat, cure or prevent any disease.

Immune Boosting Nutrients

In order to make an immune boosting recipe, one first needs to know which nutrients are known to boost immunity. I have compiled a list of immune boosting vitamins and minerals, because adding more to your diet can help boost your immunity.

Vitamin C- There is research to support Vitamin C supplementation in reducing the length and severity of respiratory infections.1 Vitamin C plays an important role in immune response.

Zinc – Plenty of research is certainly available supporting zinc supplementation in reducing the length and severity of infections.1 Zinc is an important player in immune response.

Vitamin D – There is some evidence that vitamin D could reduce the risk of Influenza and COVID-19 infections and death.2

Vitamin B6- A deficiency in Vitamin B6 reduces your ability to make antibodies to fight off infection. Vitamin B6 could help strengthen immunity.3

Vitamin E- Immune response is enhanced by Vitamin E. It can provide protection against infections.4

Selenium- The immune system relies on adequate dietary selenium.5

Immune Boosting Ingredients

I selected my granola ingredients to include as many immune boosting vitamins and minerals as possible so they can help boost immunity. Here is a list of my ingredients because it is important to understand why they were included in my recipe.

  1. Elderberry syrup (find it here): Elderberry syrup is also used to enhance immunity. Elderberries are high in flavonoids, Vitamin A and Vitamin C. It may also help reduce symptoms of viral infections by stimulating immune response.6
  2. Matcha (find it here): Another natural superfood, matcha is green tea powder. It is made by grinding green tea leaves into a fine powder. Regular consumption of green tea could decrease influenza infection rates and cold symptoms.7
  3. Hemp hearts(find them here), pumpkin seeds and Flax Seeds: I included all of these mostly for the zinc and omega 3 and 6. These polyunsaturated fats also have been extensively studied for their role in immune health.8
  4. Nuts: These serve as a good source of selenium and zinc. I also chose Brazil nuts because they have the highest amount of selenium. Cashews are also high in zinc.
  5. Sunflower seeds: These seeds also have some healthy fats, but I chose them mostly because they are an excellent source of vitamin E. They are also a good source of selenium and vitamin B6.
  6. Ginger: Can also help reduce the severity of respiratory infections.9
  7. Blueberries: Another natural superfood. Blueberries are a good source of Vitamin C. I included them because they are one of the best sources of antioxidants, mostly flavonoids.

Immune Boosting Granola Recipe

Ingredients:

4 Cups Oats

1 Cup mixed nuts (cashews, almonds, and Brazil nuts)

1/4 Cup sunflower seeds

1 Cup shelled pumpkin seeds

1/4 Cup hemp hearts

1 Tablespoon matcha powder

2 Tablespoons cinnamon

1 teaspoon ground ginger

1/2 teaspoon Himalayan pink salt

2 Tablespoons flax seed

1/3 Cup dried cranberries

1/2 Cup shredded dry coconut

1/3 Cup dried blueberries

1/2 Cup honey

1/3 Cup Peanut butter

2 Tablespoons Elderberry Syrup

1/3 Cup coconut oil

Directions:

First preheat oven to 350 degrees F. Mix together the oats, nuts, sunflower seeds, pumpkin seeds, hemp hearts, matcha, cinnamon, ginger, salt, and flax seed. Meanwhile, in a separate bowl mix the peanut butter, coconut oil, honey, elderberry syrup. Once mixed, pour the wet ingredients over the dry ingredients and mix until evenly coated.

Cover a Jelly Roll Pan with parchment paper. Spread the granola over the paper. Bake for 15 min. Remove from the oven and mix in the dried coconut. Bake for 10 more minutes. Remove and mix again. If the coconut is not completely toasted, bake for 2 more minutes or until most of the coconut is toasted but not burnt. Lastly, remove from the oven and stir in the dried fruit while the granola is still warm. Finally, allow the granola to cool to room temperature. Although it is difficult not to finish it all in one sitting, you may have some leftover. If so, you can store in an air tight container at room temperature for up to 2 weeks.

Immune Boosting Granola Served with Yogurt

Granola makes a great gift!

References:

  1. https://www.karger.com/Article/Abstract/90495
  2. https://www.mdpi.com/2072-6643/12/4/988
  3. https://pubmed.ncbi.nlm.nih.gov/28367454/
  4. https://www.ncbi.nlm.nih.gov/pmc/articles/PMC6266234/
  5. https://pubmed.ncbi.nlm.nih.gov/30200430/
  6. https://www.tandfonline.com/doi/abs/10.1271/bbb.120112
  7. https://www.mdpi.com/1420-3049/23/7/1795
  8. https://www.ncbi.nlm.nih.gov/pmc/articles/PMC6834330/
  9. https://www.ncbi.nlm.nih.gov/pmc/articles/PMC7019938/

As an Amazon Associate, I earn from qualified purchases.

Categories
Recipes Traeger Recipes

How to Make Fabulous Smoked ribs

Finally, after multiple attempts, I have been able to perfect my fall off the bone smoked baby back ribs. These ribs are fabulous! I’ve tried 3-2-1 recipes in the past; but in my opinion this recipe is better than 321 ribs. They are certainly award winning according to my family. I want to share this wonderful recipe for how to make fabulous smoked ribs with you.

Smoked ribs Ingredients

2 racks of Baby Back Ribs

4 Teaspoons garlic powder

4 Teaspoons Traeger Pork and Poultry Rub

1/3 cup honey

1/4 cup apple juice

4 Tablespoons Dark Brown Sugar

BBQ sauce to taste

How to prepare fabulous smoked ribs

The first step is to remove the silver skin from the baby back ribs. This may have been done by your butcher, but if not it’s a really simple process. Just turn over the rack and use a paper towel to find the skin and pull to remove. Once the silver skin is removed season both sides with garlic powder and a generous portion of Traeger Pork and Poultry Rub.

How to prepare the Traeger Silverton 620 for ribs

Clean the Traeger from any previous cook. Ribs can be really messy so you should use a Traeger tray liner to protect your grill. This Trager grill liner is slightly wider that the liner that came with my Silverton 620 grill, but it is bendable and actually provides more coverage. You could just use foil for this step, but the tray liners do work better. Initially I tried to clean the tray between cooks, but I ended up finding the best cost saving option to be lining the tray with foil. This way I just remove to foil and reapply clean foil to the tray. I get several uses out of each tray, and keep my grill clean. Fill the hopper with Traeger Signature Blend Pellets. Preheat the Traeger to 200 degrees F.

How to make fall off the bone ribs on the Traeger Silverton 620

Place the prepared ribs directly on the rack of the preheated Silverton 620 Treager grill. Smoke at 200 degrees F for 2 hours.

Baby Back ribs prepared to smoke

Line a 21 x 13 Inch foil pan with aluminum foil, make sure there is excess foil to wrap the ribs.

Remove the ribs from the grill, use a hand held Probe Thermometer to check the meat as close as possible to the center between two ribs. The internal temperature at this step should be approximately 150 degrees F. Turn the Traeger Silverton 620 temperature up to 235 degrees F.

Smoked baby back ribs

Place the ribs in the foil lined pan. Drizzle the ribs with honey, approximately 1/3 cup.

baby back ribs drizzled with honey
Baby back ribs drizzled with honey

Pour one cup of warm apple juice over the ribs. Then sprinkle each rack with dark brown sugar, approximately 2 tablespoons each.

baby back ribs with dark brown sugar
Baby back ribs with dark brown sugar

Tightly wrap the foil around the ribs and return to the Traeger.

Baby back ribs wrapped in foil

Smoke the foil wrapped ribs for 2.5 hours.

How to make your own BBQ sauce

While your ribs are smoking prepare your own BBQ sauce.

BBQ Sauce Recipe

Ingredients:

2 tablespoons mustard

3/4 cup ketchup

2 tablespoons apple cider vinegar

2 tablespoon dark brown sugar

1 teaspoon garlic powder

1/2 teaspoon onion powder

2 tablespoons apple juice

Mix all ingredients together in a sauce pan over low heat. I highly recommend the Ballarini Parma sauce pan for this. If you choose to buy one you will thank me when it comes to clean up time. Stir occasionally while maintaining a simmer. Taste your sauce. If it is:

Too sour? Add more apple juice or brown sugar

Too sweet? Add more apple cider vinegar

Not enough mustard, garlic, onion? Add more of those ingredients.

Continue to simmer until sauce is slightly thinner that you would desire your BBQ sauce to be. It will continue to thicken as it cools.

homemade BBQ sauce
Homemade BBQ sauce

Final step for perfect fall off the bone baby back ribs

After your wrapped ribs have smoked 2.5 hours, remove them from the Traeger Silverton 620 with, heat resistant silicone gloves , and once again check a temperature with a hand held probe thermometer. The temperature at this step should be approximately 200 degrees F.

Use a silicone basting brush to coat the top side of each rack of ribs with your homemade BBQ sauce.

Smoked baby back ribs coated with BBQ sauce

Return the ribs to the Traeger. This time they go right on the rack, unwrapped. Continue to smoke at 230 degrees F for 30-40 minutes or until the sauce is tightened.

baby back ribs with sauce on the Traeger
Baby back ribs with sauce on the Traeger

Remove from the Traeger with large tongs, slice or break apart and enjoy!

smoked baby back ribs
Smoked baby back ribs

Hope you enjoyed learning how to make fabulous smoked ribs.

As an Amazon Associate I do receive commission on qualified sales.

Categories
Recipes Soups

Zuppa Toscana – Better than Olive Garden

I’m not intending to share an Olive Garden Zuppa Toscana copy cat recipe, because I really like their Zuppa Toscana. However, I feel my homemade Sausage Kale and Potato soup is better than Olive Garden. I’m sure you will too.

This soup has been a favorite at my house long before I even tried the Olive Garden Zuppa Toscana. It all began with a recipe for Sausage and gnocchi soup, that I modified and modified until it became in my opinion, perfect!

Read on and you will find directions for my version of Zuppa Toscana, but if you prefer I also have a link to a video and a printable recipe below.

Zuppa Toscana (Creamy Sausage Kale and Potato Soup) Recipe

Ingredients:

2 Pounds ground bulk Italian sausage

8 medium potatoes peeled

2 bell peppers, chopped

2 tablespoons olive oil

8 cups chicken stock

2 cup heavy cream

1 bunch of kale, stems removed

salt and pepper to taste

Directions:

Brown the Italian sausage in a frying pan until cooked through.

Set aside on a paper towel lined plate to drain, because you will not want all that grease in your soup. Meanwhile sauté the onion and peppers with the olive oil until slightly tender.

Add the chicken stock and potatoes to the pan.

Put the drained sausage back into the pan and, bring to a boil.

Reduce to simmer until potatoes are tender.

Add the half and half.

Rip the kale into small bite size pieces, or chop with a chef knife.

Add the kale to the soup and simmer for 3-5 min. Season with salt and fresh ground pepper. Enjoy!

If you would prefer to see these directions in a video, you can find it on my YouTube channel.

As an Amazon Associate I receive commission on qualified sales.

Categories
Recipes Sides

How to make Authentic Polish Pierogi

It seems fitting to add a Pierogi recipe to my blog today because it is National Pierogi day. I happen to have an authentic pierogi recipe from my husband’s Polish mother. He was able to get the exact measurements from her back in the 90’s when he had an assignment to complete for school. His assignment was to submit a recipe for an ethnic food. It was a bit of a challenge to get the exact ingredient quantities and directions from his mother. Initially when he asked her how to make Pierogi, she said “make dough, then put in the filling, then boil them.”

He ended up having to spend an afternoon watching her and measuring everything she did in order to obtain this recipe I’m about to share with you.

Disclaimer: This post may contain affiliate links. I earn commission on qualified purchases at no additional cost to you.

Pierogi basic dough Recipe

Ingredients:

4 cups of all purpose flour

250 mL of water

1/2 teaspoon salt

2 eggs

Directions:

Mix flour and salt together and sift. Add the eggs and water and knead until dough is smooth and stretchable.

Sprinkle flour over the table where you will be rolling the dough to prevent sticking. Roll out the dough with a rolling pin until it is approximately 1/8 of an inch thick. Cut out the dough with a 3 inch round cookie cutter. It’s really nice to have a cookie cutter with a handle since you will be making so many cuts.

Put your favorite filling (filling recipe below) in the center of each circle.

Stretch the dough around the filling and pinch together to avoid leaking during boiling. Use the handle of a butter knife or spoon to make a decorative edge. This step takes practice.

How to boil Pierogi

When pierogi are stuffed and pinched together, put 8-10 of the pierogi into boiling water. Stir occasionally to prevent sticking. When pierogi begin to float, boil for another 3-5 minutes. Continue to boil the remaining pierogi.

After boiling the pierogi, transfer them to a sheet pan greased with butter. Brush more melted butter on all sides, so they do not stick together.

Coat boiled pierogi with melted butter to prevent sticking.

Pierogi Potato & Cheese Filling recipe

Ingredients:

5 Medium Potatoes

1/4 pound cheddar cheese

1 medium onion finely minced and sauteed

1/2 teaspoon salt

1/2 teaspoon pepper

Directions:

Boil the potatoes until tender, drain and mash. Shred the cheese and add to the hot potatoes so it melts. Add salt pepper and sauteed onions, mash to mix.

Pierogi Sauerkraut Filling recipe

Ingredients:

50 ounces of fresh sauerkraut, drained

2 medium onions, finely chopped

1 8-ounce package of mushrooms, minced

2 Tablespoons butter, plus more to prevent sticking

1/2 teaspoon salt

1/2 teaspoon pepper

Directions: Drain the sauerkraut through a mesh strainer.

drain the sauerkraut

Sauté the mushrooms and onions in 2 tablespoons of butter salt and pepper.

sauté mushrooms and onions

Add the mushrooms and onions to sauerkraut. Put the mixture through a meat grinder.

Mushroom and Sauerkraut filling in a meat grinder
ground sauerkraut mixture
Sauerkraut pierogi filling

Drain the ground pierogi filling before filling the pierogi. Add 1 heaping teaspoonful to each circle of dough. Stretch and pinch the dough around the filling.

Pierogi ready to pinch closed

Serving Pierogi

Saute Onions and pierogi in a frying pan until lightly browned. Serve with sour cream.

Can You Freeze Pierogi?

Yes you can! After boiling the pierogi, place them on a buttered jelly roll pan to cool. Once they are cool, place the pan of pierogi in the freezer. The next day the frozen pierogi can be transferred into a freezer bag, and placed back in the freezer. Be sure to label the bag with the date and filling flavor!

Printable Pierogi Recipe

Follow us on Social Media.

As an Amazon Associate, I earn on qualified purchases.

Categories
Appetizers Recipes

Easy Fritos Bean Dip Appetizer for all occasions

I love this Easy Fritos Bean Dip recipe, because it always goes. It works great when you need a quick and easy recipe for a party appetizer. People love it and are always asking me for the recipe. It can take on any shape and can be decorated for different for any holiday and all occasions.

Disclaimer: This post may contain affiliate links, I will earn commission from purchases at no additional cost to you.

Easy Fritos Bean Dip Video

Bean Dip Recipe

Ingredients:

1 8-ounce package of cream cheese, softened

1 9 ounce can Fritos Bean Dip

4 ounces of shredded cheddar cheese

3-4 green onions, sliced

1-2 Roma tomatoes, diced

10-12 black olives, sliced

Instructions:

Blend the Fritos bean dip and softened cream cheese until smooth and uniform. Hint: If you can’t find Fritos Bean dip, try this Copycat Recipe.

Spread the mixture in a dish or on a plate. This is where you can get creative with the dip. Because the dip can take on any shape, you can put it in a football shaped serving dish for a Super Bowl game day party, a Christmas tree shaped serving dish for a Christmas party, a heart shaped dish for Valentine’s Day or a Bridal shower. Get creative!

Top with the shredded cheese.

Layer with tomatoes, onions and olives.

Easy Bean Dip
Easy Bean Dip

This is another opportunity to get creative. For example, you could arrange the toppings like Christmas ornaments on a tree shaped platter. You can also pipe on sour cream using a frosting bag to create some fun designs. See my Easy Bean Dip Recipe seasonal designs below.

Football Party Themed Appetizer

For this football party themed bean dip I used this football shaped bowl for both the dip and the chips.

Christmas Themed Appetizer

For this Christmas Themed version of my bean dip I used a Pyrex Easy Grab Pie Dish. I covered the bean dip with Monterrey Jack cheese (white cheddar would work too). For the wreath I used shredded lettuce, cilantro, green onions and green olives. Then decorated the wreath with sliced cherry and grape tomatoes. These ingredients would also look great in a Christmas tree shaped serving dish.

Halloween Themed Appetizer

Spider Web Halloween themed Bean Dip Appetizer.

To make your Easy Bean Dip more festive for a Halloween party you could decorate it like a spider web. For the spider web I used a piping bag with a #4 tip to pipe on full fat sour cream. I topped with a couple of spider rings which I removed before serving. I still wanted the other toppings so I added them to the edge of the design. If you are really crafty you could make spiders out of olives.

Grave Yard Halloween Themed Bean Dip Appetizer

For more Halloween appetizer fun you could also make your Easy Bean dip into a grave yard. For the grave yard, I piped full fat sour cream on Wheat thins using a piping bag and a # 2 tip . Then I arranged the crackers like grave stones. I added a bat ring and a couple of skull rings too, but I removed them before serving.

Race Track Themed Appetizer

I made this appetizer for a post season Cross County Party, but you could use it for any race themed party. Just fold a label over 2 toothpicks for the finish line. Secure the toothpicks with 2 whole olives and press it down into the dip.

Curling Themed Bean Dip

Curling Bean Dip

For this curling themed bean dip I hid the green onions under shredded Monterey Jack cheese “ice”. The red ring was made with tomato slices, the blue ring was made with black olive slices. Serve with tortilla chips after a good curling match.

Is Bean Dip Gluten Free?

Yes all of the ingredients, including Fritos Original Bean Dip, are gluten free. You should however, shred your own cheese, because pre-shredded cheese could contain gluten. Also, make sure the chips you serve with it are gluten free.

Is Bean Dip Keto Friendly?

No, the Fritos Bean Dip has too many carbs. It is not keto friendly.

Please follow us on Social Media.

As an Amazon Associate I earn from qualified purchases.

x  Powerful Protection for WordPress, from Shield Security
This Site Is Protected By
Shield Security