I am a part-time pediatric pharmacist, full time wife and mother of three teens. I’m also a home chef, gamer, and love to entertain in my home. I know how to relax and enjoy my home life and would love to share my ideas with you.
Salads are a delicious nutritious way to pack some lean protein into you diet. Lean protein is essential for building muscle. Protein helps you stay full longer, which is great if you are trying to shed some extra unwanted pounds. These high-protein salad ideas can help you and your family stay healthy.
Disclaimer: This post may contain affiliate links. I earn commission at no additional cost to you.
Chef Salad
This salad is a meal. Loaded with protein. The highest protein ingredients include chicken breast 43 grams/cup, ham 29 grams/cup, cheese 28 grams/cup and 1 egg = 6 grams. The bed of spinach contains another 1 gram/cup. Dress with your favorite dressing and enjoy!
Asian Snow Pea Salad
Snow peas contain quite a bit of protein for a vegetable, approximately 5.2 grams/cup. This salad also contains chickpeas which are an excellent source of plant based protein, 39 grams/cup. The sesame seeds also provide protein, 1.6 grams/tablespoon.
Mediterranean Lentil Salad
Find this high protein lentil salad recipe here. This salad is packed with plant based protein. 1 cup of cooked lentils provides 17.9 grams of protein. This salad also contains bulgur wheat which contains 5.6 grams of protein/cup.
Chicken Fajita Salad
This tasty salad is packed with protein sources: Chicken breast 43 grams/cup, avocado 3 grams, corn 3.8 grams/cup, black beans 15 grams/cup, cheese 28 grams/cup.
Greek Quinoa Salad
Find this high-protein salad recipe here. Just one cup of cooked quinoa provides 8 grams of protein. This salad also contains chickpeas which contain a whopping 39 grams of protein/cup. Other good protein sources in this salad include kale, 2.2 grams/cup and fat free feta cheese 59 grams/cup.
Four Bean Salad
Find this hearty filling salad recipe here. The high protein ingredients include: chickpeas 39 grams/cup, kidney beans 15 grams/cup, green beans ~2 grams/cup, wax beans ~2 grams/cup.
Superfood Salad
This superfood salad contains a couple of high protein vegetables: beets ~2.2 grams/cup, spinach ~1 gram/cup. Other high protein ingredients include: fat free feta 59 grams/cup and walnuts 12 grams/cup. Find the vanilla paste here.
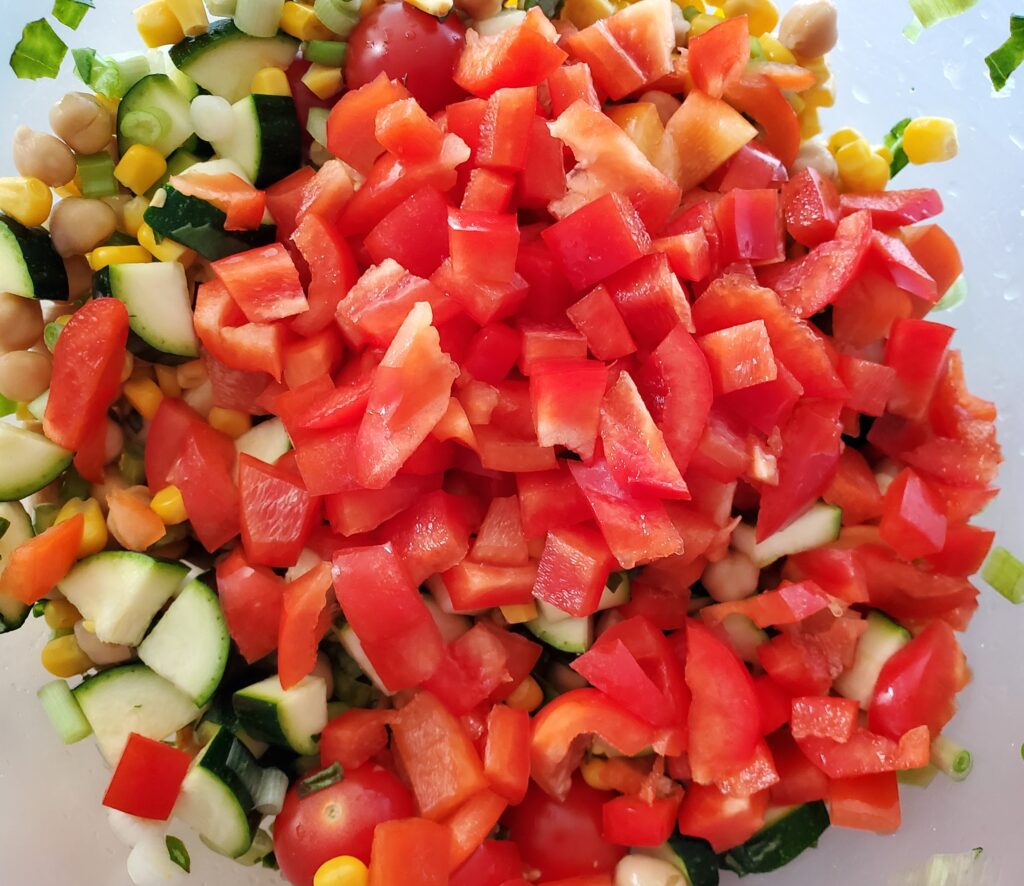
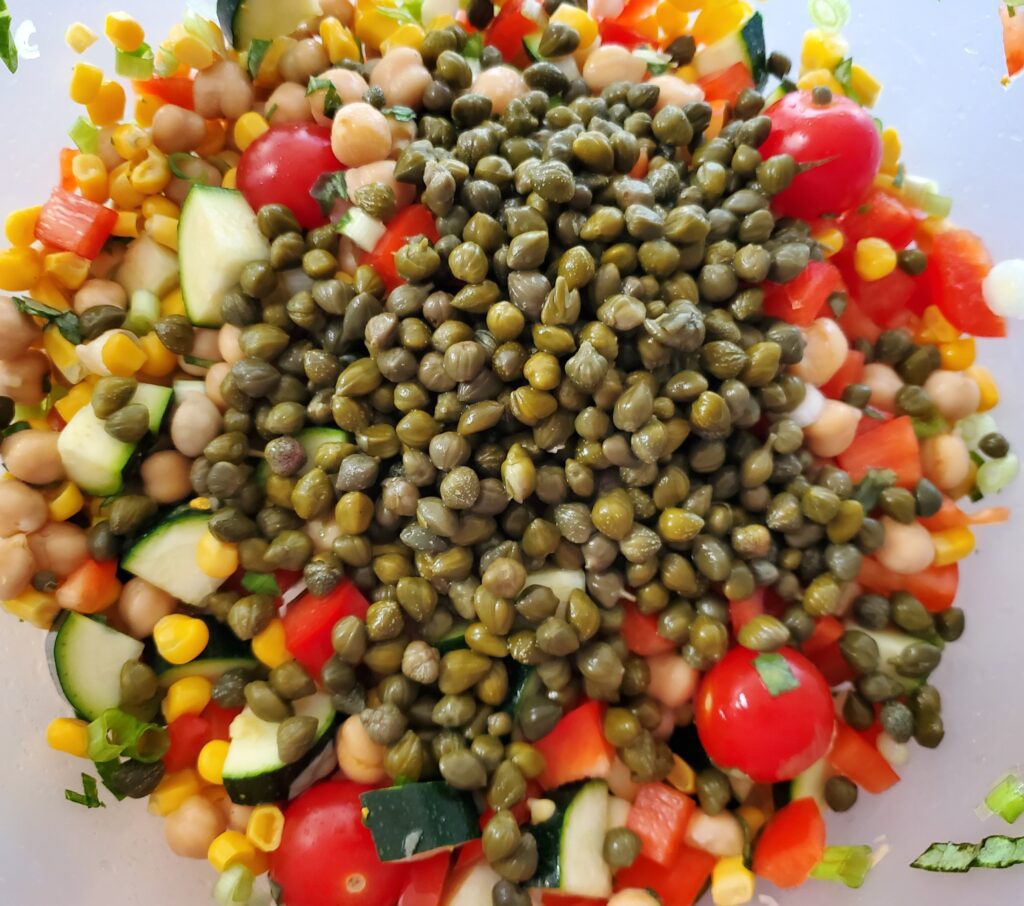
Summer Farro Salad
Find the summer farro salad recipe here. Farro contains ~7 grams or protein/cup. This salad also contains chickpeas 39 grams/cup and corn 3.8 grams/cup.
Waldorf Salad
This protein packed salad makes a great breakfast or lunch. Serve it alone or on a bed of spinach or lettuce. Protein packed ingredients include: Chicken breast 43 grams/cup, pecans 9 grams/cup, and low fat Greek yogurt 20 grams/cup.
Broccoli Salad
Believe it or not broccoli has high protein content for a vegetable ~ 2.6 grams/cup. Bacon ~3 grams/slice and sunflower seeds ~24 grams/cup pack some additional protein in this salad. The Greek yogurt in the dressing adds ~20 grams/cup.
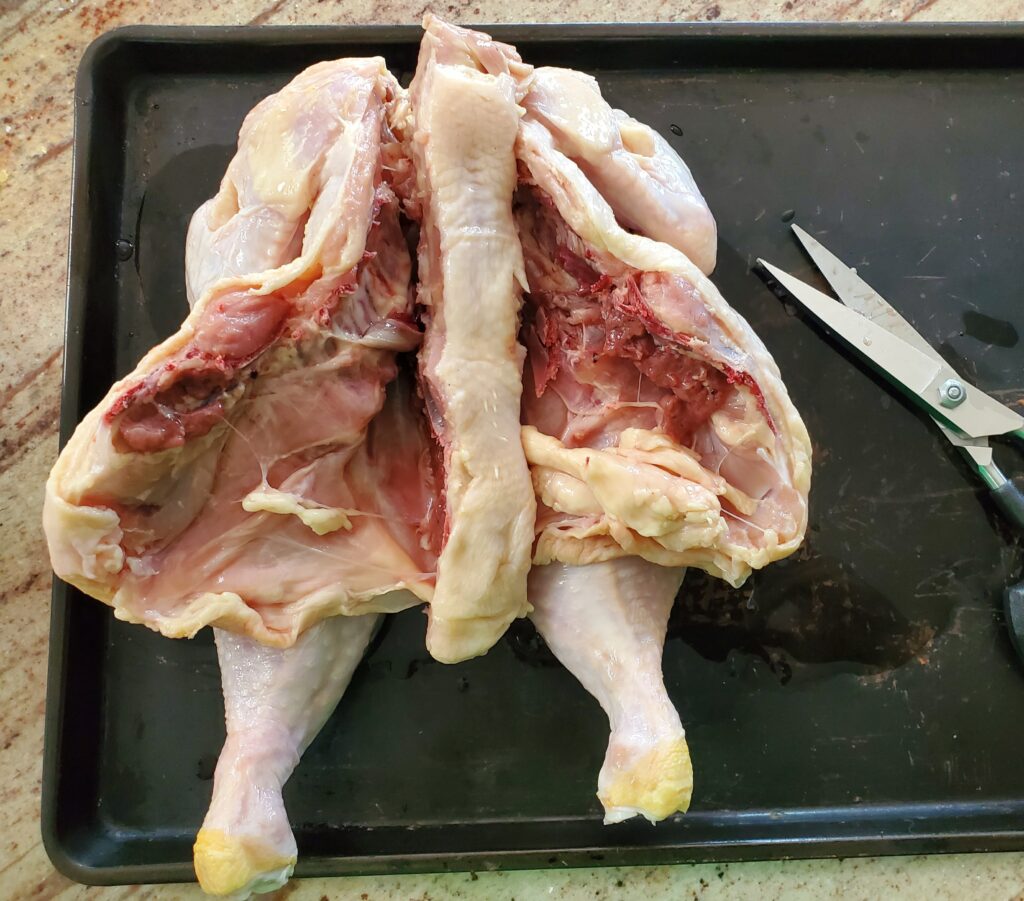
You do not need a chicken throne to smoke amazing spatchcocked chicken on the Traeger pellet grill. When you spatchcock the chicken it reduces the smoking time to about 3 hours for a four pound chicken. Add any seasoning you wish for a juicy tasty whole chicken on the Traeger smoker.
Disclaimer: This post may contain affiliate links. I earn commission at no additional cost to you.
This method will also work for a turkey, but it is much easier to spatchcock a chicken.
Start by turning the chicken over so the backbone is facing up. Use a heavy duty kitchen shears, or poultry shears to cut down alongside the backbone on both sides until it is cut completely through from end to end. You will have to cut through the ribs so it is not easy. If you are spatchcocking a turkey you may need to use a large knife or meat cleaver, but a kitchen shears is usually enough for a chicken.
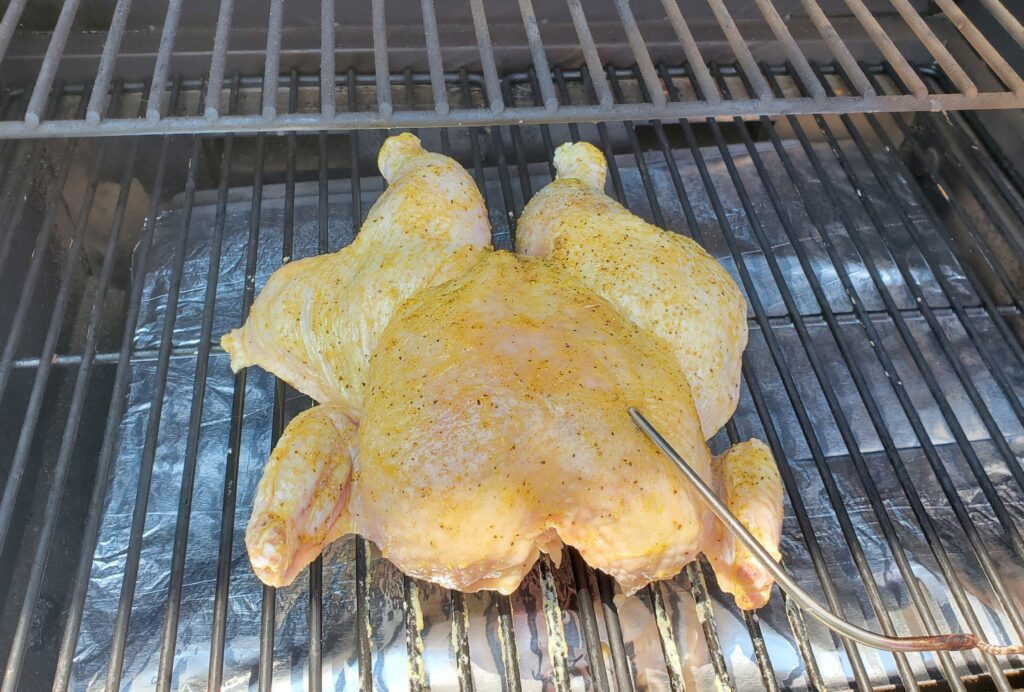
Turn the chicken over (breast side up) and press down with the heel of your hand until it flattens. You may hear a crack when the breast bone breaks. Then season both sides as desired.
How Long do you Smoke a Spatchcocked Chicken
Preheat the Traeger to 225 degrees F. Place the spatchcocked chicken directly on the grate. Insert a probe thermometer into the breast.
Smoke until the internal temperature reaches 165 degrees F. Approximately 3 hours.
1 Tablespoon Kinder's Lemon Pepper (or rub of your choice)
1 teaspoon garlic powder
DIRECTION
Start by turning the chicken over so the backbone is facing up. Use a heavy duty kitchen shears, or poultry shears to cut down alongside the backbone on both sides until it is cut completely through from end to end. You will have to cut through the ribs so it is not easy.<br>Turn the chicken over (breast side up) and press down with the heel of your hand until it flattens. You may hear a crack when the breast bone breaks. Then season both sides as desired.<br>Preheat the Traeger to 225 degrees F. Place the spatchcocked chicken directly on the grate. Insert a probe thermometer into the breast.<br>Smoke until the internal temperature reaches 165 degrees F. Approximately 3 hours.
There is some much fun to be had right at home in the summer. Why spend a bundle travelling in the summertime? Have you checked out all of the tourist attractions in your hometown? If not, here are some summer staycation ideas have fun right at home.
Disclaimer: This post may contain affiliate links. I earn commission at no additional cost to you.
Try a New Restaurant with Outdoor Seating
One thing I always try to do on vacation is dine outdoors. Especially when travelling somewhere tropical in the winter. Why not find a hometown restaurant with beautiful outdoor dining in the Summertime? This is a perfect summer staycation experience.
Photo by Datingscout on Unsplash
Try Grilling Something New
Nothing says summer more than outdoor cooking. If you do not have a grill already, I’d suggest a Traeger Grill! If you are interested in all of the wonderful things you can make on a Traeger grill, check out this post on how to use a Traeger.
I make take it for granted living in Michigan, there are plenty of Great Lake beaches as well as many other smaller lakes to enjoy nearby. If you live near any body of water, make a day trip and enjoy! If not, try a local pool.
Visit an Amusement Park or Water Park
No need to book a vacation to visit a local water park or amusement park. Sure, it’s fun to travel and try something new once in a while, but why not enjoy what you have near home? I have both a water park and an amusement park near my home. A quick day trip for the family. If you do, give it a try.
Make a Fun Summer Dessert
Flower pot cupcakes. Just put a chocolate cupcake covered with chocolate frosting and Oreo crumbs in a 2.5 inch terracotta pot. Top with berries, Oreo filling and mint leaves.
It’s fun to go to a campground, but it can also be fun to “camp” at home. Give it a try!
Make Dinner Over a Fire
If your hometown allows bonfires, you can make dinner or at least some s’mores over the fire. If you cant have a regular firepit, try a patio firepit.
Try Gardening
Tomatillo plant in a pot
You don’t need a huge space for a vegetable garden. You can plant many different vegetables in pots. Just add a few flowers and enjoy the beauty all summer. The pictured pot above contains two tomatillo plants, two sweet potato vines and a variety of marigolds.
Take a Lesson
Don’t just ship your kids off to a bunch of camps this summer. You can learn plant of new things by taking lessons. First of all everyone should learn to swim. Start with that lesson if any of your family members need it. Then try something else. Try pottery, golf, pickleball, knitting or anything else you may want to learn.
Go to a Museum
This is a popular vacation activity. Have you been to every museum within 50 miles (~1 hour) of your home? Even if you have, museums are constantly adding new exhibits. Give it a try!
Run!
Sign up for a race or just enjoy a run near your home. Either way running can be lots of fun.
Go to a Farmer’s Market
Check out your local farmer’s market. Try something new every week. You will be surprised how many different fruits and vegetables you will find.
Pick your own Produce
Photo by Joshua Woroniecki on Unsplash
Many local farms offer U-pick fruits and vegetables. Summertime in Michigan is a perfect place to pick strawberries, blueberries, cherries and peaches. If you pick blueberries, try this amazing Peach blueberry pie recipe.
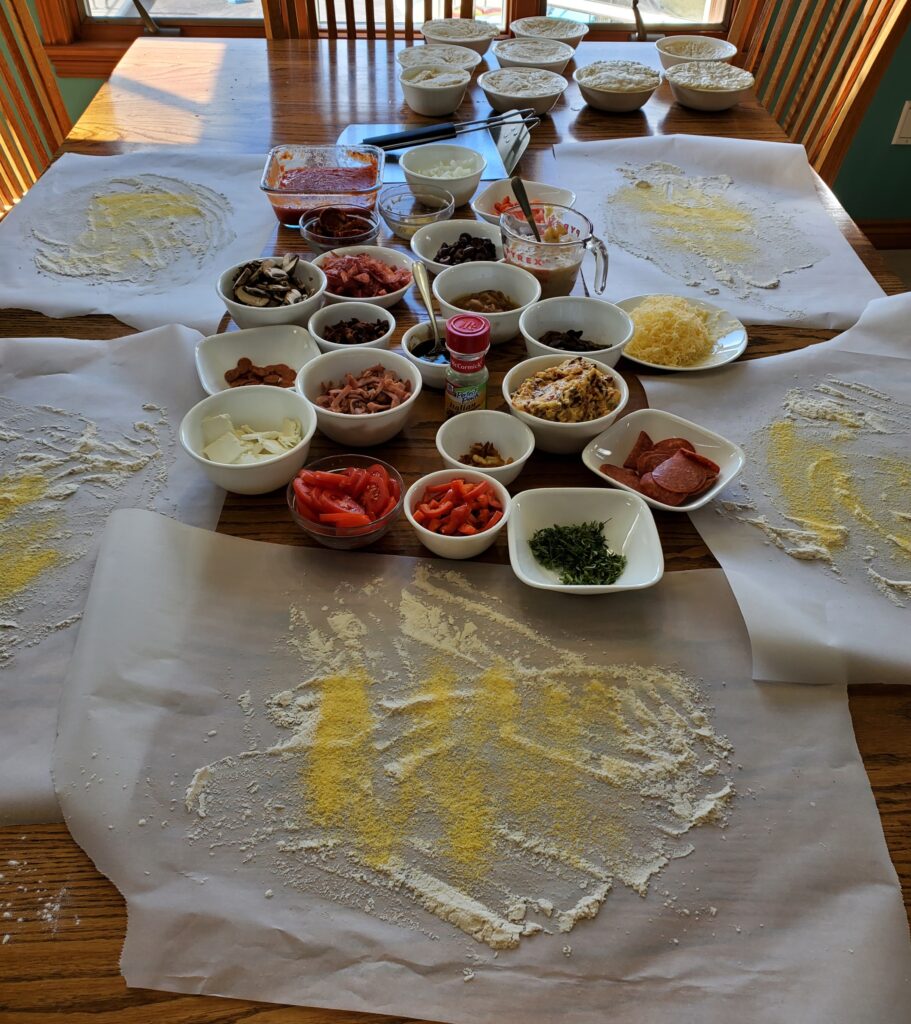
Family Pizza Night
This is great fun! Make or buy some pizza dough. Provide a selection of toppings and give each person a piece of parchment paper to assemble their own pizza.
Have you ever noticed that many vacation destinations have candy stores. You will find them in hotel lobbies and popular tourist shopping districts. Why not shop one in your hometown? Candy is a nice staycation treat!
Go to a Zoo or Aquarium
Have you been to every zoo or aquarium near home? Even if you have give it another try, they always have something new to see.
Go out for Ice Cream
Ice cream is not just for vacations. Sure you can scoop some in a bowl at home, but once in a while it’s nice to go out for a cone. Ice Cream is a staycation must!
Try a New Sport
Pickle ball is a great new sport to learn this summer. Have you driven by that new pickle ball court at your local park, thinking that looks fun? Pick up a couple paddles and some balls and find out!
Photo by Ben Hershey on Unsplash
Try a New Activity
An escape room
A trampoline park
Arcade
Bowling
Ropes Course
Zip line
Rock climbing
Skating
indoor skydiving
Walk a New Trail
Go for a Bike Ride
Photo by Yiwen on Unsplash
Watch a Movie
Of course a drive in movie would be the best summer staycation expirience, but if you don’t have drive in nearby you can still enjoy a good flick at home. If you choose to stay home make it fun with a new popcorn maker or movie theater candy! For even more fun get a projector and project your movie on a large white sheet outside.
Join a Summer Reading Program at you Local Library
Reading is a great family activity for summertime. It’s great to keep the kids reading all summer, and a perfect time to join a reading program at your local library.
Try a New Park
Visit a park near home that you have never been to before. You never know what you might find.
Do an Outdoor Craft
Take your creativity outside. Anything from sidewalk chalk to painting rocks can be fun.
Have a Spa day or get a Pedicure
Photo by Konstantin Shmatov on Unsplash
Fly a Kite
If all else fails, go fly a kite!
Photo by Belinda Fewings on Unsplash
As an Amazon associate, I earn from qualified purchases.
This Summer farro salad is fresh and delicious. Loaded with whole grains, plant based protein and Summer vegetables. This salad is perfect for a picnic, potluck or packed lunch. A tasty side for a Summer BBQ.
Disclaimer: This post may contain affiliate links. I earn commission at no additional cost to you.
This easy Mediterranean lentil salad is tasty and packed with protein and whole grains. A perfect addition to a packed lunch, an awesome appetizer or a unique side dish.
Disclaimer: This post may contain affiliate links. I earn commission at no additional cost to you.
Start by cooking the bulgur and lentils according to package directions. Chill the lentils and bulgur in a bowl in the refrigerator while you prepare the other ingredients. Once chilled, add the tomatoes, shallot, green onions, and parsley to the bowl and mix. Add the olive oil and lemon juice and mix well. Finally add the sumac, cumin and tomato powder. Mix until well incorporated. Chill for at least 1 hour before serving. If your salad is too dry add additional olive oil and lemon juice to taste.
4-5 green onions finely sliced (both whites and greens)
3/4 Cup minced fresh parsley
1/2 cup olive oil
Juice of one lemon
2 Tablespoons ground sumac
2 Tablespoons cumin
2 tablespoons tomato powder
DIRECTION
Start by cooking the bulgur and lentils according to package directions. Chill the lentils and bulgur in a bowl in the refrigerator while you prepare the other ingredients. Once chilled, add the tomatoes, shallot, green onions, and parsley to the bowl and mix. Add the olive oil and lemon juice and mix well. Finally add the sumac, cumin and tomato powder. Mix until well incorporated. Chill for at least 1 hour before serving. If your salad is too dry add additional olive oil and lemon juice to taste.
NOTES
As an Amazon associate I earn on qualified purchases.
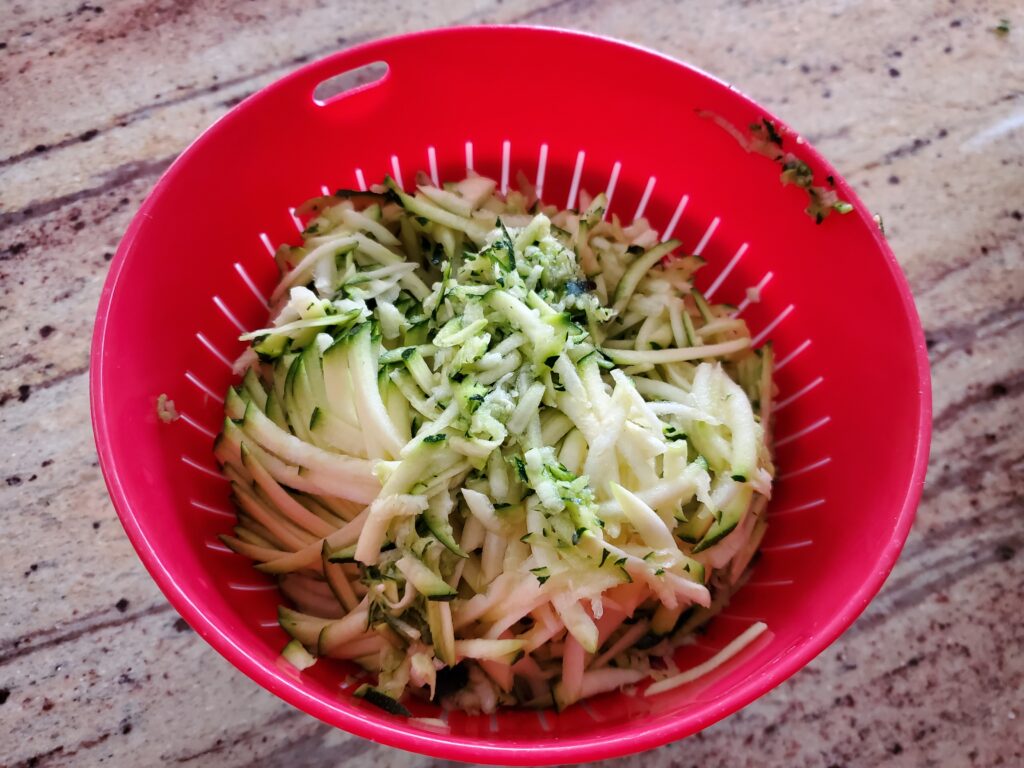
Turn some zucchini into a tasty breakfast treat with this delicious whole wheat chocolate zucchini muffin recipe. These muffins are great way to sneak some vegetables and whole grains into your kiddos. Warning, they will disappear fast!
Disclaimer: This post may contain affiliate links. I earn commission at no additional cost to you.
Start by grating the zucchini in a food processor. If you are using a large zucchini, remove the seeds before grating. Set aside in a colander to drain off excess moisture while you prepare the muffins.
Preheat the oven to 350 degrees F.
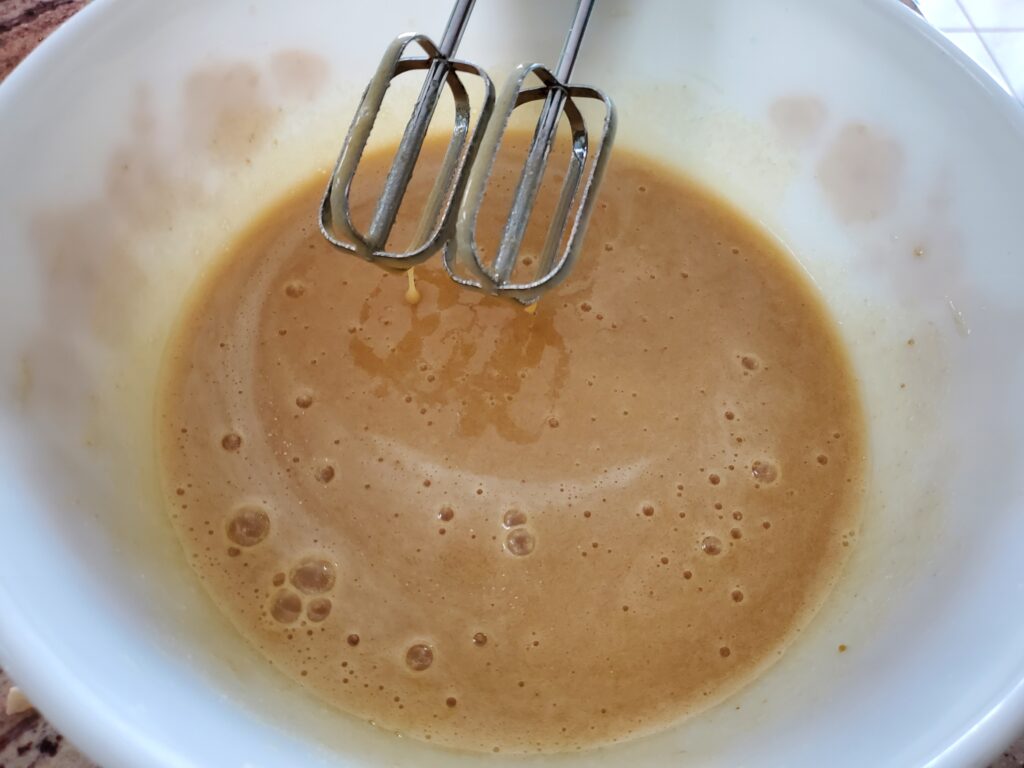
In a large bowl, beat together the sugars, oil, eggs and vanilla with an electric mixer until well combined.
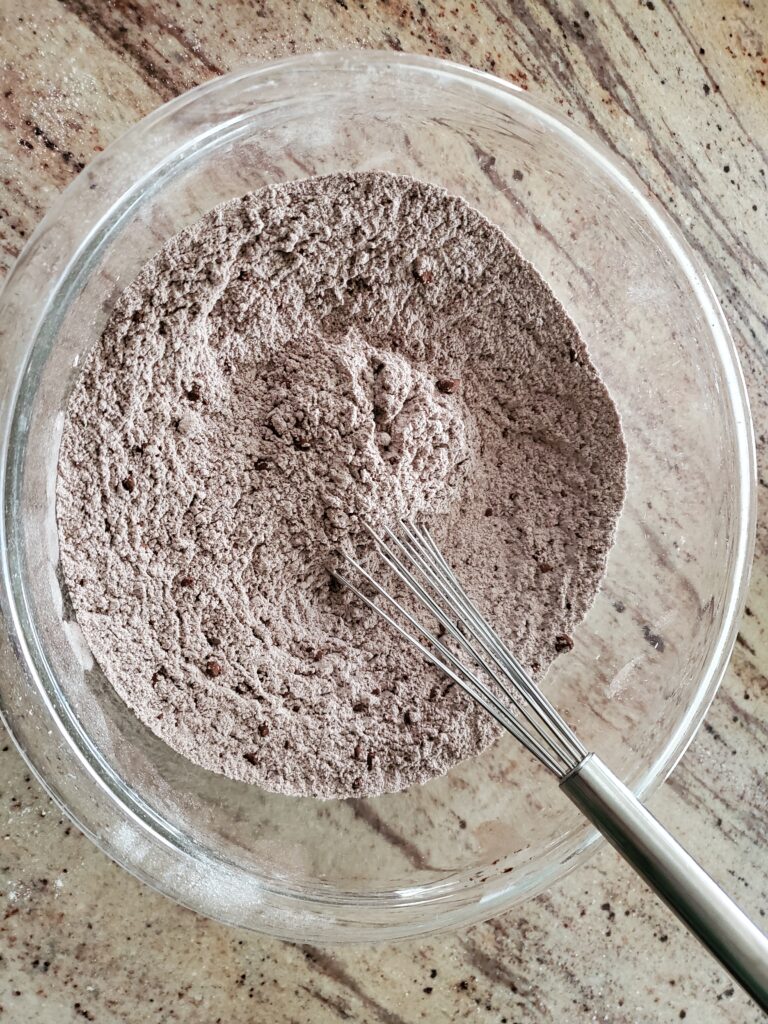
In another bowl whisk together the flours, cocoa powder, salt, baking soda and cinnamon.
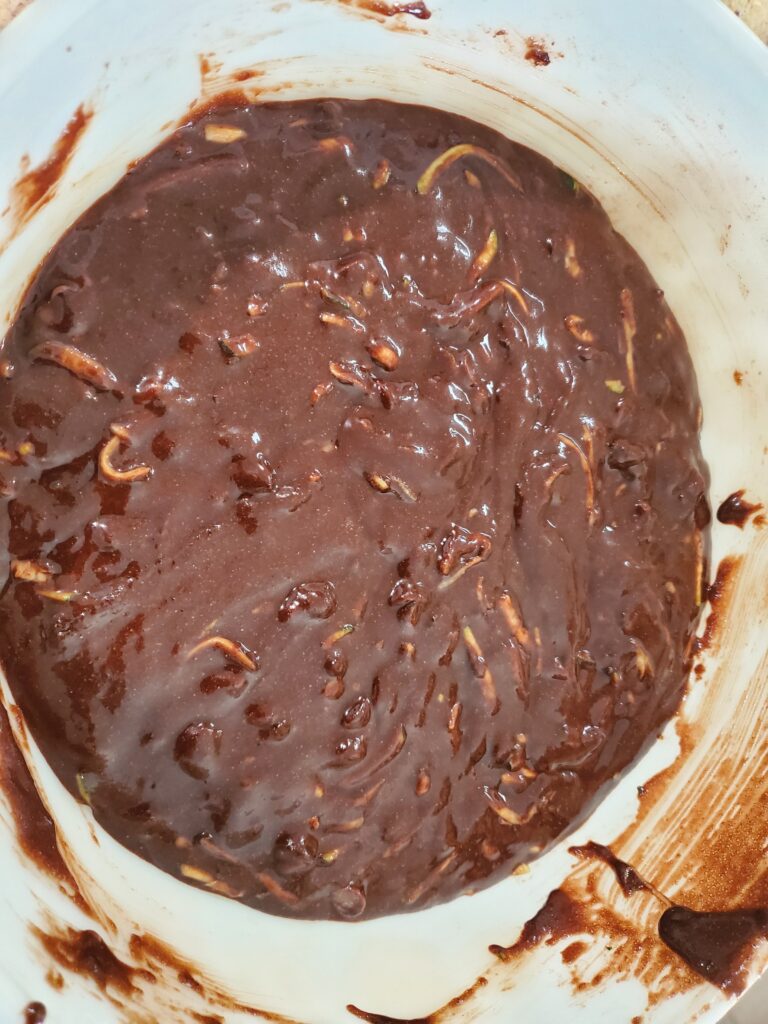
Gradually add the dry ingredients to the wet ingredients until combined. Fold in the zucchini and chocolate chips.
Spray 2 large muffin pans with non-stick spray or line with paper liners. Fill each muffin well 2/3-3/4 full with the batter. This recipe makes approximately 20-22 muffins.
Bake for 20-22 minutes or until a fork comes out clean.
Transfer the muffins to a cooling rack. Once cooled, store them in an airtight container for up to 3 days.
Start by grating the zucchini in a food processor. If you are using a large zucchini, remove the seeds before grating. Set aside in a colander to drain off excess moisture while you prepare the muffins.<br>
Preheat the oven to 350 degrees F.
In a large bowl, beat together the sugars, oil, eggs and vanilla with an electric mixer until well combined.<br>In another bowl whisk together the flours, cocoa powder, salt, baking soda and cinnamon.
Gradually add the dry ingredients to the wet ingredients until combined. Fold in the zucchini and chocolate chips.<br>Spray 2 large muffin pans with non-stick spray or line with paper liners. Fill each muffin well 2/3-3/4 full with the batter. This recipe makes approximately 20-22 muffins.<br>
Bake for 20-22 minutes or until a fork comes out clean.<br>Transfer the muffins to a cooling rack.
NOTES
As an Amazon associate, I earn on qualified purchases.
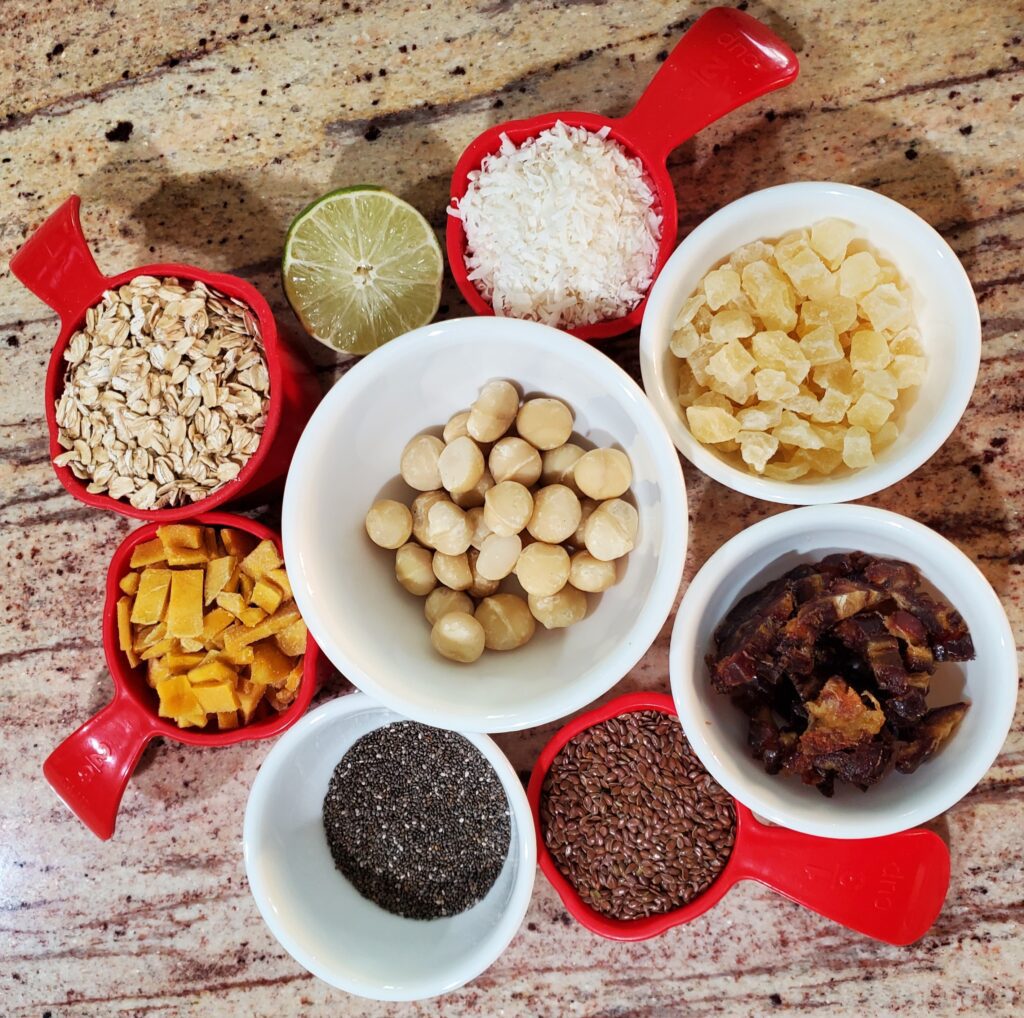
These Tropical no bake high fiber energy balls are also a great source of protein. They are made with all natural ingredients with no added sweeteners.
Disclaimer: This post may contain affiliate links. I earn commission at no additional cost to you.
2 tablespoons lime juice, or tropical juice of your choice
Lime zest to taste (optional)
How to make Tropical energy balls
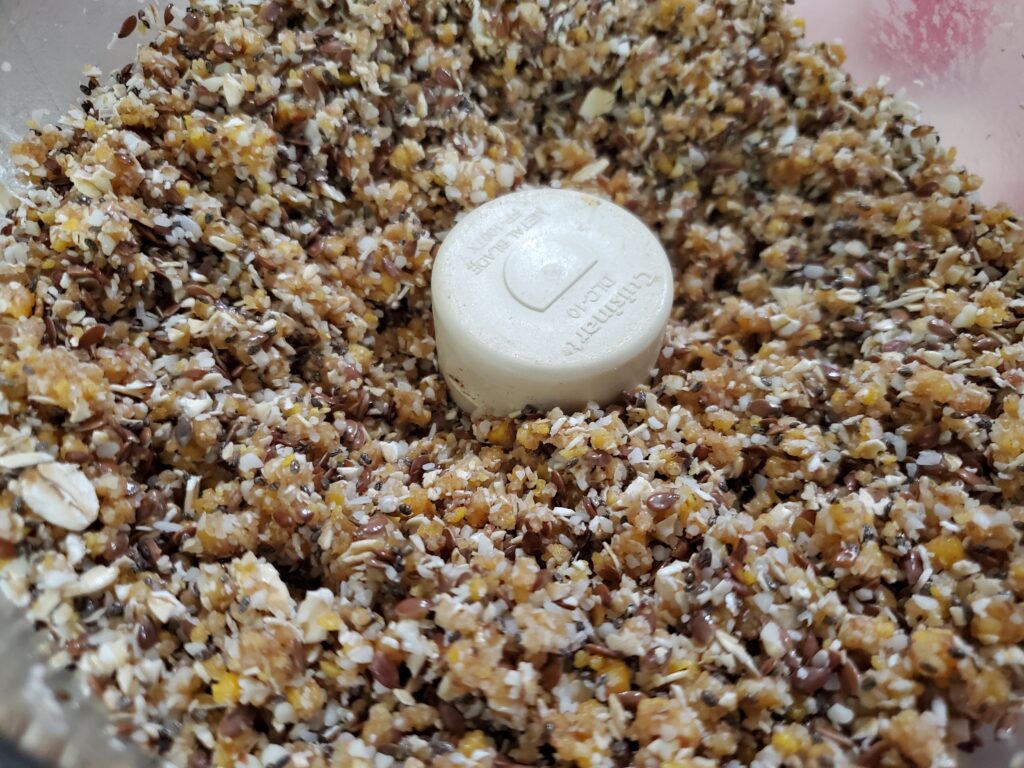
Place the dried fruits and 1/4 cup of the oats into a food processor. Pulse until well processed. If it clumps together, break up the clumps and add the macadamia nuts. Pulse again until evenly processed. Add the seeds and pulse again until well blended. Add the remaining oats and zest if desired pulse until evenly mixed. Although the mixture is very sticky, it will appear dry at this point.
Finally add the juice, and pulse until it starts to clump.
Remove from the food processor and roll into one inch balls.
Refrigerate for at least one hour before serving.
How to store energy balls
Store your energy balls in an air tight container the refrigerator for 3 weeks. If you don’t plan to use them in 3 weeks, store them in the freezer. If they are too hard when you remove them from the freezer, allow them to sit at room temperature for 5-10 minutes.
2 tablespoons lime juice, or tropical juice of your choice
Lime zest to taste (optional)
DIRECTION
Place the dried fruits and 1/4 cup of the oats into a food processor. Pulse until well processed. If it clumps together, break up the clumps and add the macadamia nuts. Pulse again until evenly processed. Add the seeds and pulse again until well blended. Add the remaining oats and zest if desired pulse until evenly mixed. Finally add the juice, and pulse until it starts to clump.
Remove from the food processor and roll into one inch balls. Refrigerate for at least one hour before serving.<br>
NOTES
As an Amazon associate, I earn on qualified purchases.
There are several ways to make Polish Easter soup aka: Barszcz Bialy or white borscht. The traditional way involves fermenting rye flour for weeks. There are also a couple of easy ways to make it with packets or bottled Zur. Lastly, you can make it with sourdough discard.
Disclaimer: This post may contain affiliate links. I earn commission at no additional cost to you.
Polish Easter Soup Ingredients:
Sour Broth (see below for 4 ways to make the broth)
1 large onion
1 teaspoon Marjoram
Hard boiled eggs
Smoked polish sausage
Fresh grated horseradish
Rye bread
Step 1 Make the Sour Broth in one of 4 ways:
Option 1: Using a packet to make sour broth
This is the easiest way to make the sour broth needed to make Polish Easter soup. When served with quality Polish sausage this broth is quite tasty and very easy. You will need to purchase Barszcz Bialy White Borscht Soup Mix packets. You can find them in a Polish or European market or find them here. The directions are printed on the back, but may be in Polish. Just add 1 Liter of water, and simmer for 5 minutes. Simply heat and serve!
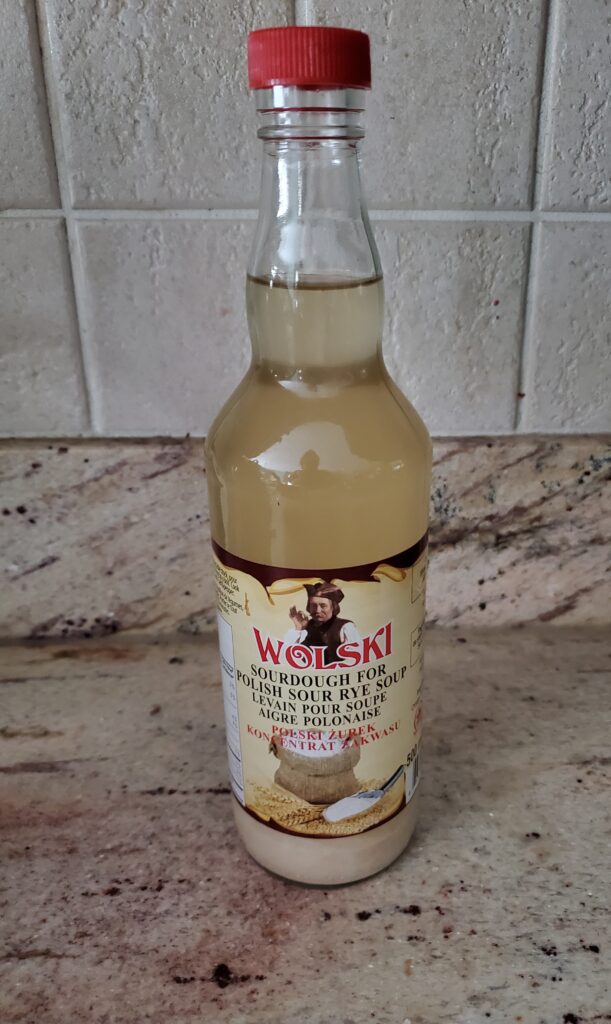
Option 2: Using Bottled Zur to make Polish Easter Soup
There are several different brands or Zur you can purchase to mix and make your sour broth. These bottles can be found in Polish or European markets. They may or may not have directions in English or Polish on them.
Typical directions, if available suggest mixing the contents of a 500 mL bottle of Zur with 2.5 Liters of vegetable stock. This results in a broth that is not very sour in my opinion. I prefer to mix the liquid portion of the contents half and half with vegetable broth. Allow the bottle to sit until all of the flour is on the bottom. Carefully pour the liquid portion into the pan, leave as much flour as possible in the jar. The flour will thicken the soup too much if you add less water. I recommend starting there, heat the soup to a simmer before tasting it. If it is too sour add more vegetable broth.
Homemade vegetable stock is best. I use this recipe, but when I make it for Polish Easter soup I add a couple slices of horseradish before simmering the broth.
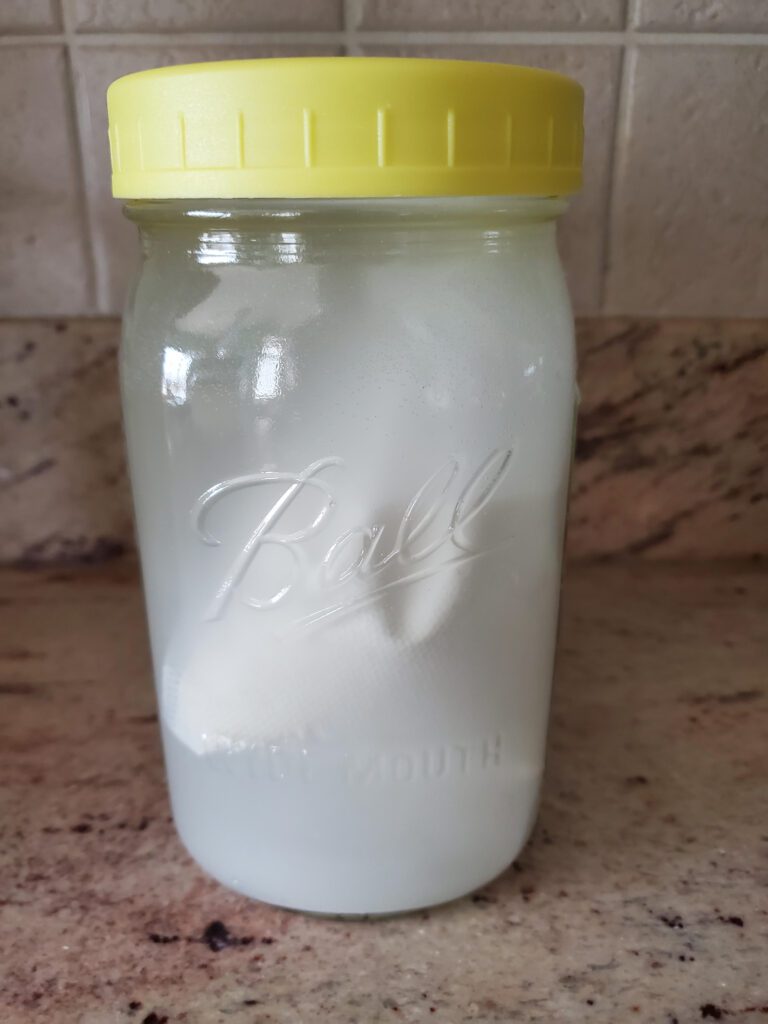
Option 3: Make Homemade Zur
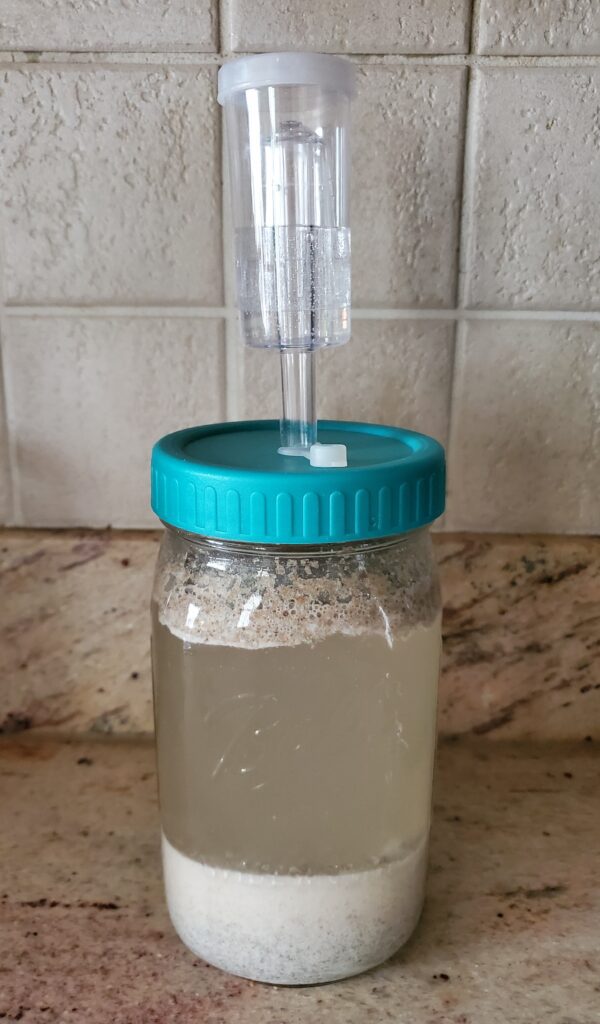
Sterilize a 1 quart mason jar with boiling water. Allow the boiled water to cool to room temperature. Add 1/2 cup of rye flour to the jar, then pour the cooled water over top to nearly fill the jar. Cover the jar with a fermentation lid. Allow this jar to sit in a warm dark place for 2-4 weeks. The result will be a sour liquid you can use to make Polish Easter soup.
Option 4: Make sour broth with Sourdough Discard
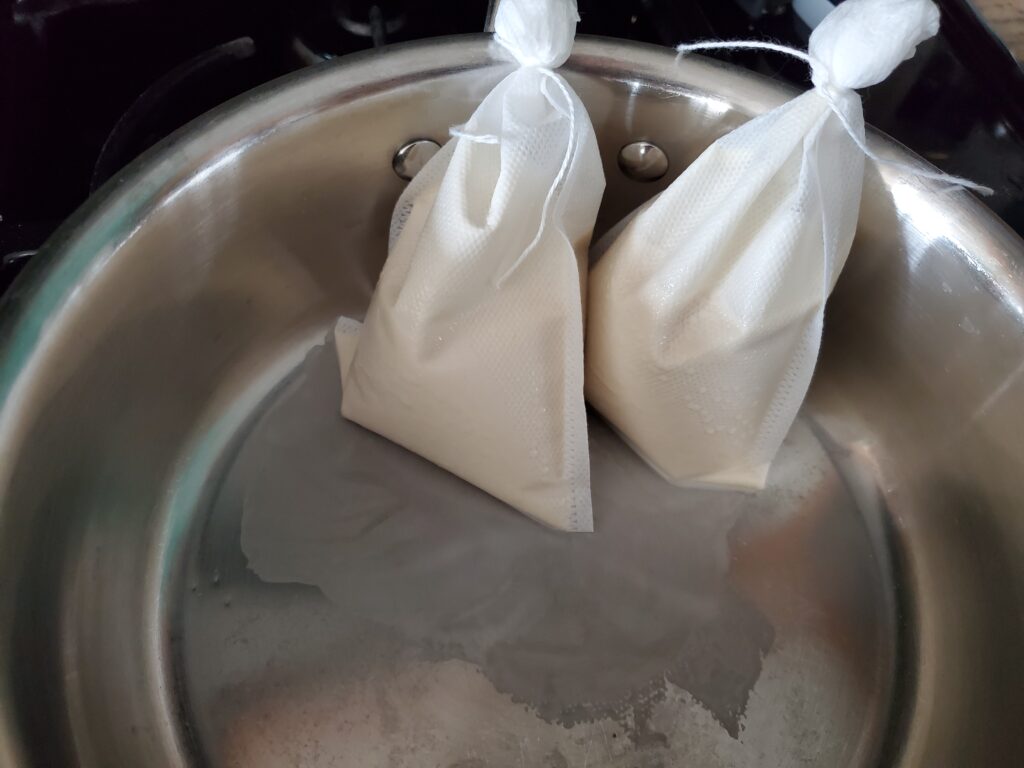
Add 1/2-2/3 cup of sourdough discard to 2-3 Tea bags. Tie off the tea bags as tightly as possible. Place the filled bags into a mason jar filled with water and store in your refrigerator for at least one week. Squeeze the remaining sour flavor from the bags and use the sour broth to make your soup.
Alternatively you can fill the bags and soak them in your pot of water or vegetable stock as you heat it. Add as many bags of sourdough discard as you like to make your soup as sour as desired. Some of the flour will escape to slightly thicken your soup.
Step 2: Make the Polish Easter Soup
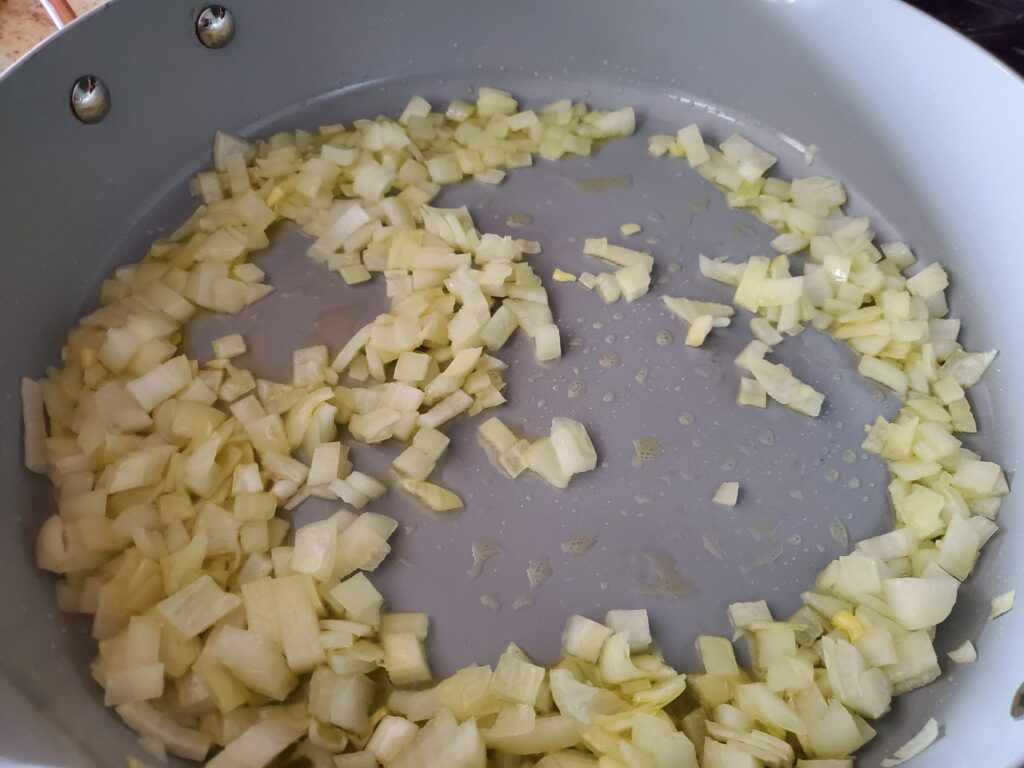
Sautee onions in a small amount of olive oil until softened. Add the sour broth and 1 teaspoon of marjoram. Simmer until heated to serving temperature, stirring occasionally.
Note: If you prefer a thicker soup, you can add a tablespoon of flour to the onions to make roux before adding the sour broth. Another way to thicken the broth is to add the hot broth 1 tablespoon at a time to 2 tablespoons of sourdough discard until the discard is heated. Then slowly pour the warm discard into the soup until the desired thickness is achieved.
Step 3: Serve the Polish Easter Soup
To Serve, spoon the broth into a bowl, then add a hard boiled egg, sliced smoked sausage and fresh horseradish to taste. Serve with a slice of rye bread for dipping.
As an Amazon associate I earn from qualified purchases.
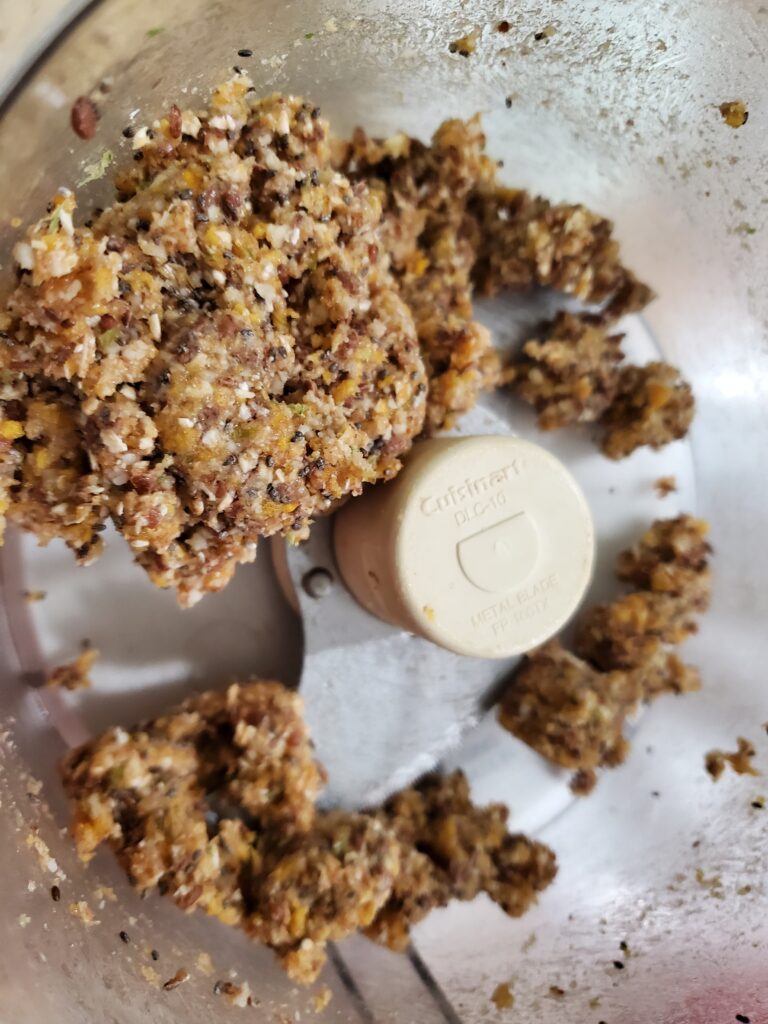
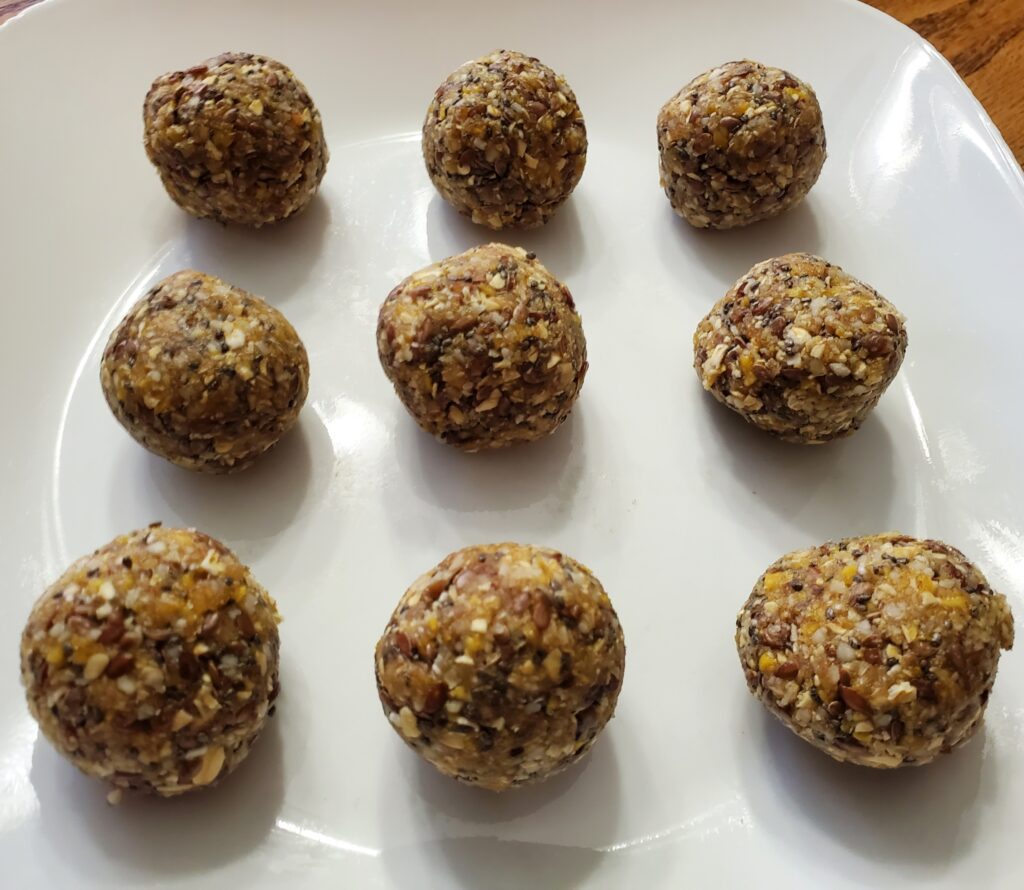
Grind flaxseed in a coffee grinder or mix flaxseed meal and all other ingredients in a large bowl, start by using a spoon or spatula. You will end up having to use your hands to mix it well.
Once mixed roll into 1 inch balls and place them on a parchment lined rimmed cookie sheet. Place the balls in the freezer for one hour before serving.
Storing energy balls
After freezing for one hour, you can remove the energy balls from the freezer and store them in the refrigerator in an air tight container for up to 3 weeks. If you don’t think you will use them in 3 weeks, then place them in a freezer bag and store them in the freezer. If the balls are too hard to eat when removed from the freezer allow them to sit at room temperature for 5-10 minutes.
Grind flaxseed in a coffee grinder or mix flaxseed meal and all other ingredients in a large bowl, start by using a spoon or spatula. You will end up having to use your hands to mix it well. Once mixed, roll into 1 inch balls and place them on a parchment lined rimmed cookie sheet. Place the balls in the freezer for one hour before serving.
NOTES
As an Amazon associate, I earn from qualified purchases.
Start by boiling the diced potatoes in salted water until just soft enough to break with a fork.
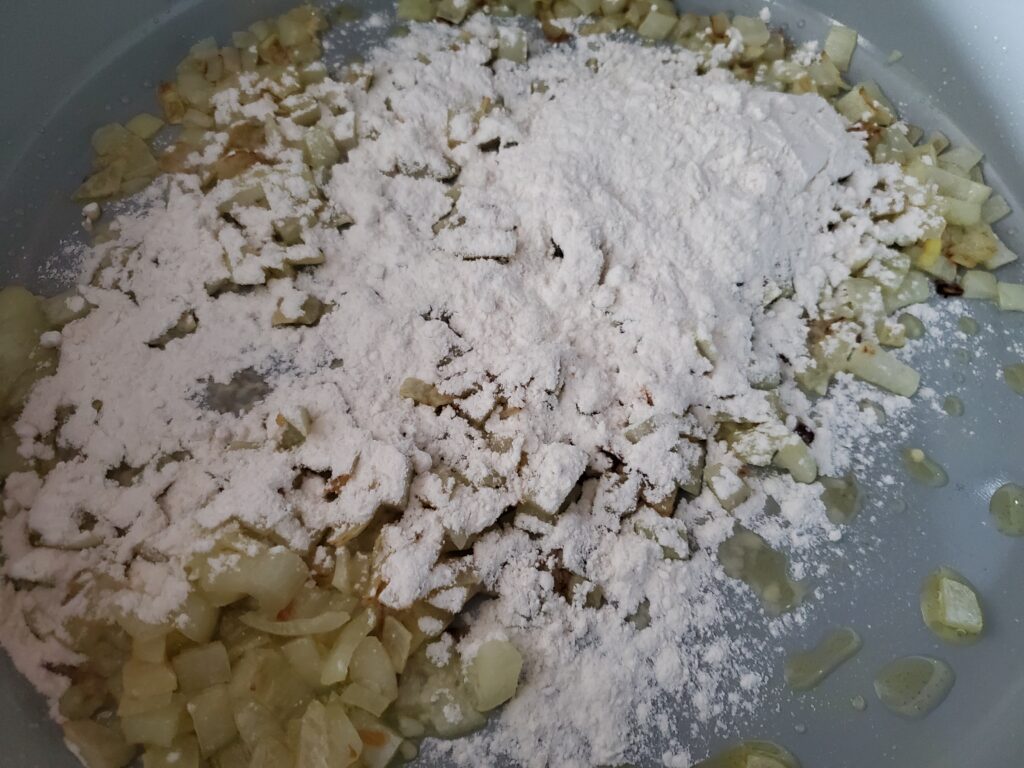
Sauté the diced onion in the olive oil or butter until softened. Mix in the flour.
Sauté onionsadd flour
Add the stock 1/2 cup at a time, mixing until well absorbed before adding more. A thickened sauce will form. Mix in the poultry seasoning, salt and pepper. Add the frozen vegetables and mix until warmed.
Remove from heat and stir in the drained potatoes.
Finally add the diced baked chicken.
Place the bottom crust into a 9.5 inch Pyrex pie dish. Pour in the filling then place the top crust over it. Pinch the edges shut with the handle of a butter knife. Cut a few slits in the top.
Cover the edge of the pie with foil to protect from over browning.
Preheat the oven to 375 degrees F. Place the pie in the oven and bake for 30 minutes. Remove the foil and bake for 10-15 more minutes or until the crust is lightly browned.
Start by boiling the diced potatoes in salted water until just soft enough to break with a fork.<br>Sauté the diced onion in the olive oil or butter until softened. Mix in the flour. Add the stock 1/2 cup at a time, mixing until well absorbed before adding more. A thickened sauce will form. Mix in the poultry seasoning, salt and pepper. Add the frozen vegetables and mix until warmed. Remove from heat and stir in the drained potatoes. Finally add the diced baked chicken.<br>Place the bottom crust into a 9.5 inch Pyrex pie dish. Pour in the filling then place the top crust over it. Pinch the edges shut with the handle of a butter knife. Cut a few slits in the top. Cover the edge of the pie with foil to protect from over browning.<br>Preheat the oven to 375 degrees F. Place the pie in the oven and bake for 30 minutes. Remove the foil and bake for 10-15 more minutes or until the crust is lightly browned.
NOTES
As an Amazon Associate, I earn on qualified purchases.