I am a part-time pediatric pharmacist, full time wife and mother of three teens. I’m also a home chef, gamer, and love to entertain in my home. I know how to relax and enjoy my home life and would love to share my ideas with you.
Do you need quick idea for dinner tonight? Try this easy chicken and orzo soup. You can even make it easier by using a rotisserie chicken. It has a fresh flavor but still warms you up. It’s really a great soup for any season.
Disclaimer: This post may contain affiliate links. I earn commission from qualified sales at no additional cost to you.
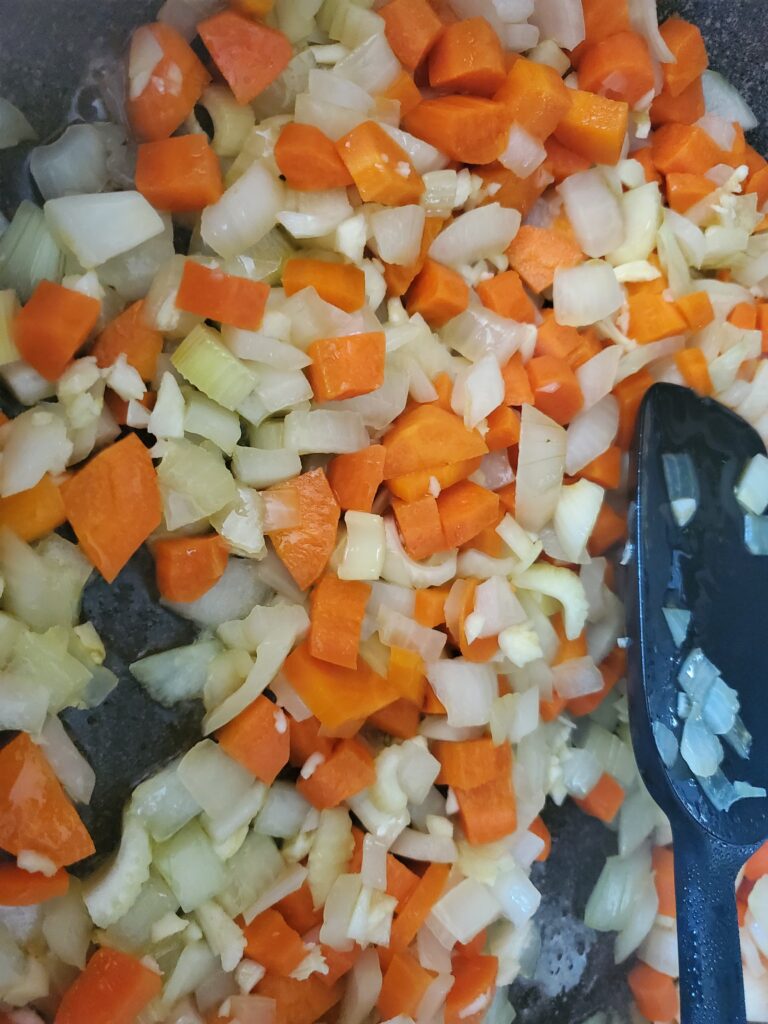
Start by sautéing the onions, carrots and celery in the olive oil.
When the carrots are softened, add the garlic and sauté for another 1-2 minutes. Add the stock and chicken. Bring to a boil. Add the orzo and simmer for 10 minutes.
Add the lemon zest, lemon juice, and peppers. Remove from heat and enjoy! Serve with crackers or fresh bread.
Can you make soup ahead of time?
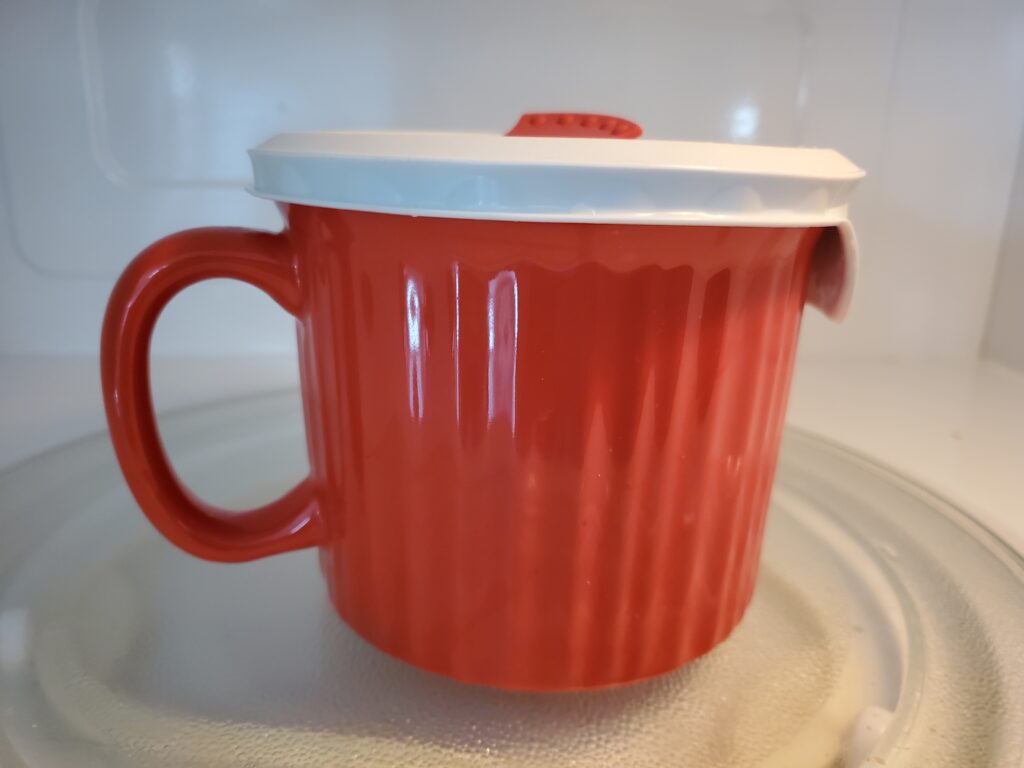
You sure can! This soup makes amazing leftovers. It makes a great packed lunch. I Recommend a mug Pop in for packed lunches. These containers are great for packing and reheating leftovers. They are ceramic with BPA free vented lids. They keep the microwave at home, work or school clean while warming up your lunch.
Yes, you can freeze chicken and orzo soup. If you don’t finish it all during the first meal, you can chill the remainder in your refrigerator overnight. It is important to chill the soup before freezing it. Then transfer the soup into single servings and freeze for a quick and easy meal later! I try to save sour cream and other similar containers for this purpose but you can also purchase freezer soup containers.
More great soup recipes:
Are you looking for another great soup to serve for a quick and easy dinner? Try one of these delicious options.
When you are leaving your home to make a new home in a dorm room, there are a few things you will need. What do you really need to make your dorm your new home? This post contains useful dorm items. A few items are not absolute needs, but would be very handy. This list does not contain any items that would be desirable, but not are not useful like decor.
Disclaimer: This post may contain affiliate links. I earn commission at no additional cost to you.
You need bedding – sleep is important
Most dorm rooms will supply you with an extra long twin bed. If you already have this type of bed at home, then you can just use you current bedding. The only problem with that idea is that you will not have any bedding when you return home for breaks. Therefore, it is best to pick up a new set of bedding for your dorm room. Here is a list of bedding essentials:
Hygiene is very important. The type of bathroom you have will determine what you need. If you have a traditional bathroom, a shared community bathroom down the hall, then this is the list of essentials:
Shower head shelf hanger (Most dorm room showers do not have much storage space for shampoo and other shower needs. I’m sure you don’t want to store your shampoo on the floor! Gross!)
I’m sure you have selected a laptop and maybe even a tablet to take with you. Here are some other tech items you may have forgotten. We forgot the cordless mouse batteries.
Ethernet cable (make sure it is long enough to reach the ethernet connection.)
In elementary school and often in high school, teachers will supply students with a list of school supplies they will need for the upcoming year. Once you reach college, you are on your own. Since you are leaving home it does help to have a list of the most common school supply items you will need in college. Keep in mind, you may have last minute schedule changes.
We ended up forgetting more things in this category than any other category. The lab coat was not packed, but needed due to a last minute schedule change. It’s much cheaper to pack one, just incase. We also forgot the graphing calculator and extra batteries for it. The most ridiculous thing we forgot was #2 pencils. I mistakenly assumed they were old school, and no longer needed for testing. I was wrong.
Assuming you already have a laptop, this is a comprehensive list of the other school supplies most college students will require.
Dorm room food prep basics
Even if you have a full meal plan there may be times that you will need to prepare small meals in your room. You may have to leave for a break before the dining hall opens, or maybe return from a sporting event after the dining hall closes. Be prepared!
So all of your friends are going away for Spring Break, and you are staying home. Don’t despair, you can have just as much fun in your home town. Here are some great ideas for how to make spring break fun at home.
Disclaimer: This post may contain affiliate links. I earn commission at no additional cost to you.
In order to make Spring Break at home feel more like a vacation, you first have to think about things you would do on vacation and do them at home. Make your break like a staycation.
Try a new restaurant
Photo by Pablo Merchán Montes on Unsplash
When I go on vacation, part of the fun is trying new foods. There are many restaurants in my hometown that I have never tried. Some even have unique foods or interesting themes. Look around, maybe you have a restaurant in or near your hometown that you have not tried.
Try a new recipe for dinner
Probably not something I would normally do on vacation, but staycation is different. Challenge yourself. Get out of you culinary comfort zone. Try a new recipe. Here are a couple of suggestions that are a little more challenging, but worth the effort:
Flower pot cupcakes. Just put a chocolate cupcake covered with chocolate frosting and Oreo crumbs in a 2.5 inch terracotta pot. Top with berries, Oreo filling and mint leaves.
Rice Krispie Bird nests. Just make rice Krispie treats according to package directions (add one extra tablespoon of butter -total of 4 tablespoons). Instead of pressing the hot mixture in a pan, shape it into birds nests. Coat your hands with canola oil, shape into 2 inch balls then pinch into nests, just like making a pinch pot. (be carful the mix is hot!) Top with M&M eggs or robin eggs.
Bunny Pretzels are really easy to make. Start with pretzel snaps, top with a Hershey kiss, bake at 200 degrees for 5 min. Top with one flat and 2 sideways M&M candies.
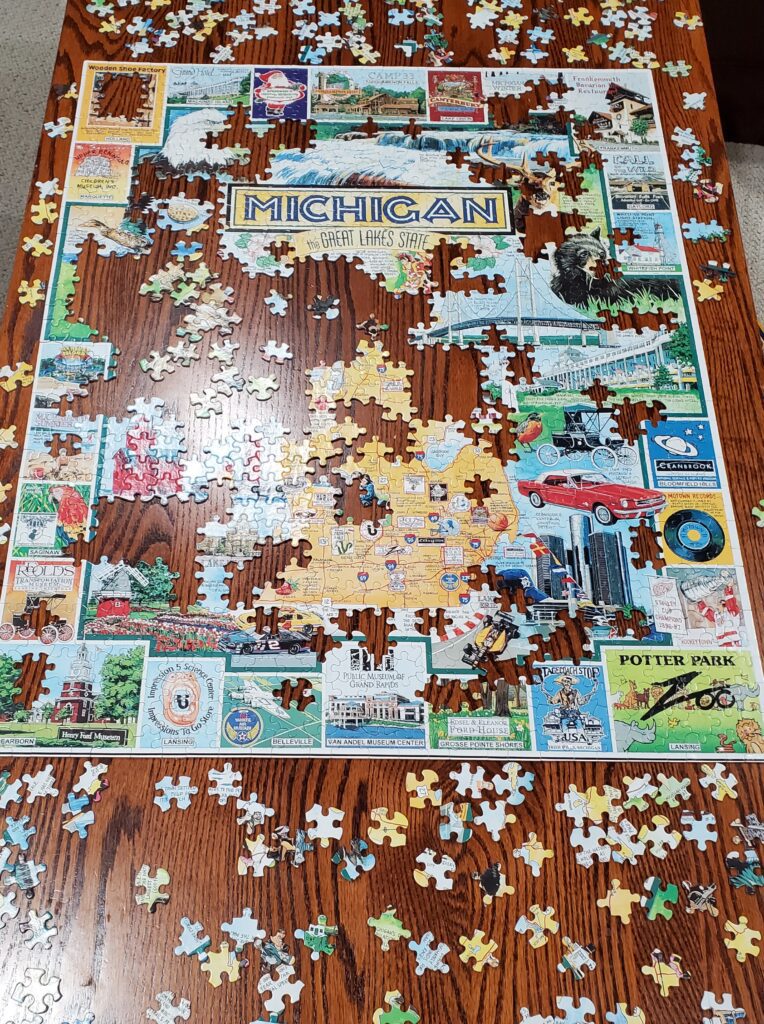
Do a puzzle
Find this Michigan puzzle here. Or find another state here.
If you are tired of your current puzzle selection, you could exchange it at a local puzzle exchange. Or get a new puzzle. Try this cute mini figure puzzle.
Play a new family game
Spring break means it’s finally warm enough to play outdoor games. Try Throw Throw Burrito Extreme! Find it here.
For more great family games ranged by age from preschool to adult, check out this post:
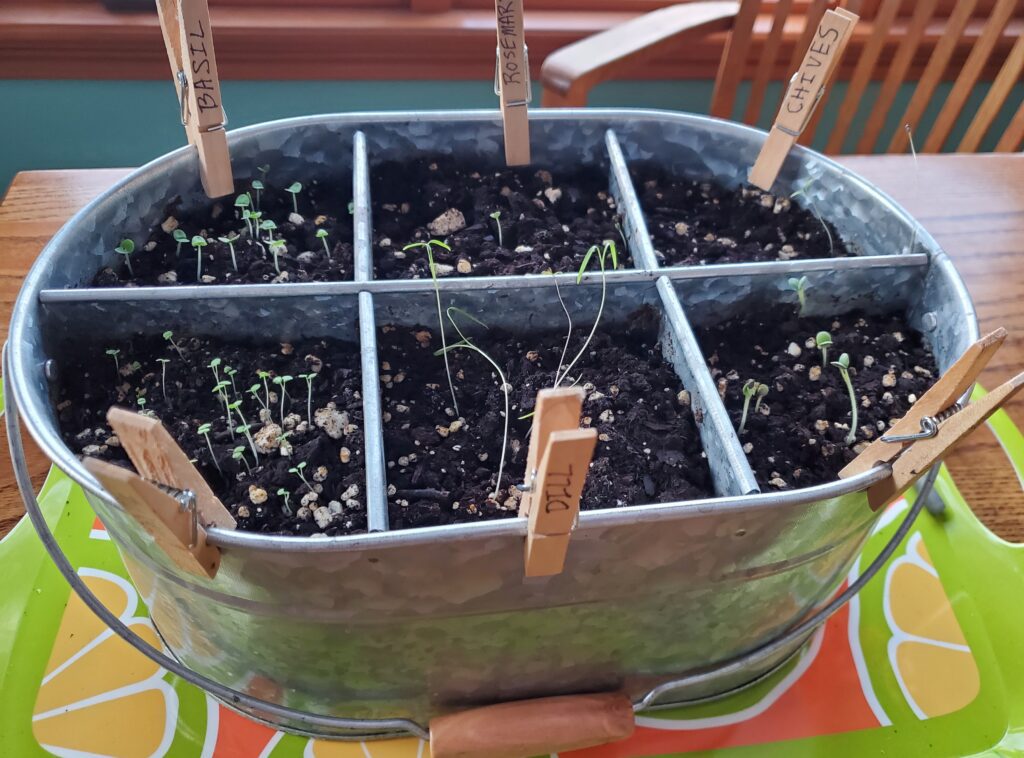
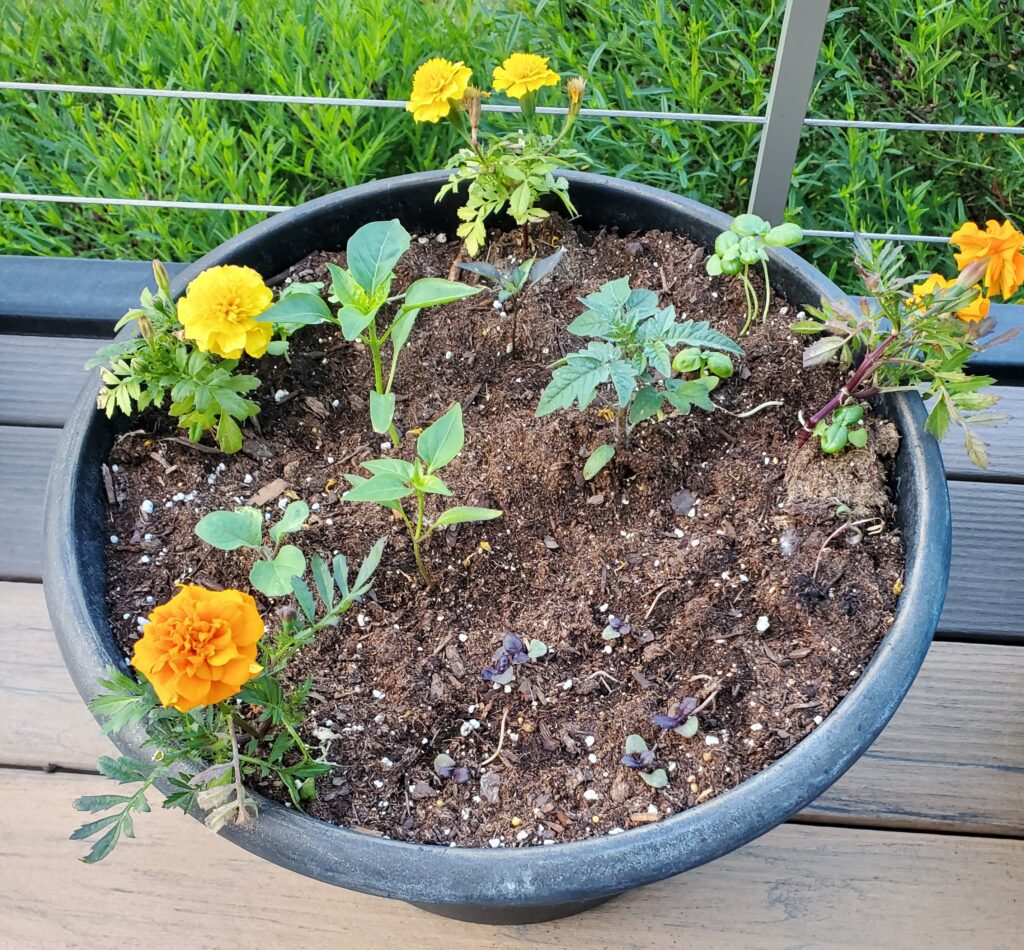
Once your herbs have sprouted you can transplant them into pots with other vegetables.
Go to a Museum
Photo by Mihai Surdu on Unsplash
This is a popular vacation activity. Have you been to every museum within 50 miles (~1 hour) of your home? Even if you have, museums are constantly adding new exhibits. Give it a try!
Family pizza night
This is great fun! Make or buy some pizza dough. Provide a selection of toppings and give each person a piece of parchment paper to assemble their own pizza.
Enjoy your staycation like a kid in a candy store, literally! Have you ever noticed that touristy locations and hotel lobbies often have candy stores? Just like a vacation a candy store is a treat. Why not treat you kids to a visit to a local candy store?
Go to a Zoo or Aquarium
Are you tired of your local zoo? Could you make a day trip to another zoo? Try a new zoo or aquarium. You could even try a local petting zoo.
Go out for ice cream
What says vacation more than going out for ice cream. Better yet, try making your own ice cream. The Ninja Creami makes the best ice cream I’ve ever had.
Try a new activity
My home town and surrounding areas have plenty of interesting activities. Maybe your hometown does too. Try something new:
An escape room
A trampoline park
Amusement park
Water park
Arcade
Bowling
Curling
Ropes Course
Zip line
Rock climbing
Skating
indoor skydiving
Watch a Movie
Whether you choose to go to the theatre or watch a movie at home, this can be a fun activity. If you choose to stay home make it fun with a new popcorn maker or movie theater candy!
Visit your local Library
Photo by Trnava University on Unsplash
Pick up a new book at your local library to read over your break. If you don’t like to ready, maybe you can find another fun activity or event at the library.
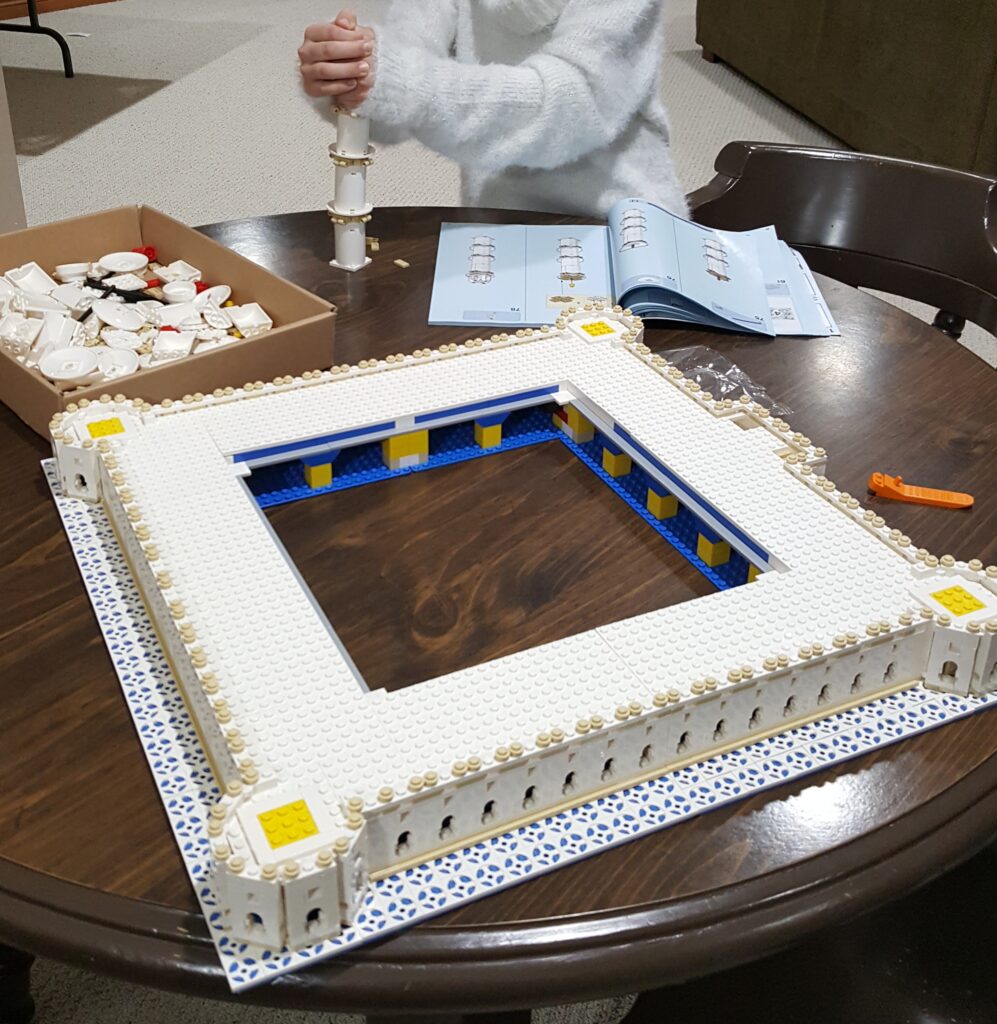
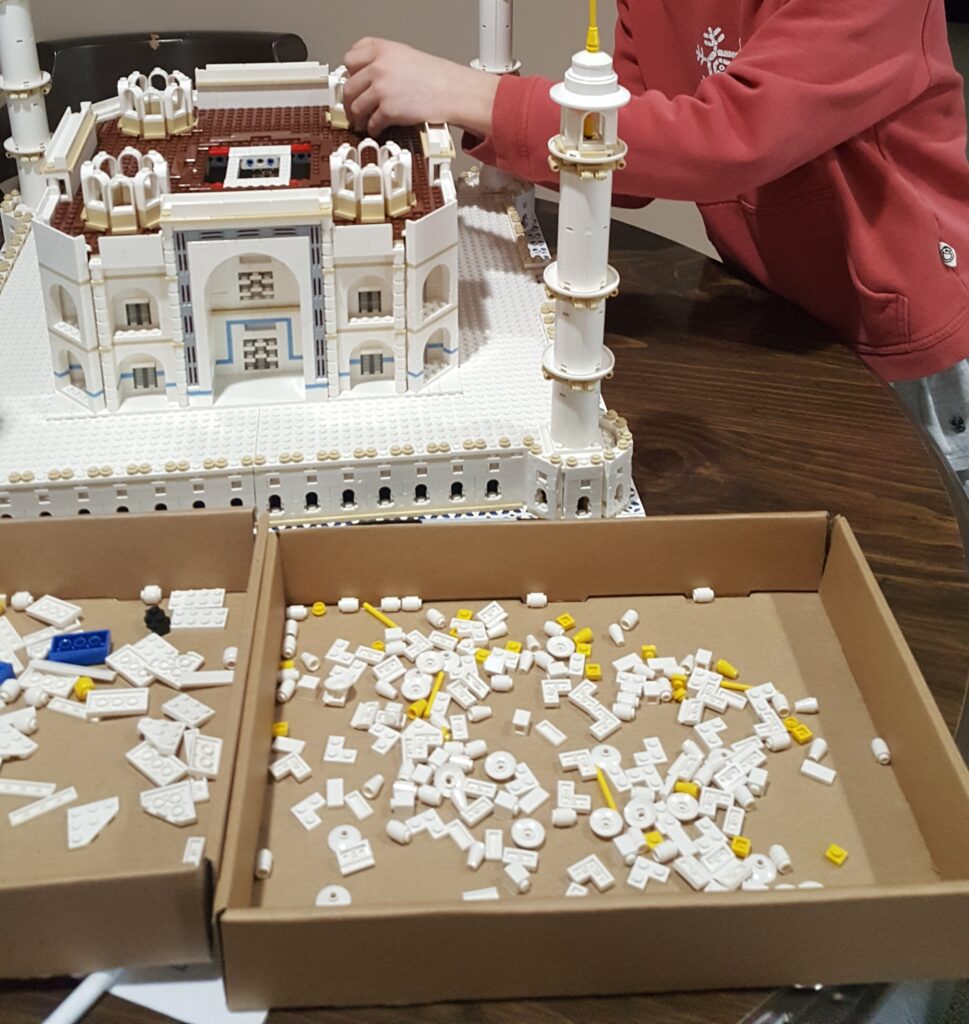
Build a huge LEGO set
Your saving a lot of money by not going on trip, so maybe you could use some of your savings on a huge LEGO family project. It doesn’t have to be the Taj Mahal, but that set was really fun.
Try a New Park
Have you been to every park within 50 miles of your home? Maybe there is a park you have been wanting to try. If not, maybe you should. Sometimes these gems are found by accident, but you can also ask some friends for a suggestion. Maybe you will find a new favorite!
Have you driven by that new pickle ball court at your local park, thinking that looks fun? Pick up a couple paddles and some balls and find out!
Photo by Ben Hershey on Unsplash
Have a Big Breakfast
Weather you choose to go out for breakfast or make a big breakfast at home, it will feel more like a vacation. There is little time during a busy week to really enjoy breakfast. Why not use your break to make a fun breakfast. Here are some great breakfast ideas:
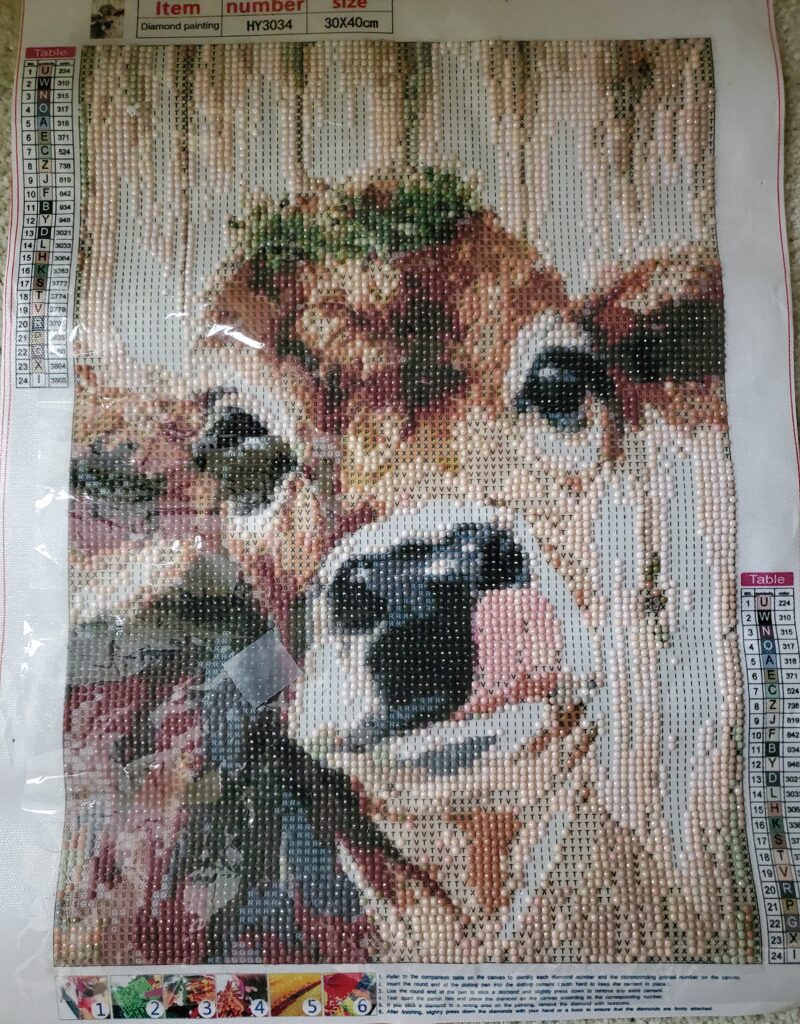
Crafts can be so much fun! Have you ever tried diamond painting? Find a kit here.
Diamond painting is really fun, but sticky mosaics would be a better craft for younger kids.
Try making your own soap. We made all of these cute soaps with a klutz kit.
Sleep in a different room
Photo by Kate Darmody on Unsplash
Part of being on vacation is sleeping in a new place. You can do this at home too. Let your kids sleepover in each others rooms for a night. You can even set up a tent in the living room and have a “campout” at home.
Make dinner over a fire
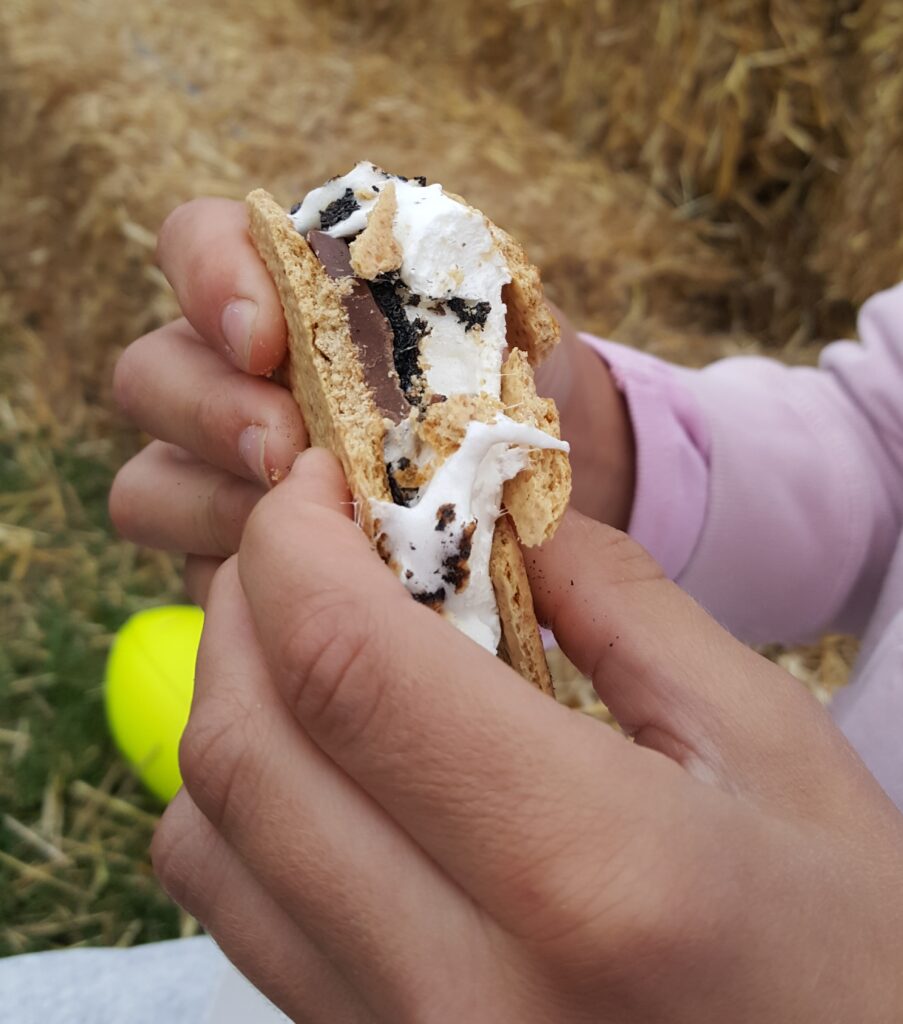
If your hometown allows bonfires, you can make dinner or at least some s’mores over the fire. If you cant have a regular firepit, try a patio firepit.
Have a Spa day or get a pedicure
Photo by Konstantin Shmatov on Unsplash
Go get your hair done or enjoy a pedicure. There are also may spa at home kits you can purchase.
Take a class or get a lesson
Sewing
Pottery
Golf
Archery
Dancing
Try a new trail
Hiking or biking are typical vacation activities. Why not try a new trail near your home?
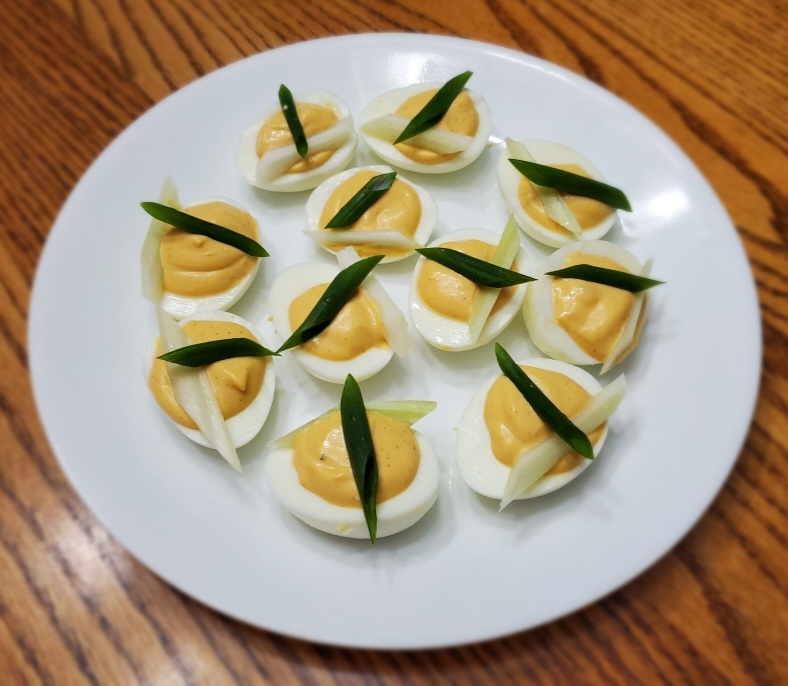
Deviled eggs are an easy and inexpensive appetizer. They are a great addition to parties and potlucks any time of year. They can be decorated for all occasions. Try mixing up the filling and garnishes to keep all of your guests happy. Here are some suggestions:
Disclaimer: This post may contain affiliate links. I earn commission at no additional cost to you.
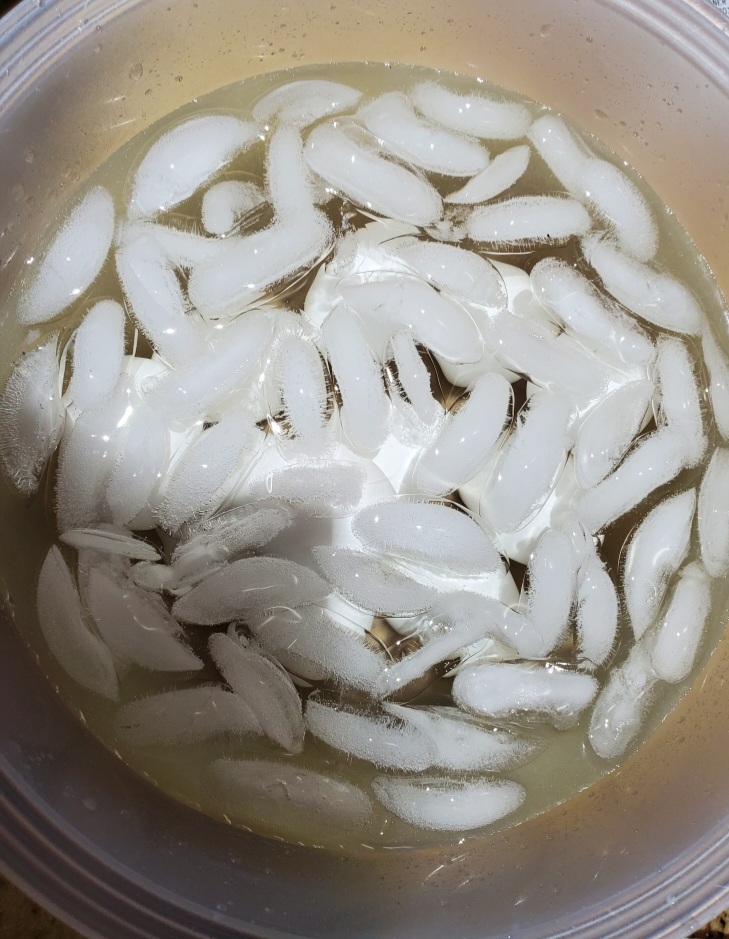
Hard boil the eggs, I recommend using this easy peel technique. Cool and peel the eggs. Slice the eggs in half with the non-serrated knife. It helps if you wipe the blade clean in between each egg. Remove the yolks and place the yolks in the mini food processor along with the mayonnaise, mustard, salt and pepper. Blend well. Remove the mixture from the food processor and place it into the piping bag. Cut off the tip of the bag and squeeze the mixture into the egg white halves. Garnish with paprika.
Dilly Bird Deviled Eggs Recipe
Dilly Bird Deviled eggs are a cute appetizer that adds fun to many occasions. Perfect for backyard BBQs, Potlucks, Baby Showers, classroom parties, and more.
Ingredients:
Classic Deviled egg recipe without paprika garnish
Fresh Dill
Orange pepper triangles
black or kalamata olive slices
Directions:
Prepare classic Deviled egg recipe. Omit the paprika garnish. Garnish instead with Fresh Dill “feather”, Olive “eyes”, and an orange pepper “beak”.
Smoked Salmon Deviled Eggs Recipe
These smoked salmon deviled eggs are a nice delicacy for many occasions. Perfect for potlucks, picnics, office parties, Fridays during Lent, and more.
Cool and peel the eggs. Slice the eggs in half with the non-serrated knife. It helps if you wipe the blade clean in between each egg. Remove the yolks and place the yolks in the mini food processor along with the mayonnaise, 1 teaspoon capers and 1 teaspoon of fresh dill. Blend until smooth. Remove the mixture from the food processor and place it into the piping bag. Cut off the tip of the bag and squeeze the mixture into the egg white halves. Garnish with capers, smoked salmon and fresh dill.
Parisian Deviled Eggs Recipe
Parisian deviled eggs are like mini charcuterie boards. They are a great addition to any event you would bring a charcuterie board to.
Ingredients:
Classic Deviled Egg Recipe minus the paprika
Cornichon pickles
ham for garnish
salami for garnish
Directions:
Prepare the classic deviled eggs with the addition of 1 cornichon pickle in the yolk mixture. Blend until smooth. Omit the paprika garnish. Garnish instead with a slice of cornichon pickle, ham and salami.
Bloody Mary Deviled Eggs
These well garnished Bloody Mary deviled eggs are perfect for a brunch, after game party, or any other occasion.
To make the filling: Prepare the classic deviled egg recipe omitting the Dijon mustard, instead mix in the ketchup, Worcestershire sauce, horseradish, tabasco sauce and half (1 teaspoon) of the paprika.
Mix the other half of the paprika (1 teaspoon), the Tajin and the celery salt in a bowl. Once mixed well spread the seasoning mixture onto a small plate. Dip each hollowed out egg white into the seasoning mixture.
Next fill each coated egg white with the filling and garnish with a celery leaf and a toothpick skewer with a cocktail onion, Cornichon pickle, and a slice of polish sausage.
Note: There are many ways to garnish a Bloody Mary so feel free to make your skewer with and items you wish. Choose olives, shrimp, cherry tomatoes, bacon, or cheese.
Polish Deviled Egg Recipe
These Polish deviled eggs are an excellent addition to sporting events, office parties, and backyard BBQs.
Ingredients:
Classic Deviled eggs recipe
1 Tablespoon of fresh grated horseradish
Smoked polish Kielbasa
Directions:
Prepare the classic deviled eggs recipe with the addition of 1 tablespoon of fresh grated horseradish in the yolk mixture. Alternatively you can use 1 tablespoon of prepared horseradish instead of one of the tablespoons of mayonnaise. Garnish with paprika and a slice of smoked kielbasa.
Buffalo Deviled Egg Recipe
Buffalo deviled eggs are perfect for a Super Bowl party, potluck or backyard BBQ.
Cool and peel the eggs. Slice the eggs in half with the non-serrated knife. It helps if you wipe the blade clean in between each egg. Remove the yolks and place the yolks in the mini food processor along with the cream cheese, blue cheese dressing, and hot sauce. Blend well. Remove the mixture from the food processor and place it into the piping bag. Cut off the tip of the bag and squeeze the mixture into the egg white halves. Garnish with celery and green onion.
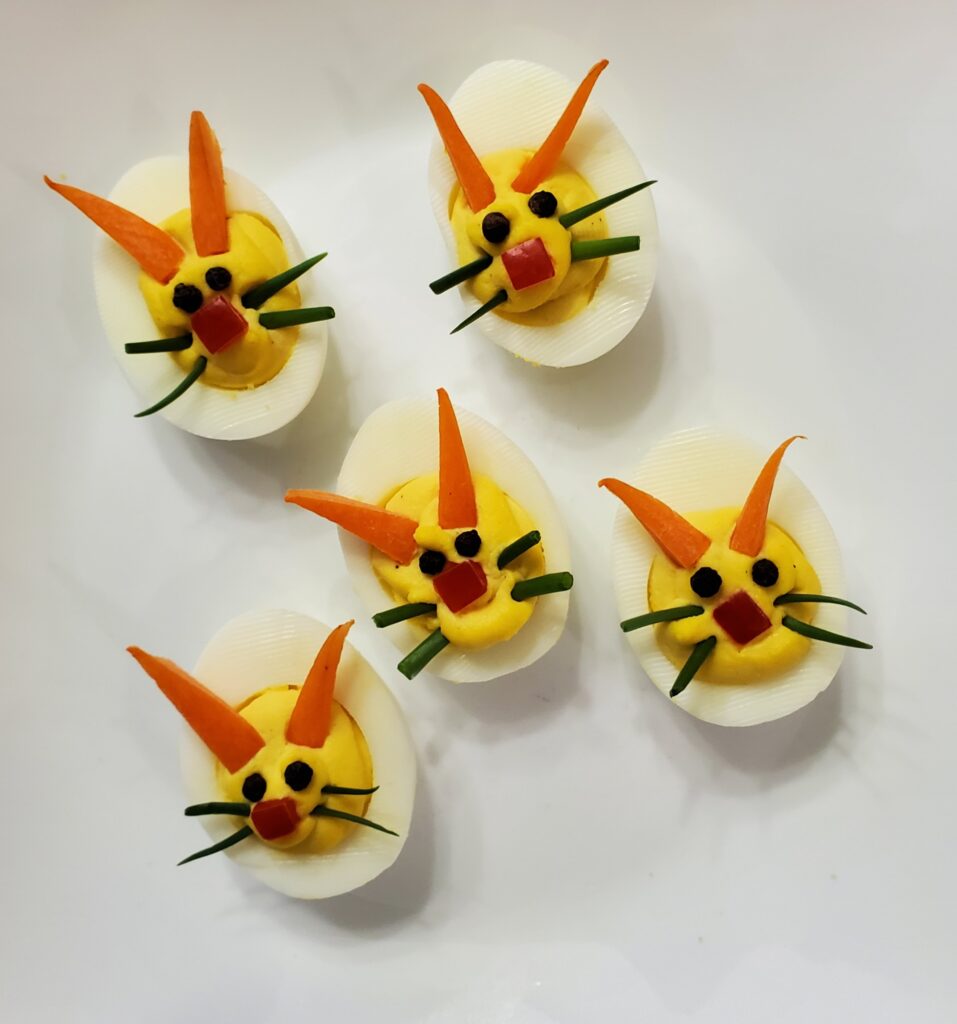
Bunny Deviled Eggs Recipe
These adorable bunny hard boiled eggs are perfect for an Easter celebration.
Ingredients:
Classic Deviled egg recipe minus the paprika
Carrots cut into little triangles
red pepper cut into little squares
peppercorns
green onion ends or chives
Directions:
Prepare the classic deviled egg recipe. Omit the paprika garnish. Instead garnish with carrot “ears”, peppercorn “eyes”, red pepper “nose”, and green onion or chive “whiskers”.
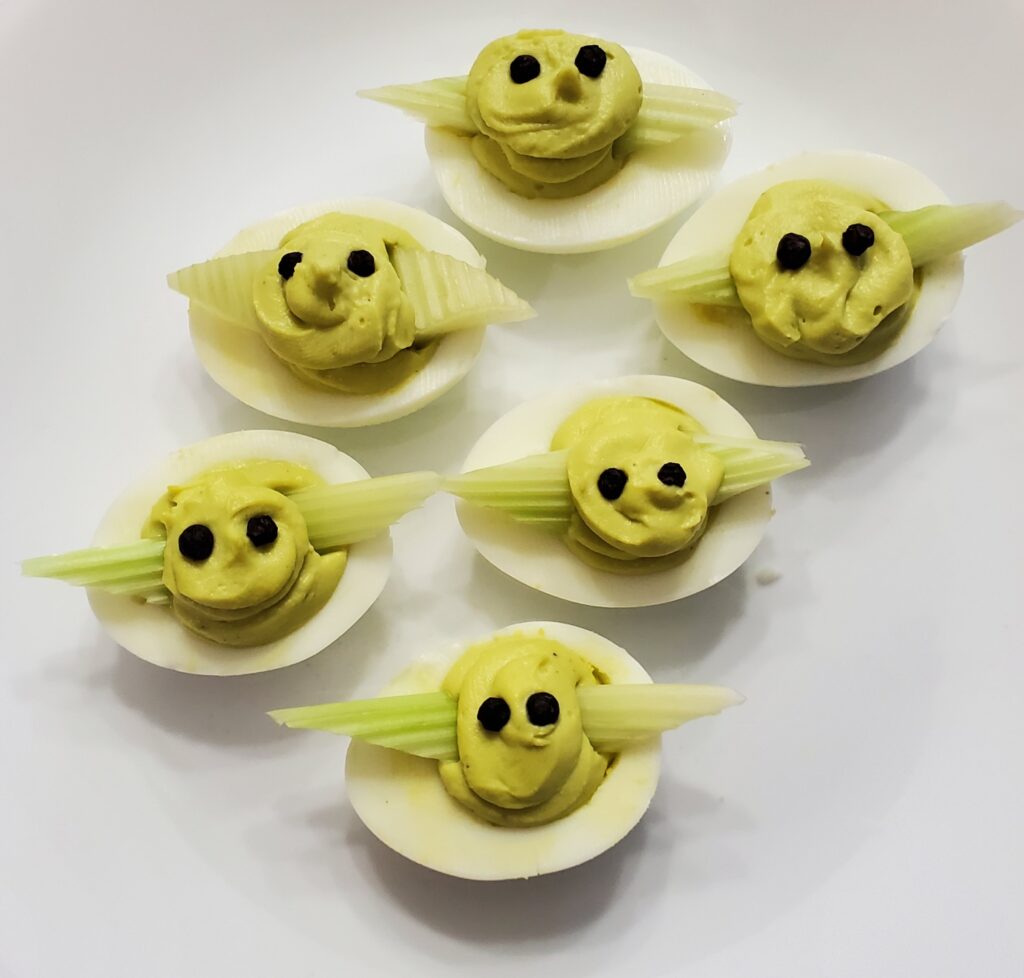
Yoda Deviled Eggs Recipe
Yoda deviled eggs are great for any Star Wars themed party.
Cool and peel the eggs. Slice the eggs in half with the non-serrated knife. It helps if you wipe the blade clean in between each egg. Remove the yolks and place 3 of the 6 yolks in the mini food processor along with the avocado half, lime juice, garlic, and salt. Blend well. Remove the mixture from the food processor and place it into the piping bag. Cut off the tip of the bag and squeeze the mixture into the egg white halves. Garnish with peppercorn “eyes” and celery “ears”.
Halloween Deviled Eggs
Mummy Eggs
Ingredients:
Classic deviled egg recipe minus the paprika
Pepper corns
Munster or another white cheese sliced into strips
Directions:
Prepare the classic deviled egg recipe, omit the paprika garnish. Instead garnish with 2 peppercorn eyes and strips of Munster cheese slices. Any white cheese variety will work. You could use white cheddar, Swiss, mozzarella, or even string cheese.
Devil Deviled eggs
Ingredients:
Classic deviled egg recipe
1 teaspoon paprika
Red peppers sliced into horns
Directions:
Prepare the classic deviled egg recipe. Add 1 teaspoon of paprika to the filling, start with 1/2 teaspoon and add more until your filling is orange. Garnish with paprika and red pepper horns.
Pumpkin Deviled Eggs
Ingredients:
Classic devilled egg recipe
1 teaspoon of paprika
Green onion
Directions:
Prepare the classic deviled egg recipe. Add 1 teaspoon of paprika to the filling, start with 1/2 teaspoon and add more until your filling is orange. Omit the paprika garnish, instead add a green onion stem.
Spider Deviled Eggs
Ingredients:
Classic deviled egg recipe, minus the paprika
Black olives
Directions:
Prepare the classic deviled egg recipe. Omit the paprika garnish. Instead garnish with black olives. Use a half an olive for the body, and half circle slices for the legs.
Eyeball Deviled Eggs
Ingredients:
Classic deviled egg recipe
Black olives
Sriracha Sauce
Directions:
Prepare the classic deviled egg recipe. Omit the paprika garnish. Add an olive slice for the eye, then sprinkle some sriracha sauce for blood.
Christmas Deviled Eggs
Jalapeño Wreath Deviled Eggs
Ingredients:
Classic deviled egg recipe
Jalapeño seeded and sliced into rings (remove seeds after slicing)
Red pepper diced or red peppercorns
Fresh dill
Directions:
Prepare the classic deviled egg recipe, omit the paprika garnish. Instead garnish with one jalapeño ring wreath, fresh dill and red pepper or red peppercorns.
Holly Deviled Eggs
Ingredients:
Classic deviled egg recipe
Fresh Cilantro or Parsley
Pomegranate seeds
Directions:
Prepare the classic deviled egg recipe, omit the paprika garnish. Garnish with a cilantro or parsley leaf and 3 pomegranate seeds.
Christmas Holly Deviled Eggs with Green Filling
Ingredients:
Classic Deviled egg recipe
Green food coloring
Diced Red Pepper
Directions:
Prepare the classic deviled egg recipe. Add a few drops of green food coloring to the filling. Garnish the egg with paprika before piping the filling into the egg with a #32 tip. Add 3 diced red peppers for holly berries.
Tall Christmas Tree with Star Deviled Eggs
Ingredients:
Classic Deviled Egg recipe
Green food coloring
Monterey Jack Cheese, cut into stars with a micro cutter
Directions:
Prepare the classic deviled egg recipe. Omit the paprika garnish. Add a few drops of green food coloring to the filling and mix. Place the colored filling into a piping bag. Use a #32 tip to pipe the filling in a tree shape onto the egg. Top with a cheese star.
Prepare the classic deviled egg recipe, omit the paprika garnish. Fold the cucumber back and forth into a tree shape onto a toothpick, add a slice of green onion between the folds to hold them apart. Top with a pomegranate seed and stick the toothpick into the filled egg.
Radish Dill Deviled Eggs
Ingredients:
Classic deviled egg recipe
Radish slices
Fresh dill
Instructions:
Prepare the classic deviled egg recipe. Omit the paprika garnish. Pipe the filling into the eggs with a #32 tip. Garnish with 2 radish slice quarters and a sprig of fresh dill. These deviled eggs look great served in a ring to resemble a large wreath.
Flat Christmas Tree Deviled Eggs
Ingredients:
Classic deviled egg recipe
Green food coloring
Red peeper, diced
Fresh Dill
Monterey Jack Cheese, cut into stars with a micro cutter
Directions:
Prepare the classic deviled egg recipe, omit the paprika garnish. Add a few drops of green food coloring to the filling. Pipe the filling into the egg with a #32 tip, then make a Christmas tree shape with more filling on top of the egg. Top with fresh dill, red pepper and a cheese star.
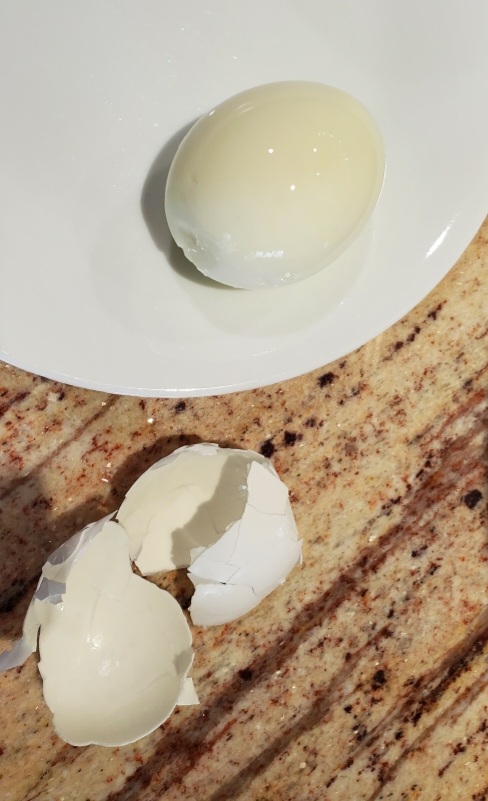
How to make Easy to Peel Hard Boiled Eggs
Check out this post for the secret to easy peel hard boiled eggs.
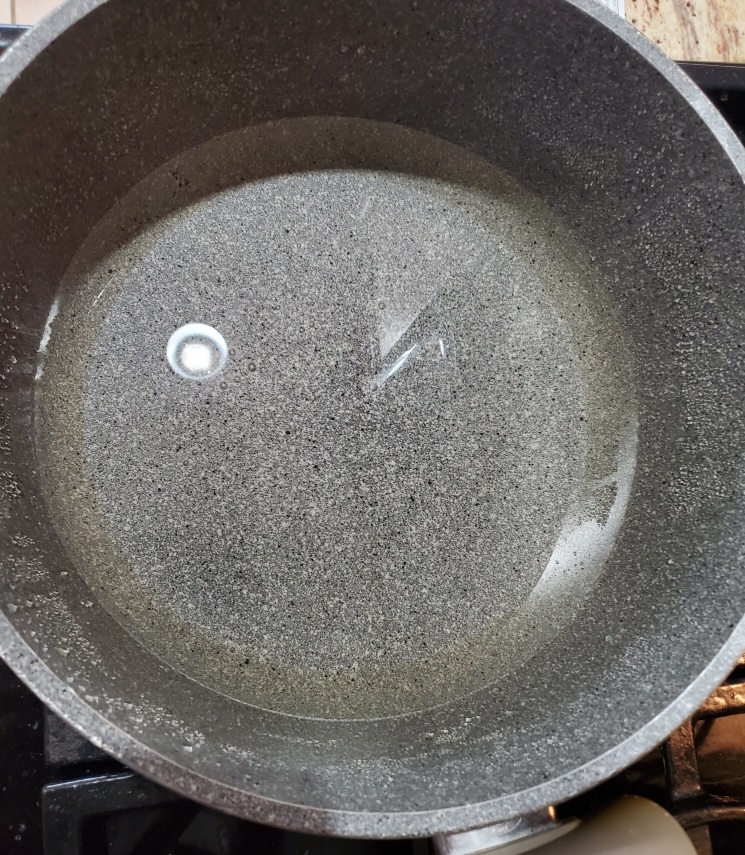
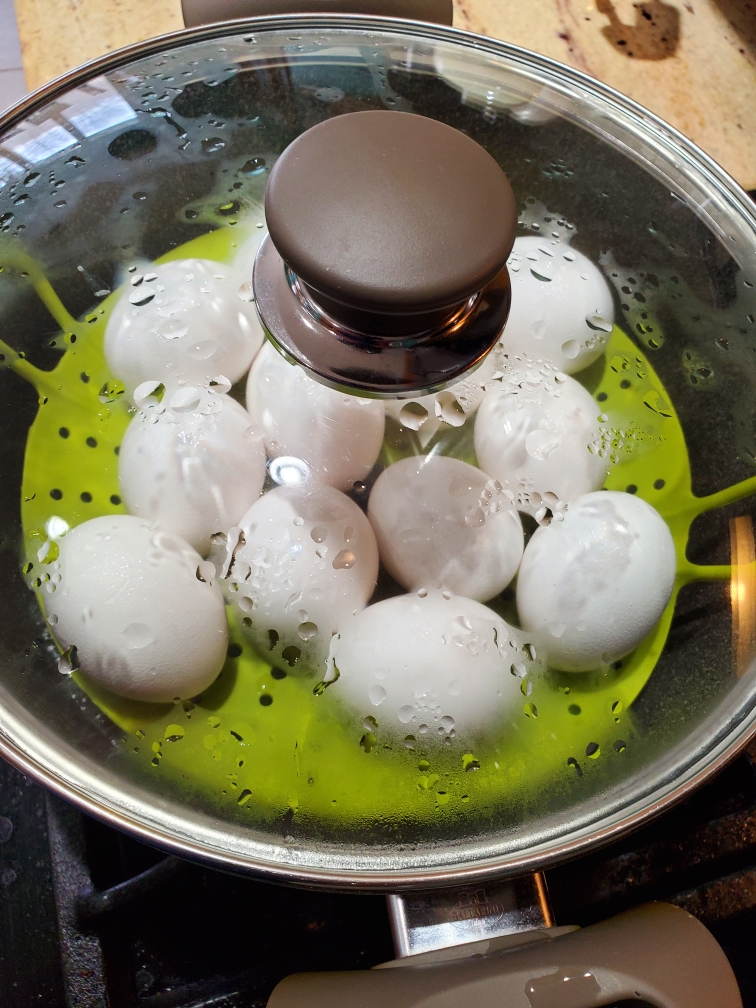
Turns out that easy to peel hard boiled eggs are not boiled! Instead they are steamed. Who knew! All of those useless additives to the water, unusual cooking times, and silly contraptions are rubbish! All you need to do is steam the eggs instead! Here’s how:
Disclaimer: This post may contain affiliate links. I earn commission at no additional cost to you.
What do you need to make eggs easy to peel?
12 eggs
A pot with a lid. The pot should be large enough to lay the eggs flat across the bottom. A 4.8 quart Dutch oven should be large enough for 12 eggs.
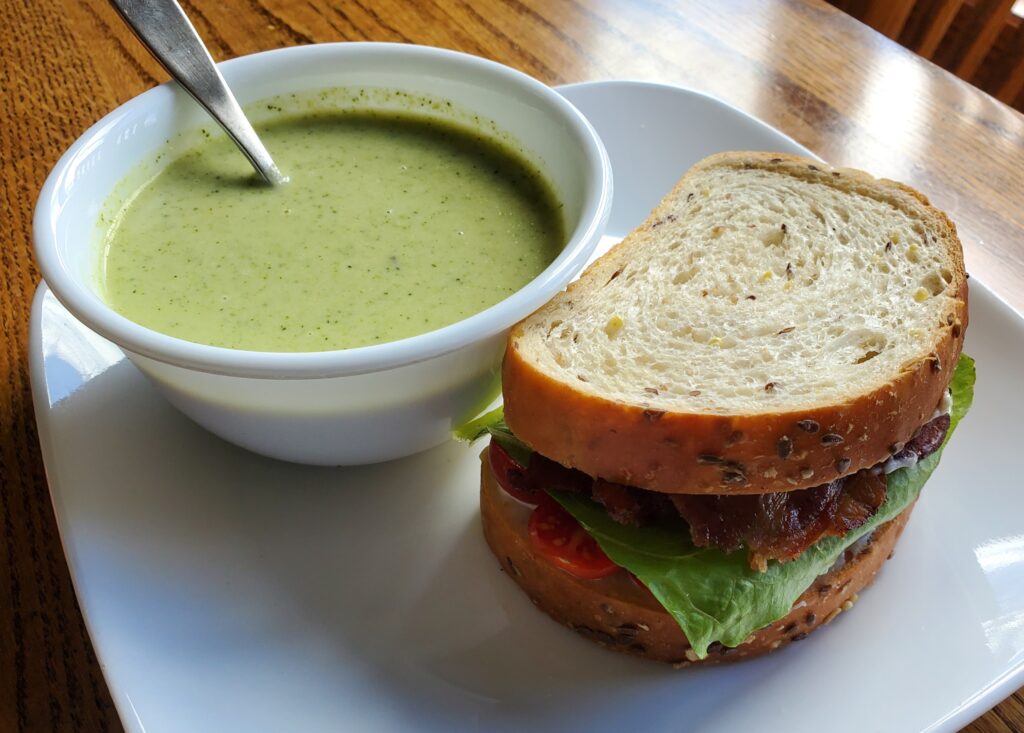
This easy cream of broccoli soup recipe is a great way to get more vegetables into your diet. It pairs well with a salad or sandwich for a quick and easy meal. This soup makes great leftovers for packed lunches.
This post may contain affiliate links. I ear commission of qualified purchase at no additional cost to you.
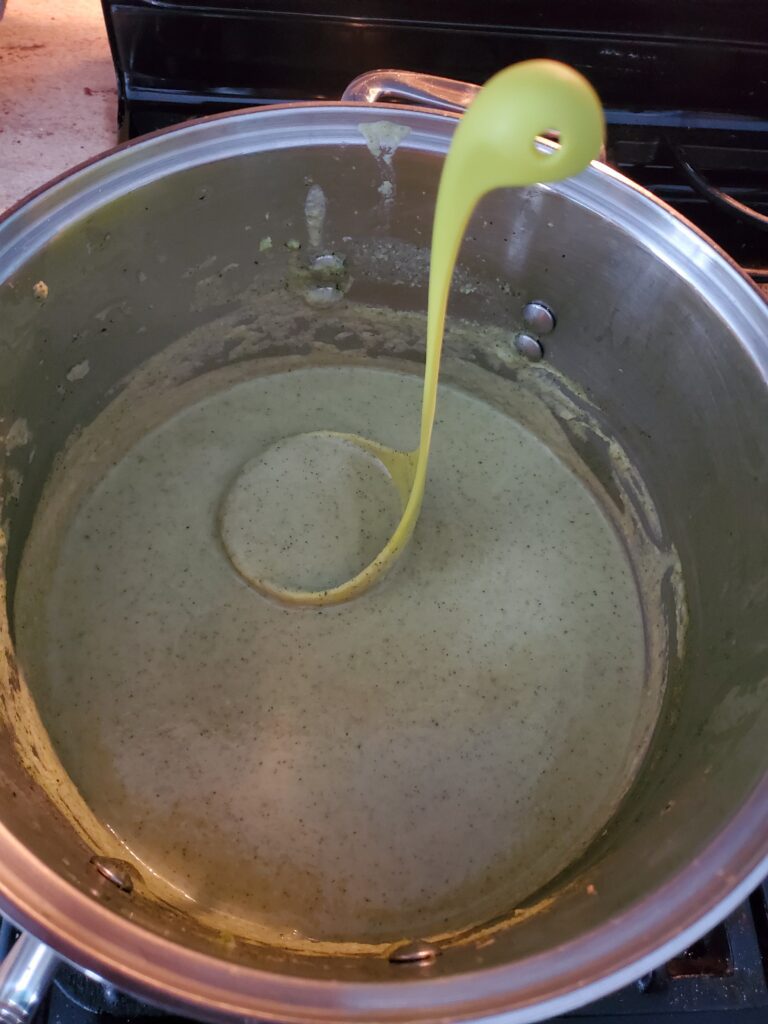
Sauté the onions and celery in the olive oil until slightly softened. Then, add the garlic and continue to sauté for another minute. Toss in the broccoli and sauté a couple minutes until slightly softened. Finally, add the broth and canned peas. Bring to a boil. Simmer for 2 minutes.
Use an Immersion blender to cream the ingredients until smooth. Stir in the cream, vinegar and peeper.
If you need some extra cute in your life, this Nessie Ladle is a great addition to get kids more interested in eating this delicious and healthy soup. Our Nessie served up so much soup, we hardly had any leftover!
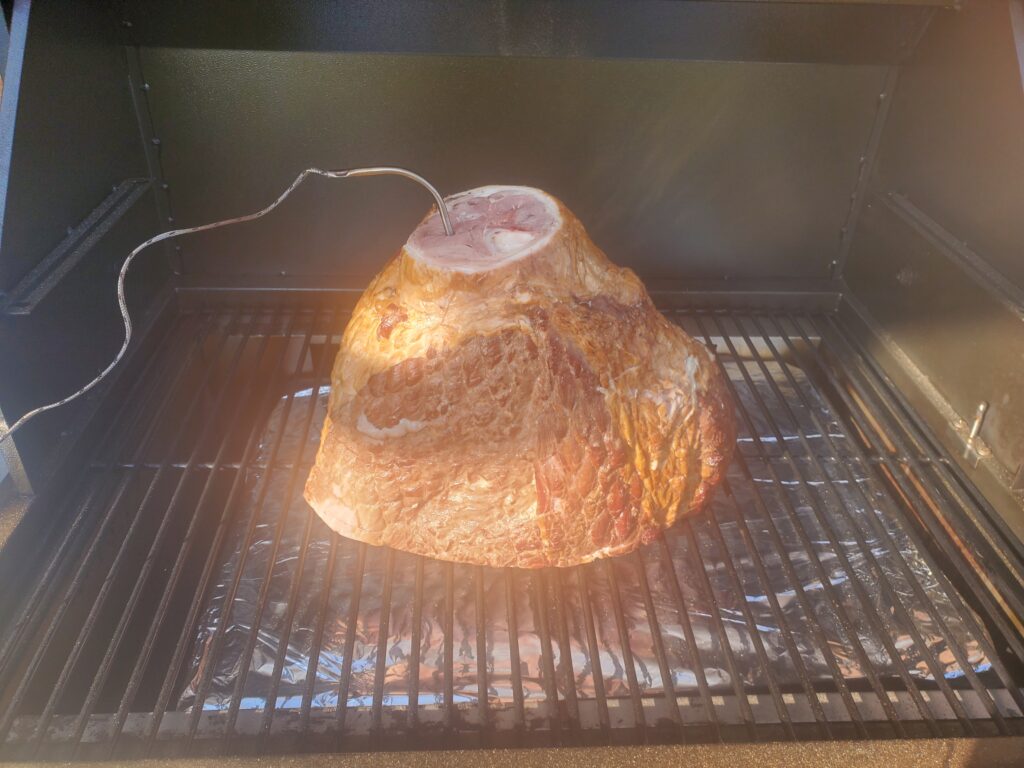
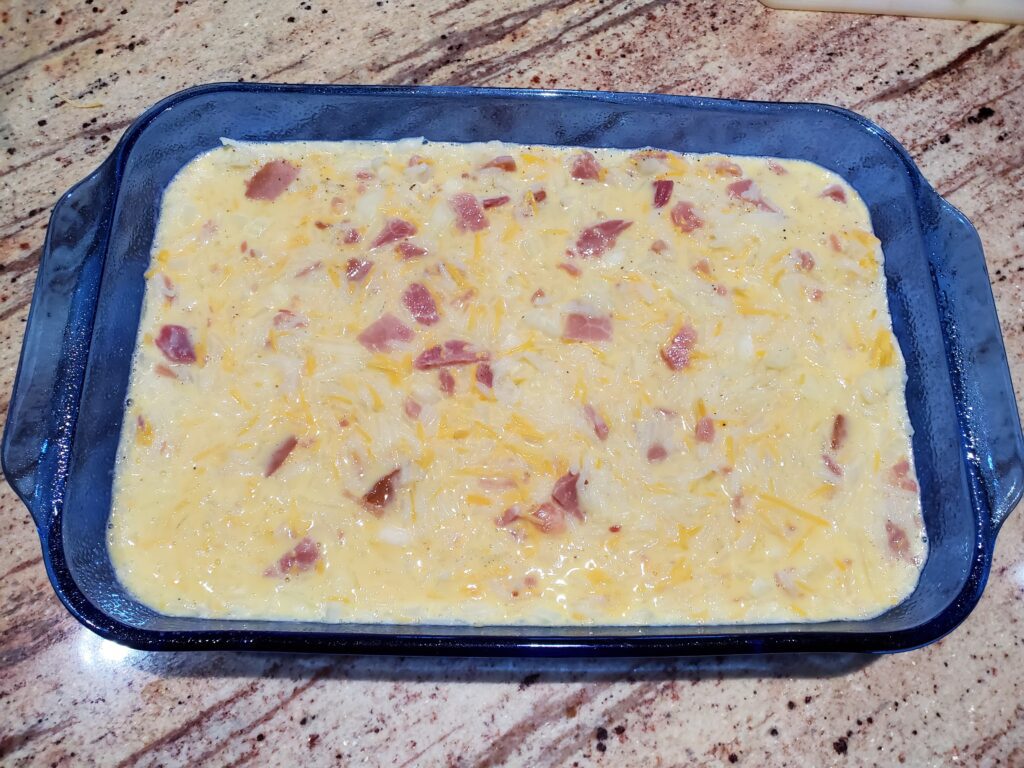
After I tried this breakfast casserole, I stopped looking for another egg bake recipe. It is so easy and so versatile. It can be assembled the night before for easy morning baking. This casserole can be baked it in an oven or smoked on a pellet grill. Use this casserole to feed a crowd, or use it for leftover breakfast for a few days.
Preheat oven or Traeger to 350 degrees F. Bake uncovered for 35-40 minutes or until the eggs are set.
Can you use Pyrex on a pellet grill?
Pyrex is rated to 425 degrees, but I never go higher than 400 degrees when I use a 9×13 inch Pyrex baking dish on my Traeger Silverton 620 because the temperature does fluctuate + or – 10 degrees. It is also important to make sure you keep you grill clean to avoid flare ups from grease fires.
Can you prepare breakfast casserole the night before?
Yes, this recipe can be prepared the night before. Overnight directions: After you pour ingredients into the greased 9×13 inch Pyrex baking dish, place the lid on the dish and store the prepared/unbaked casserole in the refrigerator overnight. Remove it from the refrigerator in the morning, remove the lid and bake or smoke it. Note this may increase the baking time slightly.
How do you reheat egg bake?
This casserole can make mornings easier because it makes great leftovers. Just cut a piece, put it on a microwave safe plate, cover, and microwave for 45 -60 seconds. Easy breakfast in 1 minute or less!
Optional Variations
Swap out the ham for 1 pound of browned bulk breakfast sausage or chorizo. Drain the sausage and allow it to cook for 5-10 minutes before mixing it into the eggs.
Swap out the onions for peppers, spinach or mushrooms!
Swap out the cheddar cheese for any cheese you like! If you try goat cheese, I would recommend slicing it on top, rather than mixing it in.
Get creative!
Egg casserole with chorizo sausage and goat cheese
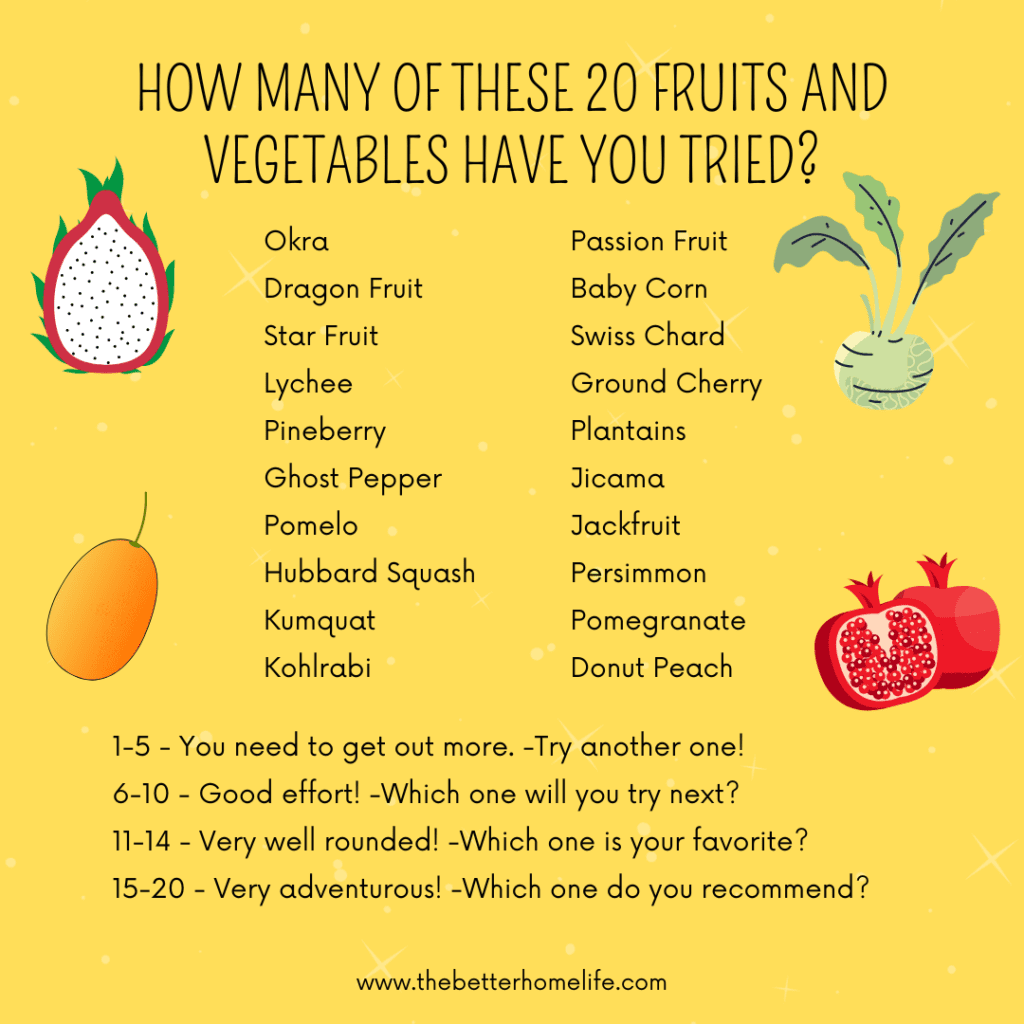
Are you trying to eat more healthy food? Fruits and vegetables pretty much top the list for health benefits, when paired with other healthy food groups. There are many ways to sneak more fruits and vegetables into your diet. Here are some suggestions for how to eat more fruits and vegetables:
This post may contain affiliate links. I earn commission at no additional cost to you.
Add more fruits and Vegetables to your favorite recipes
Problem: Your favorite recipes don’t have many fruits and vegetables.
Solution: Take your favorite recipe and add more vegetables or fruit. Start with a small amount, like 3 carrots instead of 2. I do this all the time. For example, try comparing my Italian Mac & cheese with Rachel Ray’s. Mine has more vegetables, and it is better! I dare you to add an extra half cup of shredded carrots to my morning glory muffins! You will get another muffin and they will have more vegetables! I know this because I have tried it. Try adding a 1/2 cup of blueberries to your favorite banana bread or lemon bread. Be brave! It’s fun!
Make fruits and vegetables more convenient
Problem: If you need a quick snack, it’s much easier to grab a cheese stick or a handful of pretzels than to chop up some vegetables or peel an orange.
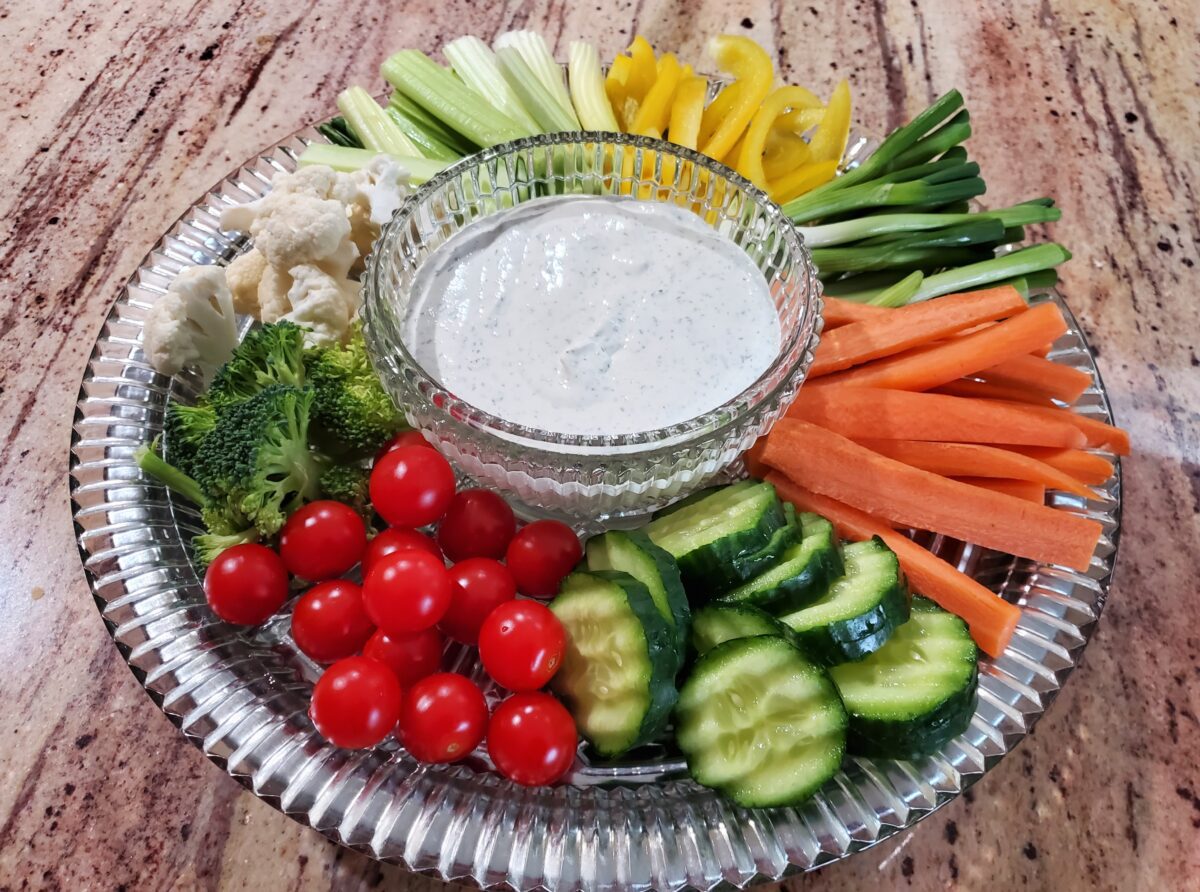
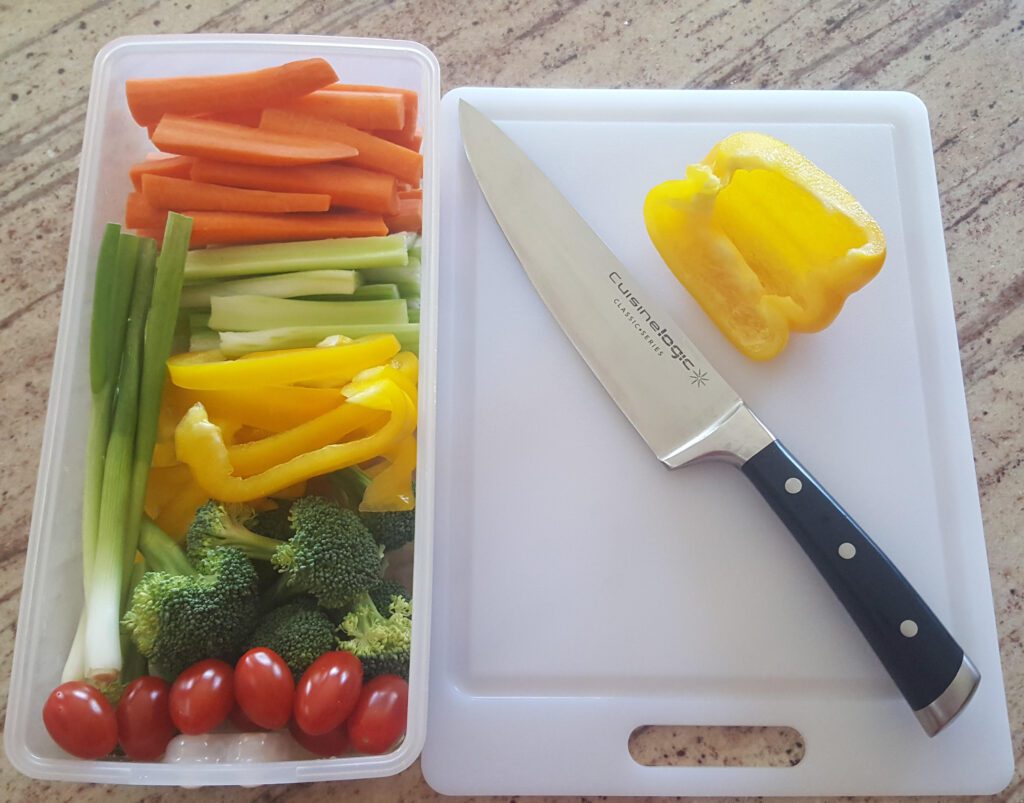
Solution: Prepare a container of sliced vegetables. Keep it in the refrigerator, along with your favorite dip or hummus. This way you can easily pull out the tray to have a quick and easy snack. Slice up the vegetables on the weekend, when you have more time. Many vegetables will last a whole week this way, if stored in the right container. The same strategy works well for fruit. Simply having the fruit peeled, sliced, and ready to eat will make it easier to consume when you are in a hurry.
Note: I recommend storing cucumber slices separate from other vegetables, since they will not last as long. Slice fresh cucumber slices every 2-3 days.
Keep fruits and vegetables where you can see them
Problem: If you keep all of your fruits and vegetables in the crisper drawer in your refrigerator, they can get lost and forgotten. Out of sight, out of mind.
Solution: Many fruits and vegetables can be stored on the counter for a few days. It’s best to store fruits and vegetables in a wide, flat fruit bowl with holes for better air circulation. This type of design will help your fruit last longer. Although, the goal would be to eat it quickly so you don’t have to worry about self life. If you buy a bag of oranges or apples, put 2 in the fruit bowl and store the rest in the refrigerator. Keep refilling the fruit bowl throughout the week. Some fruits and vegetables should be stored outside of the refrigerator. Bananas and tomatoes prefer the counter. Keep them where you can see them. Also, be sure to haul out that fruit or vegetable tray during premium after school or after work snack time!
Make salad prep easier
Problem: Salads are delicious, but they are time consuming to make. It’s easier to buy lunch than pack lunch.
Solution: Lettuce is the most difficult part of the salad. Some types of lettuce do not last as long as other varieties. Iceberg lettuce will not last long once washed. Meanwhile, washed romaine can last a week if washed, patted dry and placed in a gallon Ziplock bag with a paper towel. If you prefer Iceberg lettuce because of the crunch, add some chopped cabbage to your romaine.
Alternatively, you can purchase baby spinach, mixed greens, or other lettuce that is ready to eat.
Use the washed lettuce and the already sliced vegetables from your tray to make a quick and easy salad anytime.
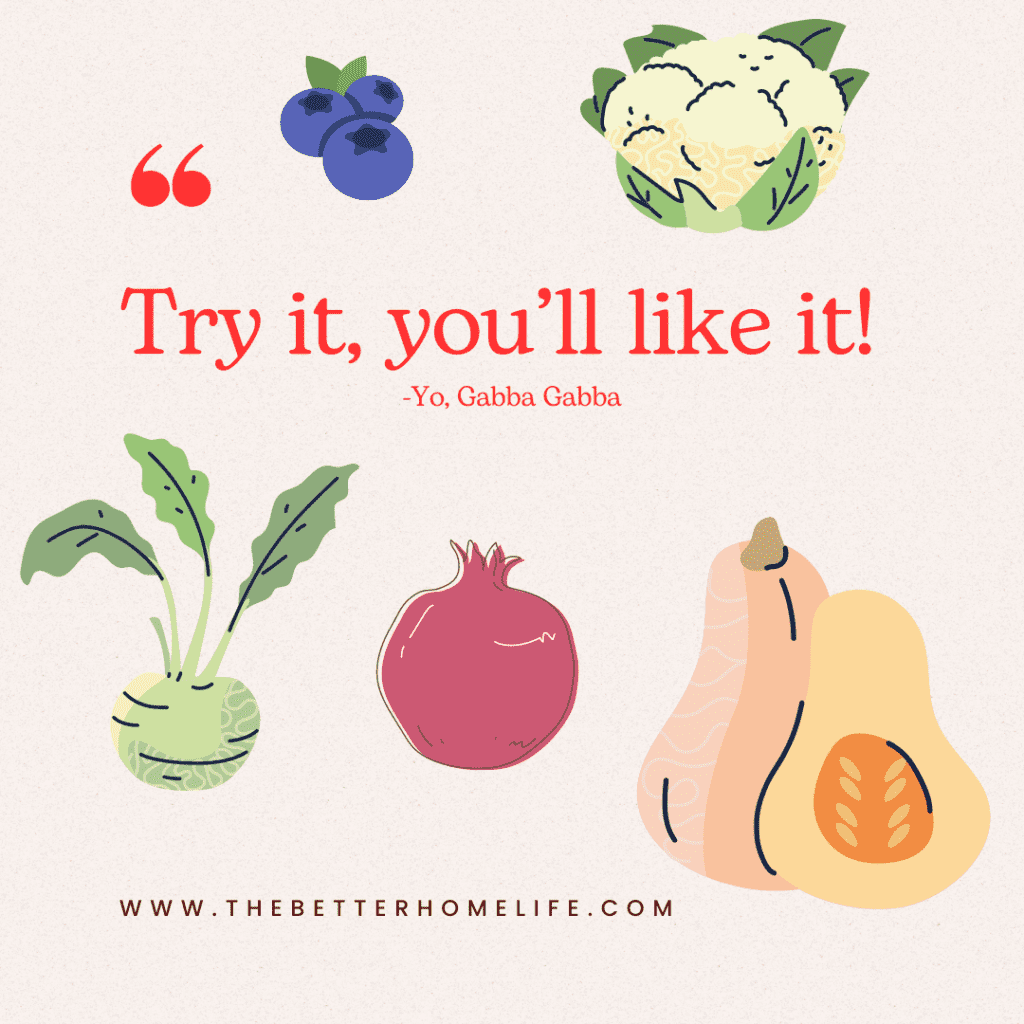
Try to eat a new fruit or vegetable
Problem: You need to eat more fruits and vegetables, but you really don’t like very many.
Solution: Try a new fruit or vegetable, maybe you will like it.
Try it, you’ll like it was a silly song on Yo, Gabba, Gabba. My kids used to watch it when they were younger. I would sing it when I wanted them to try a new food. As a parent you may feel like this strategy does not work. Don’t give up! It will work eventually! It took about 17 years for my son to eat asparagus. We always encouraged it, but never forced it. One day he ordered it at a restaurant. I was thrilled!
This method works for adults too. I used to dislike mushrooms and olives, but i kept trying them, now I like them. Try it, You’ll like it!
Try different cooking methods
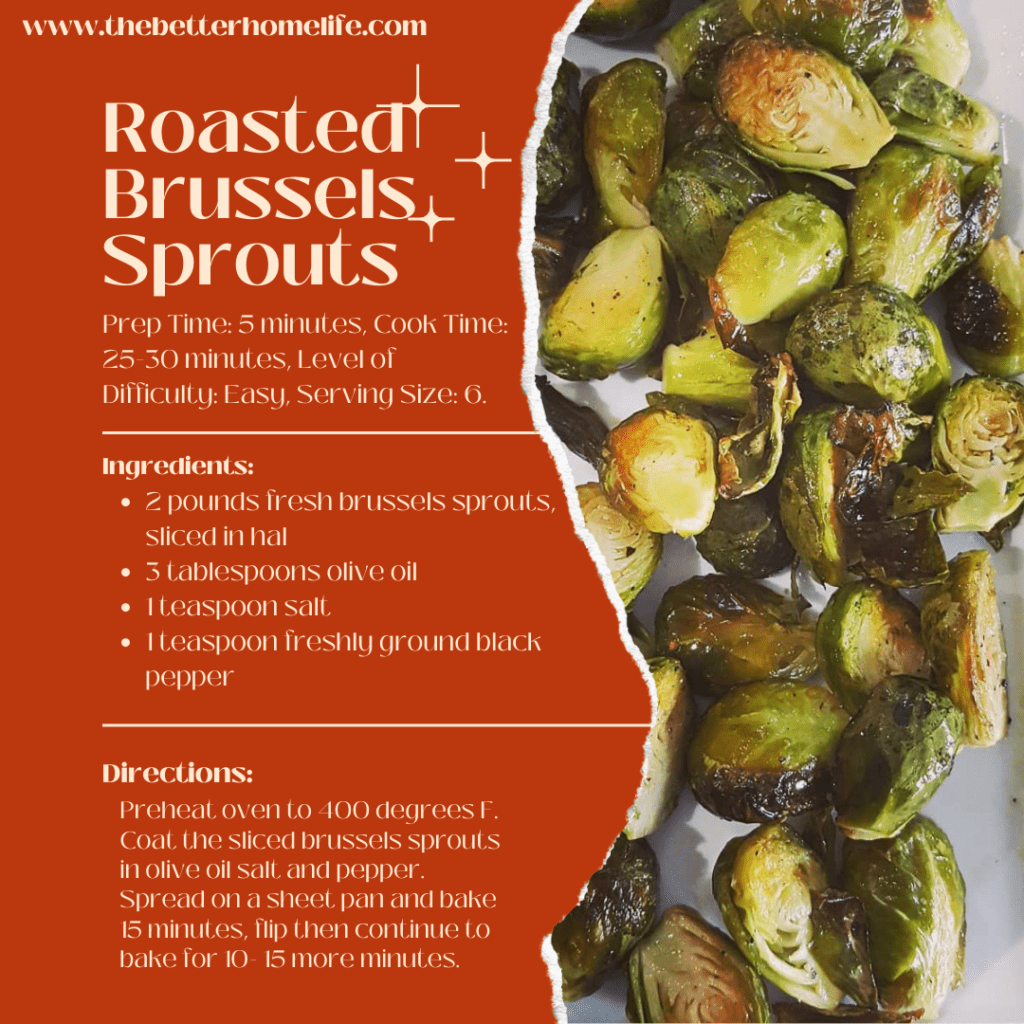
For example, if you don’t like boiled or steamed brussels sprouts, you might like them roasted. They taste totally different.
Some cooking methods can increase the nutritional value of certain vegetables, others can decrease the nutritional value. When you are mainly concerned with increasing your overall consumption, it’s best to focus more on which method will encourage you to eat more, rather than concerning yourself with which way is best. Any way you choose to eat more vegetables is healthier than not eating them. Bottom line, feel free to experiment with many cooking methods with many vegetables. Find what you like!
Boiled Vegetables
This is the most common, yet least desirable way to cook vegetables. They end up soggy and not very appetizing. If this is the only method you use, try one of the other suggestions. If it’s your preferred method, use it!
Steamed Vegetables
Steaming vegetables gives a little better flavor, texture and color than boiling. All you need is a steamer insert and a pot with a lid. Just add some water to the bottom of the pot, place the insert inside and put you vegetable of choice on top, cover and steam the vegetables to desired firmness.
Roasted Vegetables
Many vegetables are very tasty roasted. Brussels Sprouts are my favorite! Sweet potatoes, broccoli, cauliflower, and carrots are awesome roasted! Just place them on a sheet pan, coat with olive oil, season as desired and roast in the oven at 400 degrees F for 25-30 minutes.
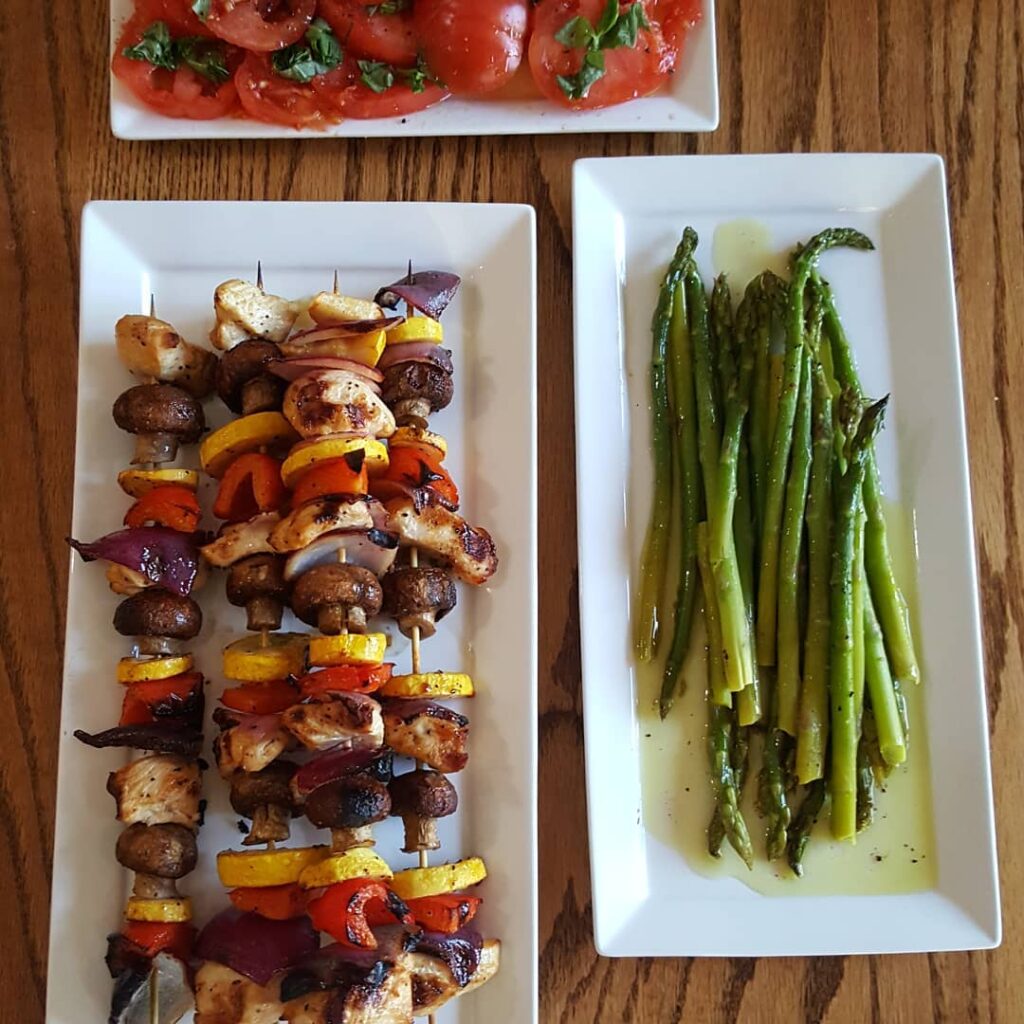
Grilled Vegetables
Choose a tasty marinade, then place your vegetable of choice on kabobs, in a grilling basket, or wrap in aluminum foil and grill to desired firmness.
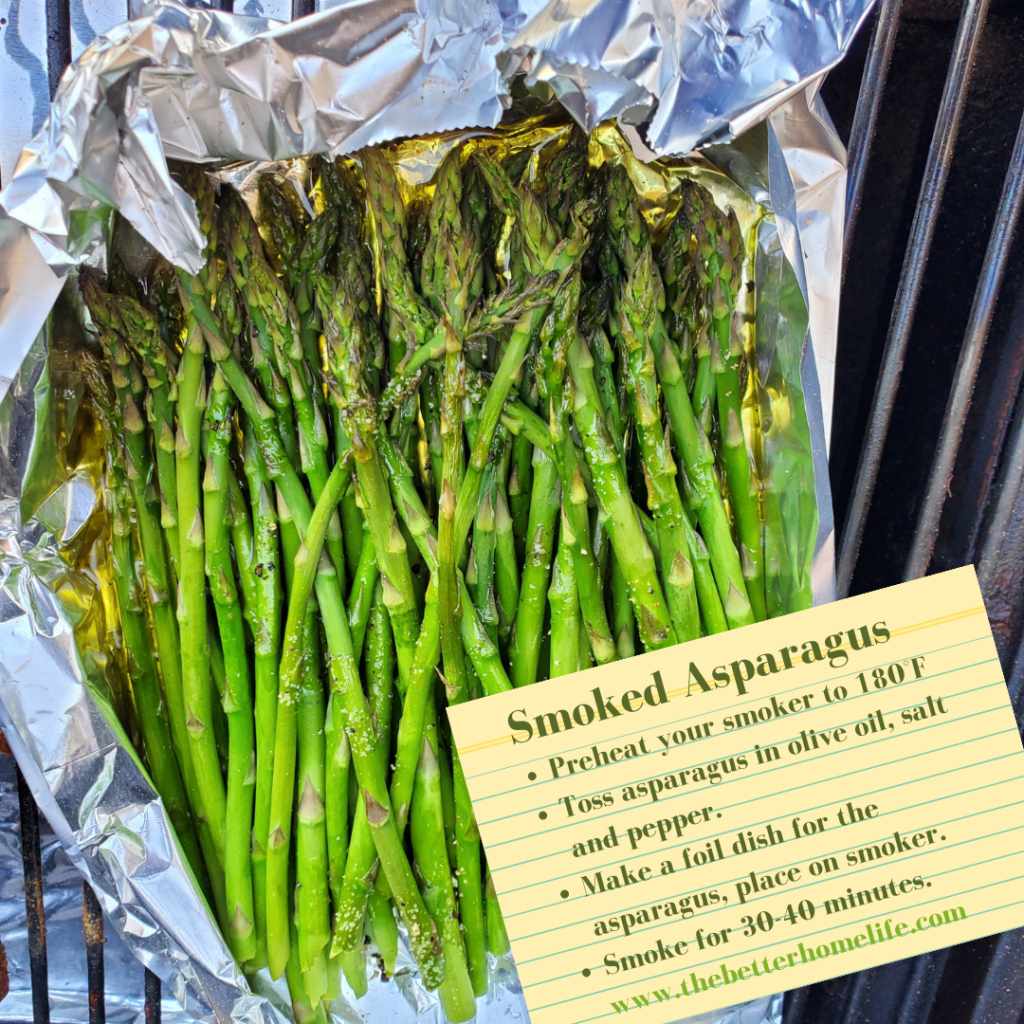
Smoked Vegetables
Vegetables can be smoked! Smoke low and slow to maintain some crispness with a nice smoky favor.
Vegetable Stir Fry
This is a great way to cook vegetables. Traditionally stir fry is done on a large grill or in a wok. Start with some stir fry oil , add the carrots and cauliflower first, fry for a couple minutes. Then add broccoli and snow peas, add more oil and some soy sauce to coat. Fry for a couple more minutes. Add bell peppers, onions and a few drops of sesame oil. Continue to fry for a couple more minutes. Add minced garlic, canned bamboo shoots, canned water chestnuts, and sesame seeds. Continue to fry until all vegetables are warm and slightly softened.
Pressure cooked vegetables
Many vegetables can be pressure cooked faster than roasted. One of my favorites is pressure cooked beets. I use a Ninja Foodi. Just place the washed beets in the Ninja Foodi, add 1 cup of water. Close and pressure cook on high for 15-20 minutes with quick release. Peel and slice the beets!
Pressure cooked Chioggia beets
Go meatless one day per weekto eat more vegetables
Meatless Monday is gaining popularity. Some Catholics go meatless on Fridays. Whatever your reason, if it helps increase your consumption of healthy fruits and vegetables it’s worth a try. Here are a couple of great meatless recipes:
Puree your fruits and vegetables
Problem: You don’t like the texture of fruits or vegetables.
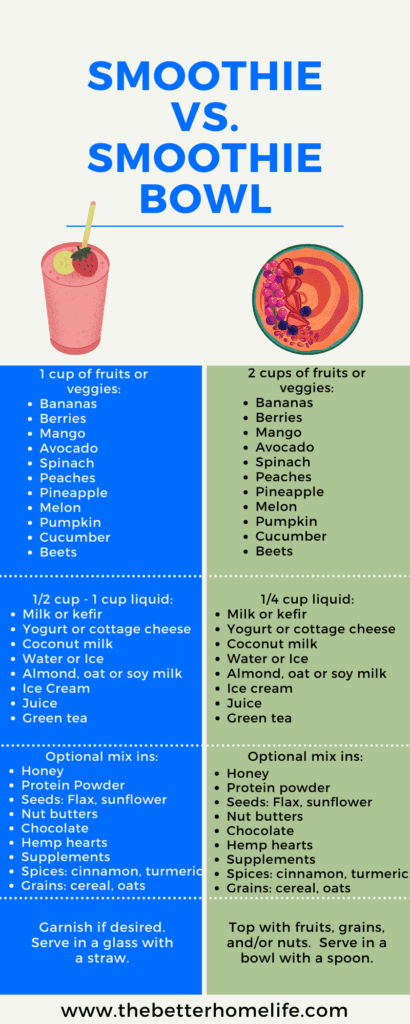
Solution: Puree them! Make a smoothie or a pureed soup! Soups and smoothies are a great way to eat more fruits and vegetables. Check out this post for more great smoothie ideas:
Try a New way of preserving your fruits and vegetables
There are many different ways to preserve fruits and vegetables. Each will give your produce a new flavor and texture. These methods are worth a try to give you some more variety.
Canned fruits and vegetables
Canning is quite a project, but it is worth a try. If you are interested in canning, I recommend the this book. Canned fruits and vegetables have a different flavor and texture than fresh or frozen. Some people prefer it, if you like canned fruits and vegetables better, then canning it is a good way to eat more of them.
Fermented vegetables
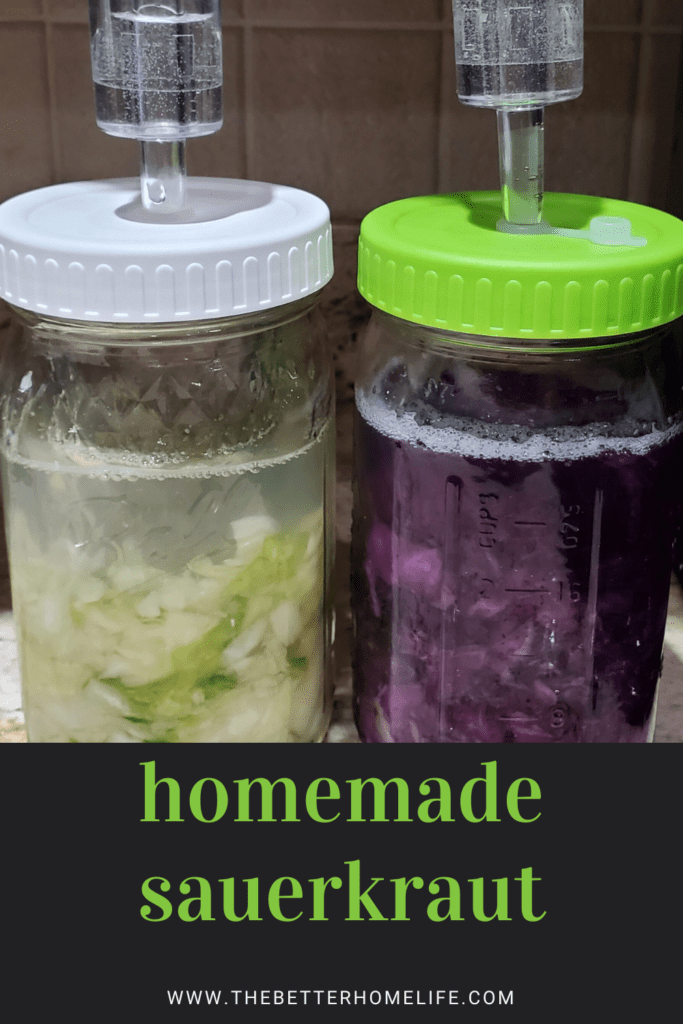
Try it, You’ll like it! Fermented cabbage is sauerkraut. It is a very healthy way to enjoy cabbage. Here is a recipe for homemade Sauerkraut.
Pickle your vegetables
Pickling isn’t just for cucumbers, aka pickles. You can pickle many vegetables: beets, peas, beans, asparagus, and more. Give it a try.
Fill half your plate with vegetables
Problem: You need to eat more vegetables.
Solution: Put more on your plate! It really is that simple.
Pork Schnitzel served with roasted vegetables
As an Amazon Associate, I earn on qualified purchases.
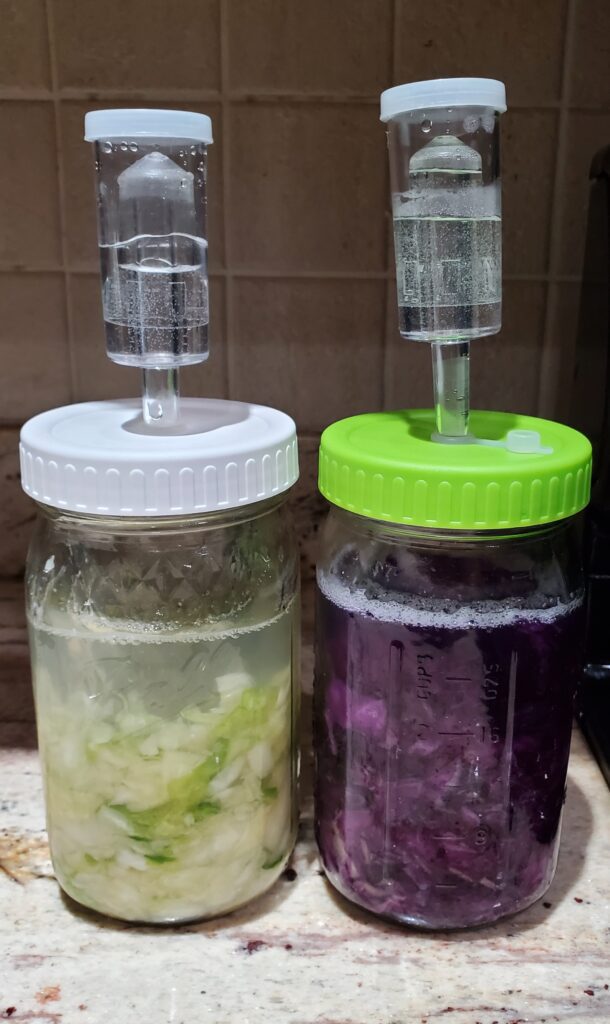
If you love sauerkraut, you will really love it if you make your own. It’s so easy, just 2 ingredients. It’s better to make your own because you can choose how sour you want it to be, which color cabbage you want to use and any additional flavors you want to add. Red cabbage sauerkraut adds a lot of color to your recipes. Any additional flavors are up to you! It’s your sauerkraut, make it the way you want it.
This post may contain affiliate links. I earn commission at no additional cost to you.
What tools do you need to make sauerkraut?
Kitchen Scale – The ingredients for sauerkraut are most accurately measured by weight. Since fermentation is a scientific process, it’s best to measure accurately. Choose one that converts from grams to ounces. Find a good one here.
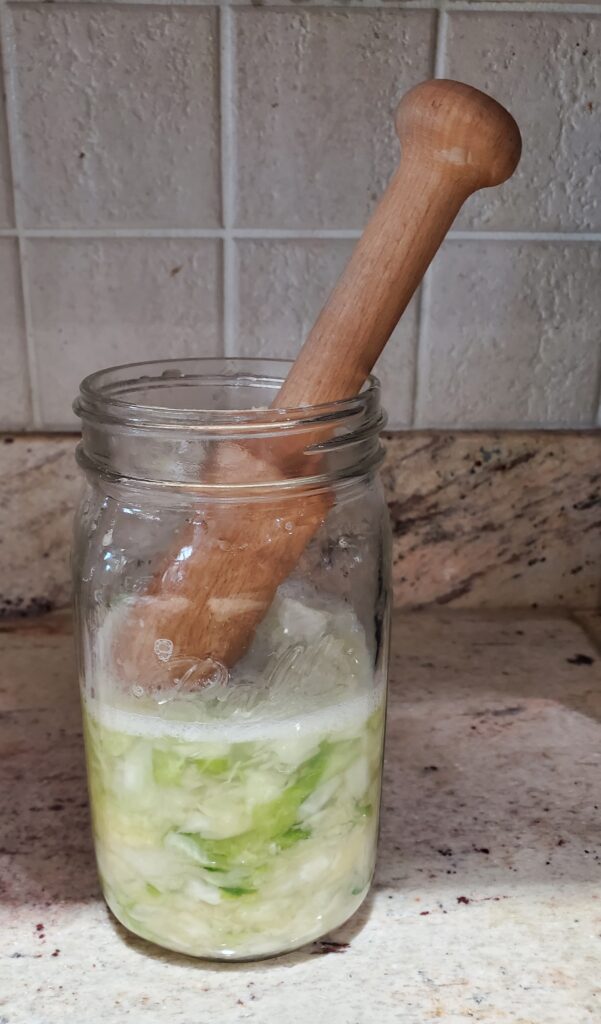
Fermentation kit – Although not absolutely necessary, a fermentation kit will make the process easier. I love this set, it is compatible with any size wide mouth canning jar.
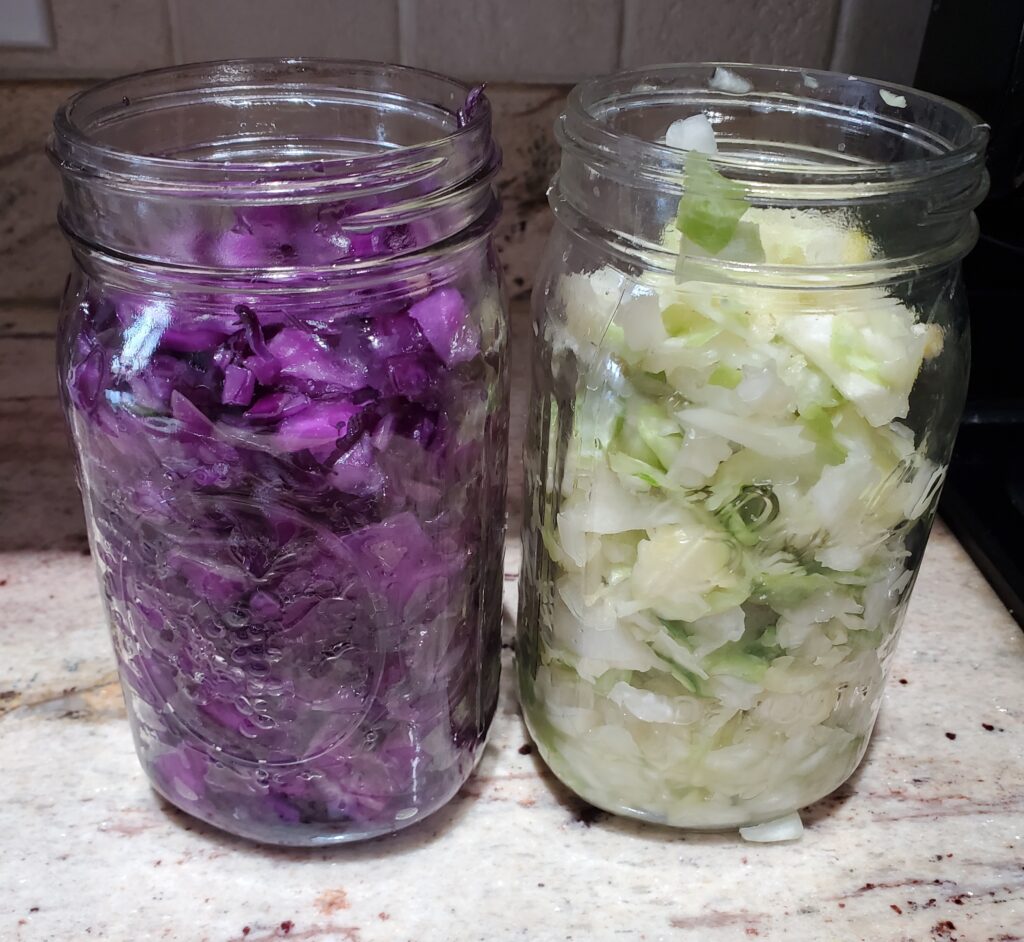
Quart size wide mouth canning jars – These jars are the perfect size for fermenting 1 pound of cabbage at a time. They are also compatible with my preferred fermentation lids. The wide mouth is large enough to fit a jam jar to hold down the cabbage.
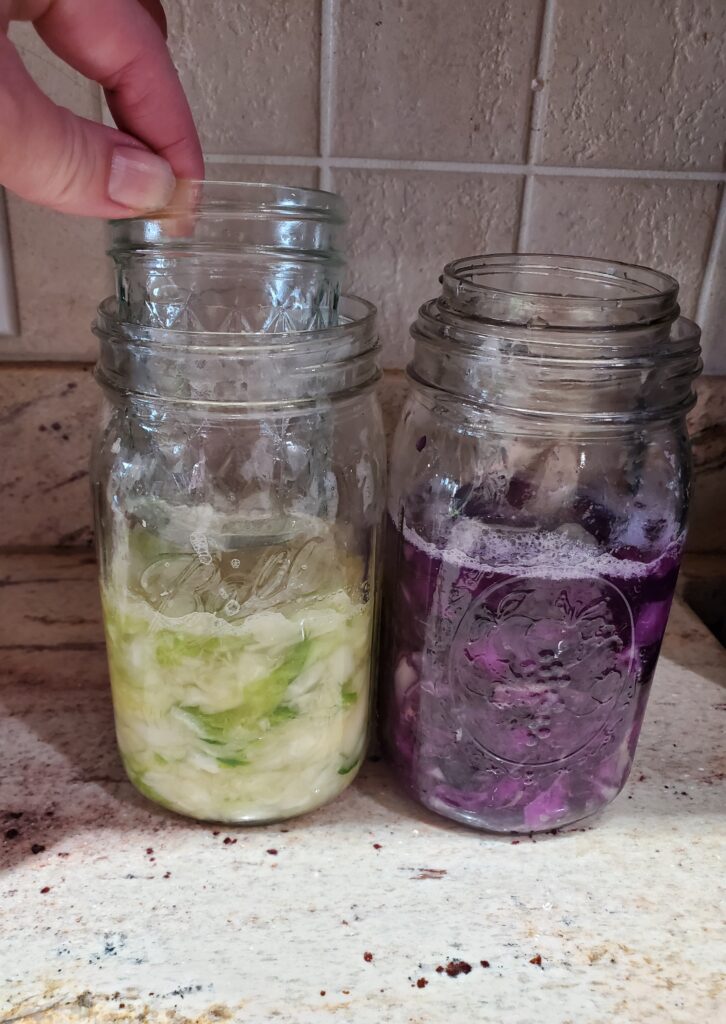
Jam jars – These 8 ounce jam jars fit perfectly inside the quart size canning jars. They are used to hold down the cabbage while it ferments. Alternatively, you could use weights for this purpose.
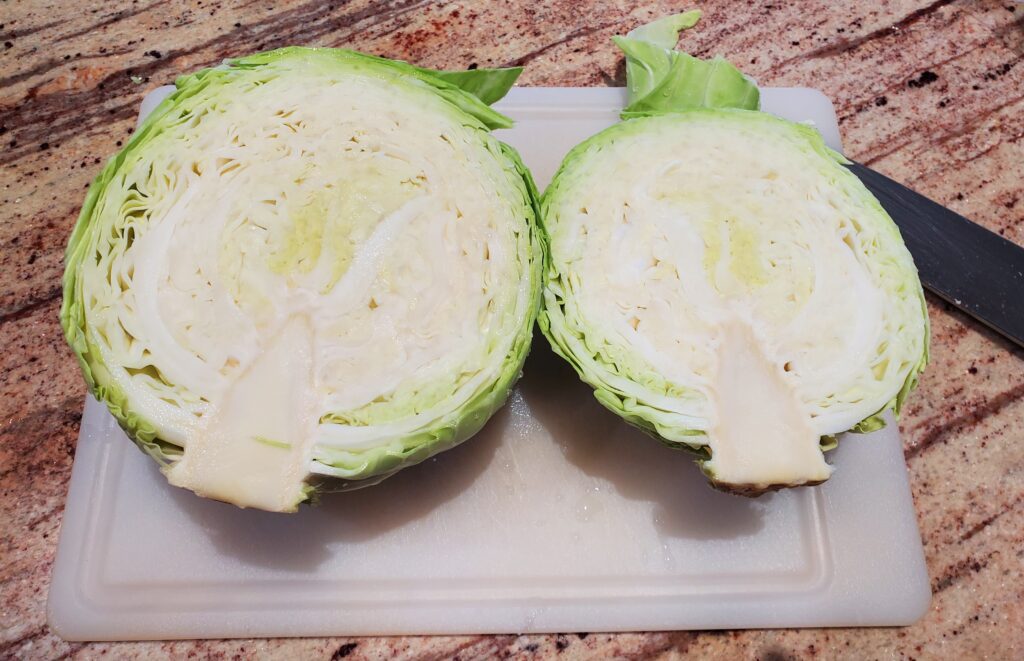
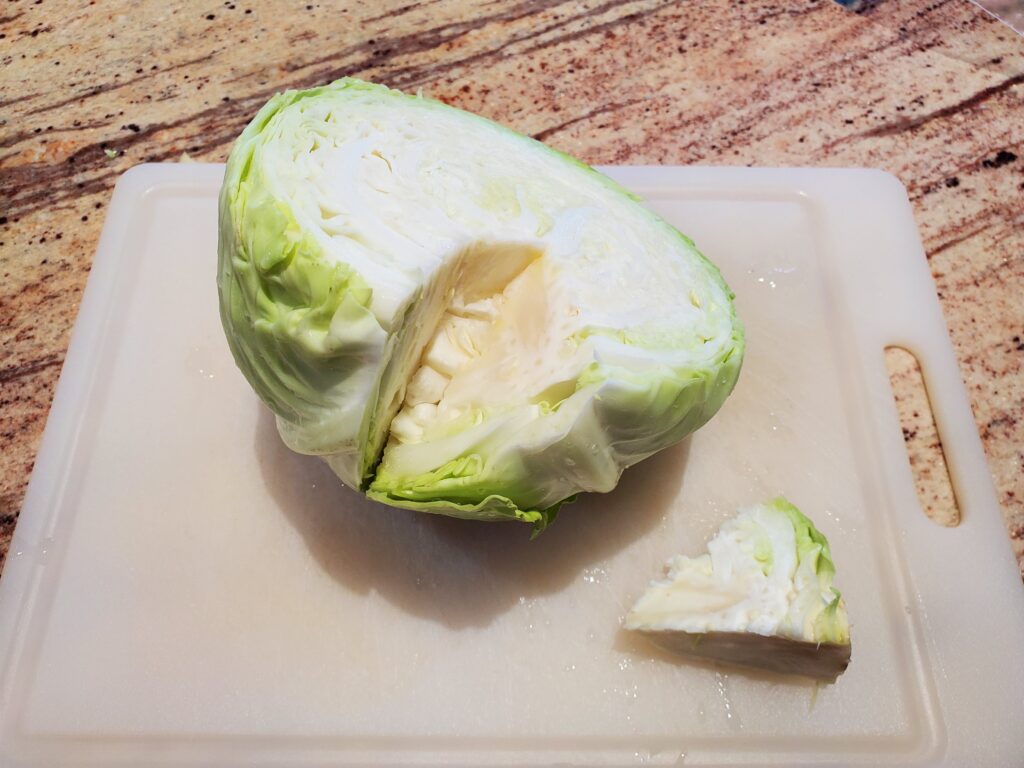
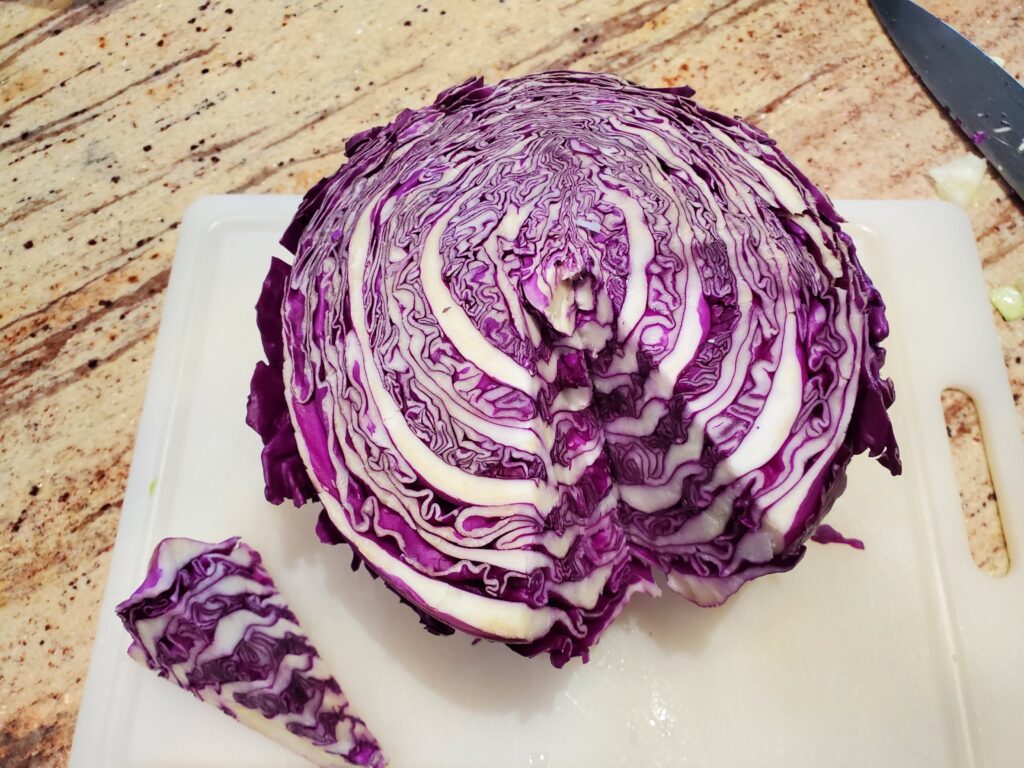
8″ Chef’s knife – An 8″ chef’s knife is the best knife for slicing large vegetables like a full head of cabbage. I honestly don’t know how a kitchen could function without at least one 8″ chef’s knife. Find one here.
Cutting Board – Choose wood or plastic, never glass. Make sure it is large enough to slice a head of cabbage.
Homemade Sauerkraut Ingredients:
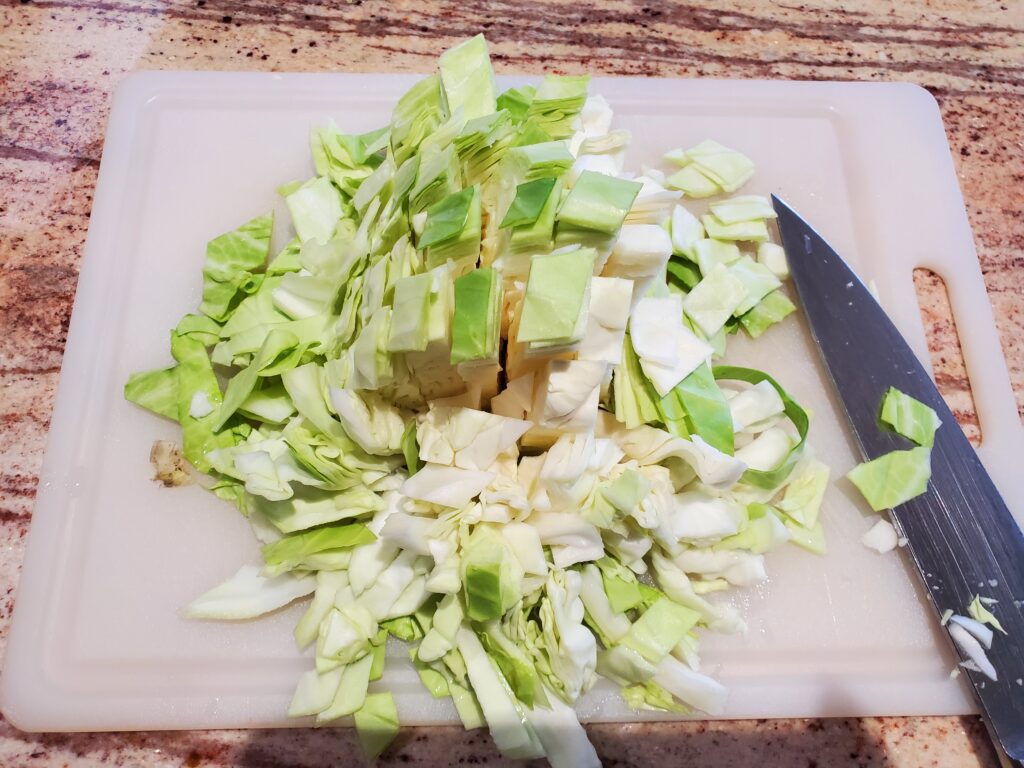
1 pound red or green cabbage -chopped or shredded
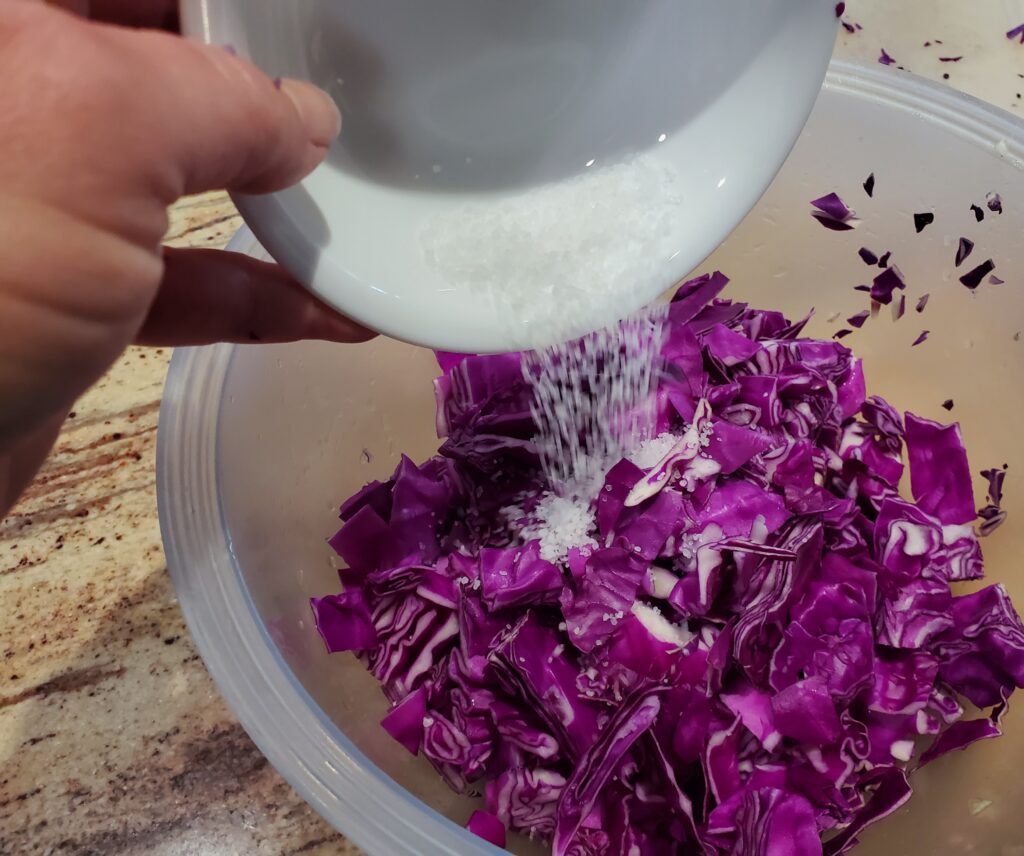
9 grams (~1.5 tablespoons) kosher salt or sea salt (not iodized- no anticaking ingredients)
Great Sauerkraut additions:
For extra flavor, you can add any of these to your homemade sauerkraut. This is anther reason why it is so much better to make your own sauerkraut.
Caraway seeds
Juniper berries
Shredded carrots or beets (80% cabbage/20% beets or carrots – otherwise the sugar from the beets or carrots can affect the fermentation)
Chop the cabbage any way you like, it’s your sauerkraut! I prefer to dice the cabbage into 1/4 to 1/2 inch squares. This makes the perfect bite size pieces, easy for adding to sandwiches or sausages.
How to make Your Own Sauerkraut:
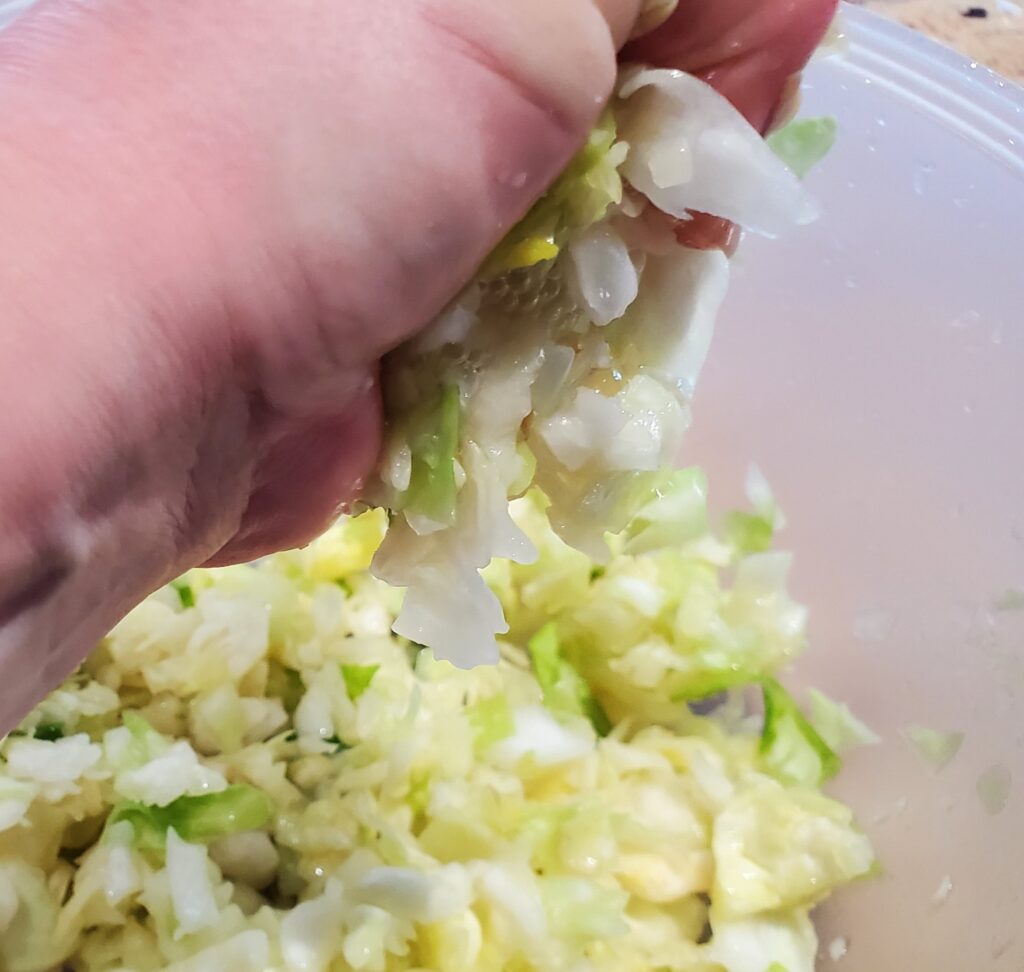
Weigh your chopped cabbage on a Kitchen Scale. Put the diced cabbage in a bowl, then add 1.5 teaspoons of kosher salt per pound of cabbage.
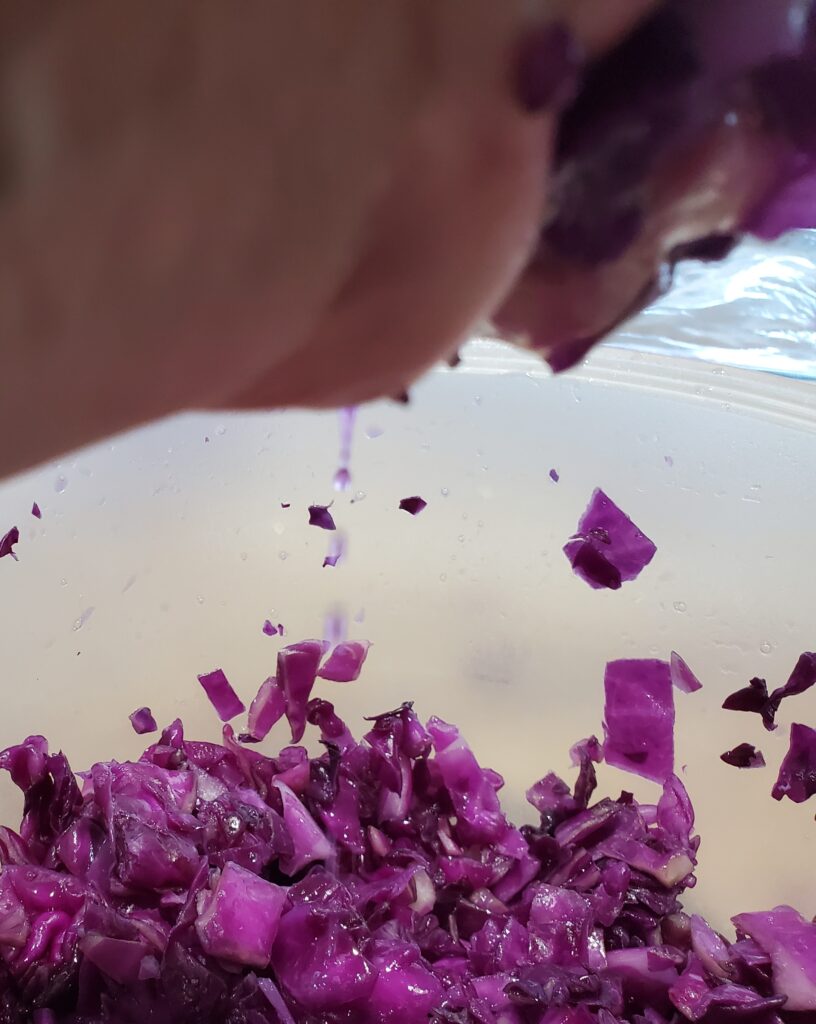
With clean hands, press and squeeze the cabbage until it is very wet. You should be able to see the water dripping down when you squeeze it. This will take a few minutes.
Use a Sauerkraut Pounder to press the cabbage down into the brine. The cabbage should all be completely submerged in brine.
Place the jam jars, or fermentation weights inside the quart size jars to hold the cabbage down in the brine.
Screw on the fermentation lids. Let the jars sit on the counter out of direct sunlight for 1-6 weeks. I usually date the jars. The ideal temperature for fermentation is between 60-70 degrees F. After a couple of days you will begin to see bubbles forming in the jars. This is the fermentation taking place. Check for desired sourness after 7 days. Continue checking every couple days or at least weekly after that. Once you have your desired sourness, put an airtight cap on it, and place it in the refrigerator. The fermentation lids I used have an air tight seal that can be closed when the fermentation vent is removed.
Is Sauerkraut Healthy?
Yes! Cabbage alone is very healthy. It is a good source of Vitamin C and Vitamin K. Cabbage is also good for you because it is a great low calorie high fiber food. Fermentation adds the benefit of probiotics which are good for gut health. Sauerkraut has many health benefits, it is anti-inflammatory, a great anti-oxidant, and may even protect against cancer. Some people experience upset stomach or diarrhea from eating sauerkraut. If you are new to sauerkraut it would be best to start with a small serving, you can increase your serving size when your body adjusts to it.
Recipe By Kristin
Course: Condiment
Cusine:German
Difficulty:Easy
Servings
20 minutes
Preparing Time
30 minutes
Cooking Time
minutes
Calories
6 kcal
INGREDIENTS
1 pound Cabbage
1.5 teaspoons kosher salt
DIRECTION
Chop the cabbage.
Add the salt.
Mash and squeeze the cabbage until it is very wet and water drops form when squeezed. 2-5 minuets.
Press the cabbage into a wide mouth quart size canning jar with a sauerkraut pounder.
Hold the cabbage down in the brine with fermentation weights or jam jars.
Place a fermentation lid on the jar.
Leave on the counter out of direct sunlight, between 60-70 degrees F for 1-6 weeks. Check weekly for desired sourness.
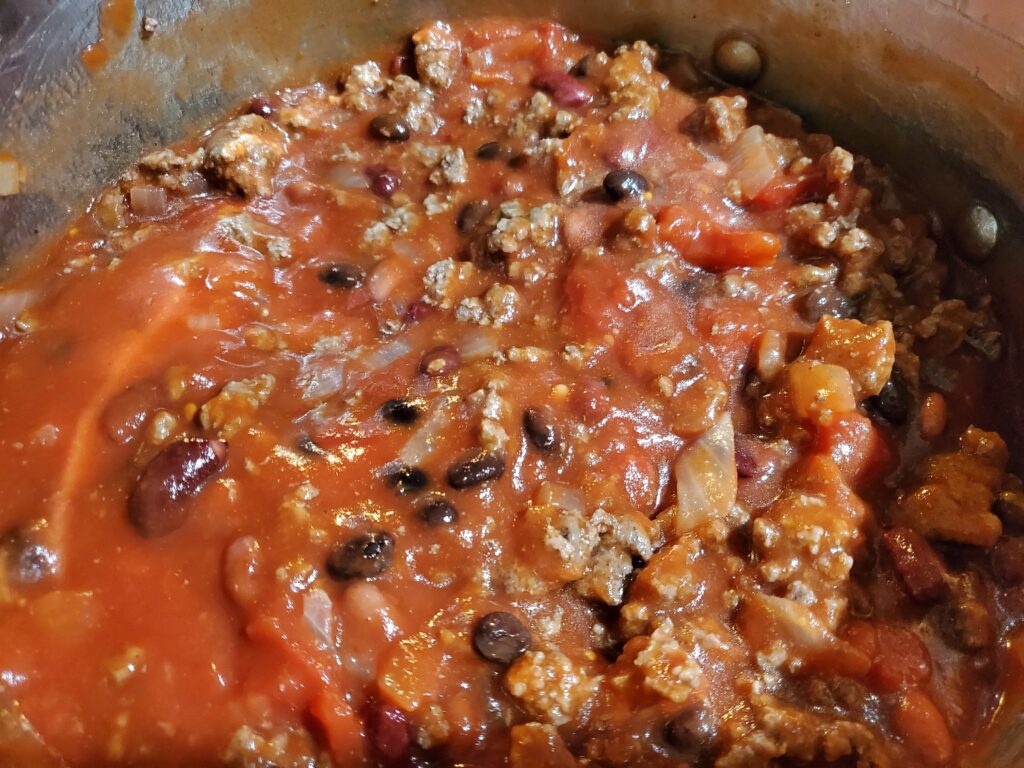
Sometimes even those of us who enjoy cooking just don’t have time to cook. Sometimes we need to get dinner on the table as quick and painless as possible. If you ever have a busy day and need a quick and easy dinner, this chili recipe is for you. This is not an award winning recipe, but it wins many compliments at my house and makes great leftovers for packed lunches.
This post may contain affiliate links. I earn commission on qualified purchases at no additional cost to you.
Start by browning the ground beef. Once it is fully cooked, drain it and set it aside. Next sauté the onion in the olive oil. When the onion is softened, add the tomato sauce and mix well. Add the drained meat, beans and diced tomatoes, mix well. Add the remaining ingredients and mix until well combined. Continue to heat until warm and bubbly. Taste and add additional seasoning if desired. Simmer on low for about 20 min.