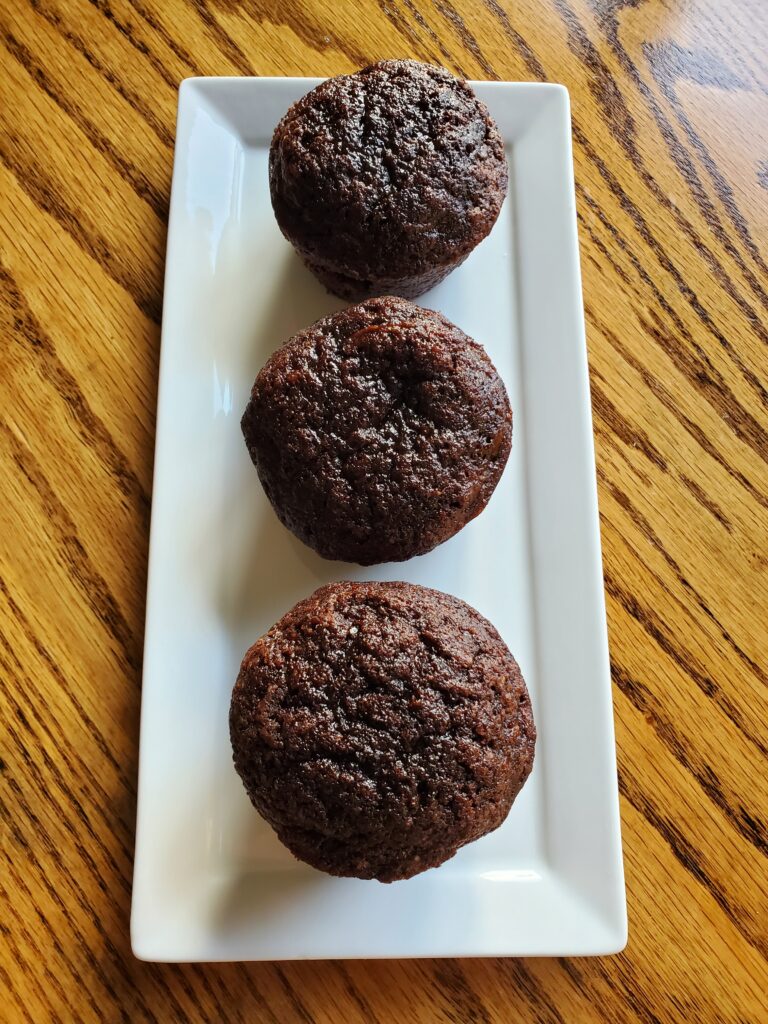
Turn some zucchini into a tasty breakfast treat with this delicious whole wheat chocolate zucchini muffin recipe. These muffins are great way to sneak some vegetables and whole grains into your kiddos. Warning, they will disappear fast!
Disclaimer: This post may contain affiliate links. I earn commission at no additional cost to you.
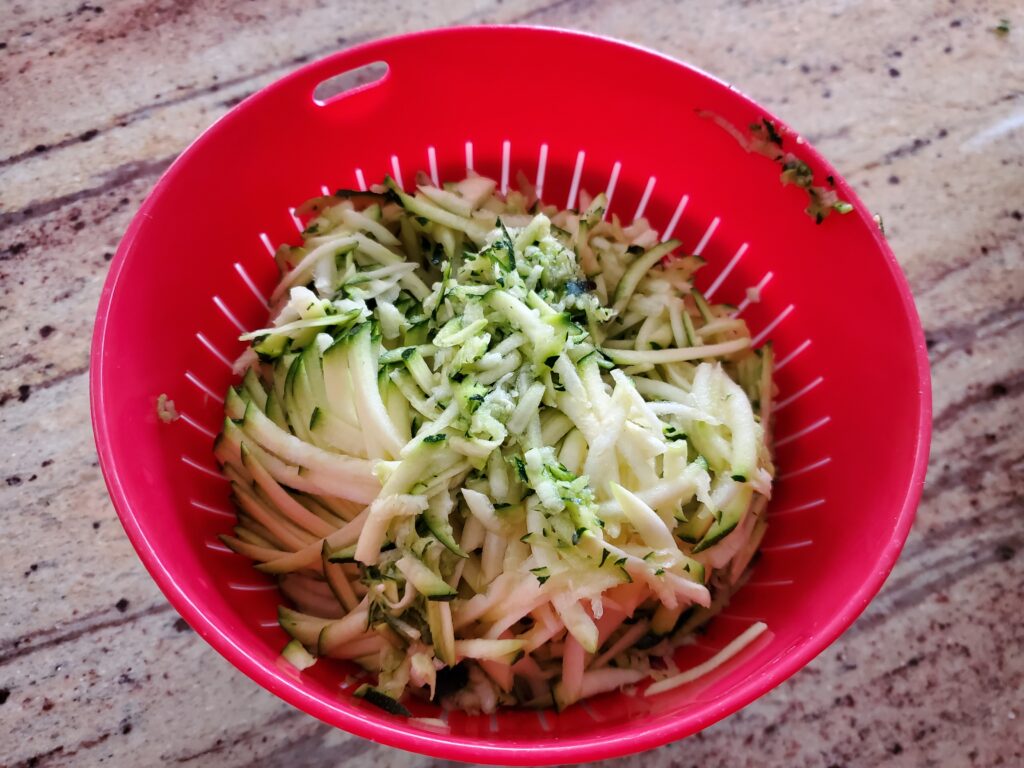
Start by grating the zucchini in a food processor. If you are using a large zucchini, remove the seeds before grating. Set aside in a colander to drain off excess moisture while you prepare the muffins.
Preheat the oven to 350 degrees F.
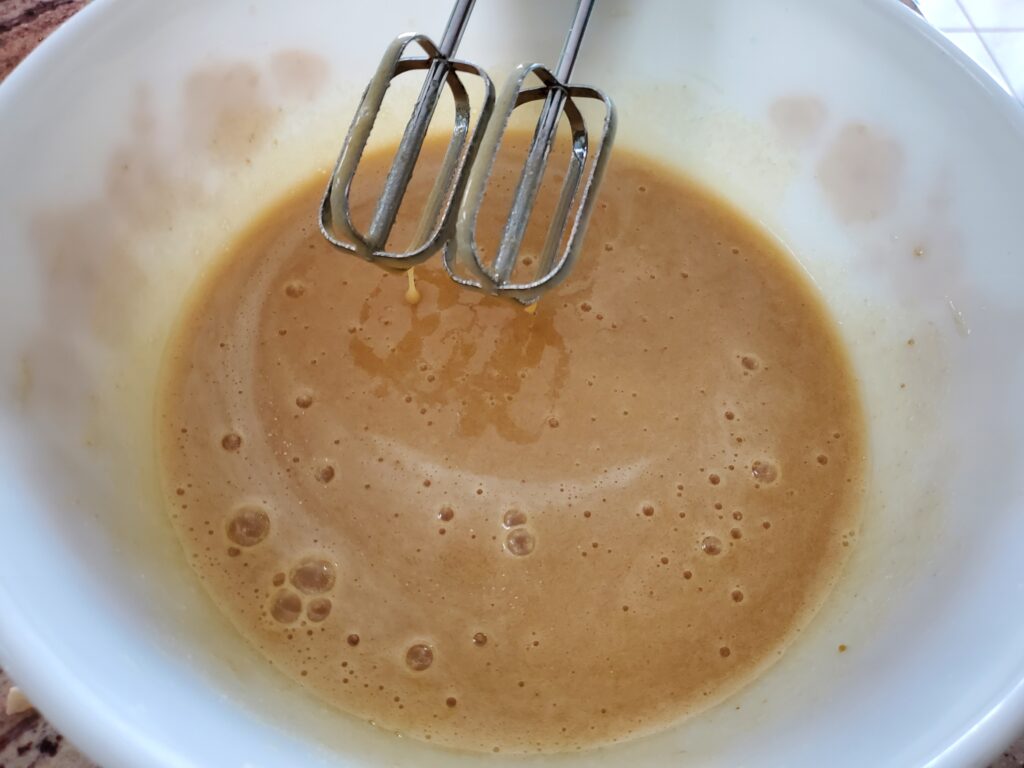
In a large bowl, beat together the sugars, oil, eggs and vanilla with an electric mixer until well combined.
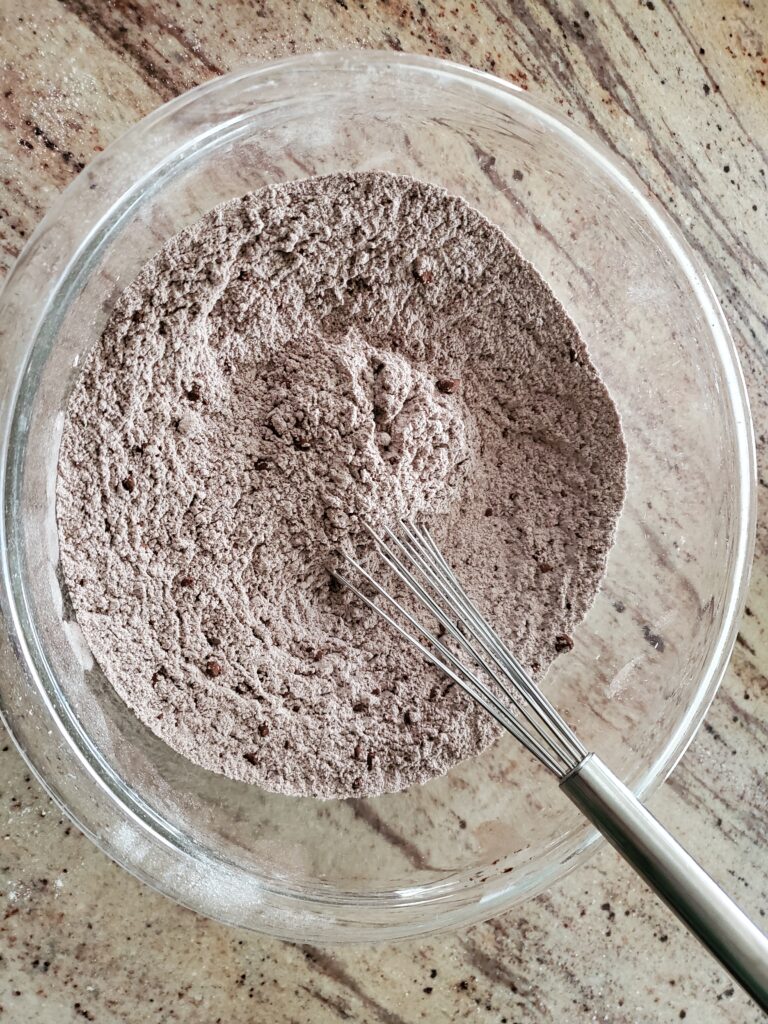
In another bowl whisk together the flours, cocoa powder, salt, baking soda and cinnamon.
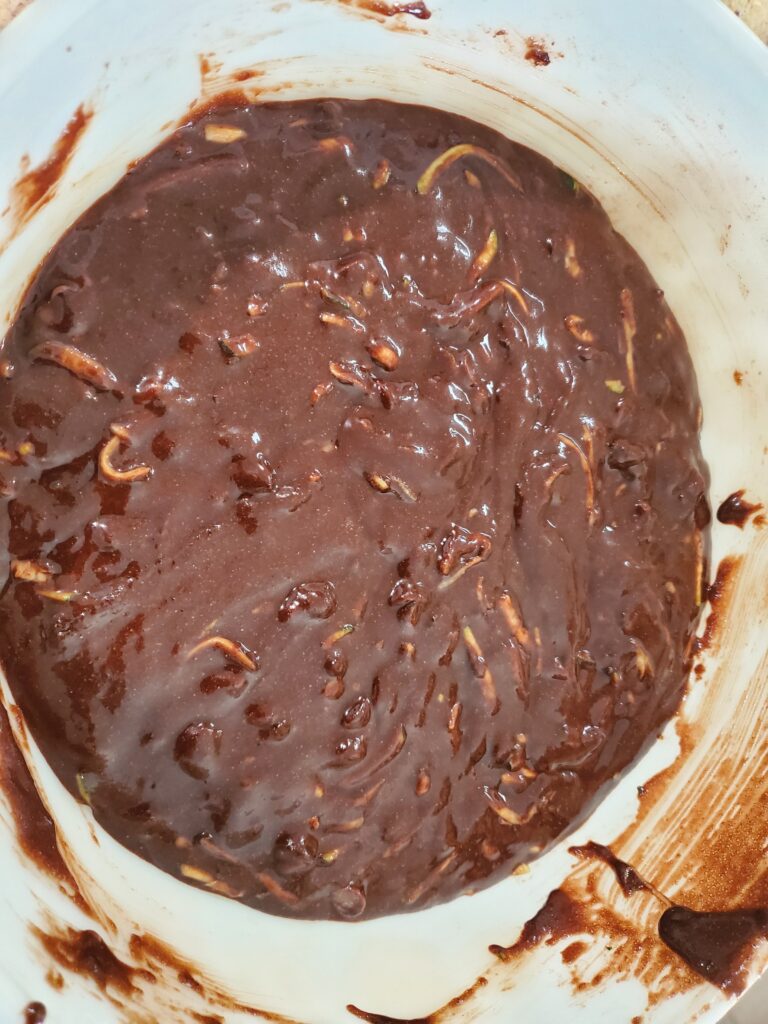
Gradually add the dry ingredients to the wet ingredients until combined. Fold in the zucchini and chocolate chips.
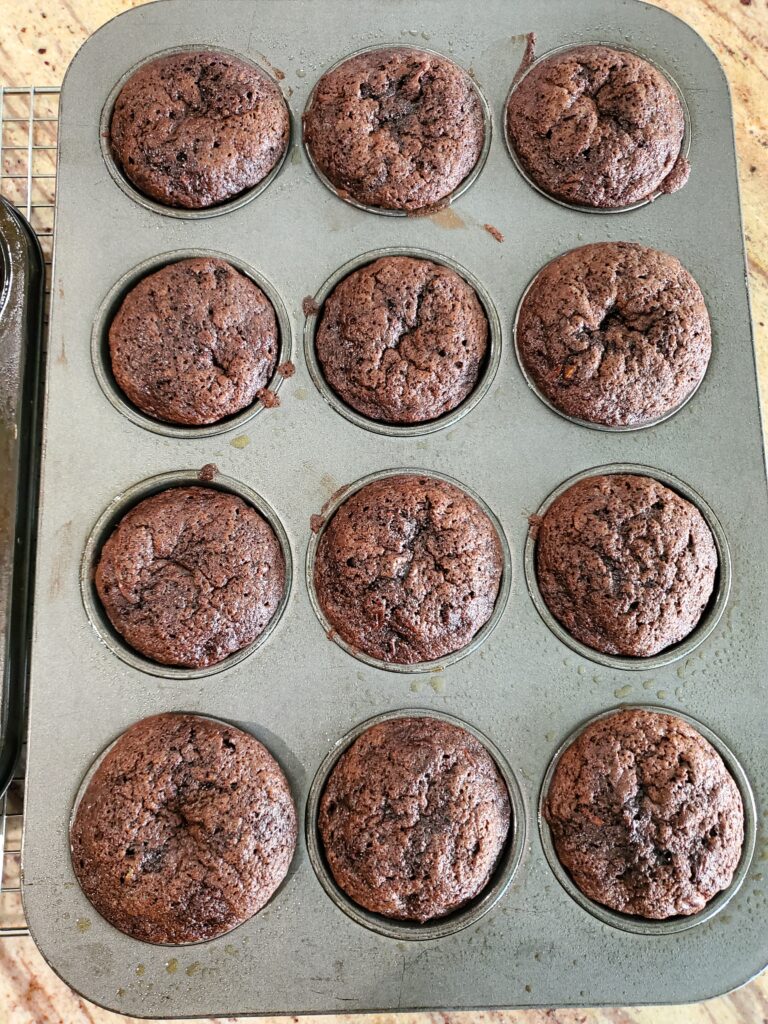
Spray 2 large muffin pans with non-stick spray or line with paper liners. Fill each muffin well 2/3-3/4 full with the batter. This recipe makes approximately 20-22 muffins.
Bake for 20-22 minutes or until a fork comes out clean.
Transfer the muffins to a cooling rack. Once cooled, store them in an airtight container for up to 3 days.
Start by grating the zucchini in a food processor. If you are using a large zucchini, remove the seeds before grating. Set aside in a colander to drain off excess moisture while you prepare the muffins.<br>
Preheat the oven to 350 degrees F.
In a large bowl, beat together the sugars, oil, eggs and vanilla with an electric mixer until well combined.<br>In another bowl whisk together the flours, cocoa powder, salt, baking soda and cinnamon.
Gradually add the dry ingredients to the wet ingredients until combined. Fold in the zucchini and chocolate chips.<br>Spray 2 large muffin pans with non-stick spray or line with paper liners. Fill each muffin well 2/3-3/4 full with the batter. This recipe makes approximately 20-22 muffins.<br>
Bake for 20-22 minutes or until a fork comes out clean.<br>Transfer the muffins to a cooling rack.
NOTES
As an Amazon associate, I earn on qualified purchases.
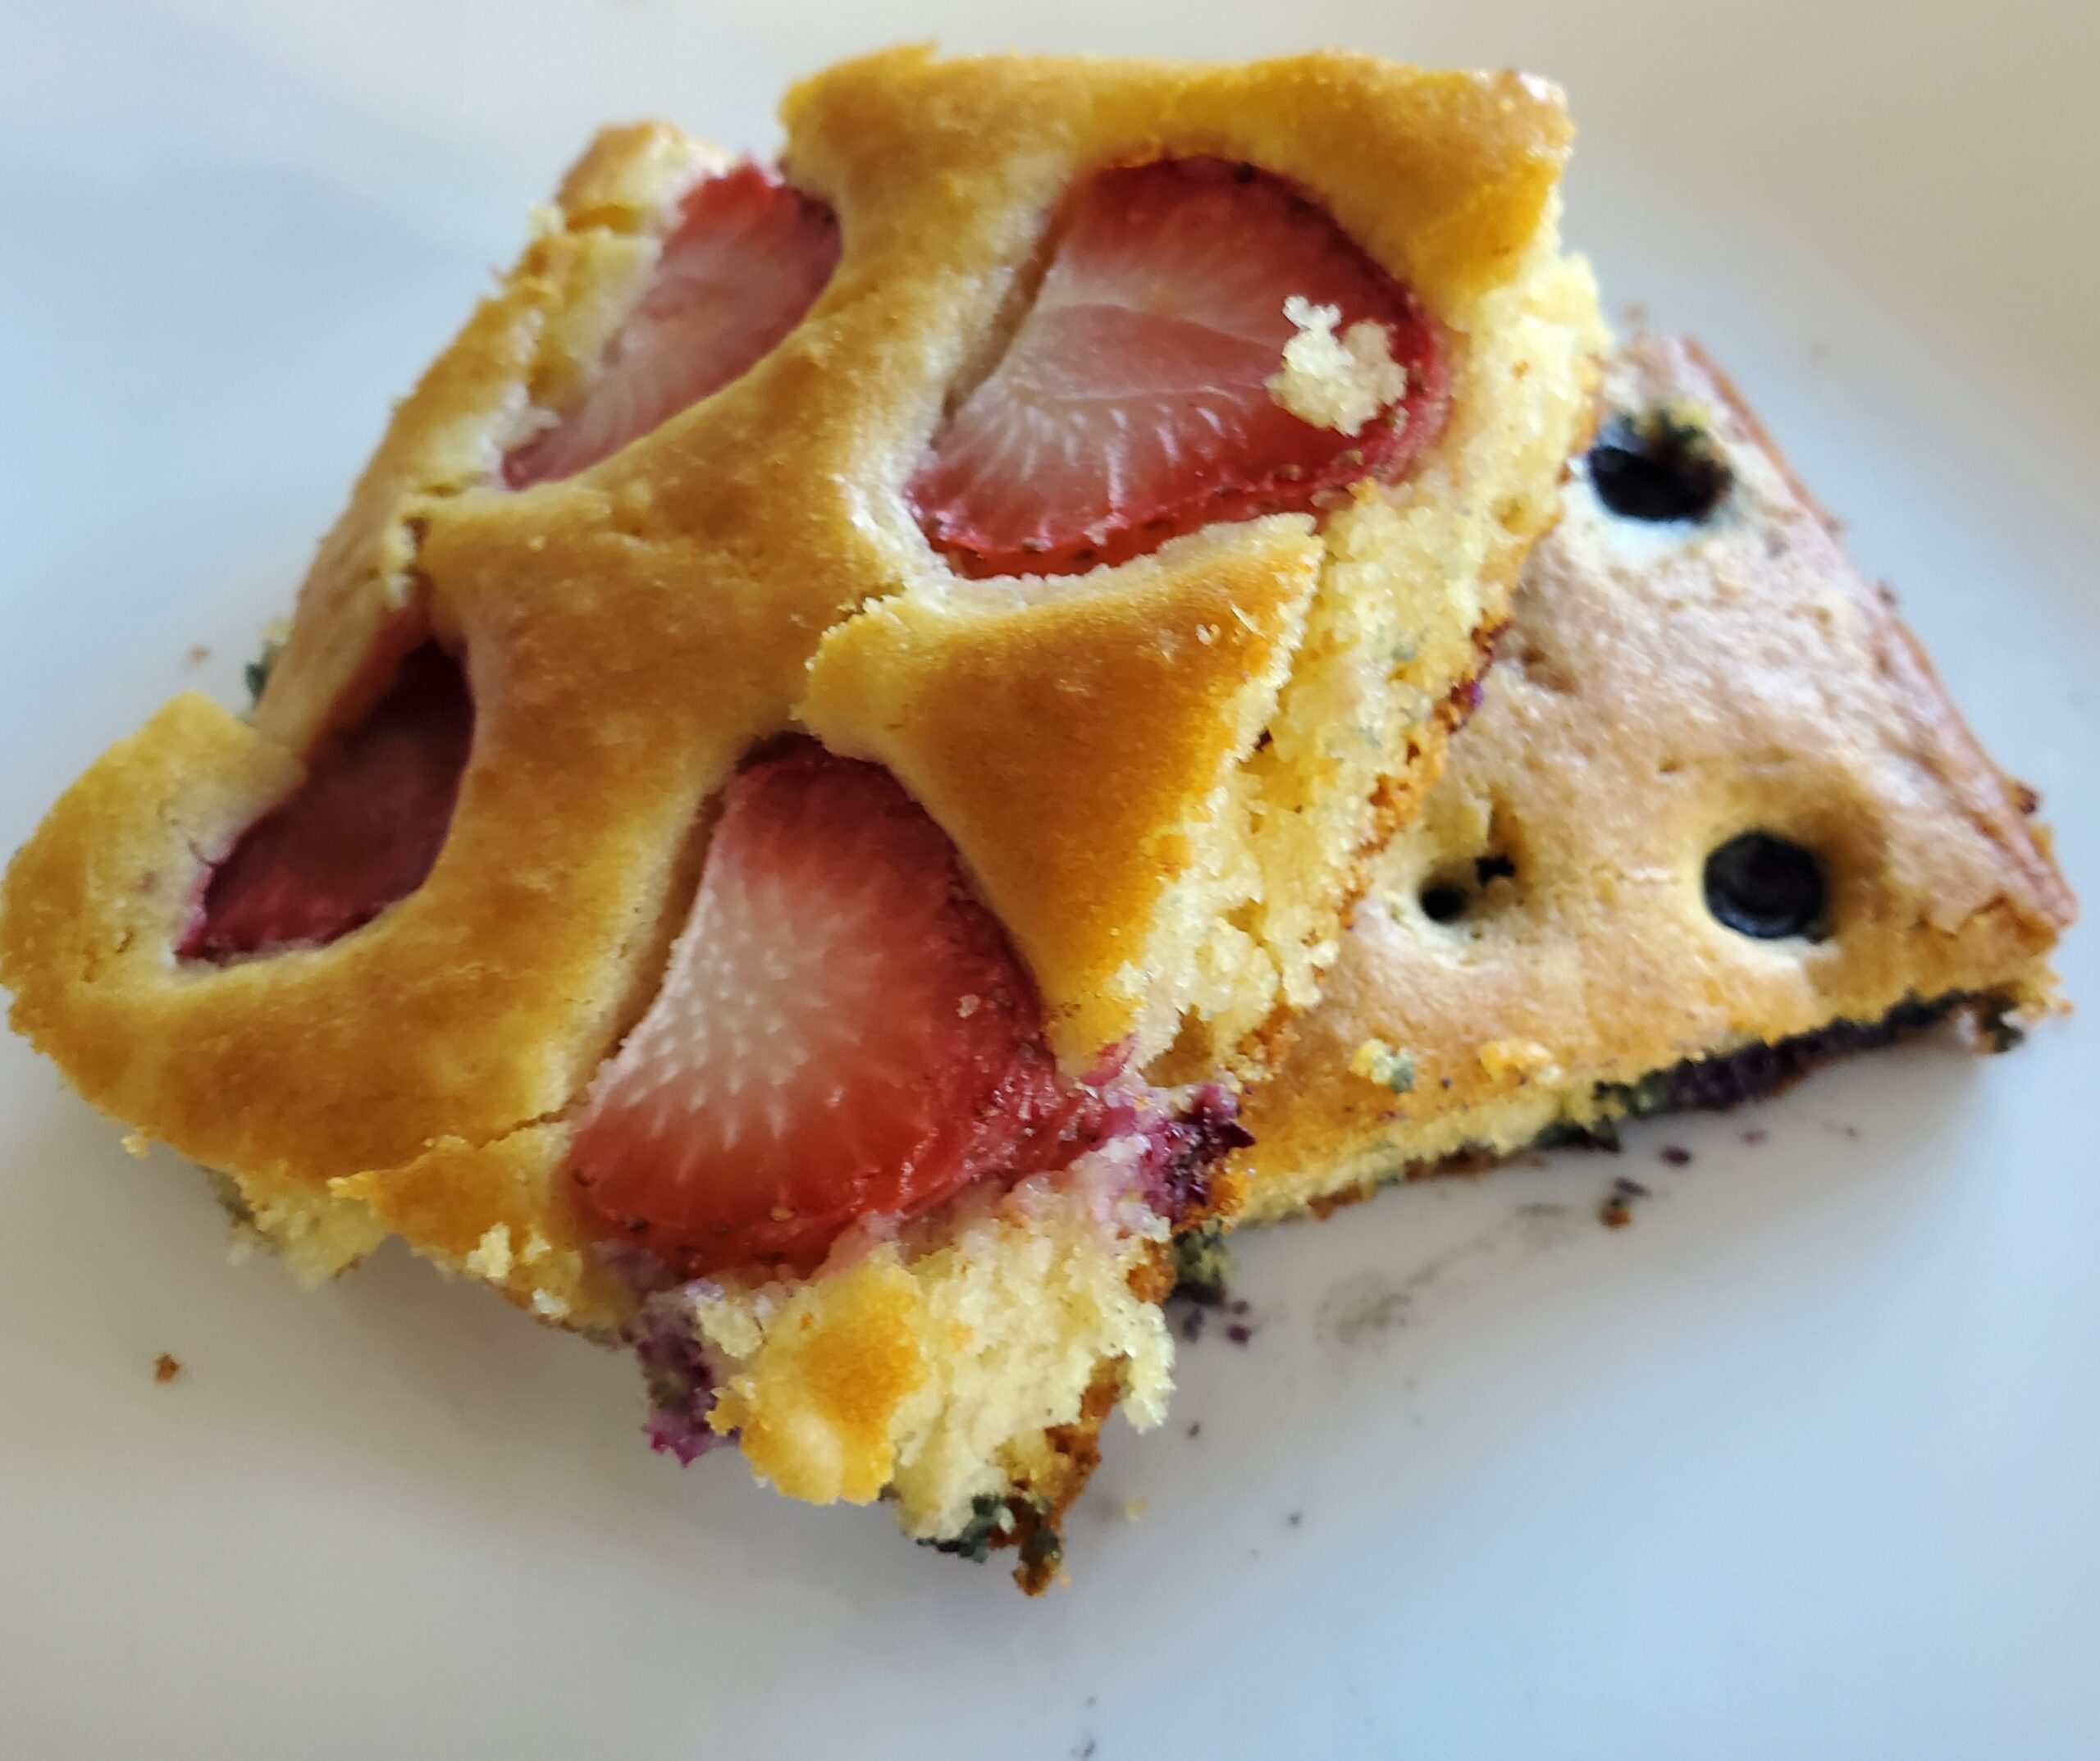
Sheet pan pancakes are a quick and easy way to feed a crowd in the morning without having to stand by the stove for hours. They also make great leftover breakfast for easy weekday mornings. This sourdough sheet pan pancake recipe is also great for using up some extra discard. This recipe can also be used to make regular sourdough discard pancakes and waffles.
Sourdough discard – If you don’t have sourdough discard you can replace it with 1/2 cup of all-purpose flour and 1/2 cup of buttermilk or milk.
Sourdough discard sheet pan pancake ingredients
2 Cups All-purpose flour
1 teaspoon baking soda
1 teaspoon baking powder
1 teaspoon sea salt
3 tablespoons sugar
1 cup sourdough discard
1 and 1/2 cups milk
1 teaspoon pure vanilla extract
4 tablespoons butter, melted
2 large eggs
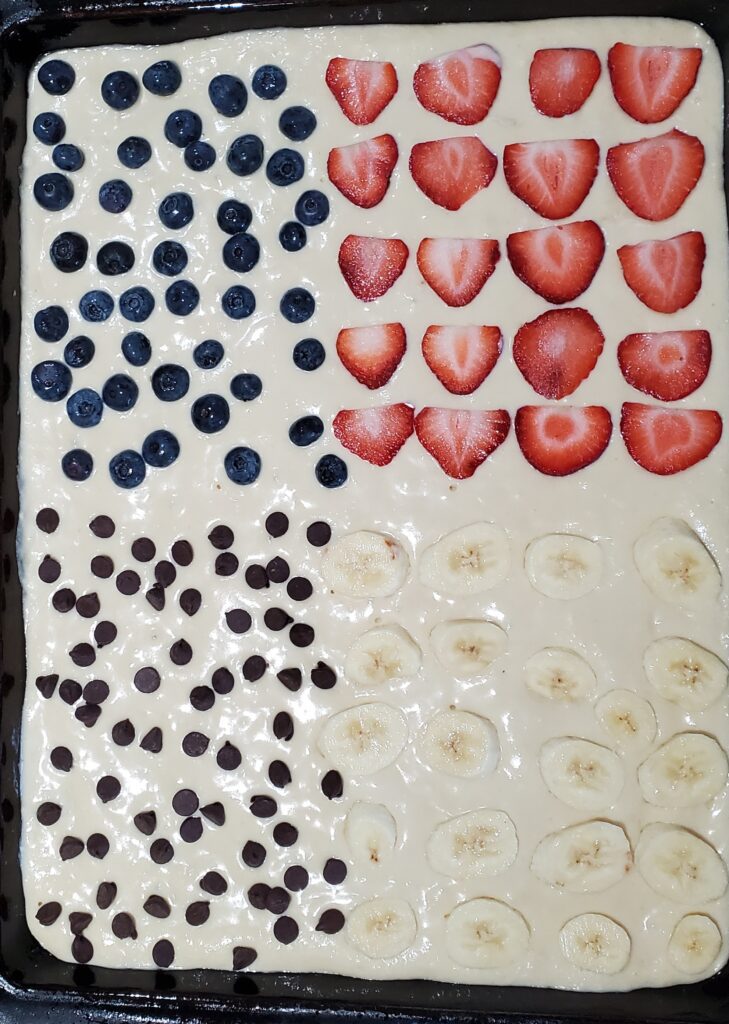
1/2 cup fresh blueberries, washed and patted dry
5-6 fresh strawberries, washed patted dry, and sliced
1 banana, peeled and sliced
1/4 cup of chocolate chips
Sheet Pan Pancake Directions
Mix all of the dry ingredients (flour, baking soda, baking powder, salt and sugar) in a bowl. Crack the eggs and whisk them a bit before adding. Add the discard, milk, vanilla, melted butter and eggs to the dry ingredients and mix well. It’s ok if the batter is a little lumpy. Pour the batter on a greased or parchment lined 18 x 13 inch sheet pan. Allow the batter to sit for 20-30 minutes before baking.
Meanwhile, prepare your fruit. Make sure your fruit is patted dry.
Add the chocolate chips and fruit to the top of the batter.
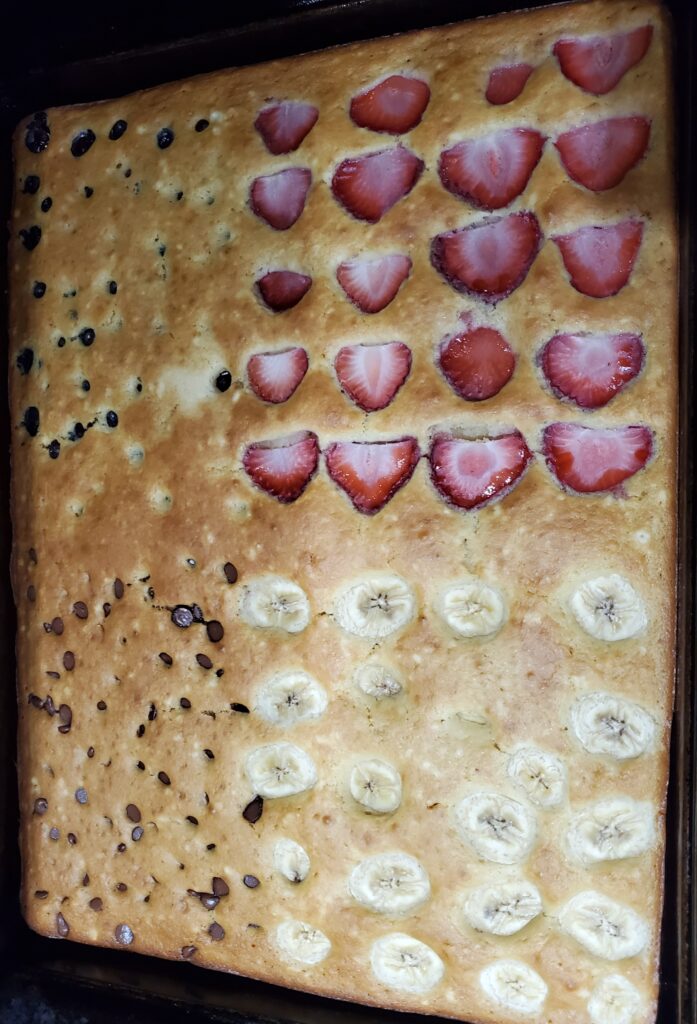
Preheat the oven to 425 degrees F. Bake for 15-18 minutes or until the top is golden brown. Wait 1-2 minutes before slicing.
Sheet pan pancake mix-in and topping ideas
Mix-ins:
Fresh blueberries
Fresh strawberries
Fresh raspberries
Fresh black berries
Bananas
Chocolate chips, or any chip e.g. white chocolate, butterscotch etc..
Fresh thin apple slices, with cinnamon
Cinnamon and brown sugar
Nuts e.g. walnuts, pecans, cashews
Toppings:
Maple syrup
Powdered sugar
Strawberry syrup
Whipped cream
Nutella
Jam
Can you use this recipe to make regular pancakes or waffles?
Yes you can use this same recipe to make sourdough pancakes and waffles.
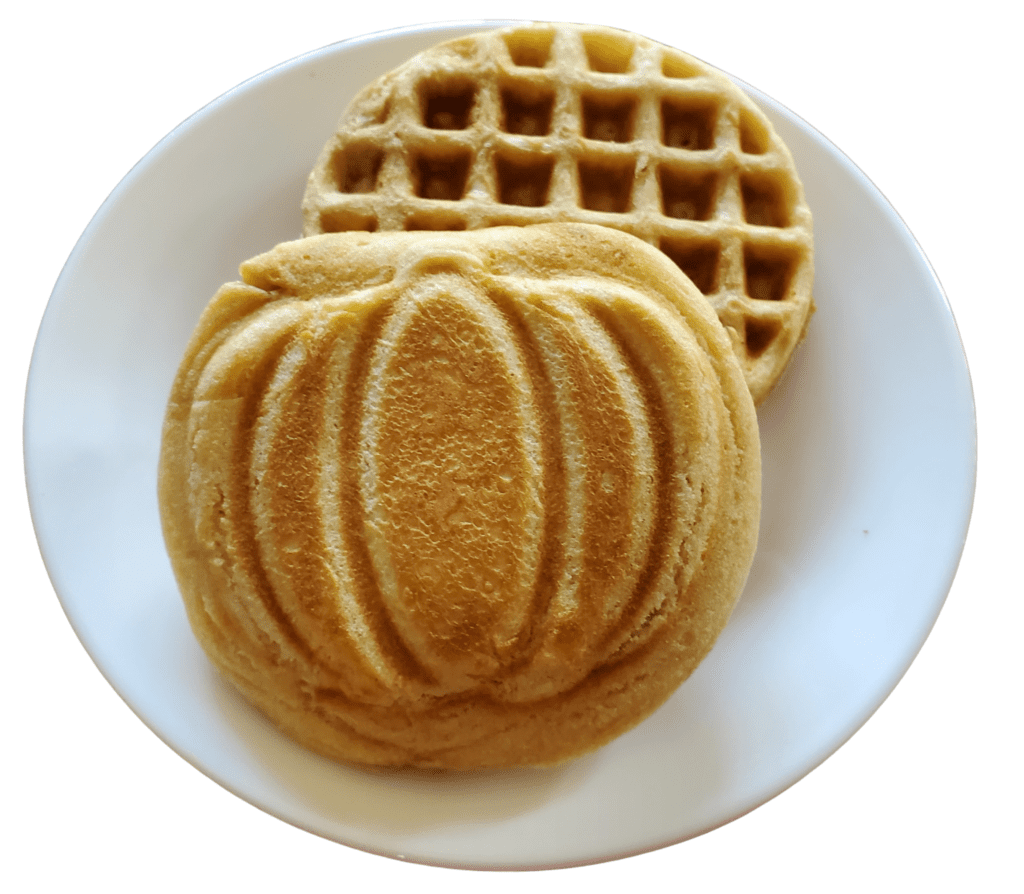
Find this cute pumpkin waffle maker here. These mini waffles fit perfectly in a standard toaster and make a quick and easy breakfast. Just make the waffles on the weekend and you will be ready for a busy week.
5-6 fresh strawberries, washed patted dry, and sliced
1 banana, peeled and sliced
1/4 cup of chocolate chips
DIRECTION
Mix all of the dry ingredients (flour, baking soda, baking powder, salt and sugar) in a bowl. Crack the eggs and whisk them a bit before adding. Add the discard, milk, vanilla, melted butter and eggs to the dry ingredients and mix well. It's ok if the batter is a little lumpy. Pour the batter on a greased or parchment lined 18 x 13 inch sheet pan. Allow the batter to sit for 20-30 minutes before baking.
Meanwhile, prepare your fruit. Make sure your fruit is patted dry.<br>Add the chocolate chips and fruit to the top of the batter.
Preheat the oven to 425 degrees F. Bake for 15-18 minutes or until the top is golden brown. Wait 1-2 minutes before slicing.
NOTES
As an Amazon associate, I earn on qualified purchases.
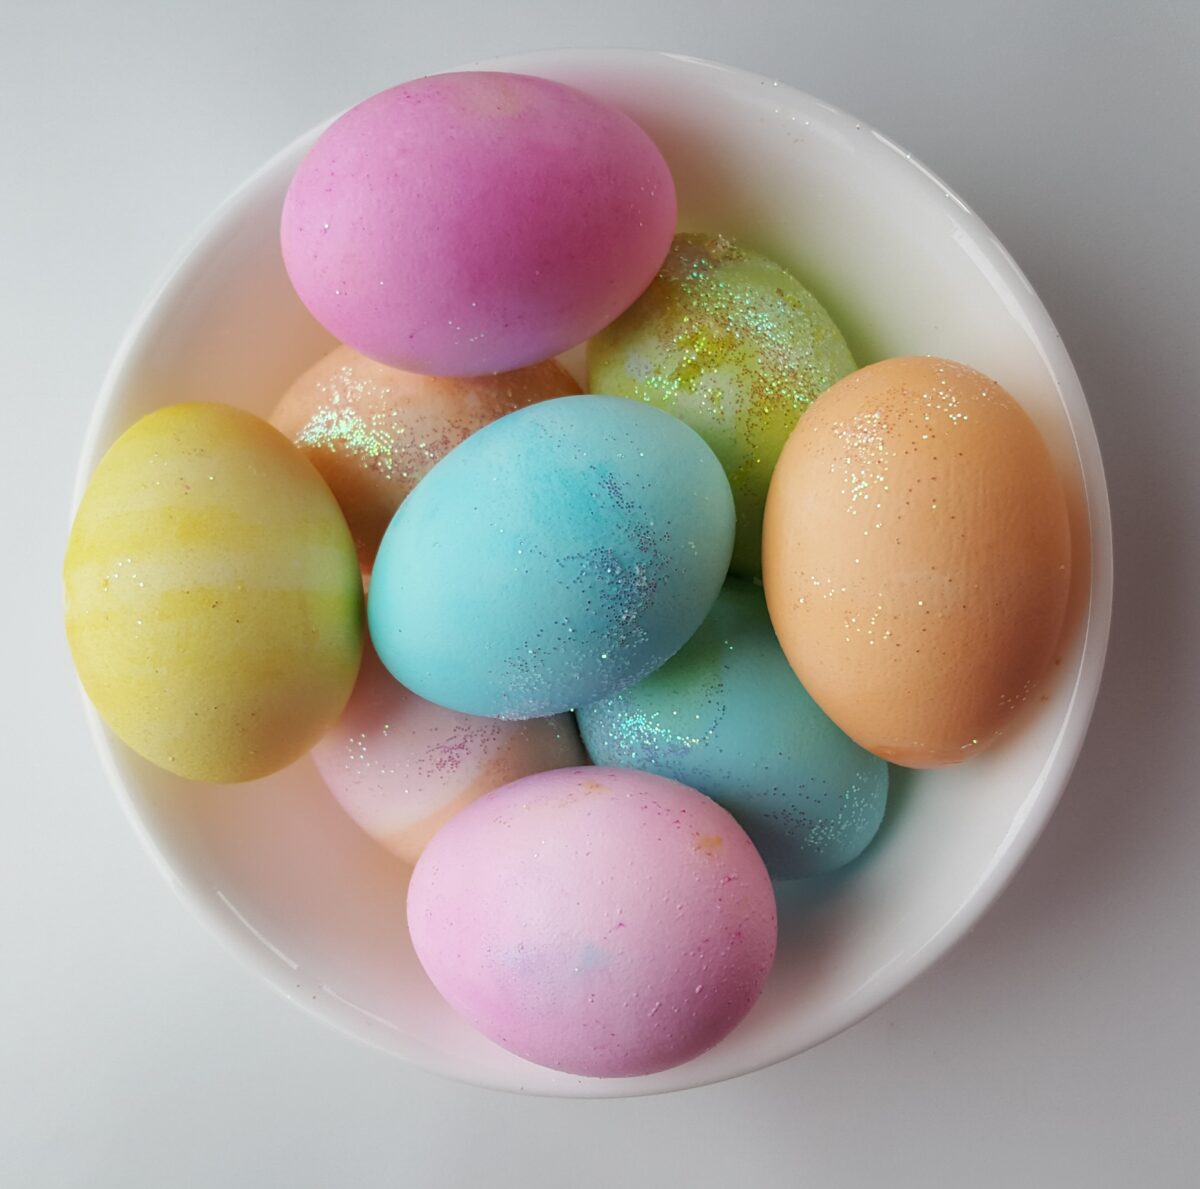
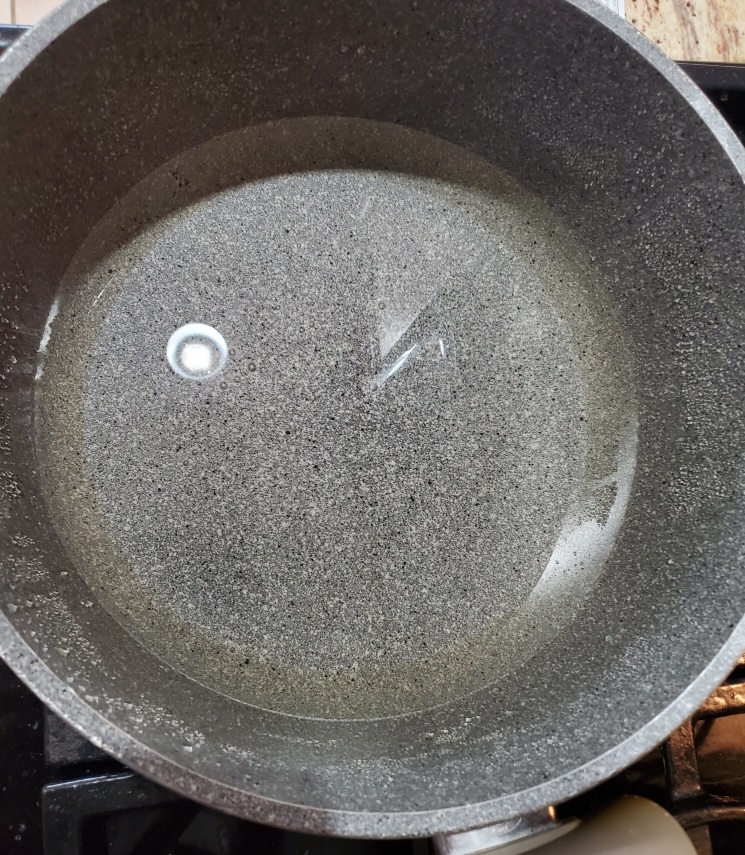
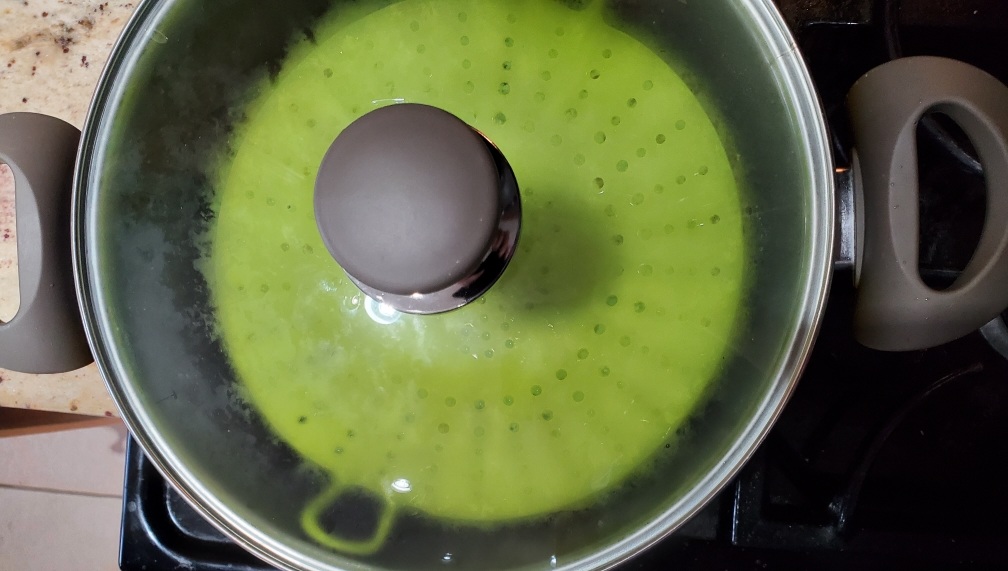
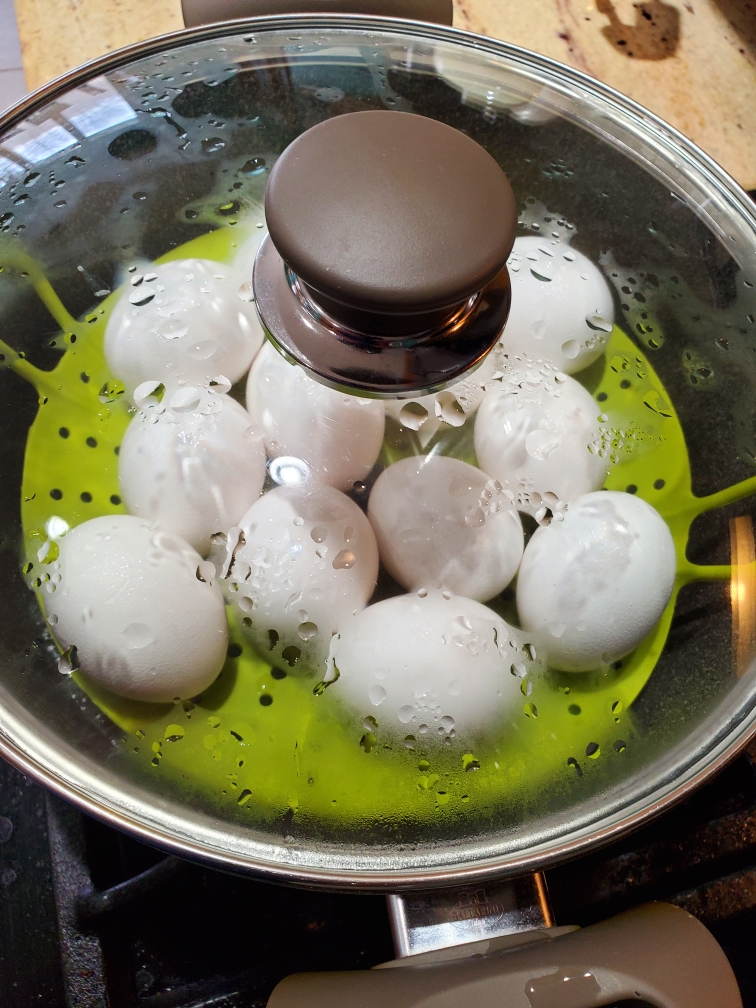
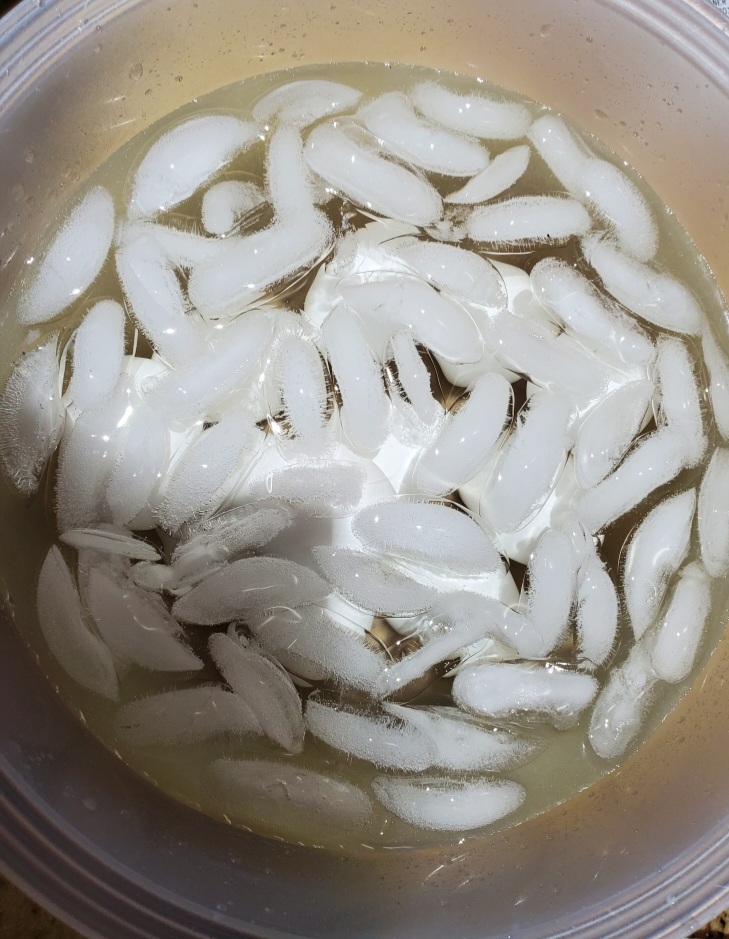
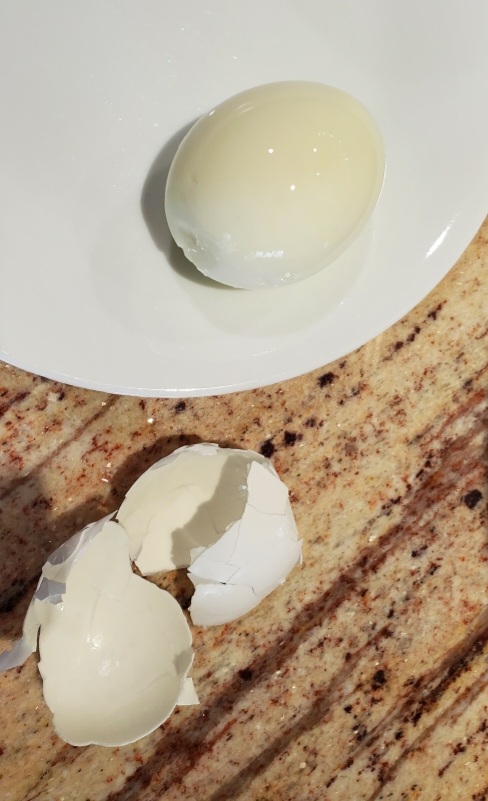
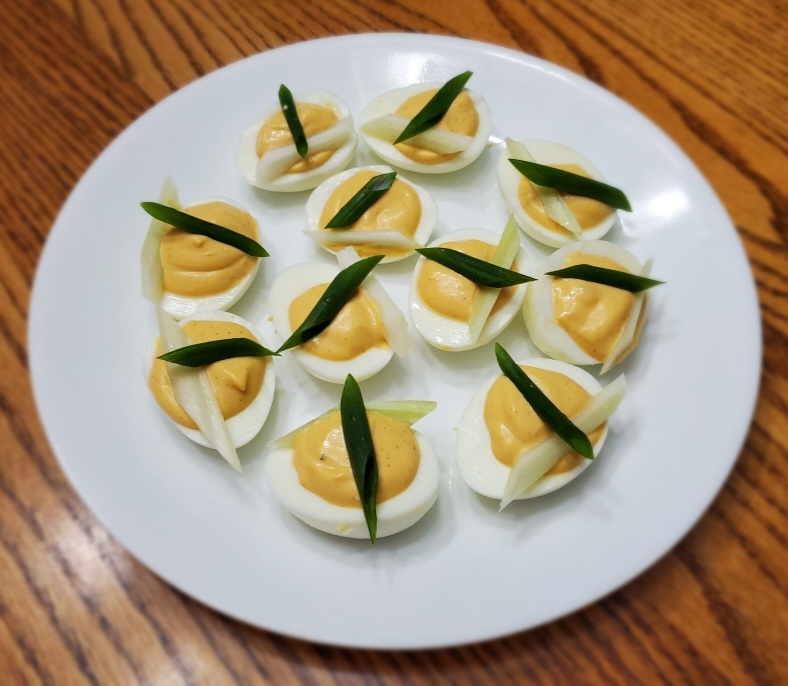
Turns out that easy to peel hard boiled eggs are not boiled! Instead they are steamed. Who knew! All of those useless additives to the water, unusual cooking times, and silly contraptions are rubbish! All you need to do is steam the eggs instead! Here’s how:
Disclaimer: This post may contain affiliate links. I earn commission at no additional cost to you.
What do you need to make eggs easy to peel?
12 eggs
A pot with a lid. The pot should be large enough to lay the eggs flat across the bottom. A 4.8 quart Dutch oven should be large enough for 12 eggs.
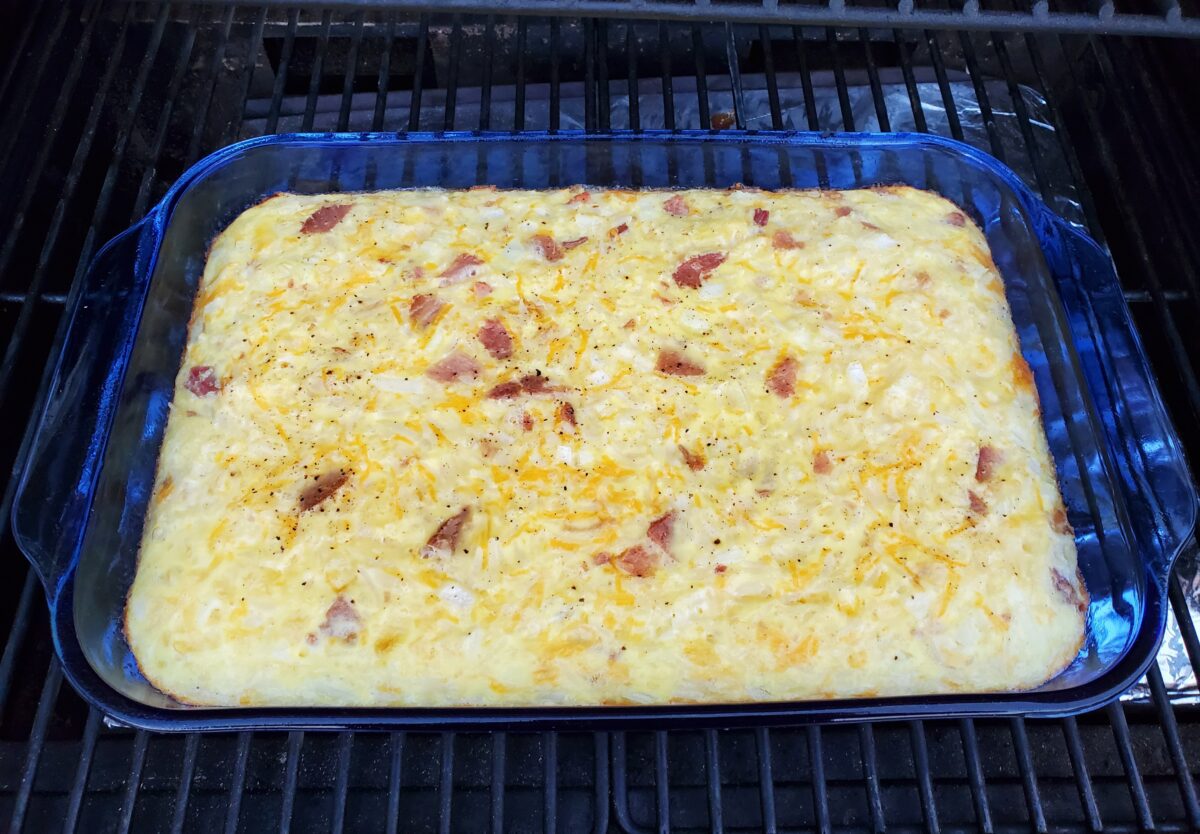
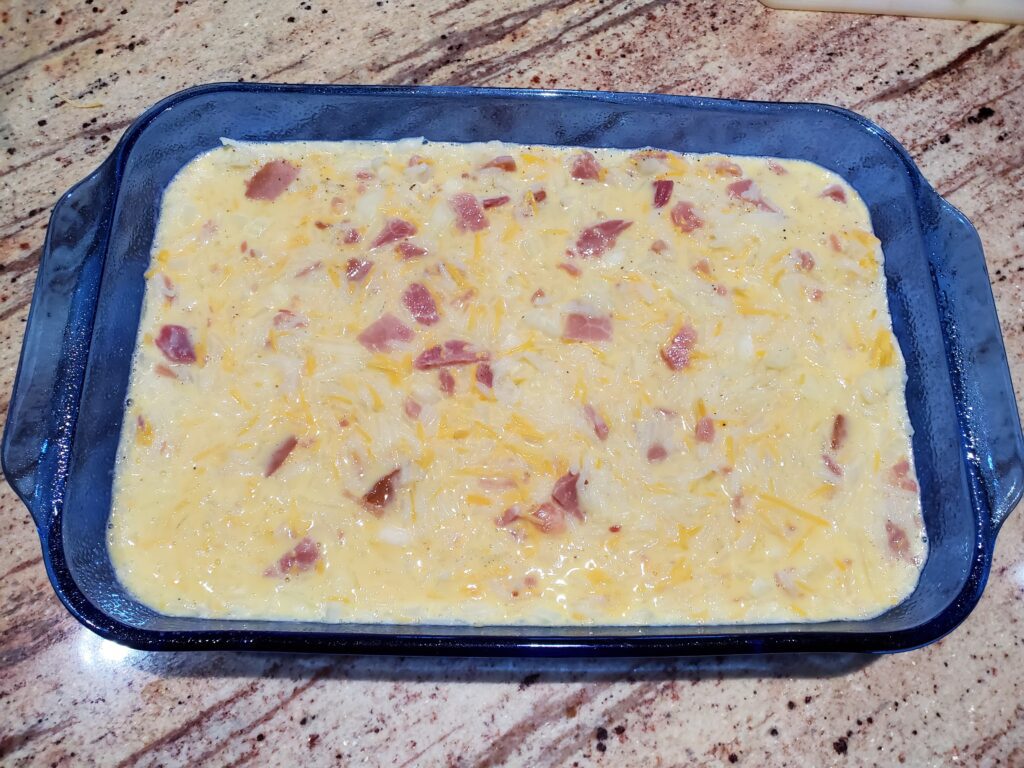
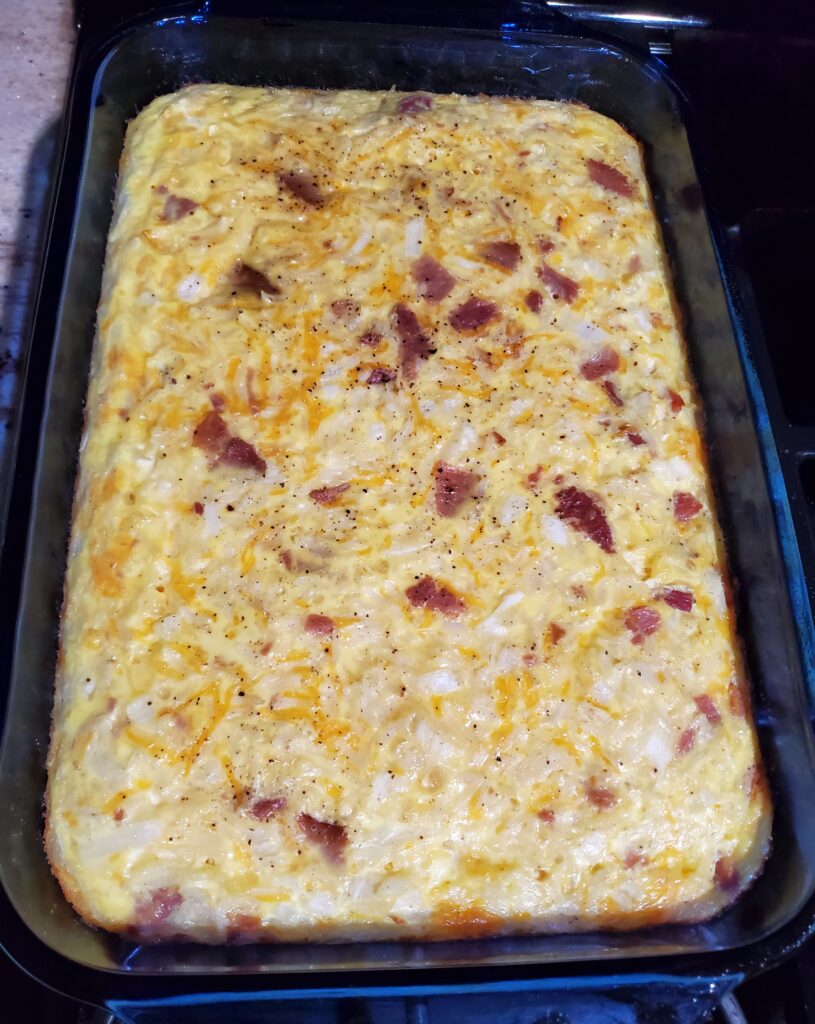
After I tried this breakfast casserole, I stopped looking for another egg bake recipe. It is so easy and so versatile. It can be assembled the night before for easy morning baking. This casserole can be baked it in an oven or smoked on a pellet grill. Use this casserole to feed a crowd, or use it for leftover breakfast for a few days.
Preheat oven or Traeger to 350 degrees F. Bake uncovered for 35-40 minutes or until the eggs are set.
Can you use Pyrex on a pellet grill?
Pyrex is rated to 425 degrees, but I never go higher than 400 degrees when I use a 9×13 inch Pyrex baking dish on my Traeger Silverton 620 because the temperature does fluctuate + or – 10 degrees. It is also important to make sure you keep you grill clean to avoid flare ups from grease fires.
Can you prepare breakfast casserole the night before?
Yes, this recipe can be prepared the night before. Overnight directions: After you pour ingredients into the greased 9×13 inch Pyrex baking dish, place the lid on the dish and store the prepared/unbaked casserole in the refrigerator overnight. Remove it from the refrigerator in the morning, remove the lid and bake or smoke it. Note this may increase the baking time slightly.
How do you reheat egg bake?
This casserole can make mornings easier because it makes great leftovers. Just cut a piece, put it on a microwave safe plate, cover, and microwave for 45 -60 seconds. Easy breakfast in 1 minute or less!
Optional Variations
Swap out the ham for 1 pound of browned bulk breakfast sausage or chorizo. Drain the sausage and allow it to cook for 5-10 minutes before mixing it into the eggs.
Swap out the onions for peppers, spinach or mushrooms!
Swap out the cheddar cheese for any cheese you like! If you try goat cheese, I would recommend slicing it on top, rather than mixing it in.
Get creative!
Egg casserole with chorizo sausage and goat cheese
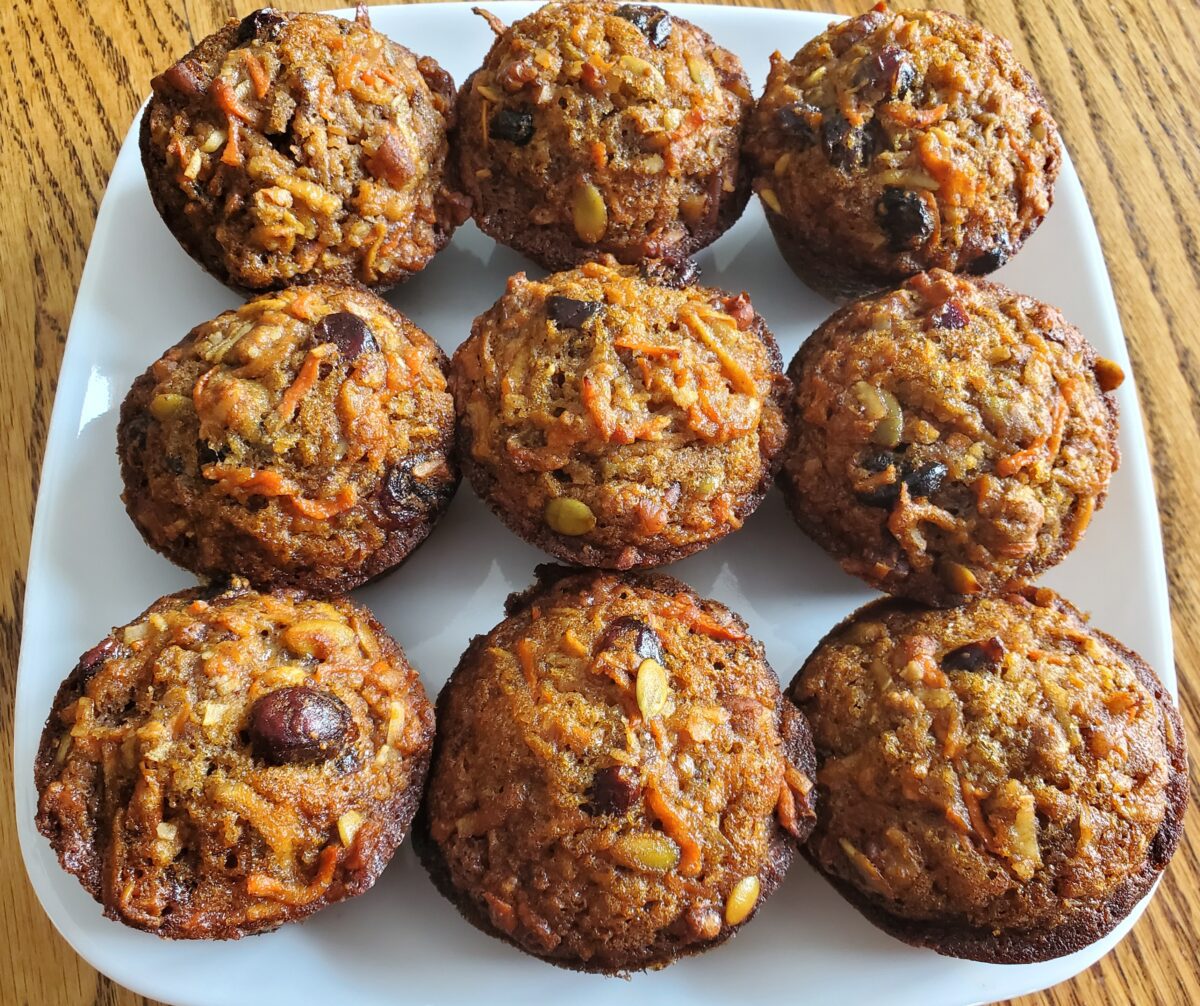
These morning glory muffins are a favorite in my home. It’s best to make them on the weekend, that way you will have easy breakfast all week. They are loaded with heathy ingredients. Plenty of nuts, seeds, fruits and vegetables to start your day out right.
This post may contain affiliate links. I earn commission on qualified purchases at no additional cost to you.
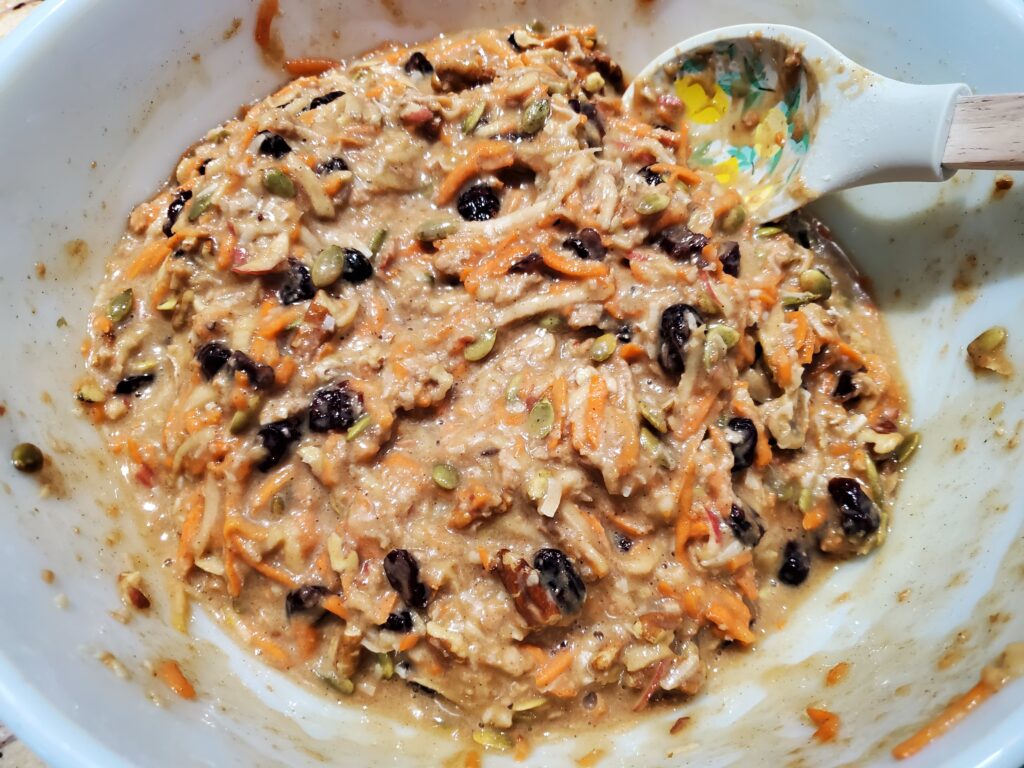
In a large bowl mix the dry ingredients: flour, sugar, baking soda, salt and seasonings. Then stir in carrots, apples, coconut, nuts, and seeds.
In a separate bowl beat together the wet ingredients: eggs, oil, juice, and vanilla.
Add the wet ingredients to the dry ingredients and mixt until well combined.
Drain the water from the craisins and stir them in.
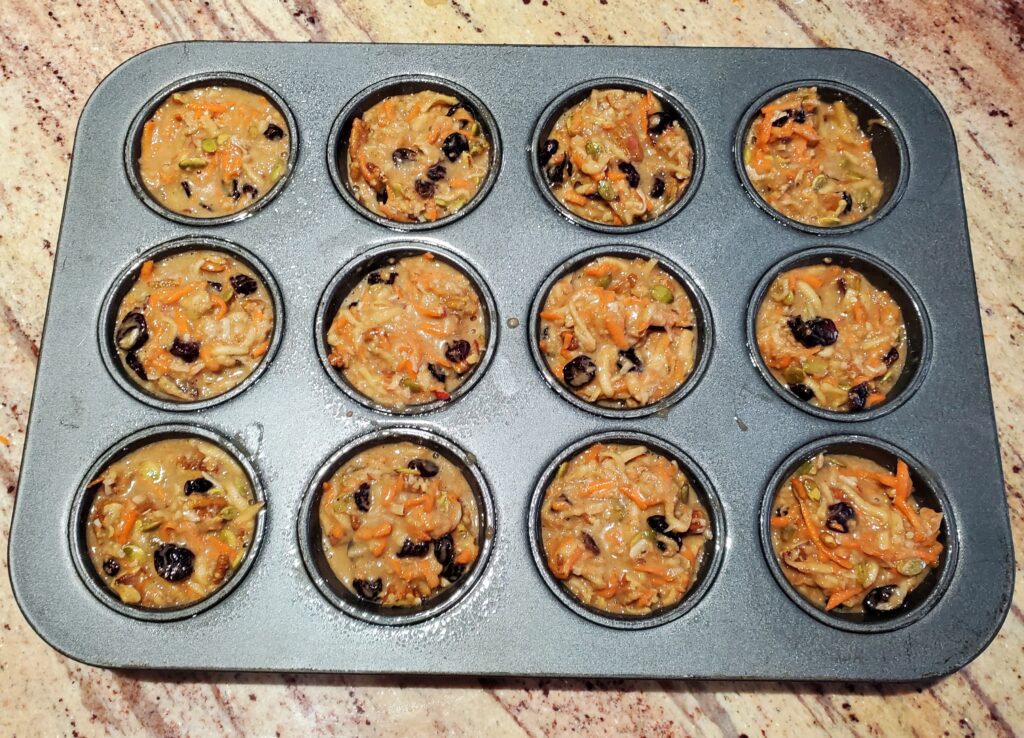
Fill the muffin cups all the way to the top. You should be able to fill 12-16 cups.
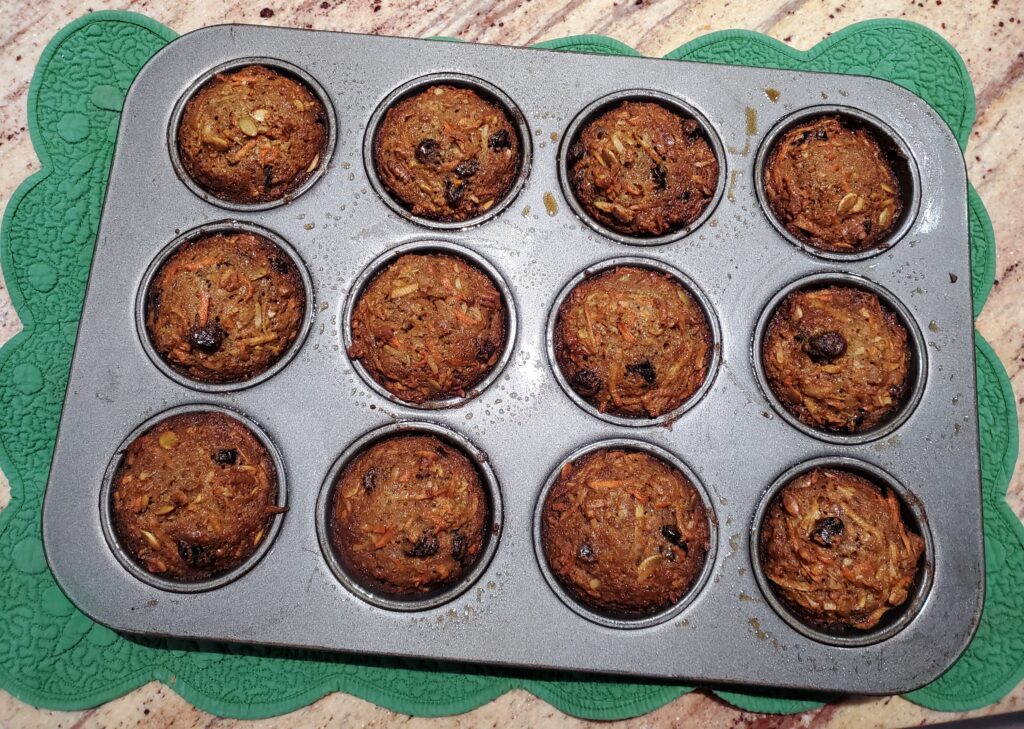
Bake for 25-28 minutes or until a fork comes out clear.
Remove from the oven and allow them to cool for about 5 minutes, then finish cooling on a cooling rack.
Store in an airtight container for a few days, or freeze for longer storage.
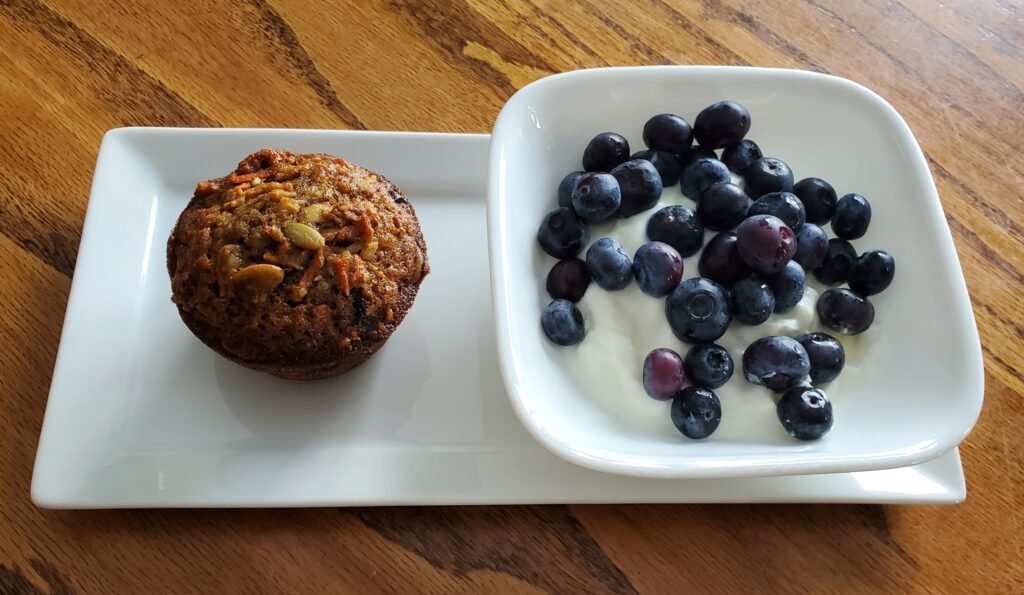
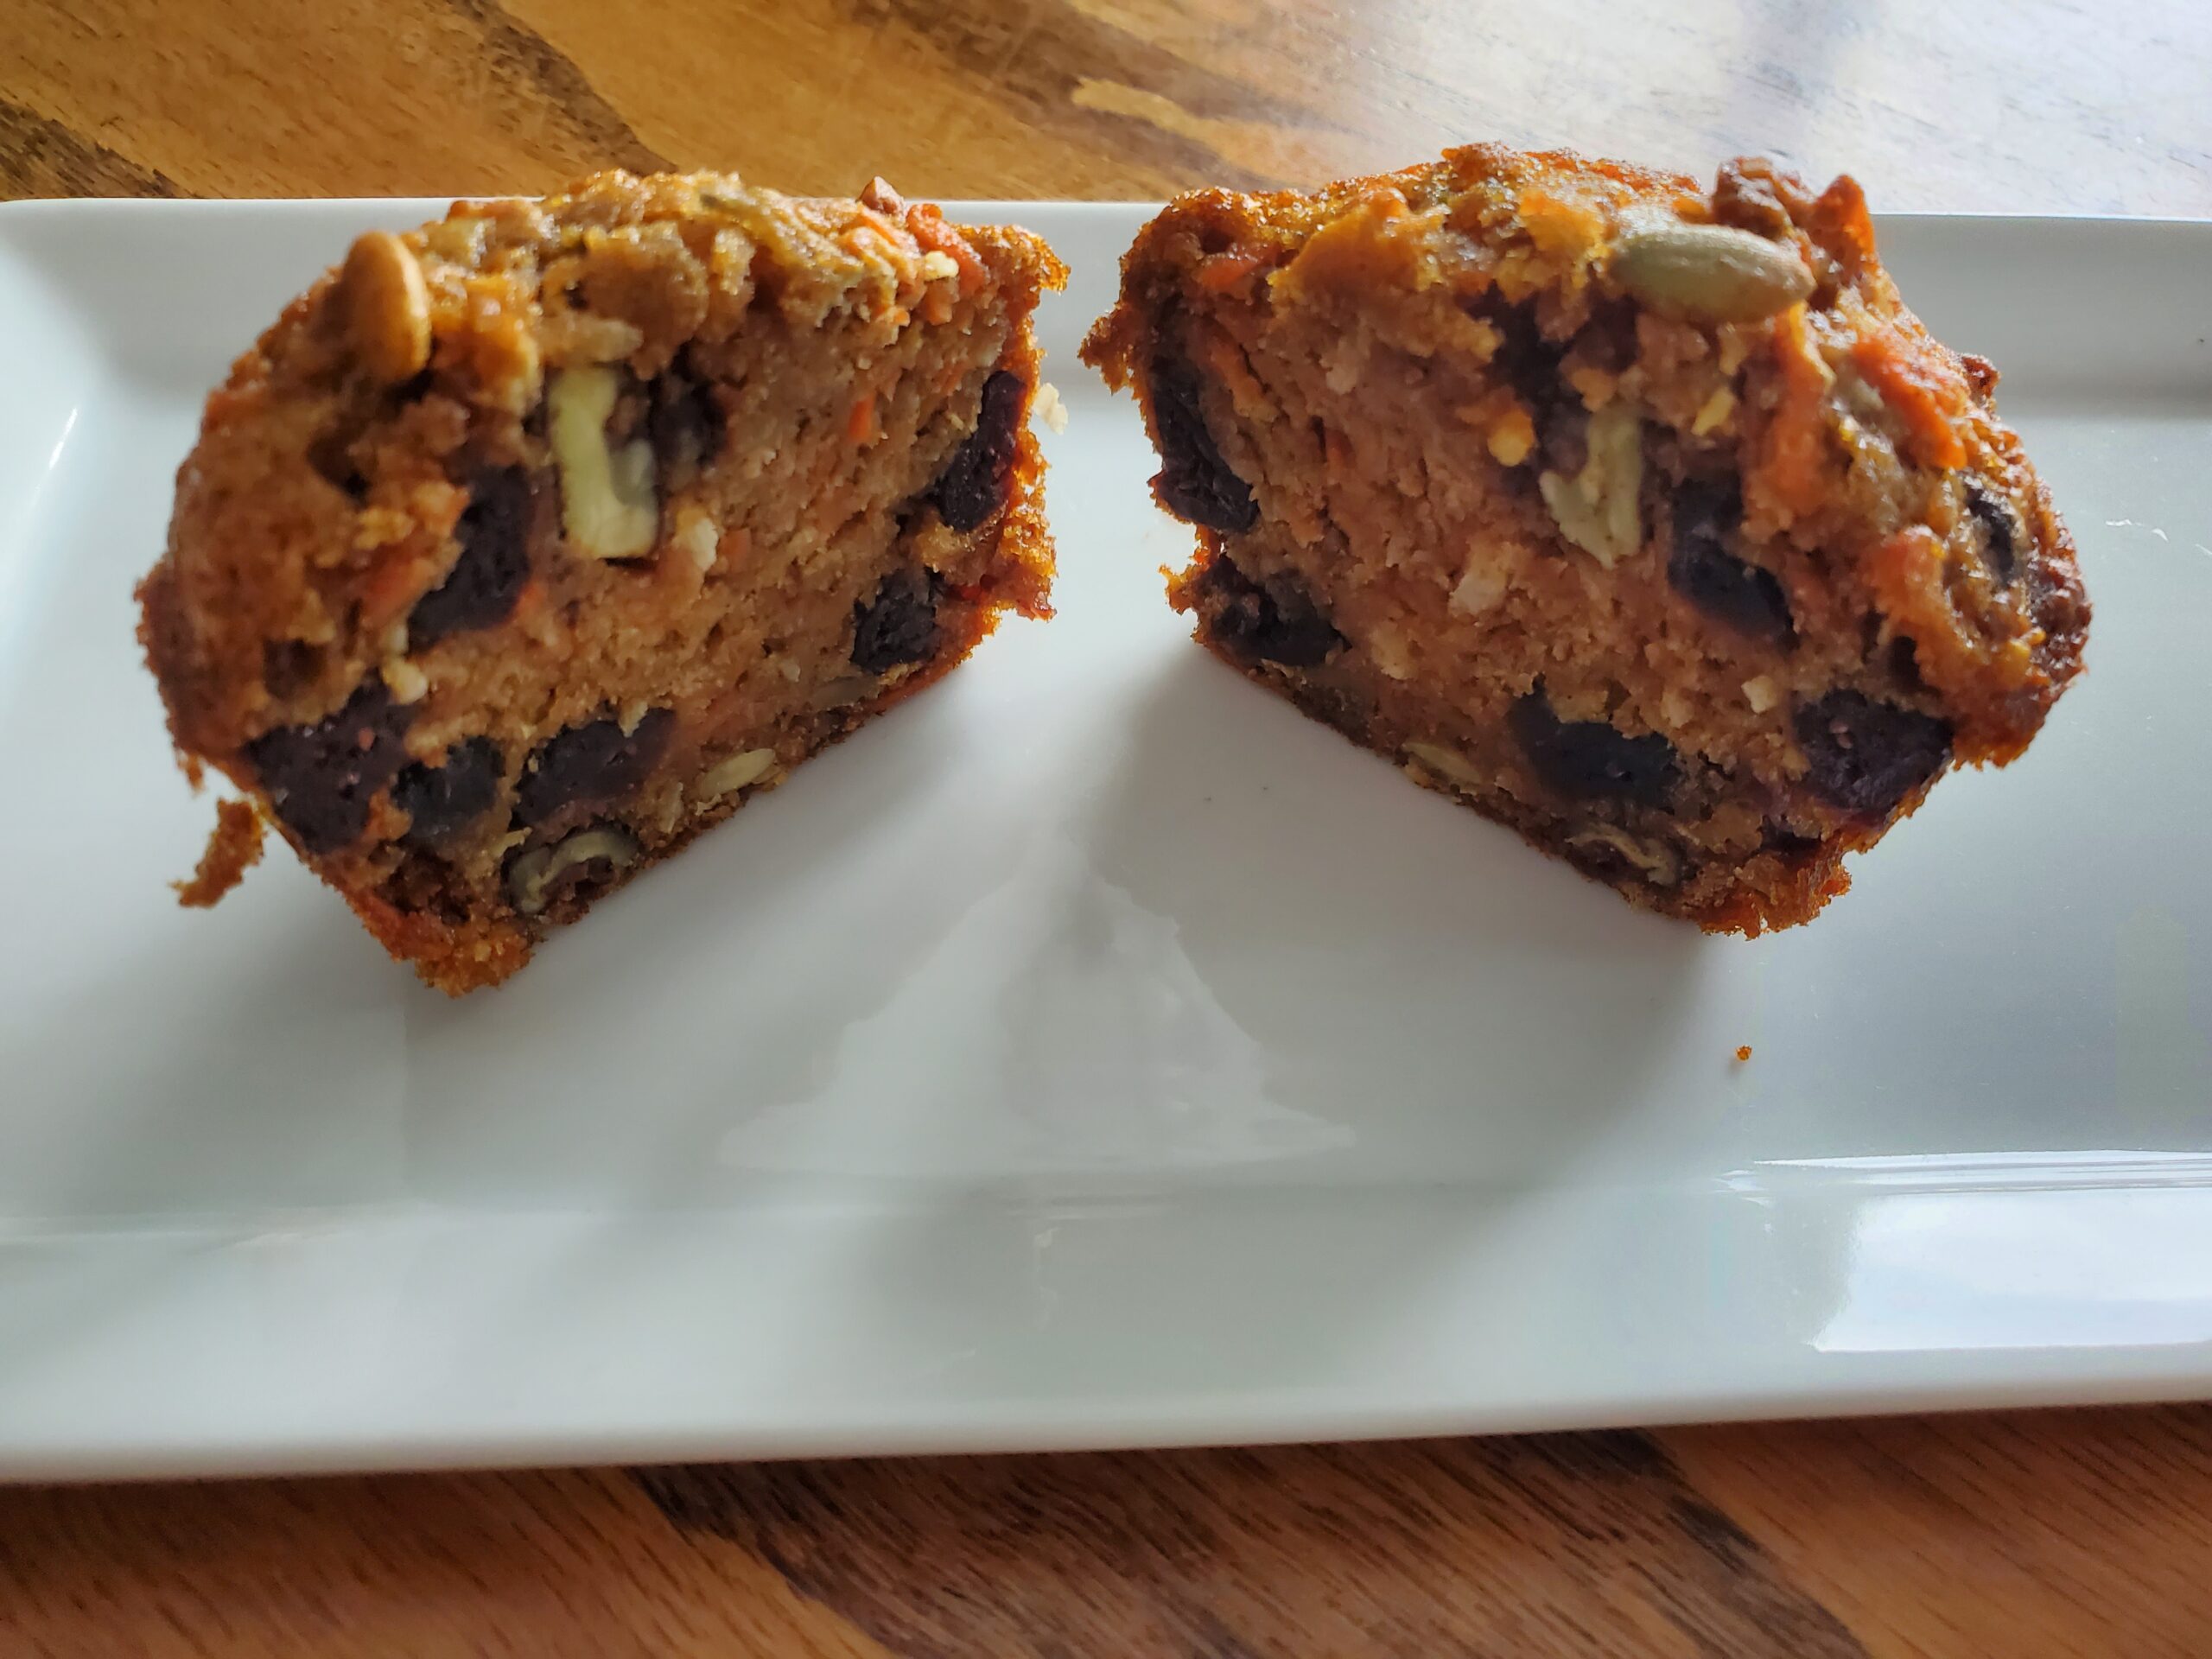
Morning glory muffins make a great breakfast
Recipe By Kristin
Course: breakfast
Cusine:American
Difficulty:Easy
Servings
14 minutes
Preparing Time
15 minutes
Cooking Time
25 minutes
Calories
kcal
INGREDIENTS
1 cup Craisins
2 cups flour
1 cup packed light brown sugar
1 teaspoon baking soda
2 teaspoons cinnamon
1/2 teaspoon ginger
1/2 teaspoon salt
2 cups carrots, peeled and grated
2 medium apples, cored and grated
1/2 cup unsweetened shredded coconut
3/4 cup chopped pecans
1/3 cup pumpkin or sunflower seeds
3 large eggs
2/3 cup vegetable or canola oil
2 teaspoons pure vanilla extract
1/4 cup orange juice or juice of one orange
DIRECTION
Preheat oven to 375 degrees F. Grease three 6-cup muffin tins.
In a small bowl soak the craisins in hot water. Set aside.
In a large bowl mix the dry ingredients: flour, sugar, baking soda, salt and seasonings. Then stir in carrots, apples, coconut, nuts, and seeds.
In a separate bowl beat together the wet ingredients: eggs, oil, juice, and vanilla.
Add the wet ingredients to the dry ingredients and mixt until well combined.
Drain the water from the craisins and stir them in.
Fill the muffin cups all the way to the top. You should be able to fill 12-16 cups.
Bake for 25-28 minutes or until a fork comes out clear. Remove from the oven and allow them to cool for about 5 minutes, then finish cooling on a cooling rack. Store in an air tight container for a few days, or freeze for longer storage.
NOTES
As an amazon associate, I earn on qualified purchases.
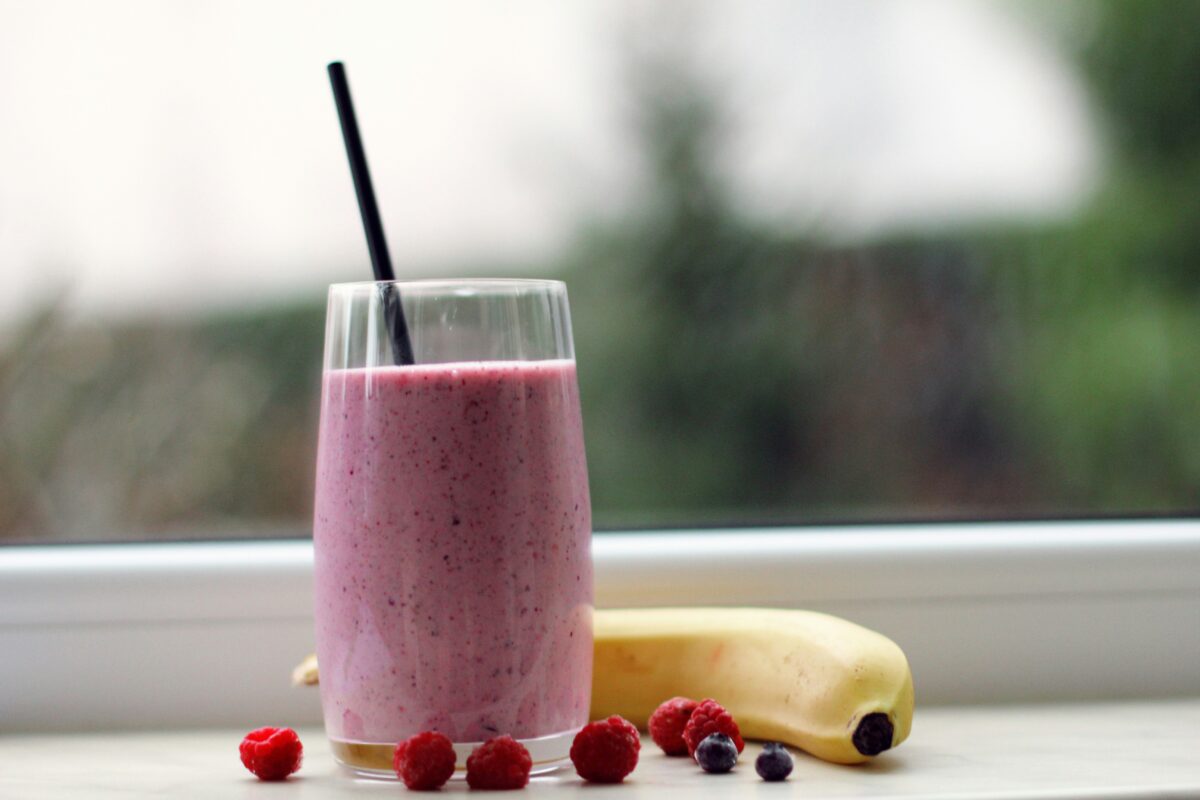
Save a ton of money by making your own smoothies and smoothie bowls at home. Learn how to create your own recipes and which ingredients provide the best nutrients for your health.
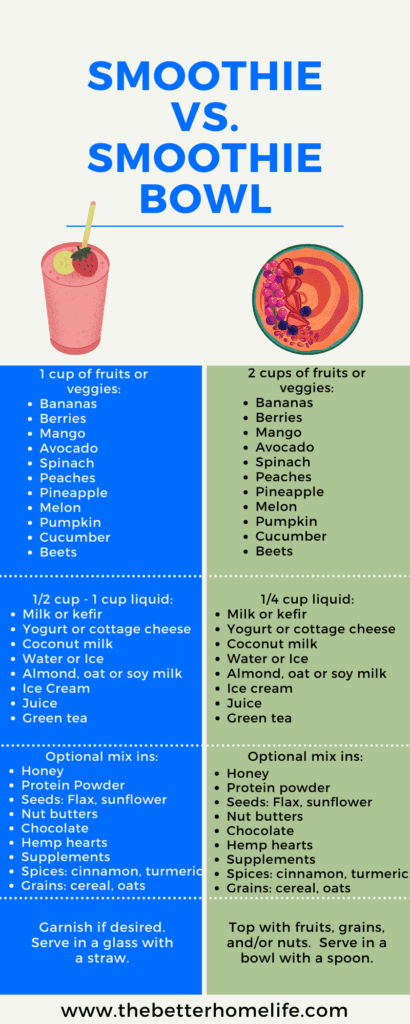
A smoothie is a simply a beverage made by pureeing fruits and vegetables with other ingredients in a blender. A smoothie bowl is a thicker more nutrient packed smoothie, thick enough to eat with a spoon, and often topped with fruit, granola, nuts, and seeds. Lets review some common smoothie vs. smoothie bowl questions and how to pack them with nutrients.
Disclaimer: The statements made regarding these recipes have not been evaluated by the Food and Drug Administration. The efficacy of these recipes have not been confirmed by FDA-approved research. These recipes are not intended to diagnose, treat, cure or prevent any disease.
Smoothie vs. smoothie bowl
A smoothie is thin enough to drink through a smoothie straw. For a smoothie bowl you can use the same ingredients to make a smoothie, but it will be thick enough to eat with a spoon.
Basic smoothie vs. smoothie bowl ingredients:
Smoothie: 1 cup (8 ounces of fruits and veggies) to 1/2 cup to 1 cup of liquid. Less liquid will make a thicker smoothie, more liquid makes a thinner smoothie.
Smoothie bowl: 2 cups (16 ounces of fruits and veggies) to 1/4 cup liquid.
Optional additives can be mixed in in small quantities. For example, a tablespoon of honey or a scoop of protein powder.
Basic Smoothie recipe example:
1/2 cup frozen mixed berries
1 frozen banana (sliced before freezing) ~1/2 cup
1/2 cup vanilla yogurt
1/2 cup milk
Optional: 1 tablespoon elderberry syrup.
Puree in a blender
Serve in a cup with a straw.
Basic Smoothie bowl recipe example:
1.5 cups frozen mixed berries
1 frozen banana (sliced before freezing) ~1/2 cup
2 tablespoons yogurt
2 tablespoons milk
Optional: 1 teaspoon honey
Puree in a blender
Top with fresh blueberries, almond slices, and hemp hearts. Serve in a bowl with a spoon.
Which blender is best for making smoothies?
I personally prefer the Ninja Professional Blender. It has a large capacity, it blends everything smoothly. It is also dishwasher safe for quick and easy clean up.
Another awesome option for delicious smoothies is the Vitamix Blender. The only drawback is the price. Although it is expensive, it has a few features that the Ninja does not have. It will heat soups, but that is not necessary for smoothies.
Lastly, there is the Ninja Creami which is perfect for making smoothies and best for making smoothie bowls with the added benefit of making ice cream.
Can you make a smoothie the night before?
The best way to make a smoothie the night before is to prepare all of the ingredients. Chop and freeze the fruit you wish to use. Measure out the liquid ingredients and place them in the refrigerator. Then you can quickly blend them together in the morning.
Can you store a smoothie in the refrigerator or freezer?
If you prepare a smoothie with ice or frozen ingredients then it will thin with refrigeration because the ice will melt and the frozen ingredients will thaw. The smoothie will be thinner, but still tasty. It will probably need to be stirred before consuming.
You can freeze a smoothie, but it will thicken like ice cream or sorbet. Frozen smoothie would require a spoon to consume. You can defrost it but depending on the ingredients, it may not remain smooth. It is possible to blend it again, but the consistency may not be the same.
Are smoothies and smoothie bowls healthy?
Smoothies and smoothie bowls can both be very healthy depending on the ingredients you choose. Read on to learn about healthy and unhealthy ingredients found in smoothies and smoothie bowls.
Which smoothie is anti-inflammatory?
Most smoothie ingredients are naturally anti-inflammatory, which makes smoothies and smoothie bowls a great option for an anti-inflammatory diet. Here are some ingredients to avoid and some to include in anti-inflammatory smoothies and smoothie bowls:
Smoothie ingredients to avoid because they can increase inflammation:
There are plenty of fad diets out there that will each have their own smoothie recipes. The key to consuming smoothies for weight loss is choosing the right ingredients. Fruits and vegetables are typically the main ingredients in most smoothie and smoothie bowl recipes. The reason why fruits and vegetables are good for weight loss is because they have low energy density. Meaning they have few calories in a large volume of food. This way you can fill up, and feel full while consuming fewer calories. There is some research to prove that consuming low-energy-dense foods will lead to weight loss without feeling hungry.
If you choose low-energy-dense ingredients for your smoothie, you can stay full longer on fewer calories and lose weight.
Best ingredients for a weight loss smoothie or smoothie bowl (low-energy-dense foods)
Fresh or frozen vegetables
Fresh or frozen fruits
Low-fat or fat-free dairy products with no sugar added
Whole grains
Water or ice
Worst ingredients for a weight loss smoothie or smoothie bowl (high-energy-dense foods)
Fruits canned in heavy syrup
Juice
Sweetened yogurt
Sugar
Full fat dairy products
Dried fruits
Refined grains: white rice or cereal made with white flour
Smoothie vs. smoothie bowl, which is good for diarrhea?
If you have diarrhea hydration is important. If you are recovering from a stomach bug and have been vomiting also, you should probably start with clear liquids. Once you are feeling better, then a smoothie would still be better than a smoothie bowl because smoothies have more liquid. In the past a BRAT (banana, rice, applesauce, toast) diet was often recommended as a bland diet to eat for the first day of solid food after a stomach bug. These four foods are still a great option, but many experts recommend adding in a few more foods for better nutrition. There are still some foods that should be avoided when you have diarrhea.
Ingredients to avoid adding to a smoothie when you have diarrhea:
Dairy (with the exception of yogurt or kefir-especially with antibiotic associated diarrhea)
Citrus fruits
pineapple
leafy green vegetables
raw vegetables
Spices
berries or seedy fruits
oils
caffeine
Best smoothie ingredients to add when you have diarrhea:
Hydration and fiber are both important for prevention and treatment of constipation. Smoothies will help more with hydration, but you can pack more fiber in a smoothie bowl. Both are good options for constipation. I unusually try to help my patients choose good foods to treat occasional constipation before resorting to medications.
Best Smoothie and smoothie bowl ingredients for constipation
Which smoothie is best when you are sick with a cold or flu?
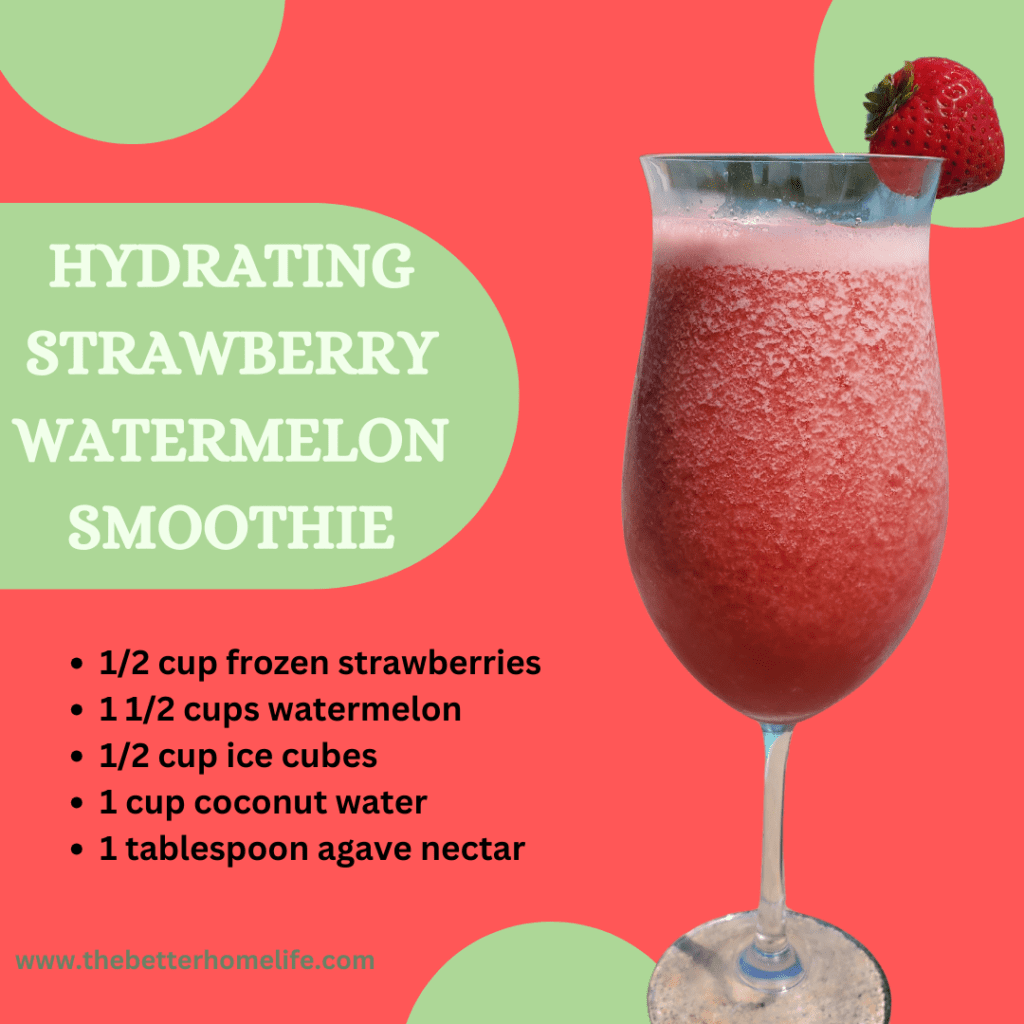
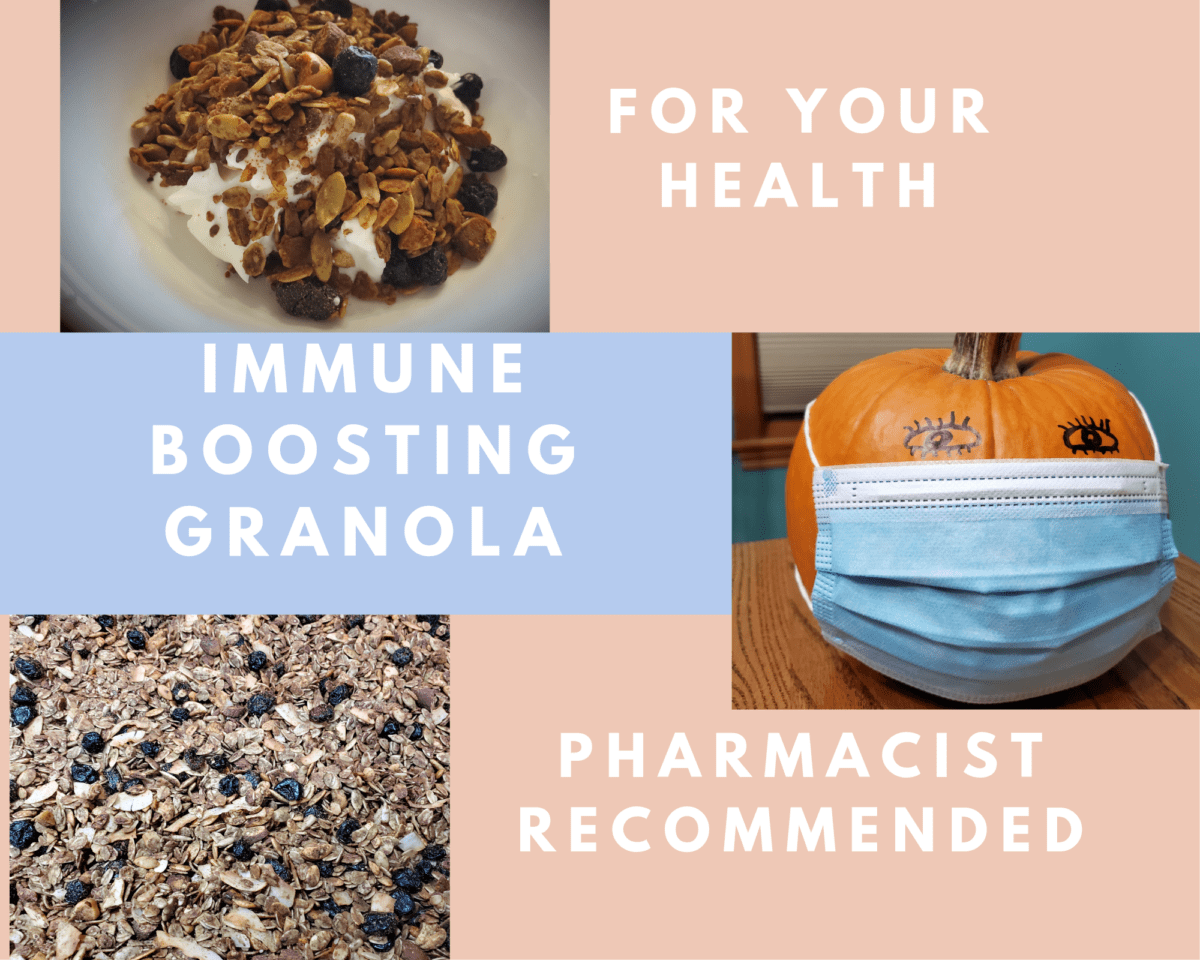
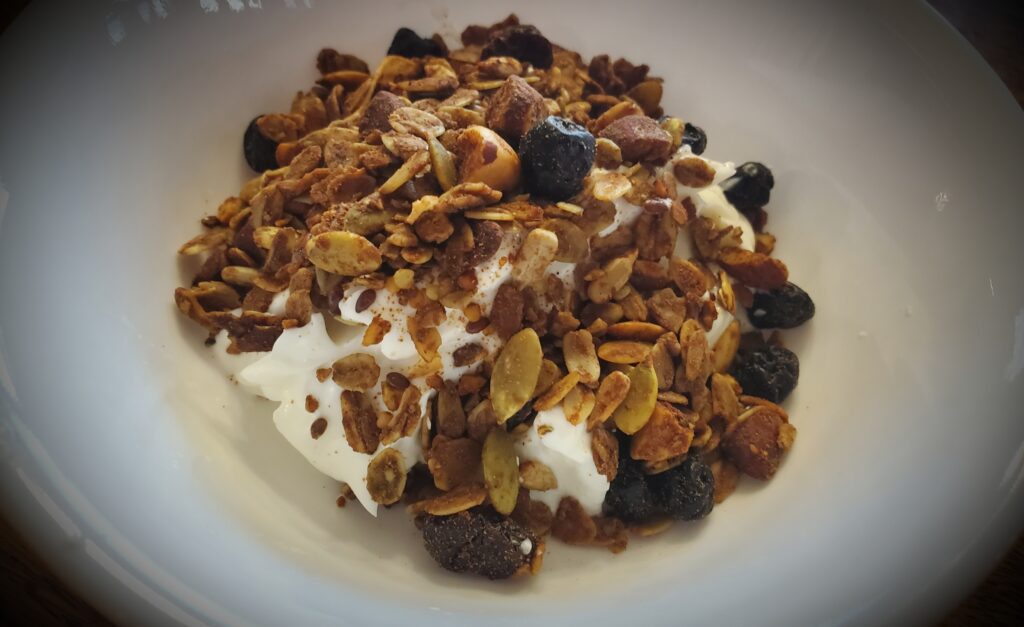
If you are sick with a cold or flu you need hydration, especially if you have a fever. Smoothies are a great way in increase hydration. Fruits, vegetables and other immune boosting foods are also beneficial when nursing a viral infection. A cold smoothie made with frozen fruits and/or ice can help to sooth a sore throat. Top your smoothie bowl with my immune boosting granola.
Best Immune boosting smoothie and smoothie bowl ingredients:
Although both smoothies and smoothie bowls contain hydration, smoothies are more hydrating because they contain more liquid. There are some fruits and vegetables that have a higher water content and are better for improving hydration. Electrolytes are important for improving hydration lost due to sweating from exercise or illness. For more hydration tips, check out my post on hydration.
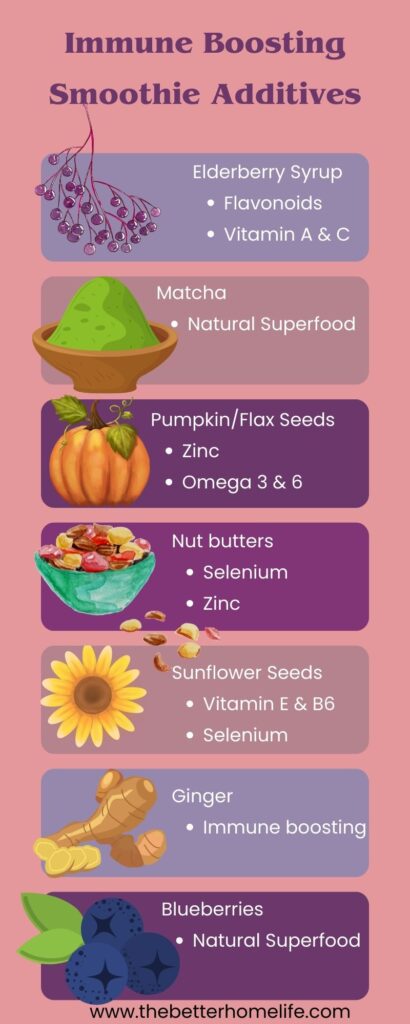
Customers are flooding into local pharmacies in search of immune boosting supplements. Many of these immune boosting ingredients can easily be included in your diet. It’s much less expensive to eat your vitamins than to purchase supplements. I’m a pharmacist and I would love to share my recipe for Immune Boosting Granola. Granola is a quick and easy breakfast or snack that can easily be added to any daily meal plan. Add some to you favorite yogurt or just pack it for a quick and easy snack.
Disclaimer: The statements made regarding this recipe have not been evaluated by the Food and Drug Administration. The efficacy of this recipe has not been confirmed by FDA-approved research. This recipe is not intended to diagnose, treat, cure or prevent any disease.
Immune Boosting Nutrients
In order to make an immune boosting recipe, one first needs to know which nutrients are known to boost immunity. I have compiled a list of immune boosting vitamins and minerals, because adding more to your diet can help boost your immunity.
Vitamin C- There is research to support Vitamin C supplementation in reducing the length and severity of respiratory infections.1 Vitamin C plays an important role in immune response.
Zinc – Plenty of research is certainly available supporting zinc supplementation in reducing the length and severity of infections.1 Zinc is an important player in immune response.
Vitamin D – There is some evidence that vitamin D could reduce the risk of Influenza and COVID-19 infections and death.2
Vitamin B6- A deficiency in Vitamin B6 reduces your ability to make antibodies to fight off infection. Vitamin B6 could help strengthen immunity.3
Vitamin E- Immune response is enhanced by Vitamin E. It can provide protection against infections.4
Selenium- The immune system relies on adequate dietary selenium.5
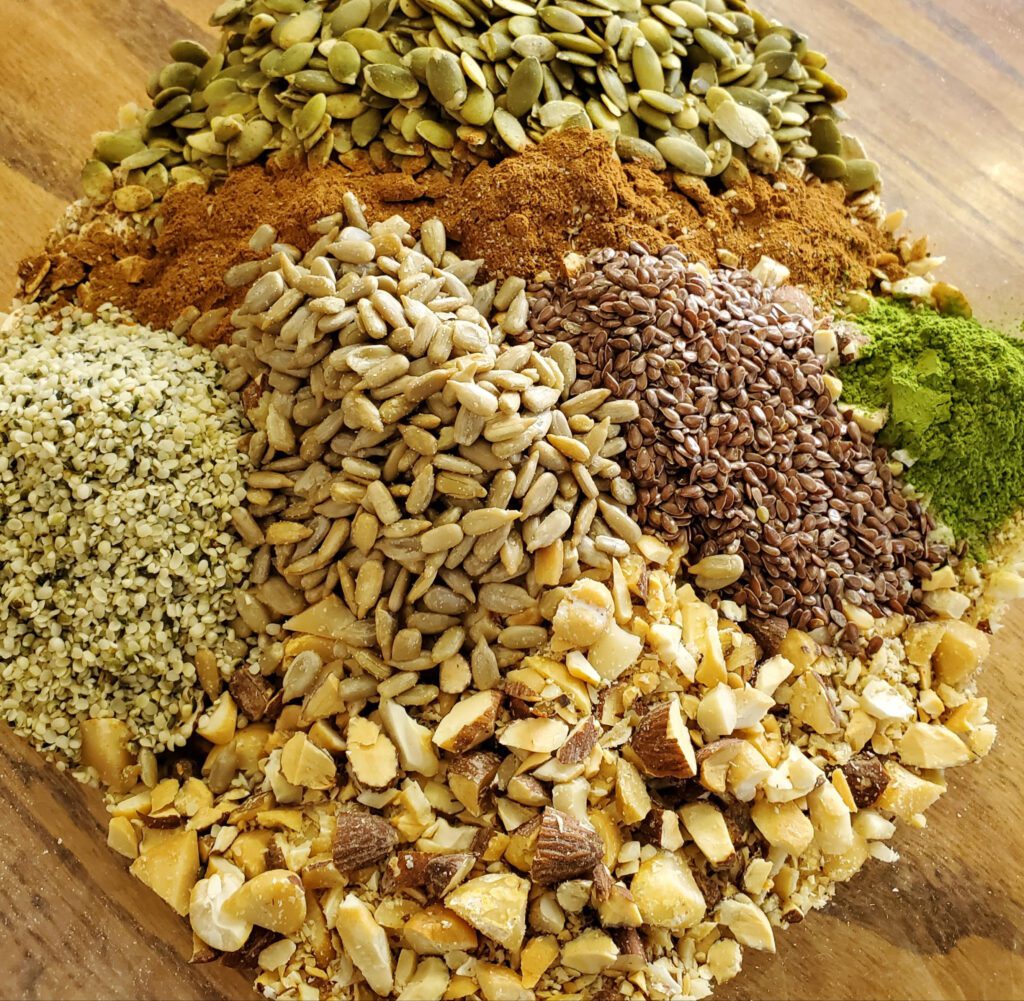
Immune Boosting Ingredients
I selected my granola ingredients to include as many immune boosting vitamins and minerals as possible so they can help boost immunity. Here is a list of my ingredients because it is important to understand why they were included in my recipe.
Elderberry syrup (find it here): Elderberry syrup is also used to enhance immunity. Elderberries are high in flavonoids, Vitamin A and Vitamin C. It may also help reduce symptoms of viral infections by stimulating immune response.6
Matcha (find it here): Another natural superfood, matcha is green tea powder. It is made by grinding green tea leaves into a fine powder. Regular consumption of green tea could decrease influenza infection rates and cold symptoms.7
Hemp hearts(find them here), pumpkin seeds and Flax Seeds: I included all of these mostly for the zinc and omega 3 and 6. These polyunsaturated fats also have been extensively studied for their role in immune health.8
Nuts: These serve as a good source of selenium and zinc. I also chose Brazil nuts because they have the highest amount of selenium. Cashews are also high in zinc.
Sunflower seeds: These seeds also have some healthy fats, but I chose them mostly because they are an excellent source of vitamin E. They are also a good source of selenium and vitamin B6.
Ginger: Can also help reduce the severity of respiratory infections.9
Blueberries: Another natural superfood. Blueberries are a good source of Vitamin C. I included them because they are one of the best sources of antioxidants, mostly flavonoids.
Immune Boosting Granola Recipe
Ingredients:
4 Cups Oats
1 Cup mixed nuts (cashews, almonds, and Brazil nuts)
1/4 Cup sunflower seeds
1 Cup shelled pumpkin seeds
1/4 Cup hemp hearts
1 Tablespoon matcha powder
2 Tablespoons cinnamon
1 teaspoon ground ginger
1/2 teaspoon Himalayan pink salt
2 Tablespoons flax seed
1/3 Cup dried cranberries
1/2 Cup shredded dry coconut
1/3 Cup dried blueberries
1/2 Cup honey
1/3 Cup Peanut butter
2 Tablespoons Elderberry Syrup
1/3 Cup coconut oil
Directions:
First preheat oven to 350 degrees F. Mix together the oats, nuts, sunflower seeds, pumpkin seeds, hemp hearts, matcha, cinnamon, ginger, salt, and flax seed. Meanwhile, in a separate bowl mix the peanut butter, coconut oil, honey, elderberry syrup. Once mixed, pour the wet ingredients over the dry ingredients and mix until evenly coated.
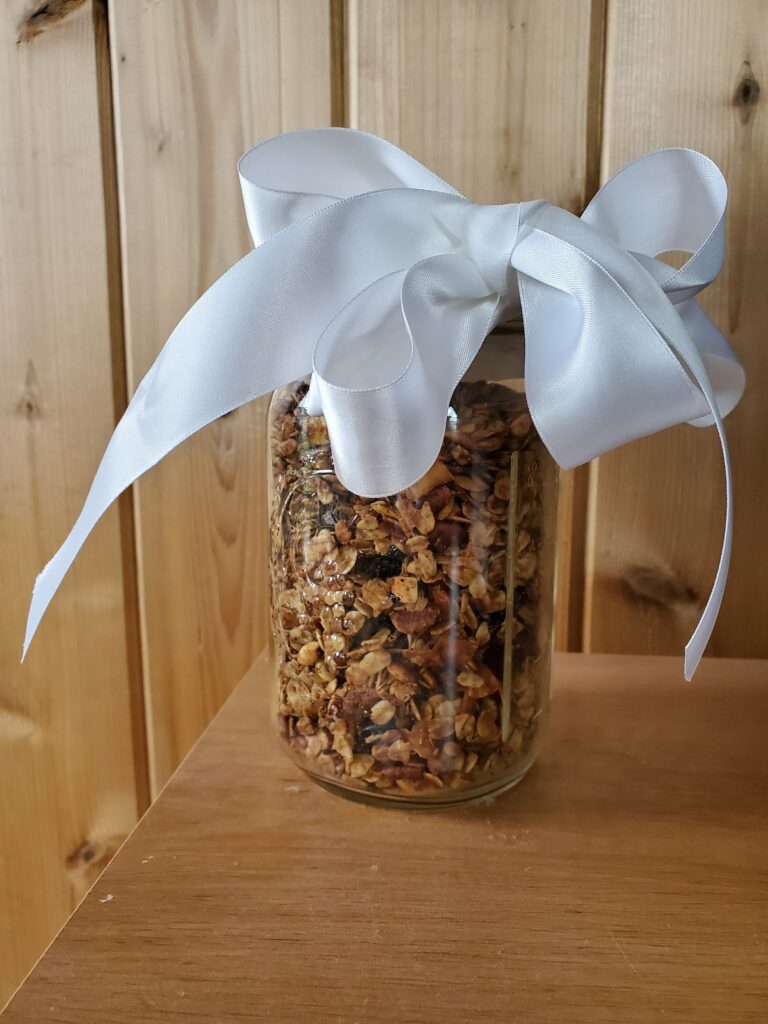
Cover a Jelly Roll Pan with parchment paper. Spread the granola over the paper. Bake for 15 min. Remove from the oven and mix in the dried coconut. Bake for 10 more minutes. Remove and mix again. If the coconut is not completely toasted, bake for 2 more minutes or until most of the coconut is toasted but not burnt. Lastly, remove from the oven and stir in the dried fruit while the granola is still warm. Finally, allow the granola to cool to room temperature. Although it is difficult not to finish it all in one sitting, you may have some leftover. If so, you can store in an air tight container at room temperature for up to 2 weeks.
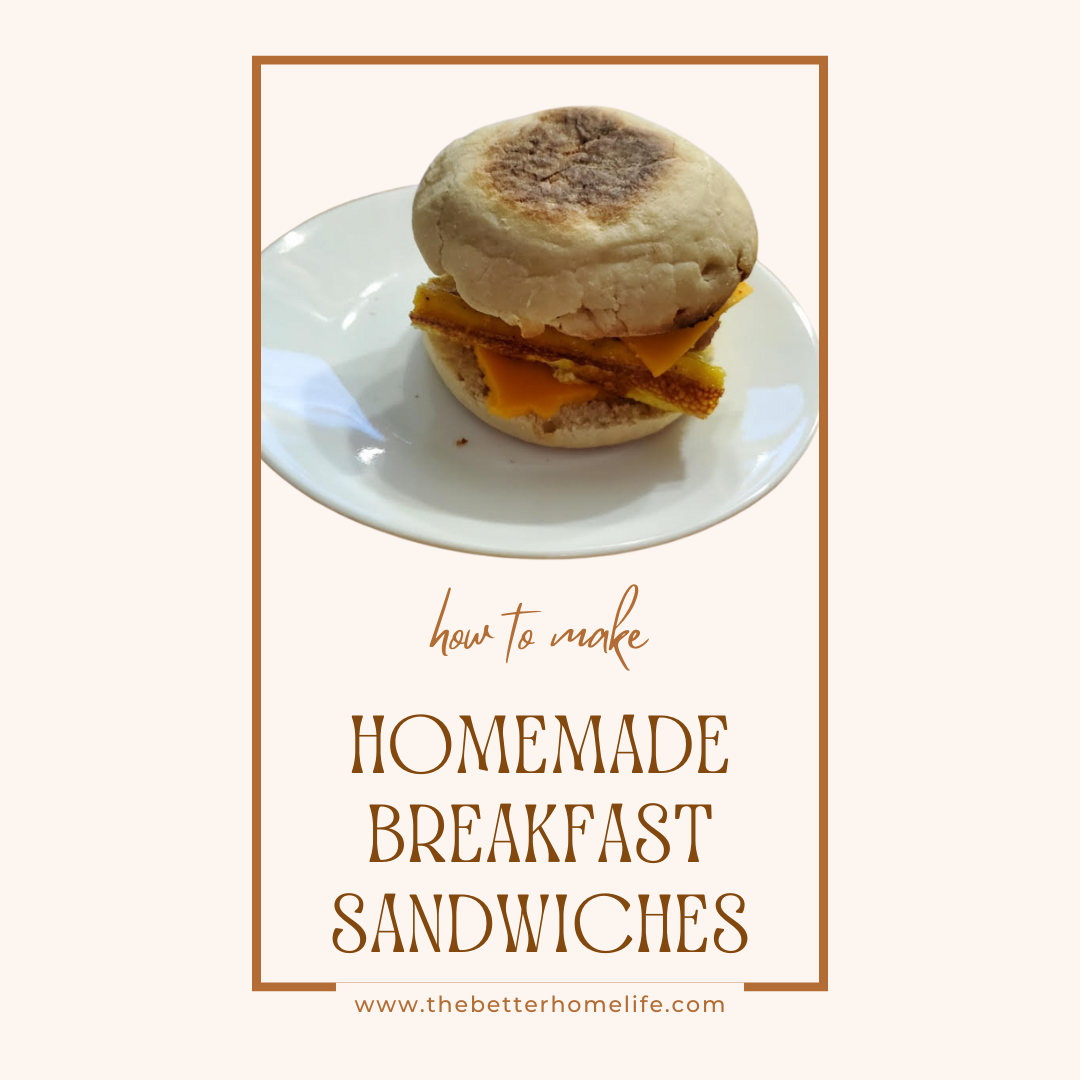
These easy prepare ahead breakfast sandwiches are delicious and they are sure to take some stress out of your morning routine. I like to prepare them on the weekend when I have some extra time. They can be frozen and used for hectic mornings during the week.
Disclaimer: This post may contain affiliate links. I earn commission at no additional cost to you.
Recipe for make ahead breakfast sandwiches
Ingredients:
12 Eggs
12 English Muffins
3/4 cup half and half
1 finely chopped onion
1/2 teaspoon salt
1/2 teaspoon pepper
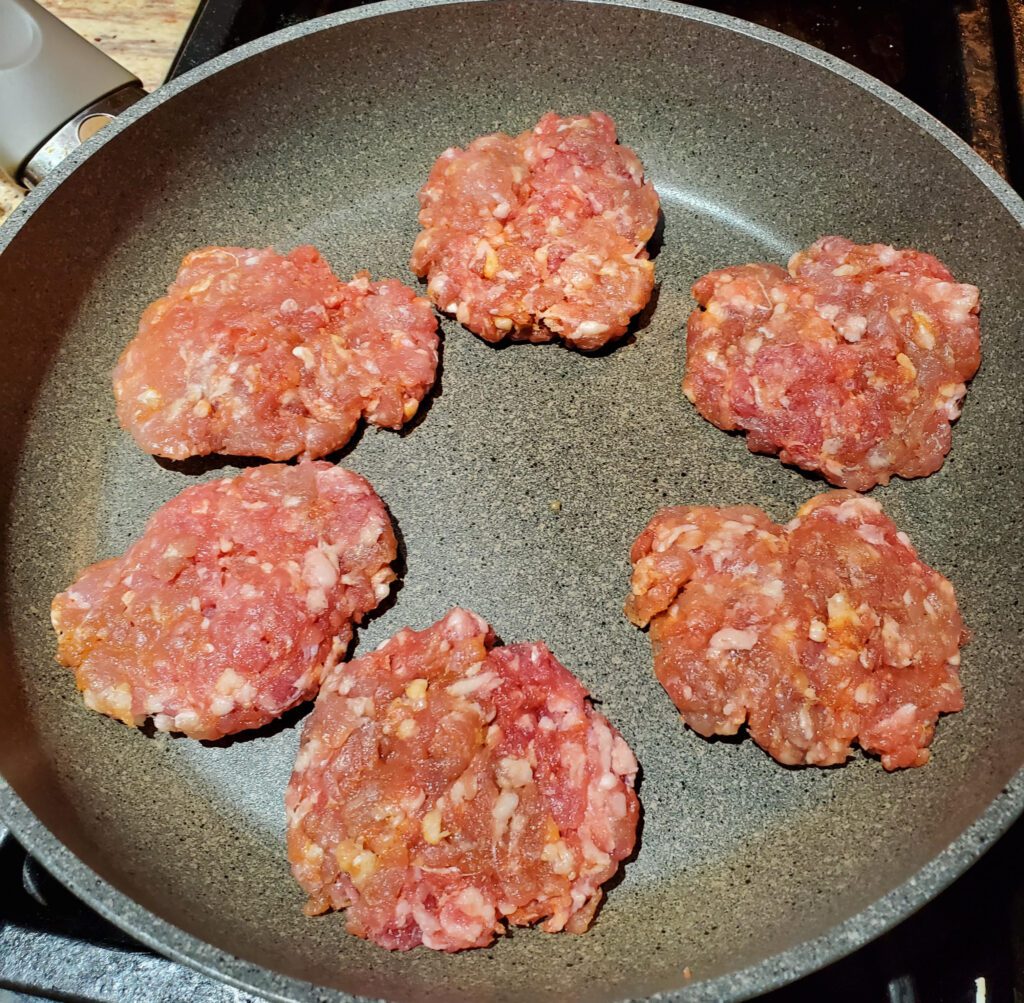
1.5 pounds ground bulk breakfast sausage
12 slices of cheddar cheese
Directions:
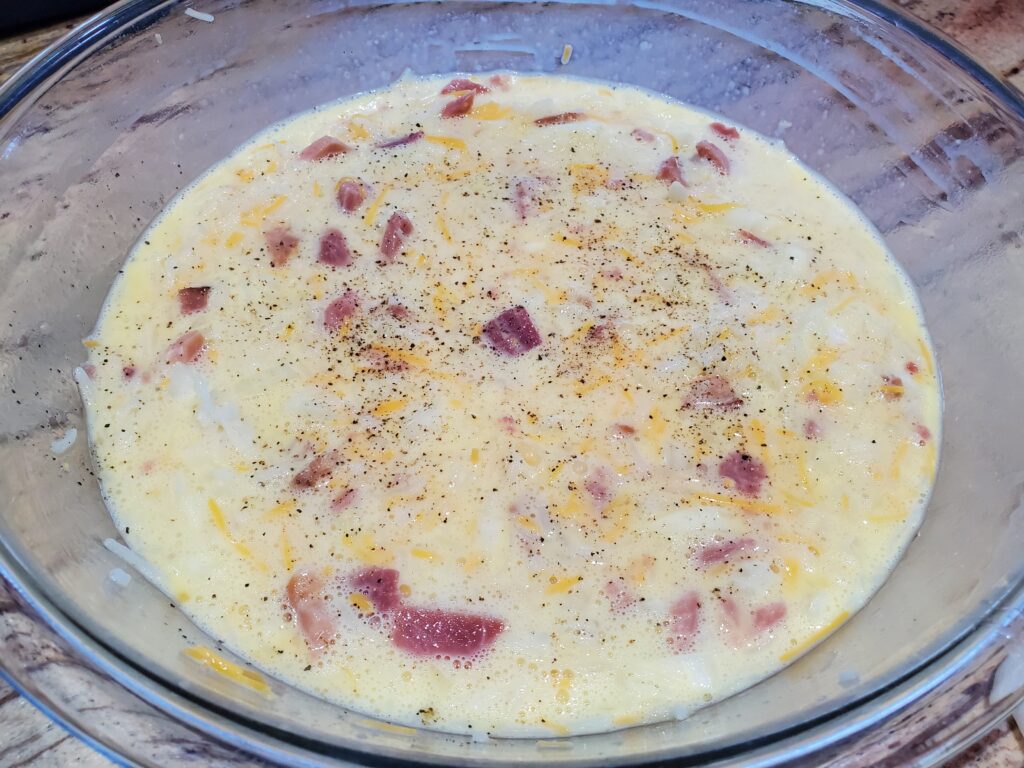
Egg mixture ready for the oven.
Preheat oven to 375 degrees F. Crack 12 eggs into a mixing bowl. Add the half and half, onion, salt a pepper. Whisk until smooth. Pour into a greased 9 x 13 inch Pyrex Baking Dish. Bake uncovered until lightly browned, approximately 25 minutes. Allow to cool, then cut into 12 squares.
While the eggs are baking, toast the English muffins. I like to use my toaster oven for this. I just love my toaster oven because it is also a convection oven, and air fryer. It’s so handy we use it almost every day. If you don’t have a toaster oven, you could also place the muffins on a sheet pan and broil then for 5-10 minutes.
Sausage Patties in a Ballarini Parma Forged Aluminum Nonstick pan
Divide the 1.5 pounds of bulk breakfast sausage into 12 pieces and smash into patties. Fry on the stove top until cooked through. For easy clean up I recommend using the Ballarini Parma forged Aluminum Nonstick Pan pictured. Set the sausage aside on a paper towel lined plate to cool and drain.
Once the eggs, sausage, and English muffins have cooled you can assemble the sandwiches. Place one egg square, one sausage patty and one slice of cheese in each English muffin. I recommend breaking up the cheese slices so they do not hang over the edge of the muffin. If the cheese hangs over the edge it will make a mess when you reheat the sandwich.
How to prepare breakfast sandwiches for freezing
To Prepare the sandwiches for freezing you will need 12 of each:
Moist paper towels
10×10 inch pieces of parchment paper
Zip lock sandwich bags
Wrap each sandwich first in a moist (not wet) paper towel, then wrap with parchment paper. Slide each wrapped sandwich into a zip lock sandwich bag. Pinch out the air and place in your freezer.
How to reheat frozen make ahead breakfast sandwiches
Remove the breakfast sandwich from the freezer. Take the sandwich out of the bag, and remove the parchment paper. Place the paper towel wrapped frozen sandwich on a plate and microwave for 2 minutes. Remove the paper towel and enjoy a delicious breakfast and stress free morning!
Preheat oven to 375 degrees F. Crack 12 eggs into a mixing bowl. Add the half and half, onion, salt a pepper. Whisk until smooth. Pour into a greased 9x 13 inch casserole dish uncovered until lightly browned, approximately 25 minutes. Allow to cool, then cut into 12 squares. While the eggs are baking, toast the English muffins in a toaster oven. If you don’t have a toaster oven, you could also place the muffins on a sheet pan and broil then for 5-10 minutes. Divide the 1.5 pounds of bulk breakfast sausage into 12 pieces and smash into patties. Fry on the stove top until cooked through. Set the sausage aside on a paper towel lined plate to cool and drain. Once the eggs, sausage, and English muffins have cooled you can assemble the sandwiches. Place one egg square, one sausage patty and one slice of cheese in each English muffin.
Prepare the sandwiches for freezing
Wrap each sandwich first in a moist (not wet) paper towel, then wrap with parchment paper. Slide each wrapped sandwich into a zip lock sandwich bag. Pinch out the air and place in your freezer.
How to reheat the sandwiches
Remove the breakfast sandwich from the freezer. Take the sandwich out of the bag, and remove the parchment paper. Place the paper towel wrapped frozen sandwich on a plate and microwave for 2 minutes. Remove the paper towel and enjoy a delicious breakfast and stress free morning!
NOTES
As an Amazon Associate, I earn from qualified purchases.