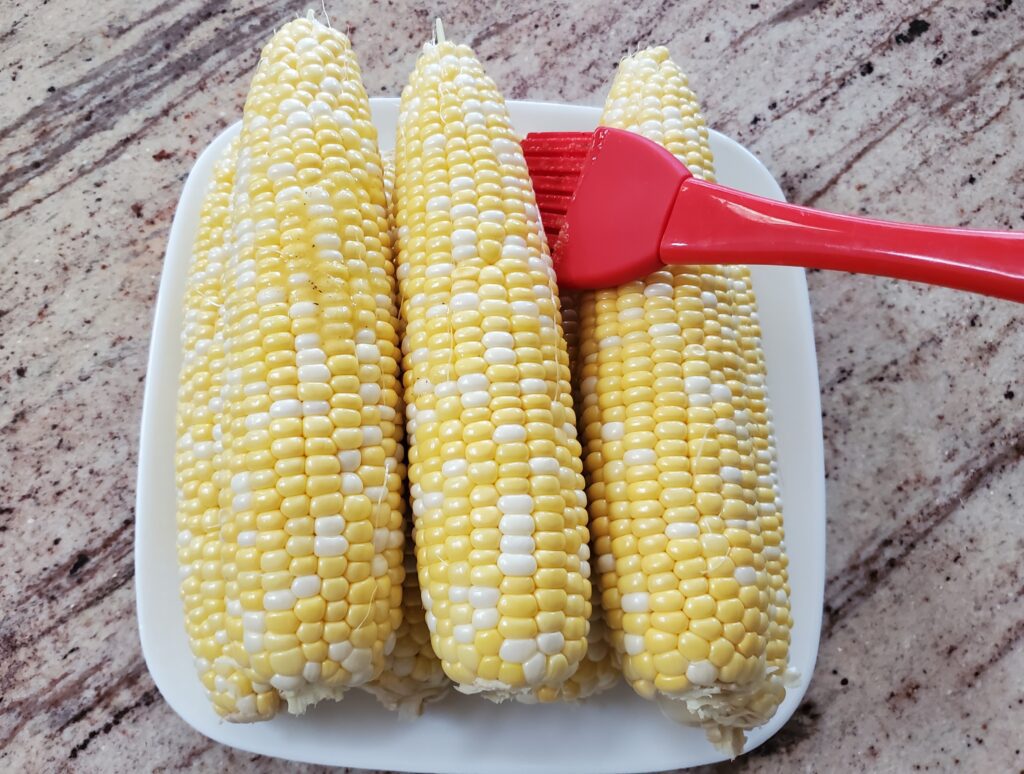
Melt the butter and add the seasonings to the melted butter. Mix well.
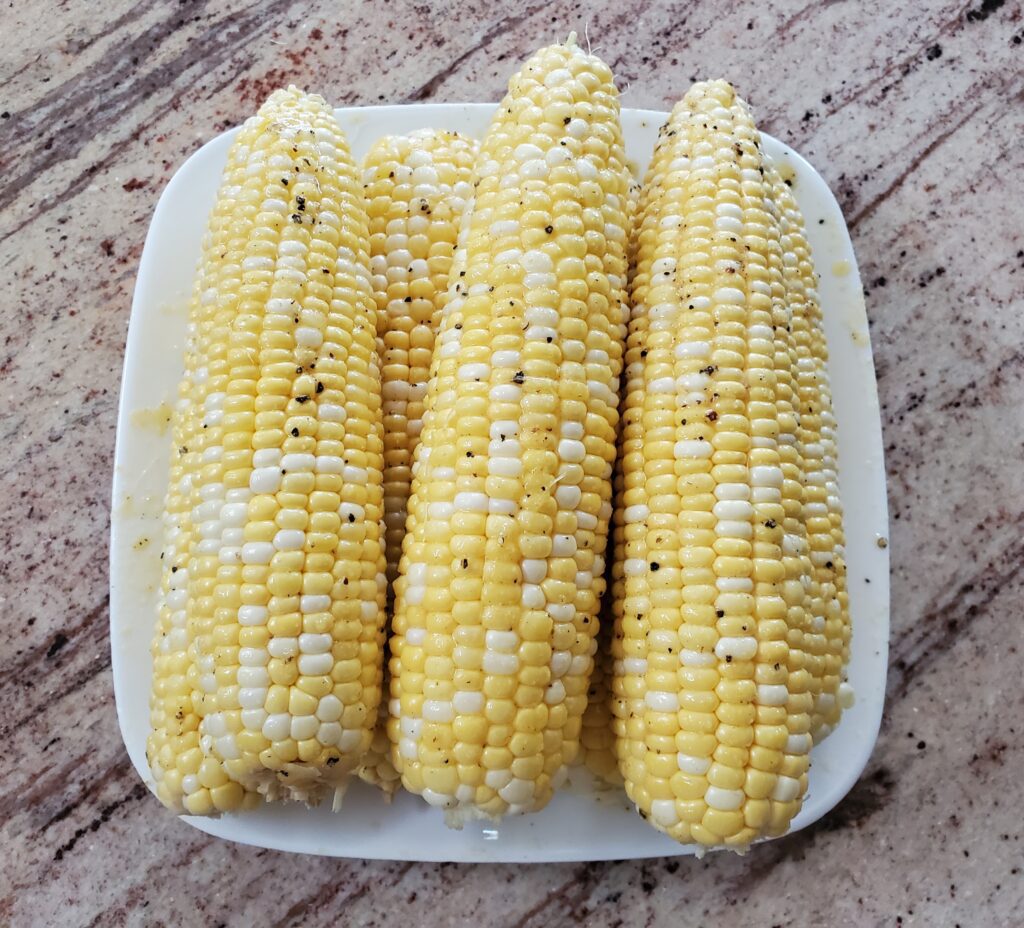
Use a silicone brush to coat the corn cobs with the seasoned butter.
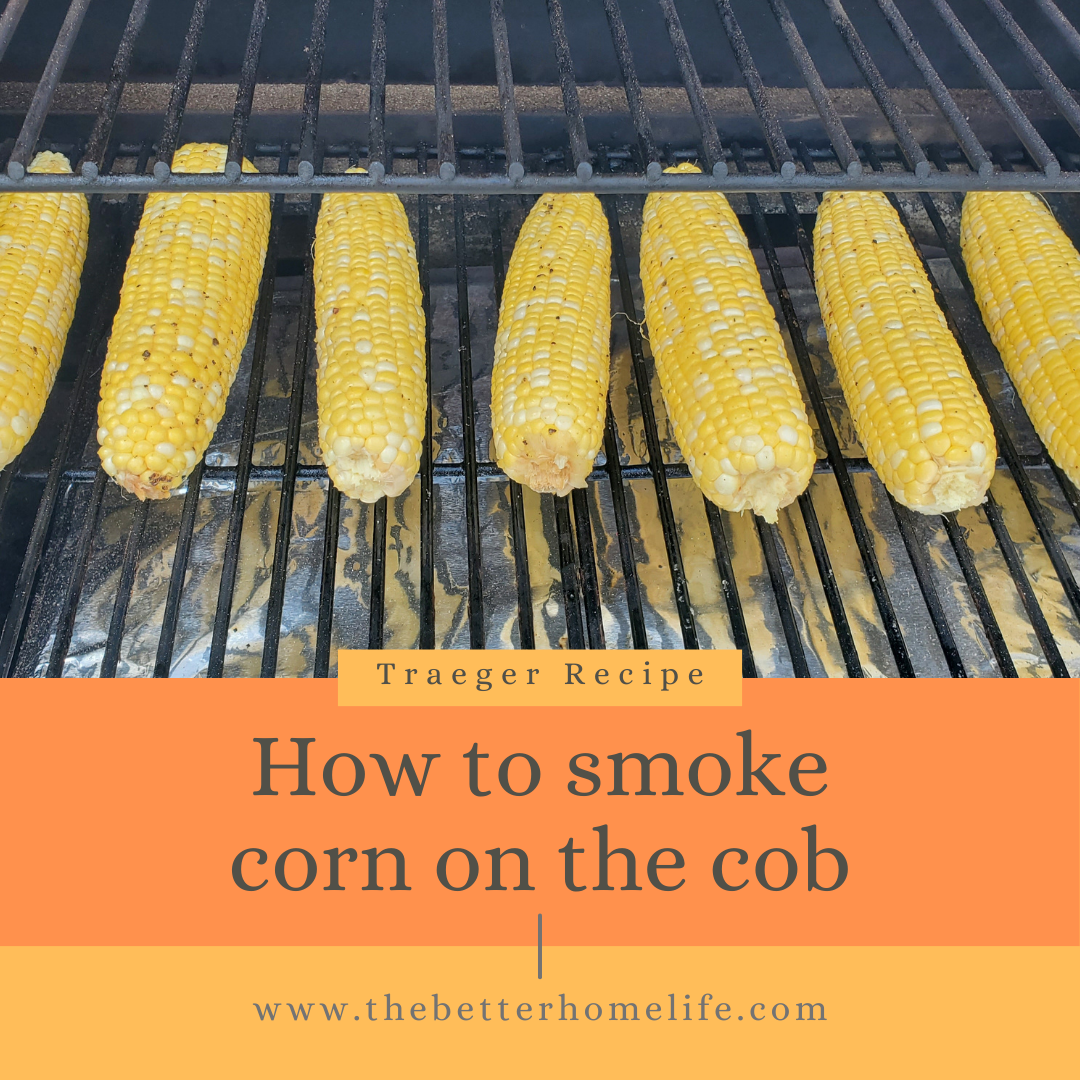
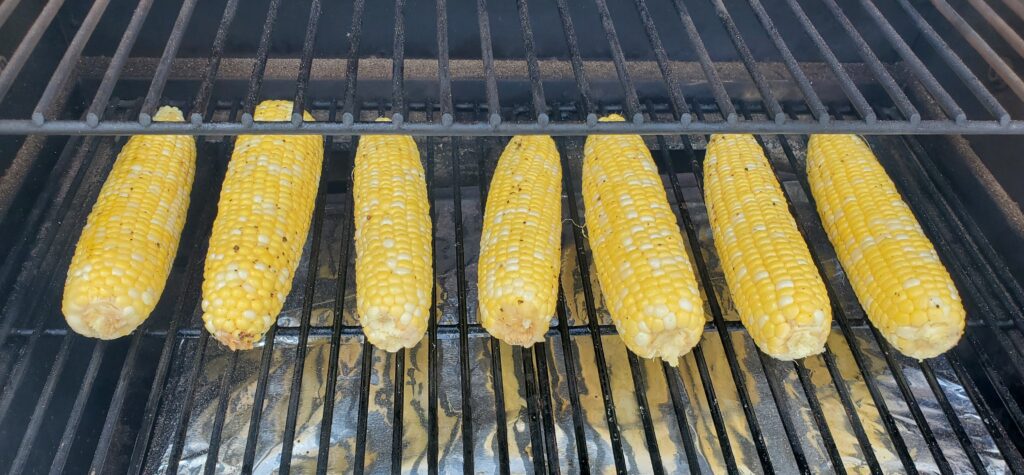
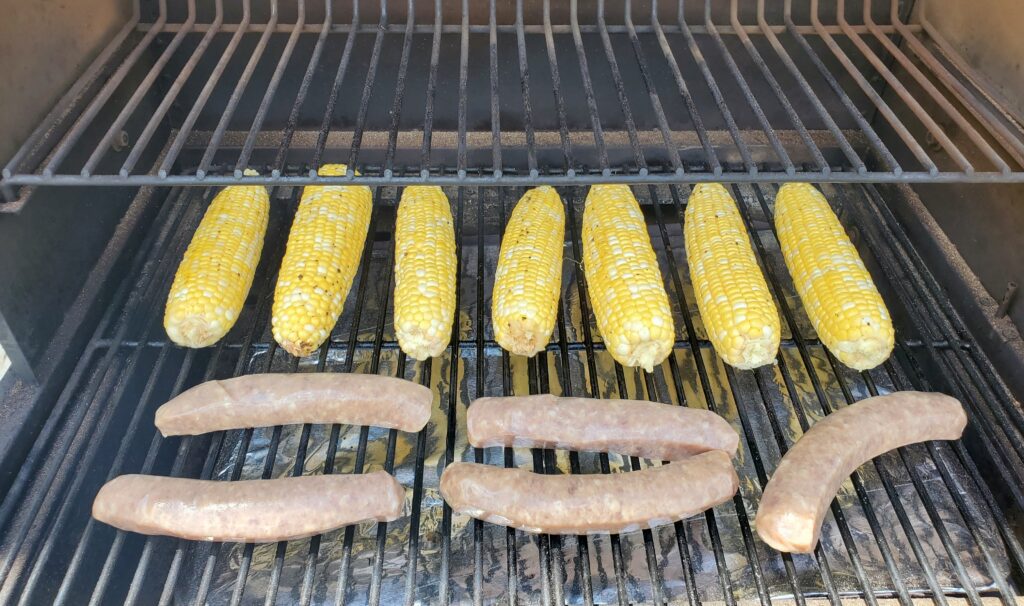
Preheat the smoker to 225 degrees F. Place the corn cobs on the grill. After 25 minutes flip the cobs. Continue to smoke for another 50 minutes. The total smoke time is 1 hour and 15 minutes.
Use tongs to remove the corn from the smoker. Allow them to cool for at least 1 minute before eating.
What goes great with smoked corn on the cob?
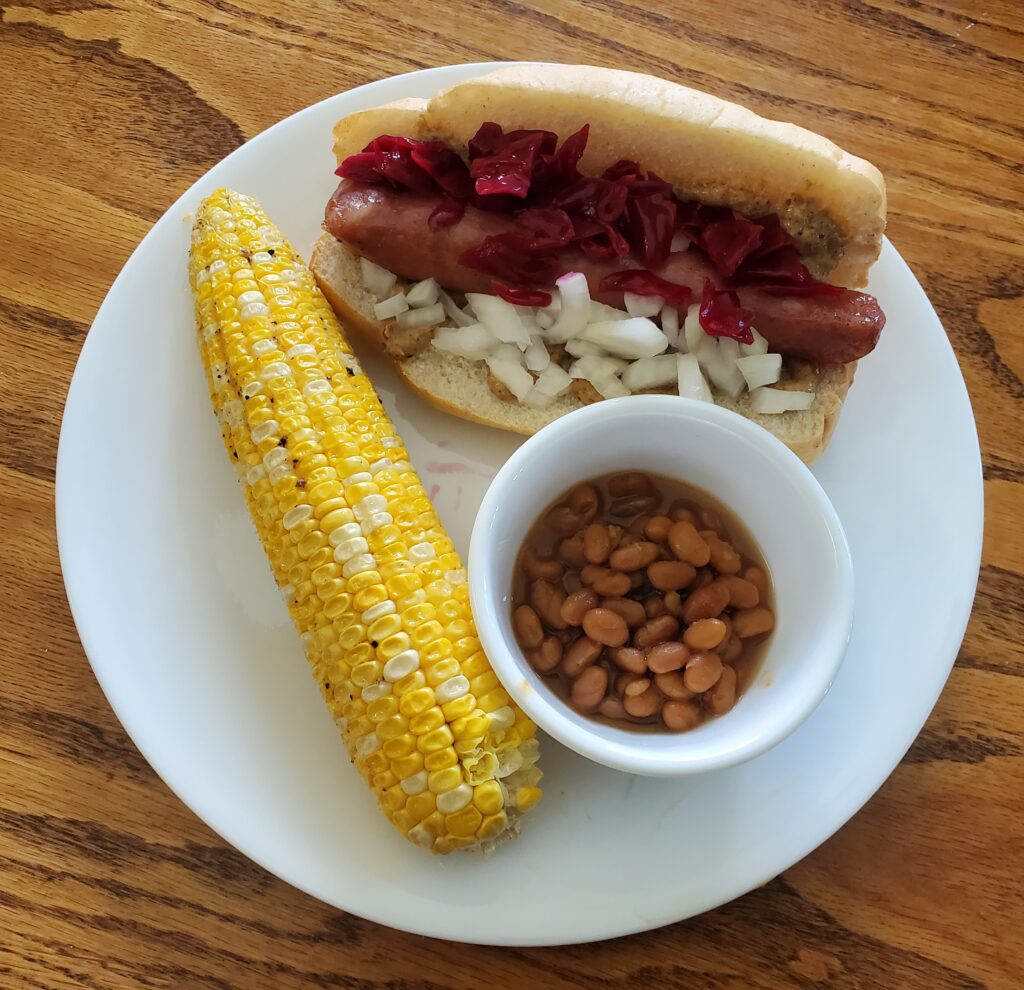
Honestly any summer grilled or smoked meat would be perfect for a side of corn on the cob! Smoked sausage pairs really well with smoked corn on the cob because it smokes for almost the same amount of time at the same temperature! If you are smoking a larger meat that needs more space the corn can smoke on the top shelf. Try it with these tasty ribs.
Try adding this smoked corn to smoked succotash! Just cut the corn from the cob and mix it in instead of using canned corn. Four corn cobs is approximately equal to one can of corn. A perfect side for any smoked meat.
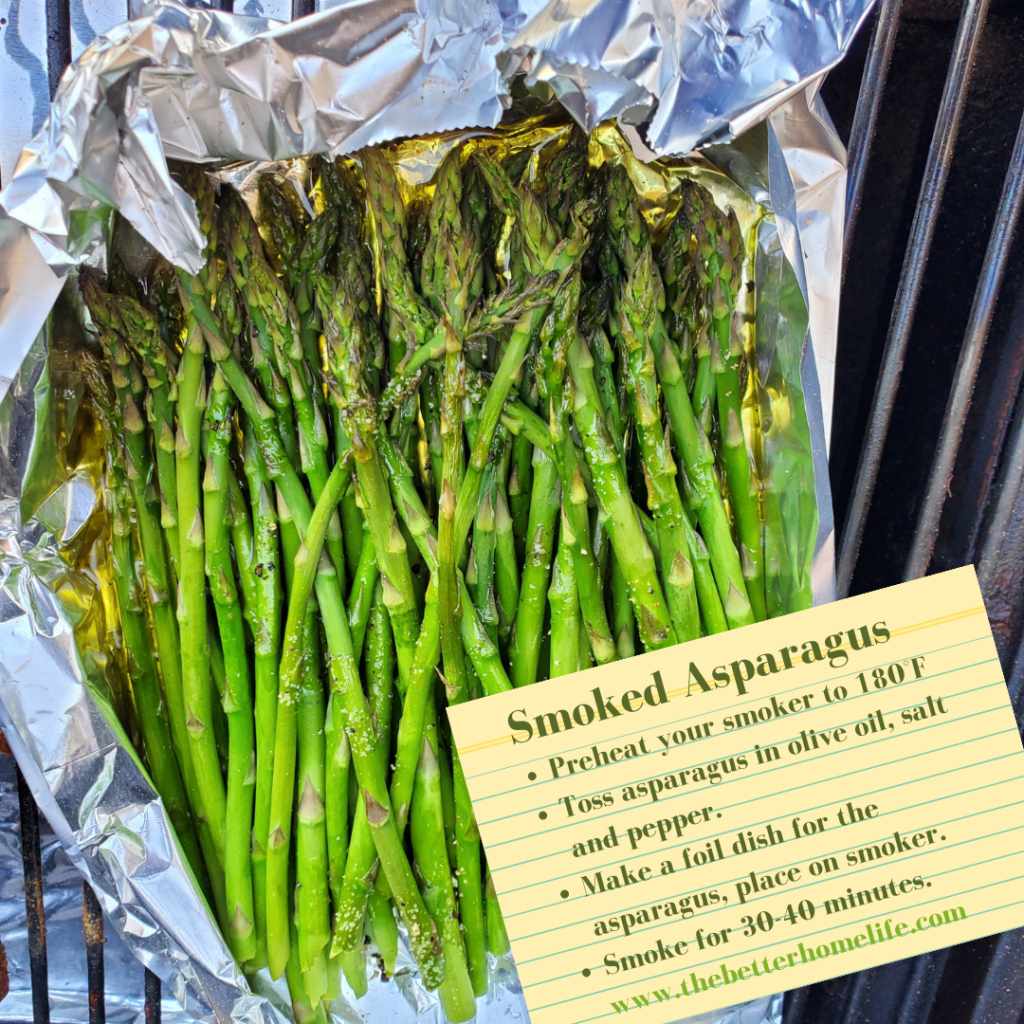
Many vegetables are great smoked. Try this amazing smoked asparagus.
Melt the butter and add the seasonings to the melted butter. Mix well. Use a silicone brush to coat the corn cobs with the seasoned butter.
Preheat the smoker to 225 degrees F. Place the corn cobs on the grill. After 25 minutes flip the cobs. Continue to smoke for another 50 minutes. The total smoke time is 1 hour and 15 minutes.
Use tongs to remove the corn from the smoker. Allow them to cool for at least 1 minute before eating.
NOTES
As an Amazon Associate, I earn from qualified purchases.
2 – 15 ounce cans of sweet corn, drained (or corn from 8 smoked cobs)
1/2 teaspoon fresh ground pepper
4 tablespoons butter
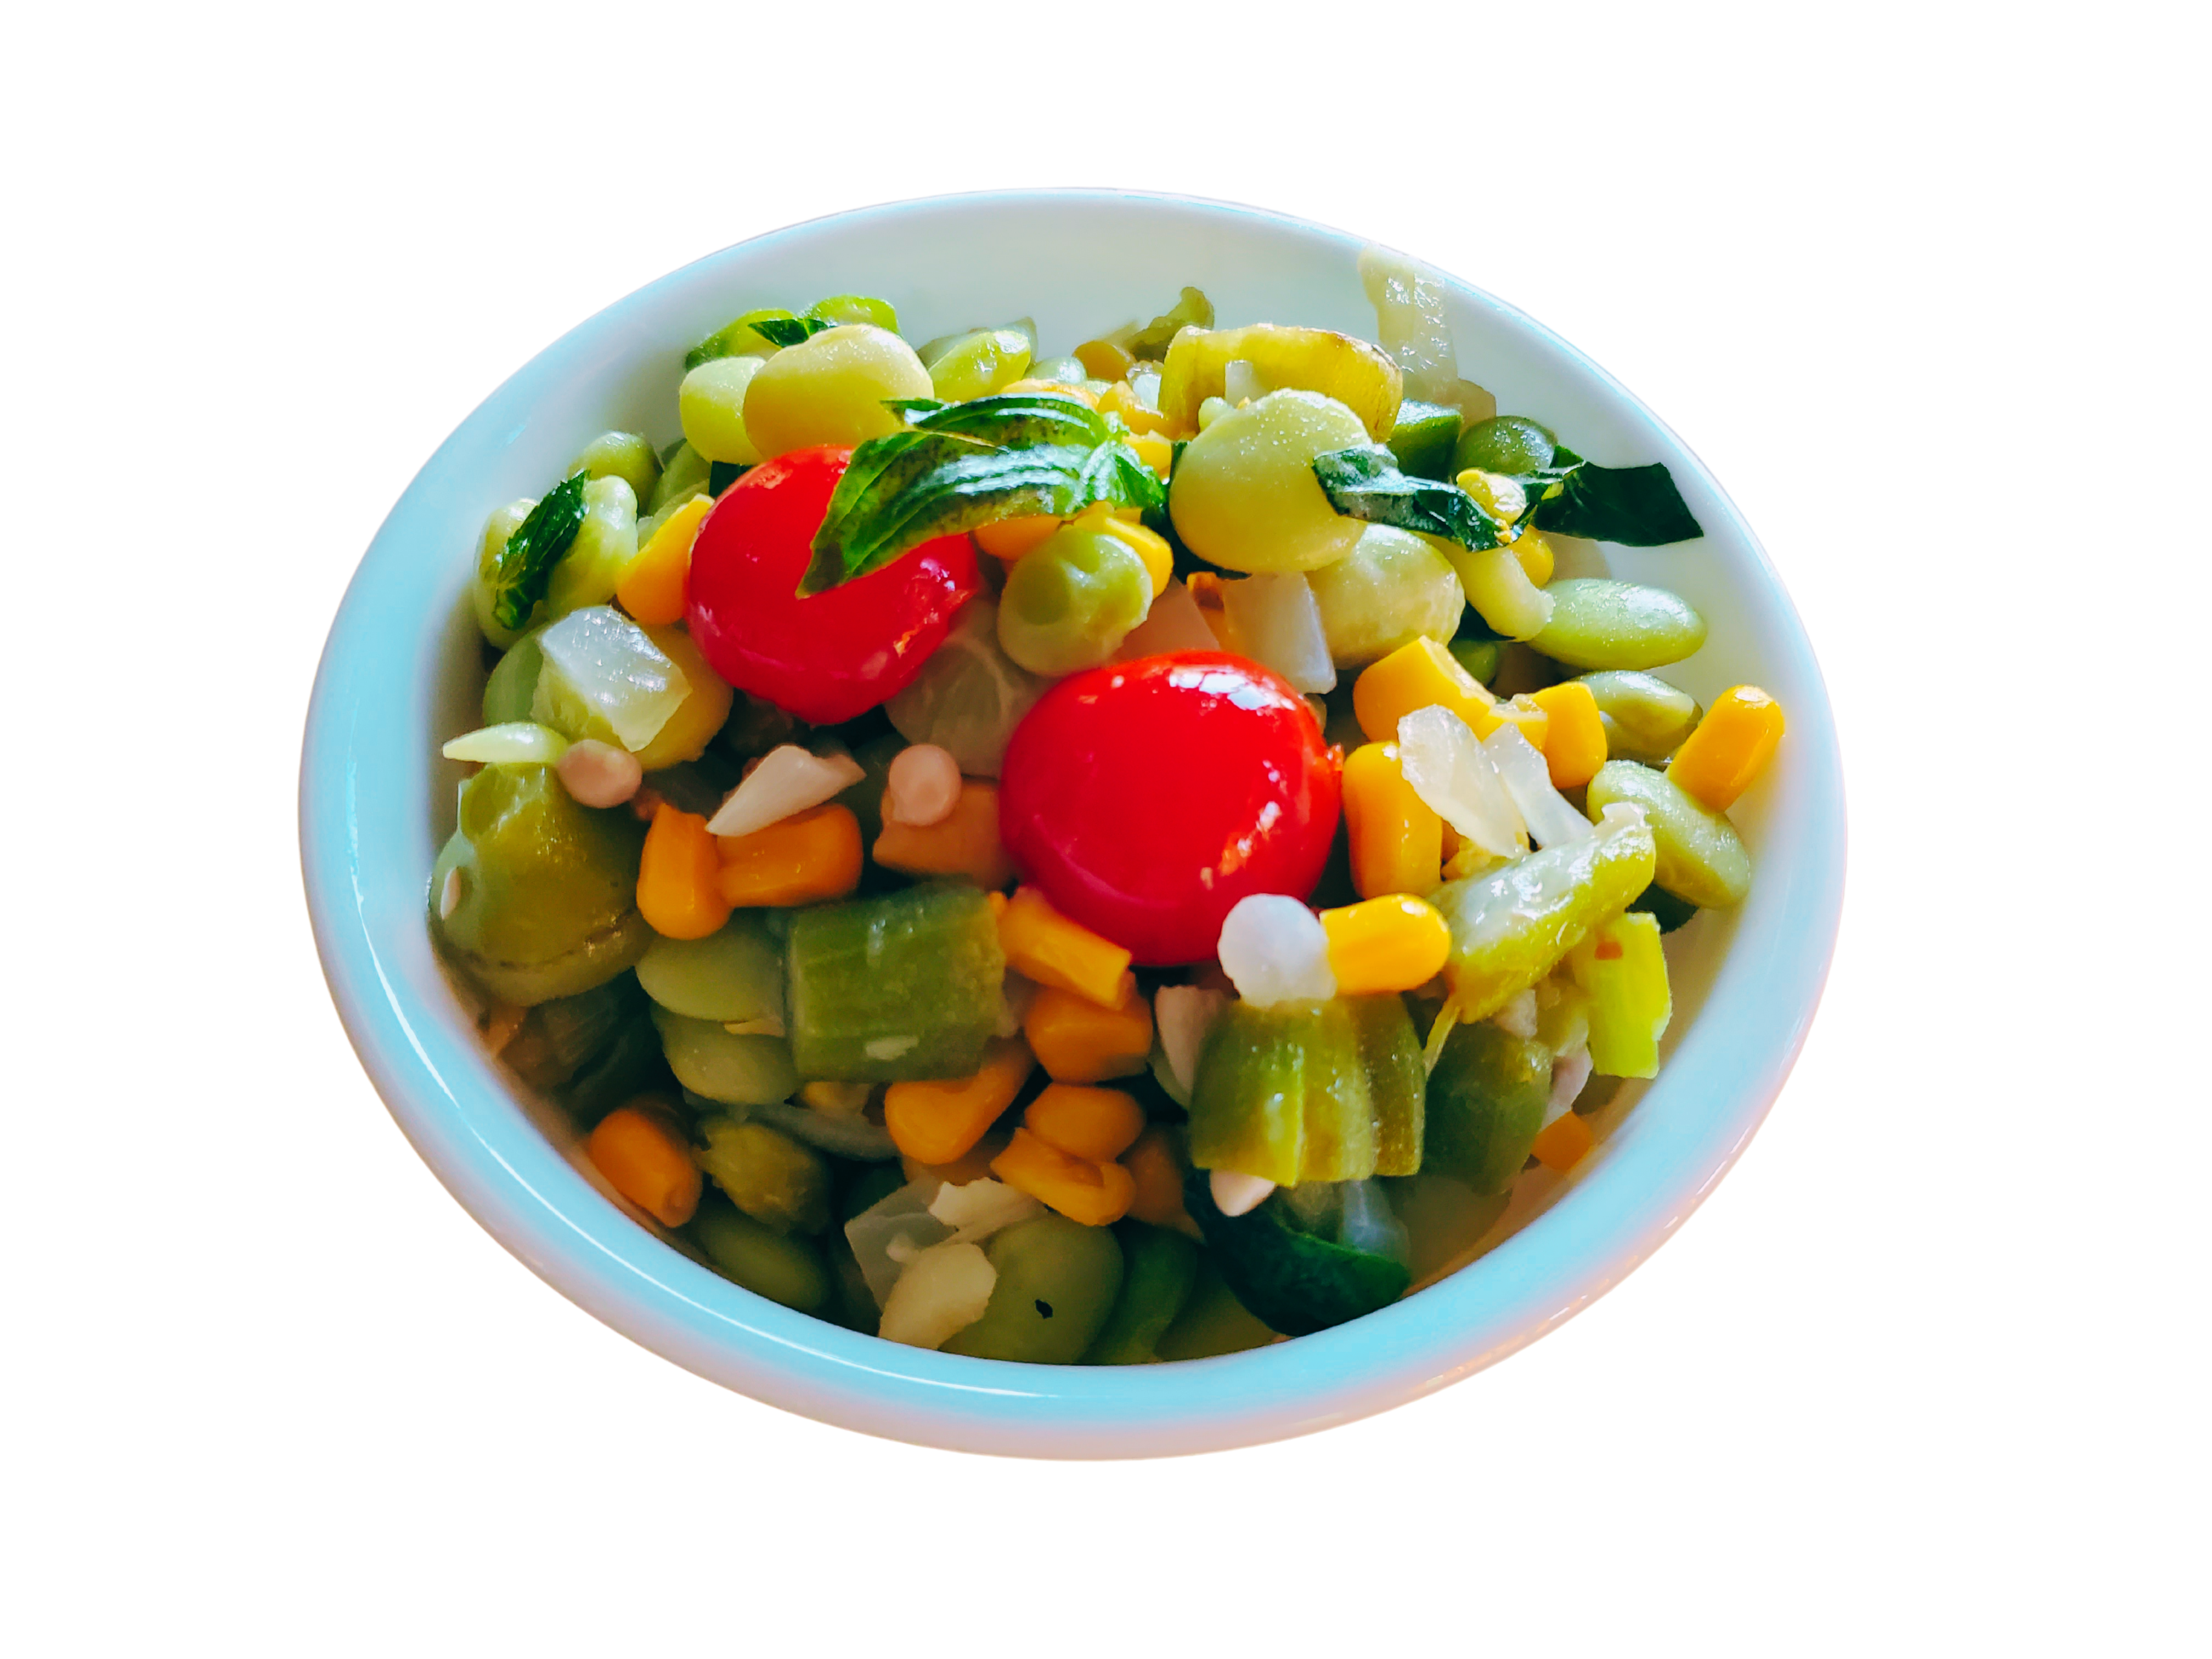
1 pint cherry tomatoes, halved
1/4 cup thinly sliced fresh basil
Directions:
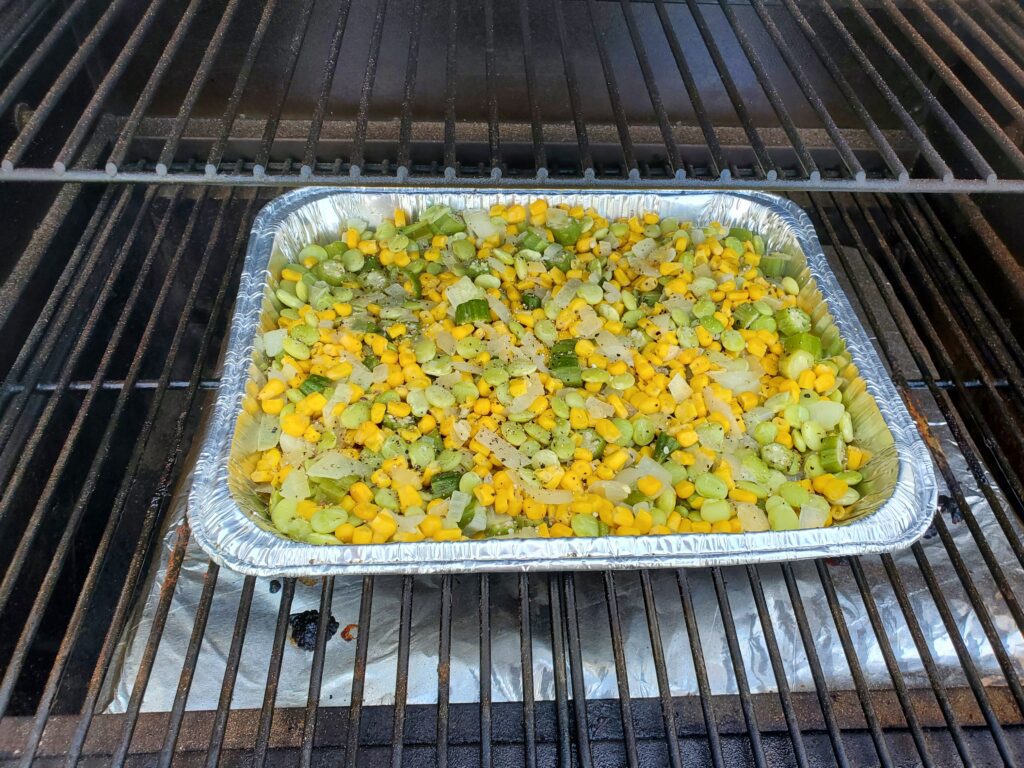
Place the lima beans in a saucepan, add enough water to cover. Bring to a boil. Reduce heat to low and simmer until tender ~ 8-10 minutes. Drain and set aside.
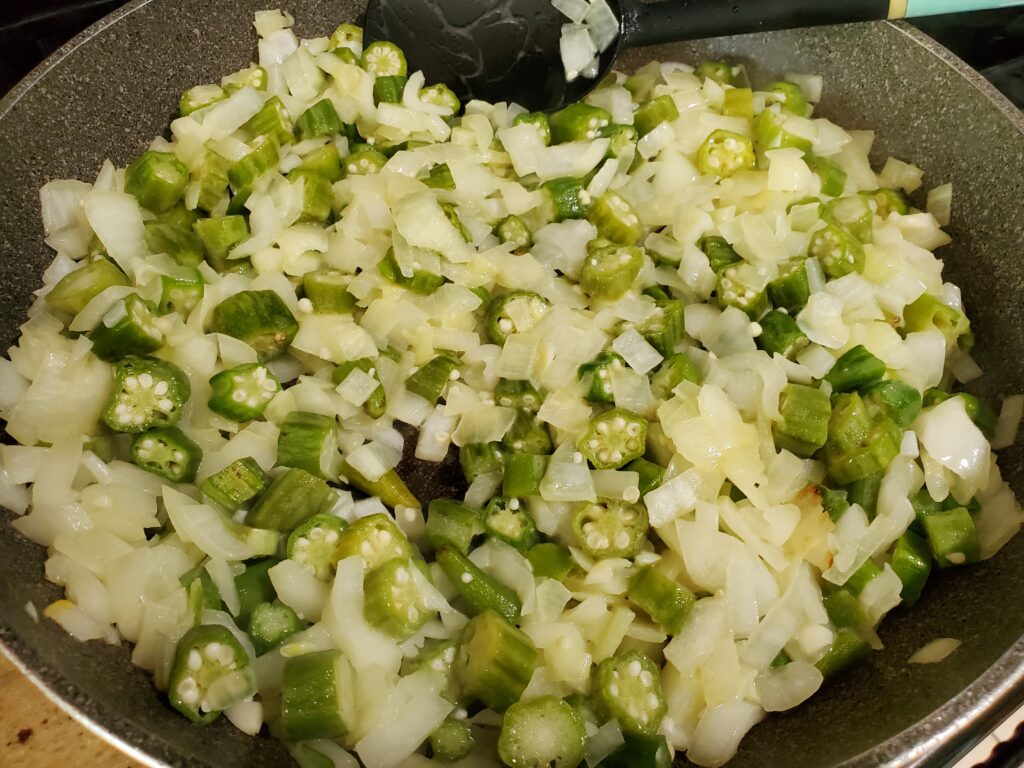
Meanwhile, sauté the onions and okra in a skillet with 2 tablespoons of the butter until tender. Remove from heat. Stir in the corn, lima beans, remaining butter and pepper.
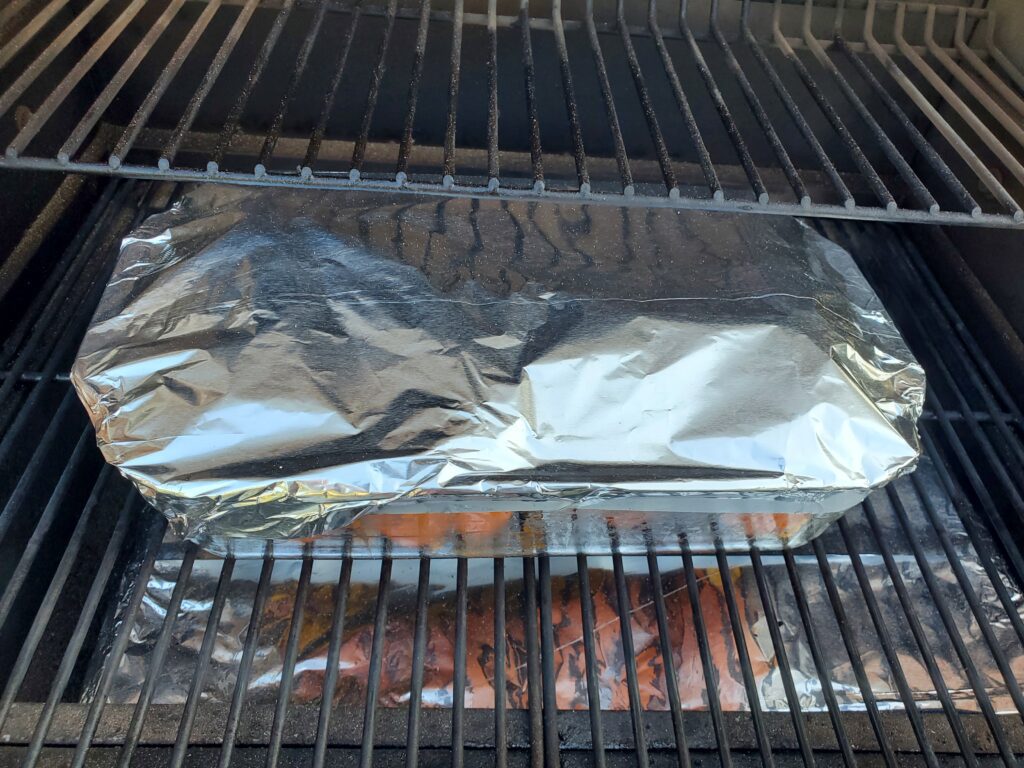
Place the mixture in a foil pan and put it on the Traeger at 225 degrees F for about 60 min.
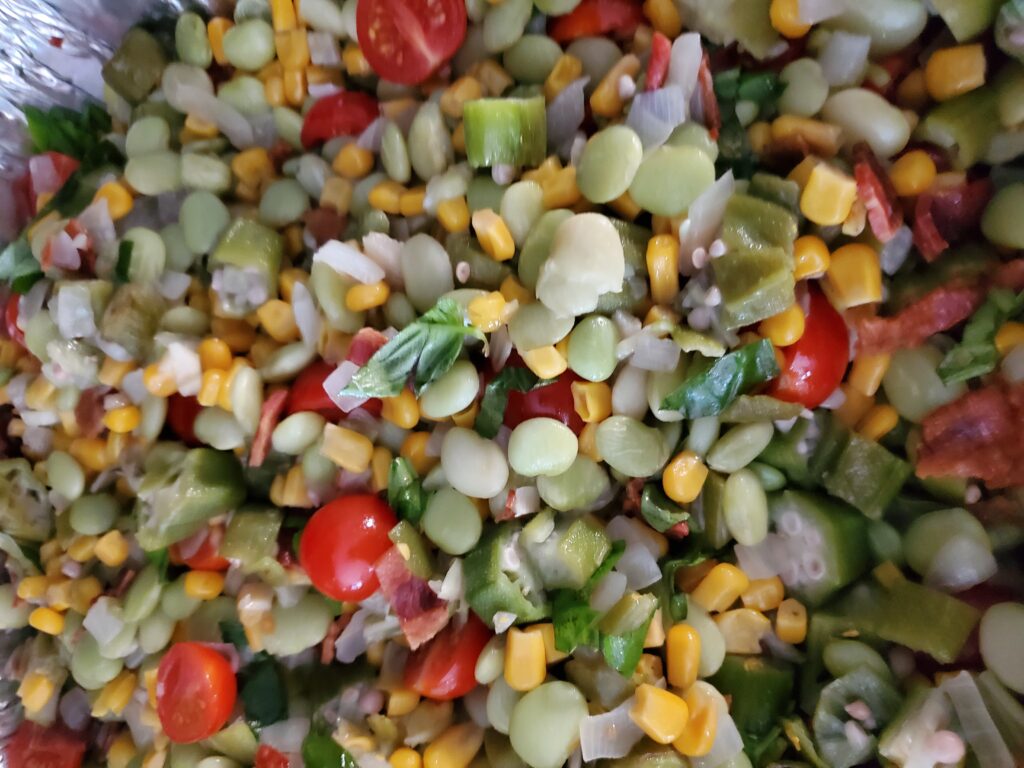
When ready to serve, remove from heat and stir in the cooked bacon, tomatoes, and fresh basil.
Note: When you smoke the succotash, you are essentially just adding smoky flavor and heat. The temperature and time can be adjusted. This is part of the reason why this is such a great side for smoked meat. You can add this side for the last hour of smoking at any temperature between 180-225 degrees F. Alternatively you can smoke this side while your meat rests. If you want to warm it faster you can smoke ate 350 degrees F for about 20 minutes.
Can you prepare Smoked Succotash ahead of time?
Yes, you can! You can prepare it the night before. Refrigerate overnight, but bring it to room temp before smoking it. If you want to heat it straight from the fridge, you will need to increase the temperature and cooking time. From cold, smoke at 350 degrees F for 30 min. No matter how you choose to smoke it, wait to stir in the tomatoes, basil and cooked bacon until ready to serve.
Does smoked succotash make good leftovers?
It sure does! So great my daughter eats it for breakfast. I mean, why not? It does have bacon!
What goes great with Smoked Succotash?
Smoked succotash is a great summer side for burgers and brats! Try it with Smoked Ribs, brisket or pulled pork!
Place the lima beans in a saucepan, add enough water to cover. Bring to a boil. Reduce heat to low and simmer until tender ~ 8-10 minutes. Drain and set aside.
Meanwhile, sauté the onions and okra in a skillet with 2 tablespoons of the butter until tender. Remove from heat.
Stir in the corn, lima beans, remaining butter and pepper.
Place the mixture in a foil pan and put it on the Traeger at 225 degrees F for about 60 min.
When ready to serve, remove from heat and stir in the cooked bacon, tomatoes, and fresh basil.
NOTES
As an Amazon associate I earn form qualified purchases.
This easy stuffed pepper recipe is a great meal to prepare ahead or bake right away. I usually make it when peppers are on sale, which is usually in the summer. I don’t like to heat up my house with the oven in the summer so, I’ve included directions for smoked stuffed peppers. These stuffed peppers also make great leftovers for packed lunches and this meal is freezable. Basically the prefect family meal!
Disclaimer: This post may contain affiliate links. I earn commission from qualified purchases at no additional cost to you.
Best pepper characteristics for making stuffed peppers
similar in shape and size
level bottom, so they stand up straight
tall and thin vs. short and fat – to fit in the baking dish better
4 bumps on the bottom rather than 3, because the stand up better on their own
Choose peppers with 4 bumps on the bottom.
Stuffed Pepper Ingredients:
8 bell peppers, any color
1 pound ground beef
1 package of taco seasoning + water needed per package directions
1 cup rice, cooked according to package directions (~ 2 cups cooked)
1 medium onion, diced
2-3 garlic cloves, minced or grated
1 15.5 ounce can black beans, drained and rinsed
1 14.5 ounce can of fire roasted diced tomatoes
1 4 ounce can of diced green chilis
1 cup shredded cheddar cheese
fresh cilantro for garnish
How to make stuffed peppers
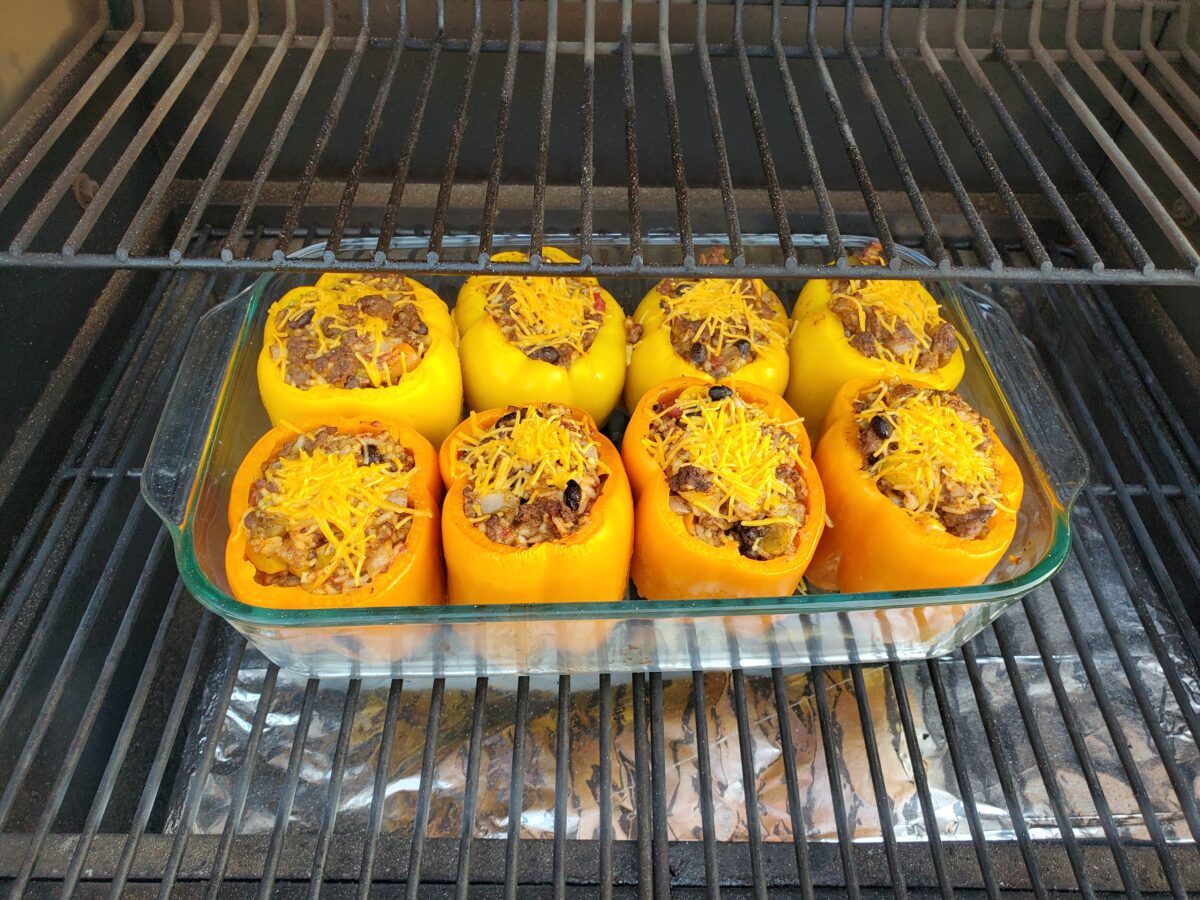
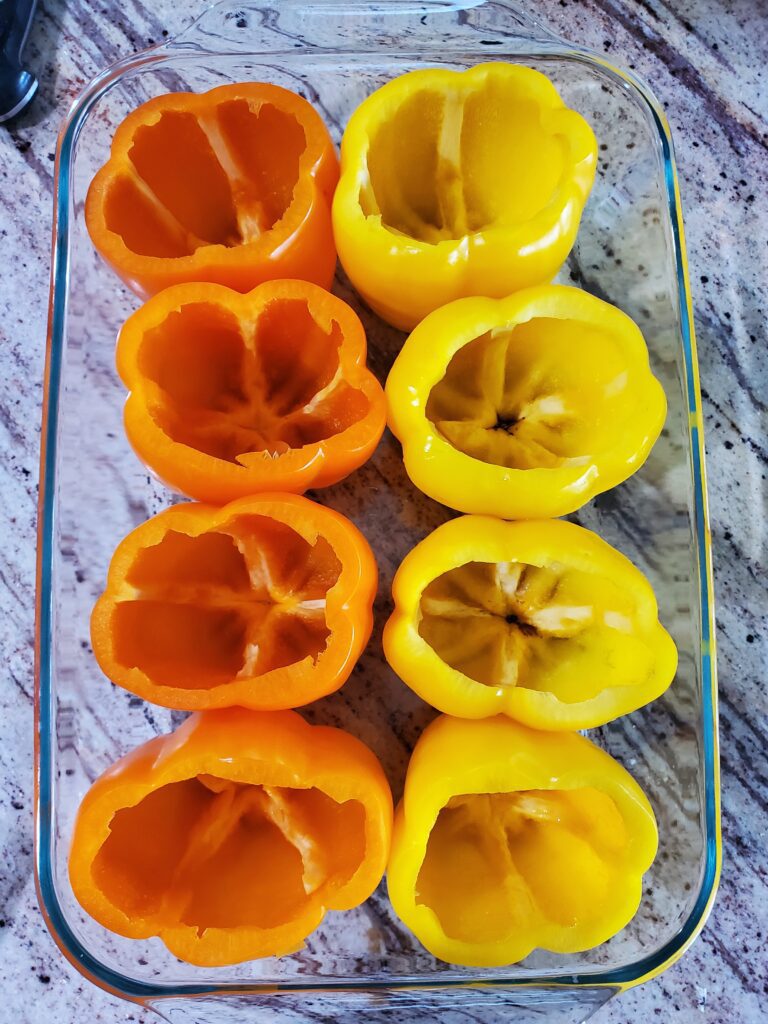
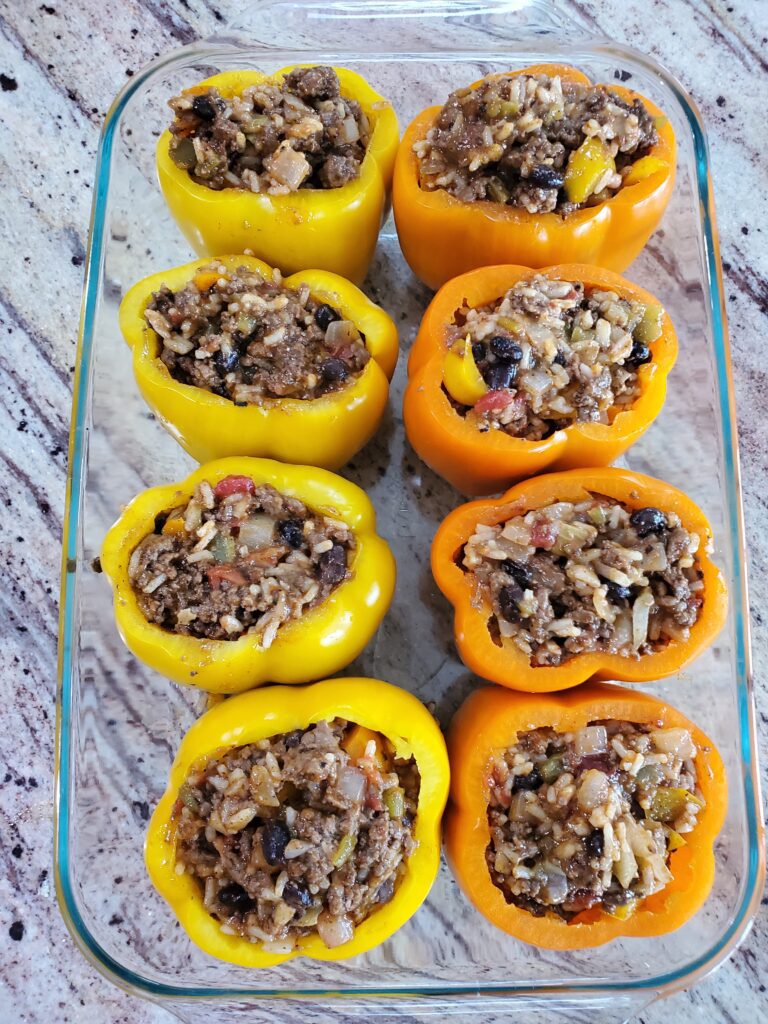
Cut the tops off the peppers. Remove the stems, but keep the remaining flesh from the top. Remove any remaining seeds and as much pith as possible. Place the pepper bottoms in a Pyrex deep 9×13 inch baking dish and dice up the tops.
Prepare the rice according to package directions. Set aside.
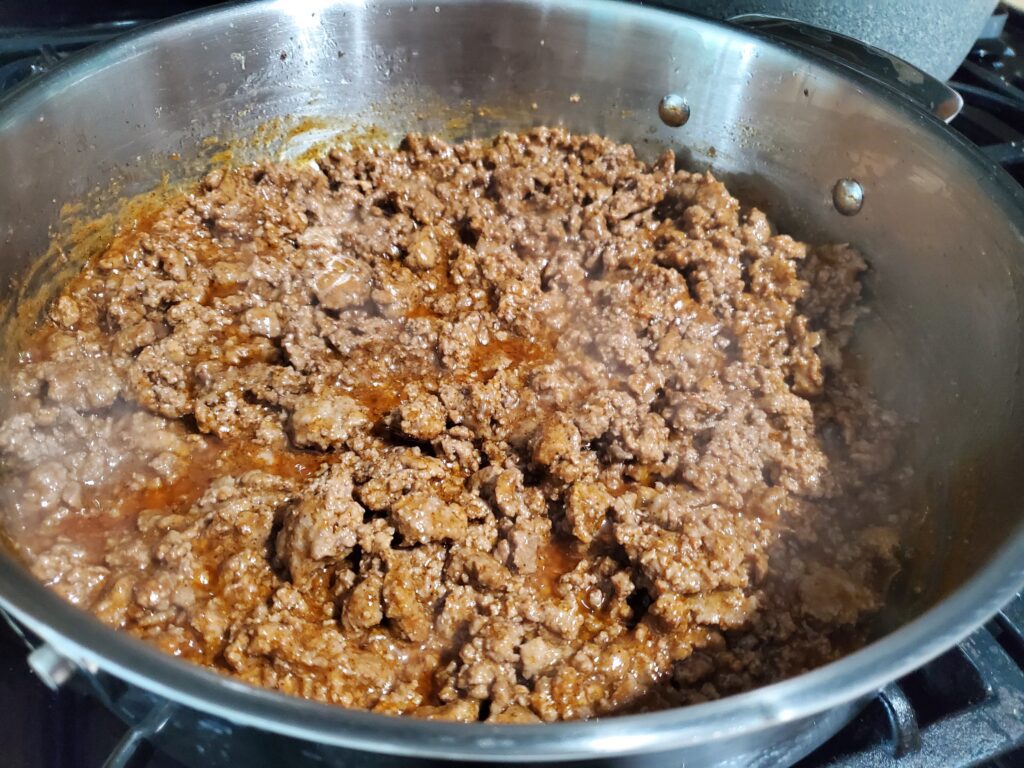
Brown the ground beef, drain and add the taco seasoning according to package directions. Set aside.
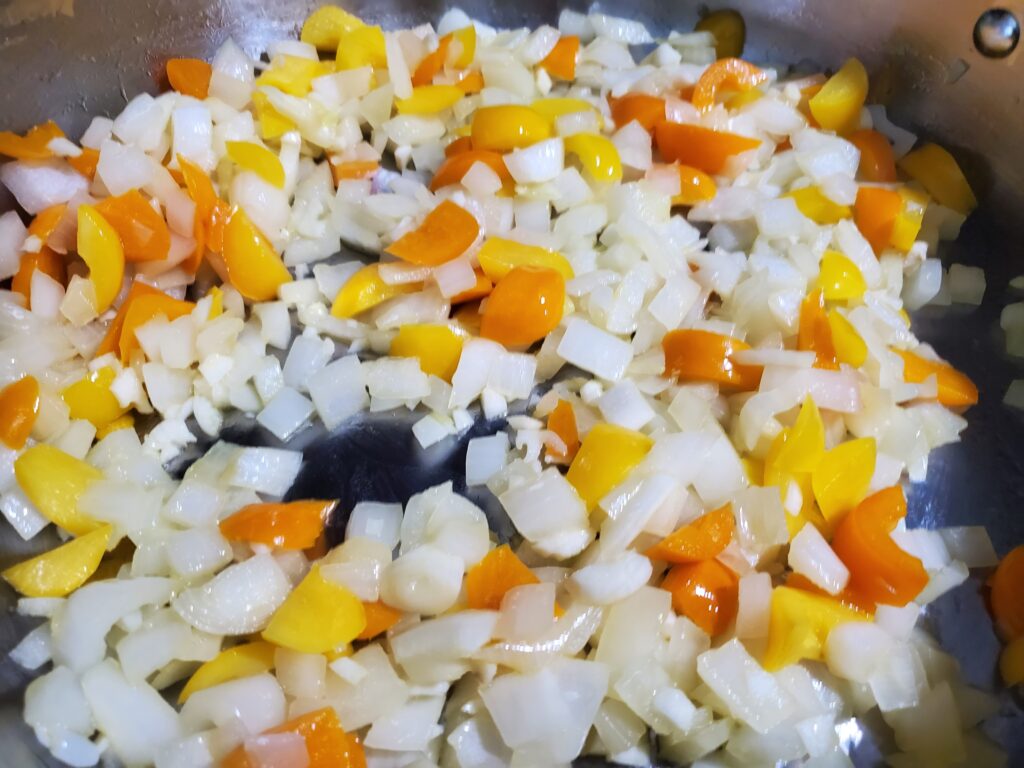
Sauté the onions and diced pepper tops until softened, add the garlic, and sauté for another minute.
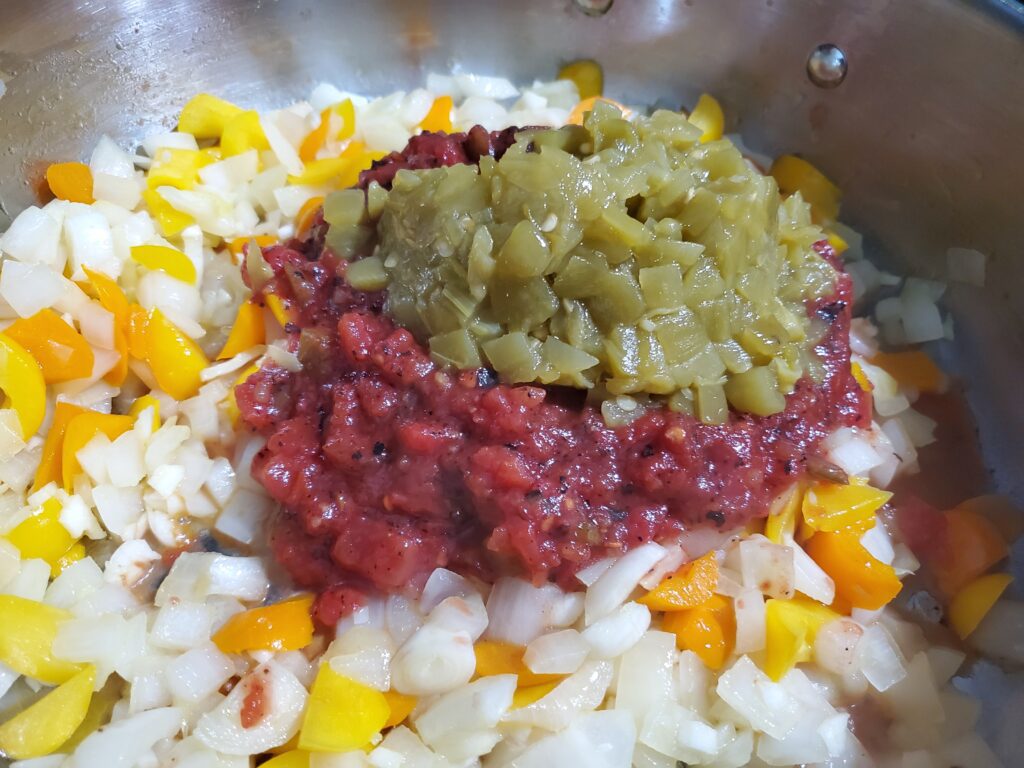
Add the tomatoes and green chilis, mix until well combined.
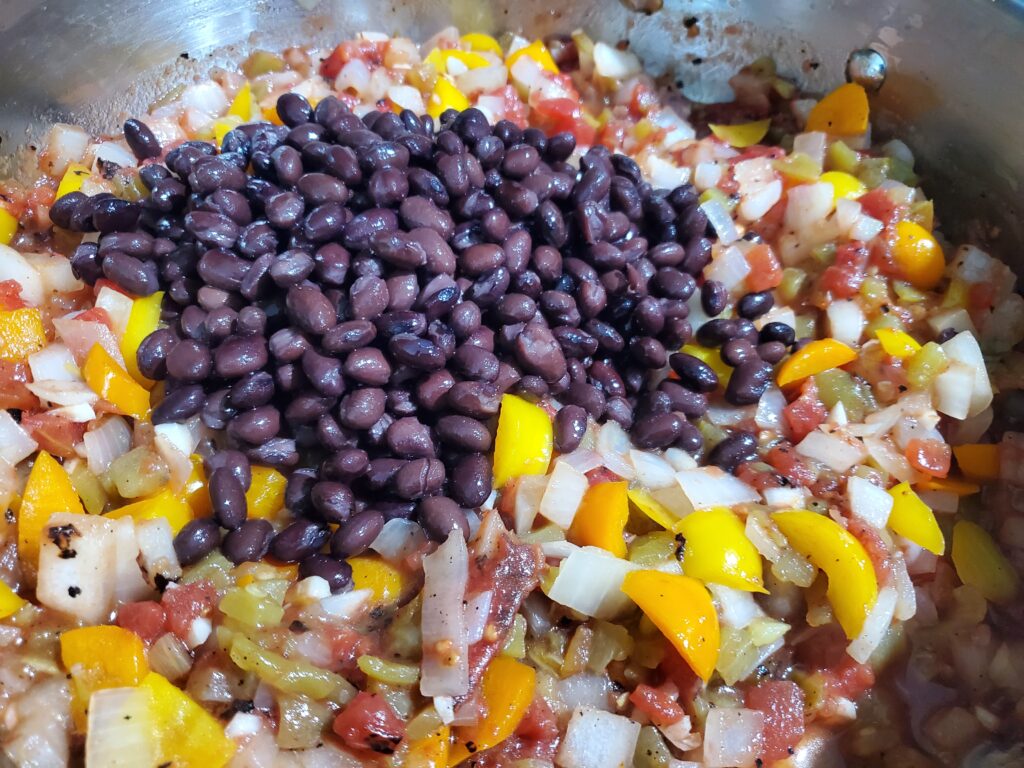
Add the black beans and mix.
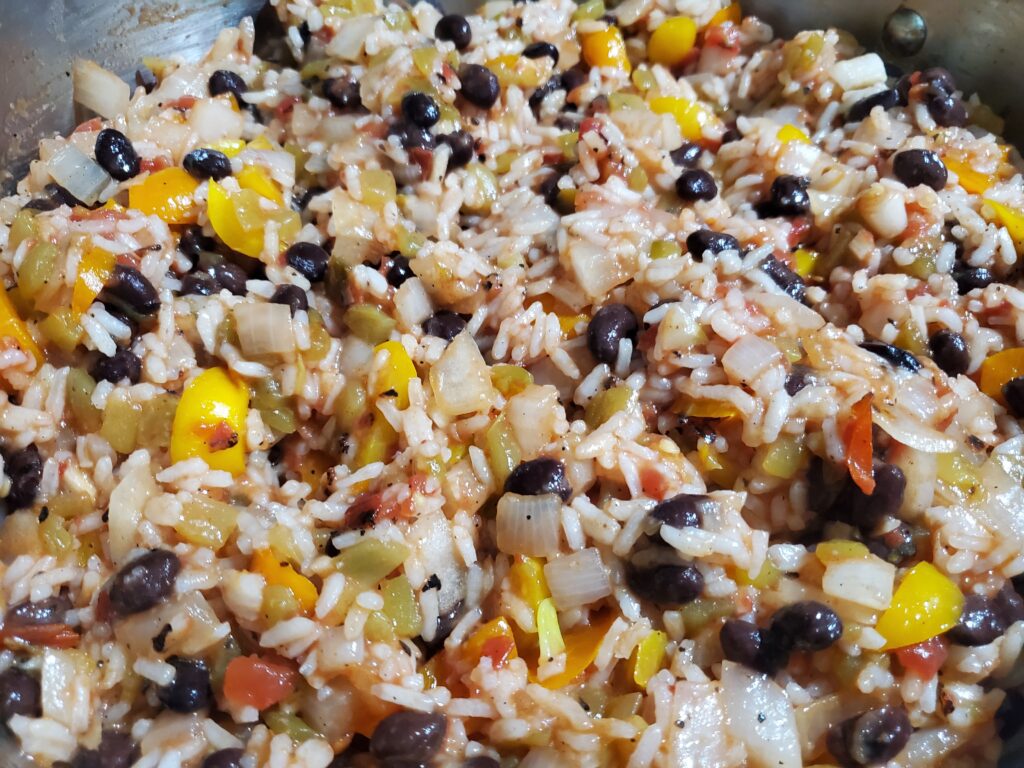
Finally add the cooked rice and mix until well combined.
Remove from heat and mix in the taco meat.
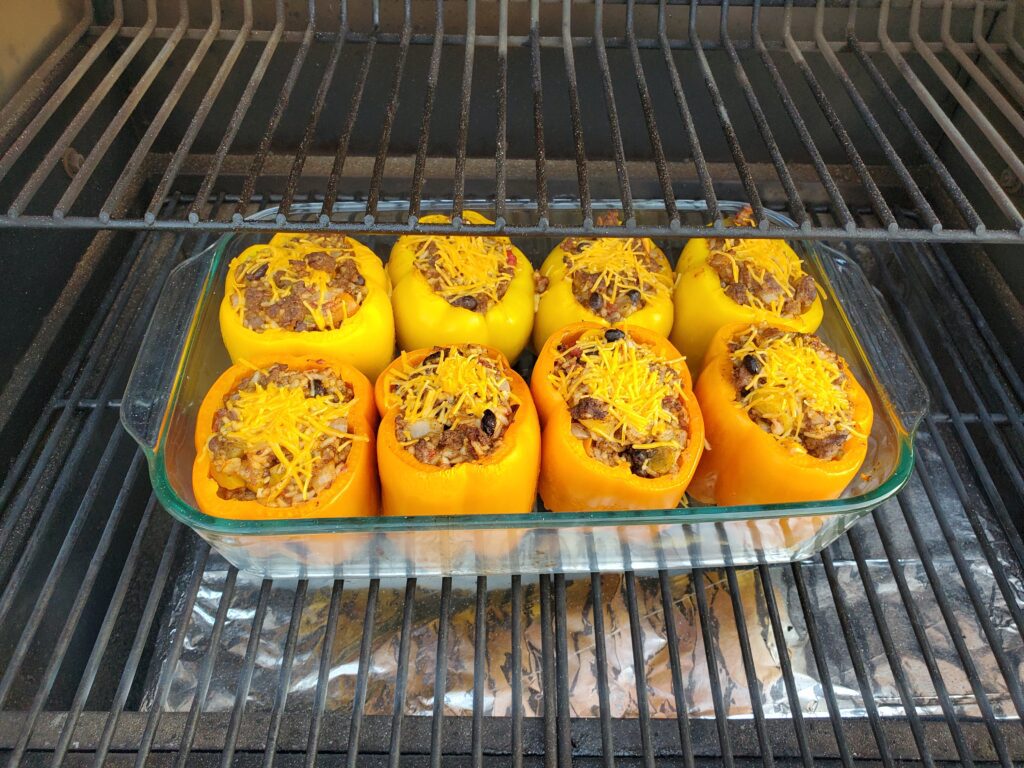
Stuff this mixture into the pepper bottoms.
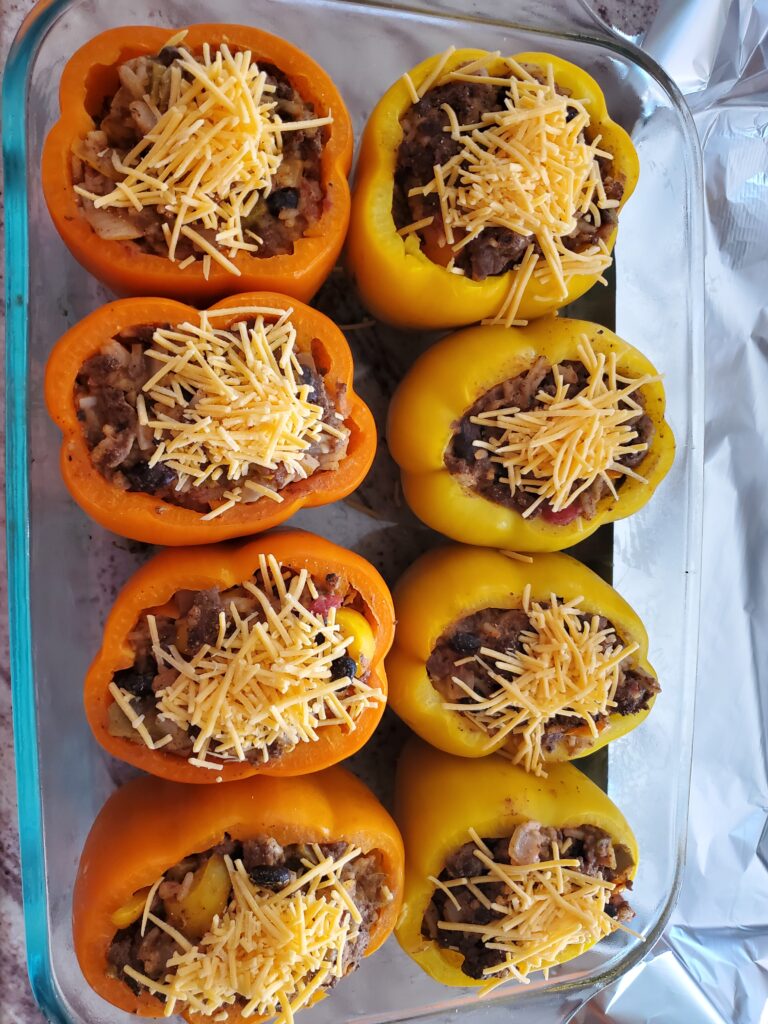
Top with shredded cheese. Pour about 3/4 cup of water into the bottom of the baking dish. Just enough to cover the bottom of the dish.
Cover with aluminum foil.
Smoke/bake covered 30 minSmoke bake uncovered 10 min
Preheat the Traeger or Oven to 400 degrees F. Bake/smoke covered for 30 min. Remove the foil and continue to bake/smoke for another 10 minutes or until the cheese is melted.
Garnish with fresh cilantro.
Are smoked stuffed peppers good re-heated?
Yes, stuffed peppers make a great leftover meal. They are perfect for packed lunches too. They fit perfectly into a mug Pop-in for easy reheating!
As ama Amazon Associate, I earn on qualified purchases.
More Great smoked meals:
Try this amazing smoked Shepherd’s Pie. This recipe includes both directions for baking and smoking the pie.
1 package of taco seasoning + water needed per package directions
1 cup rice, cooked according to package directions (~ 2 cups cooked)
1 medium onion, diced
2-3 garlic cloves, minced or grated
1 15.5 ounce can black beans, drained and rinsed
1 14.5 ounce can of fire roasted diced tomatoes
1 4 ounce can of diced green chilis
1 cup shredded cheddar cheese
fresh cilantro for garnish
DIRECTION
Cut the tops off the peppers. Remove the stems, but keep the remaining flesh from the top. Remove any remaining seeds and as much pith as possible. Place the pepper bottoms in a baking dish and dice up the tops.
Prepare the rice according to package directions. Set aside.
Brown the ground beef, drain and add the taco seasoning according to package directions. Set aside.
Sauté the onions and diced pepper tops until softened, add the garlic, and sauté for another minute.<br>
Add the tomatoes and green chilis, mix until well combined. Add the black beans and mix. Finally add the cooked rice and mix until well combined.
Remove from heat and mix in the taco meat.<br>Stuff this mixture into the pepper bottoms. Top with shredded cheese.
Pour about 3/4 cup of water into the bottom of the baking dish. Just enough to cover the bottom of the dish.
Cover with foil.
Preheat the Traeger or Oven to 400 degrees F. Bake/smoke covered for 30 min. Remove the foil and continue to bake/smoke for another 10 minutes or until the cheese is melted.
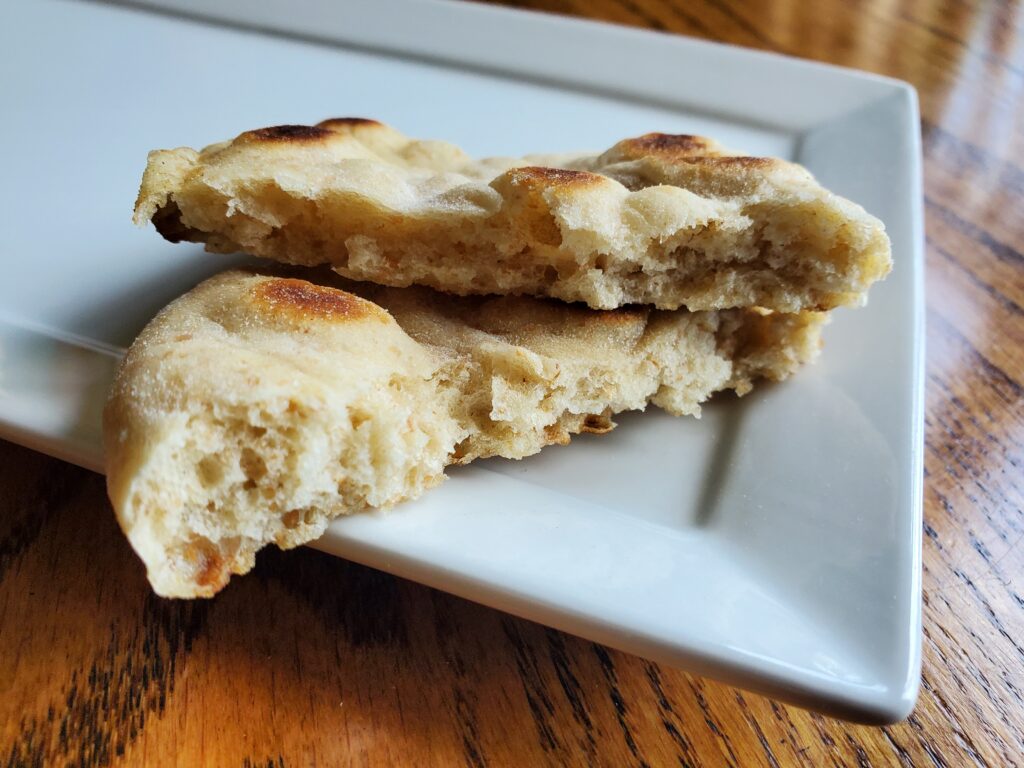
If you enjoy sourdough bread baking you must have tons of discard waiting to be used up. This sourdough discard mini pita bread recipe is a great way to use up that discard. Mini pita bread is great for dipping! It’s great paired with hummus or tzatziki sauce. Kids love them for making mini pita sandwiches. Perfect for bento boxes or other packed lunches.
Disclaimer: This post may contain affiliate links. I earn commission on qualified purchases at no additional cost to you.
First combine the water, sugar, salt, and yeast in a large mixing bowl. Next add the sourdough starter. Finally, mix in the flours until well combined.
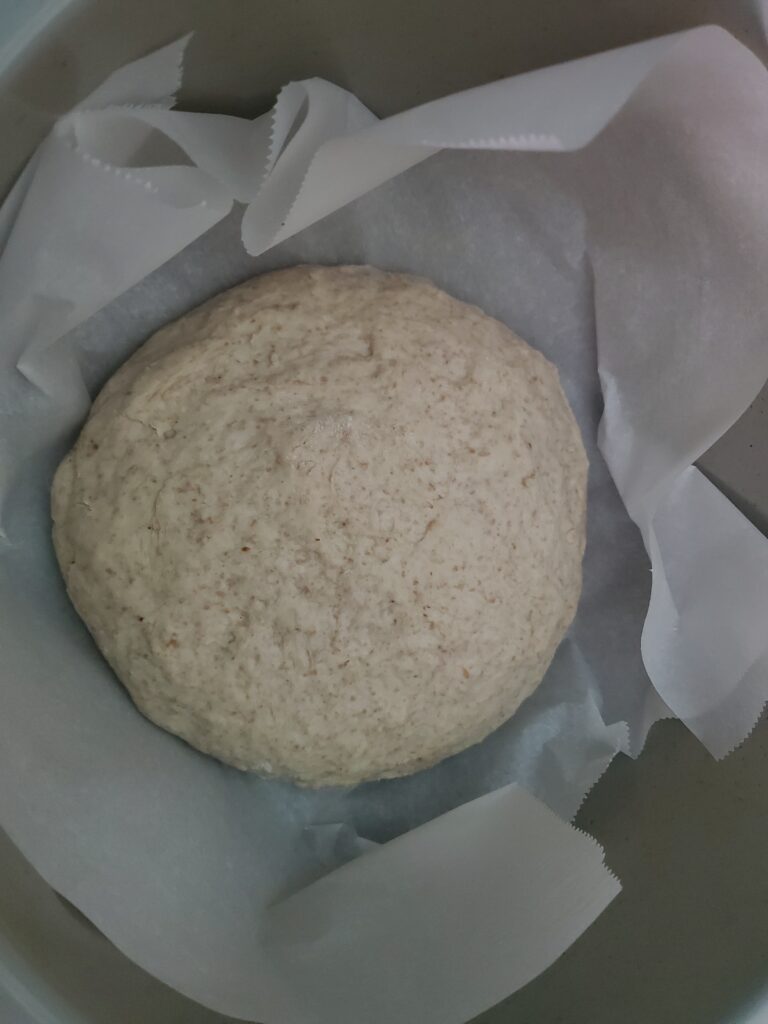
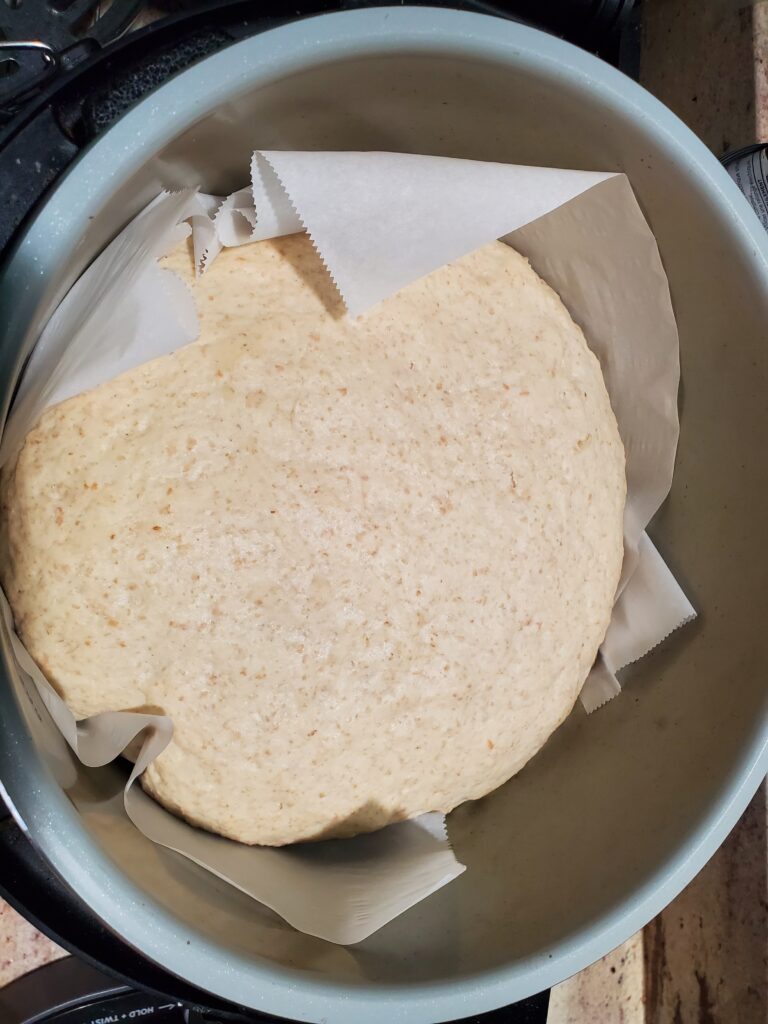
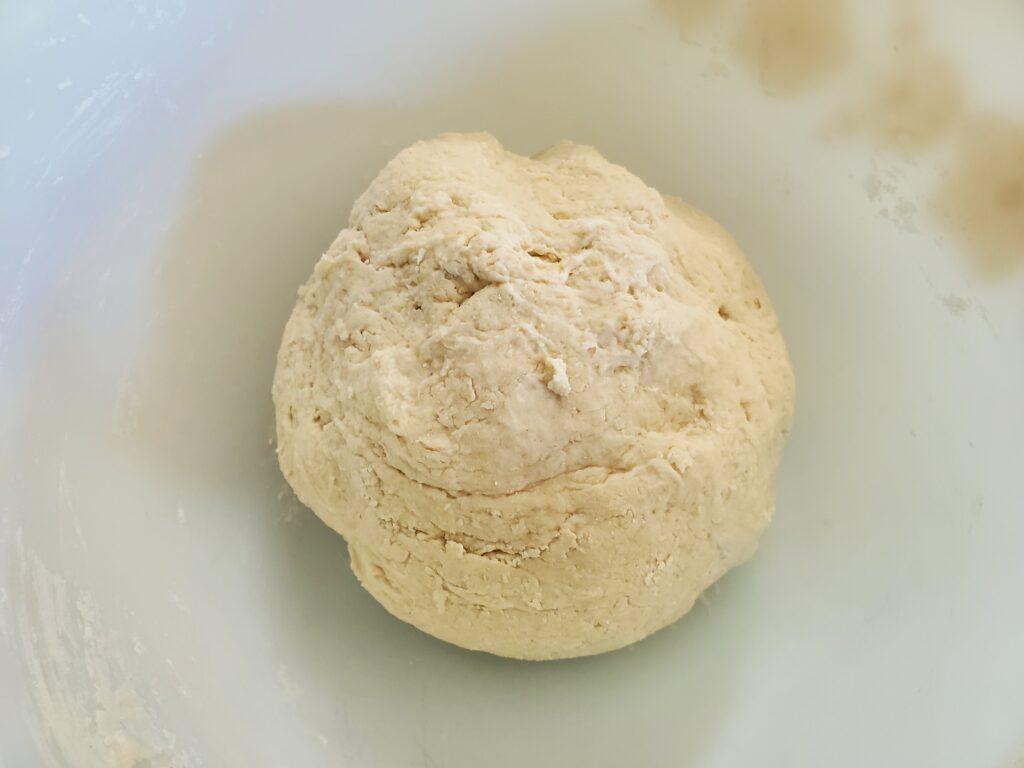
Form the dough into a ball. Knead it for 5 minutes. Add additional flour a couple tablespoons at a time if it is too sticky.
Cover the dough ball and allow it to rise in a warm spot until it has doubled in size ~ 1 hour. I usually use my Ninja Foodi on the Proof setting set to 90 degrees for this step.
Before risingAfter rising
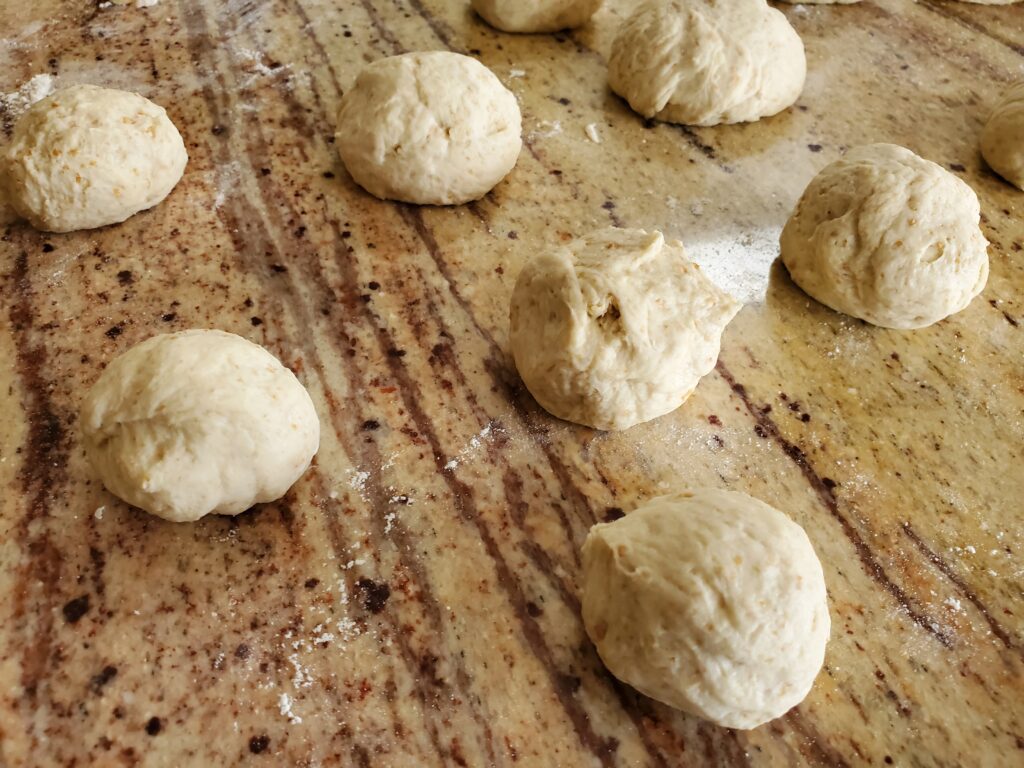
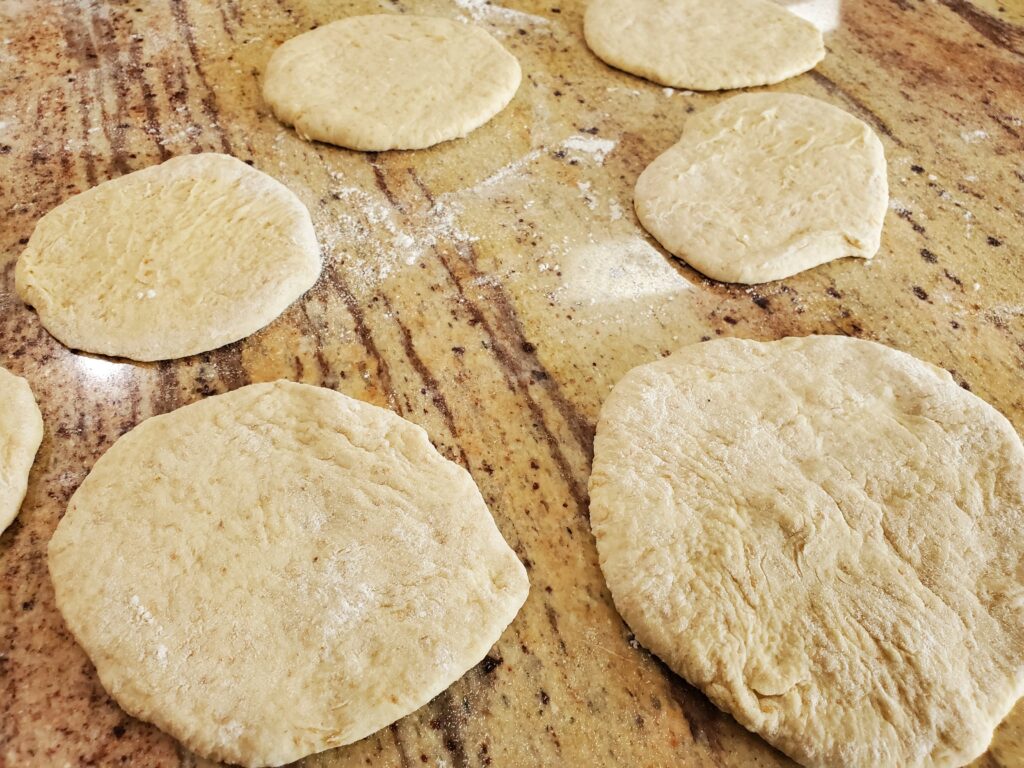
Punch down the dough and cut it into 24 pieces. Roll each section into a ball, then use a rolling pin to flatten each ball into a 3-4 inch round disk (between 1/8 and 1/4 inch thick).
Dough ballsDough disks
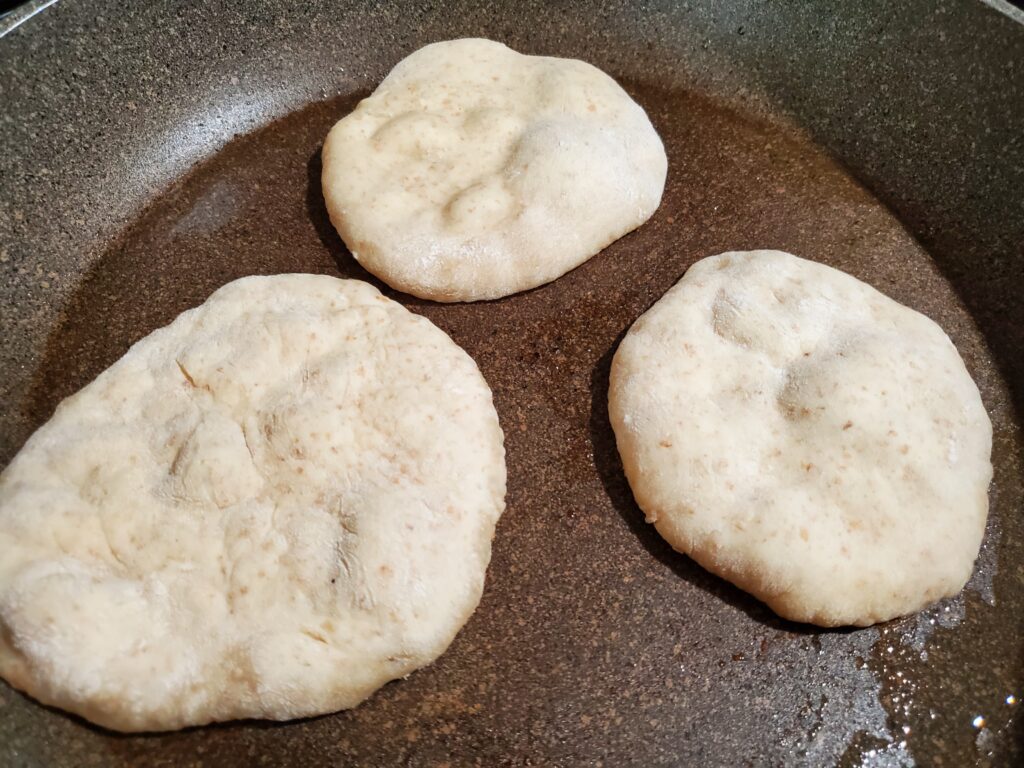
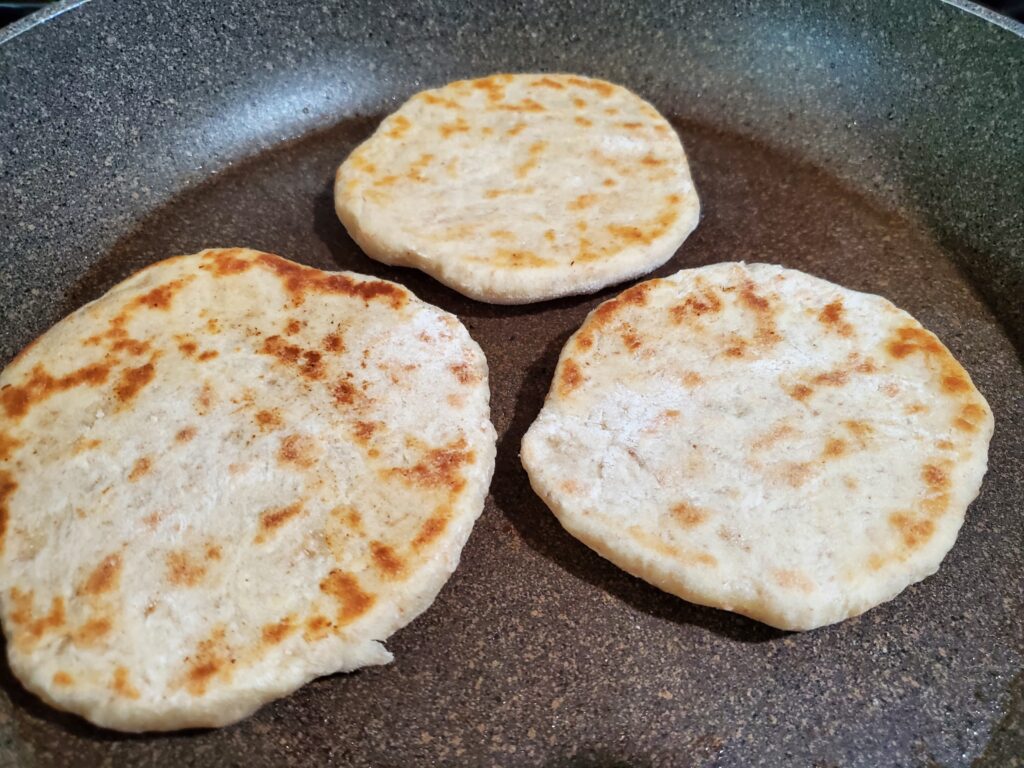
Heat up a non-stick pan to medium-high. Flip the disks into the pan. Cook until bubbles form ~ 2 minutes, then flip and cook for another minute or two.
Wait for bubblesFlip and cook another 1-2 min.
Remove from heat and place the mini pitas on a cooling rack. If the pitas stick, you can add a very small amount of olive oil to the pan.
So fluffy and delicious!
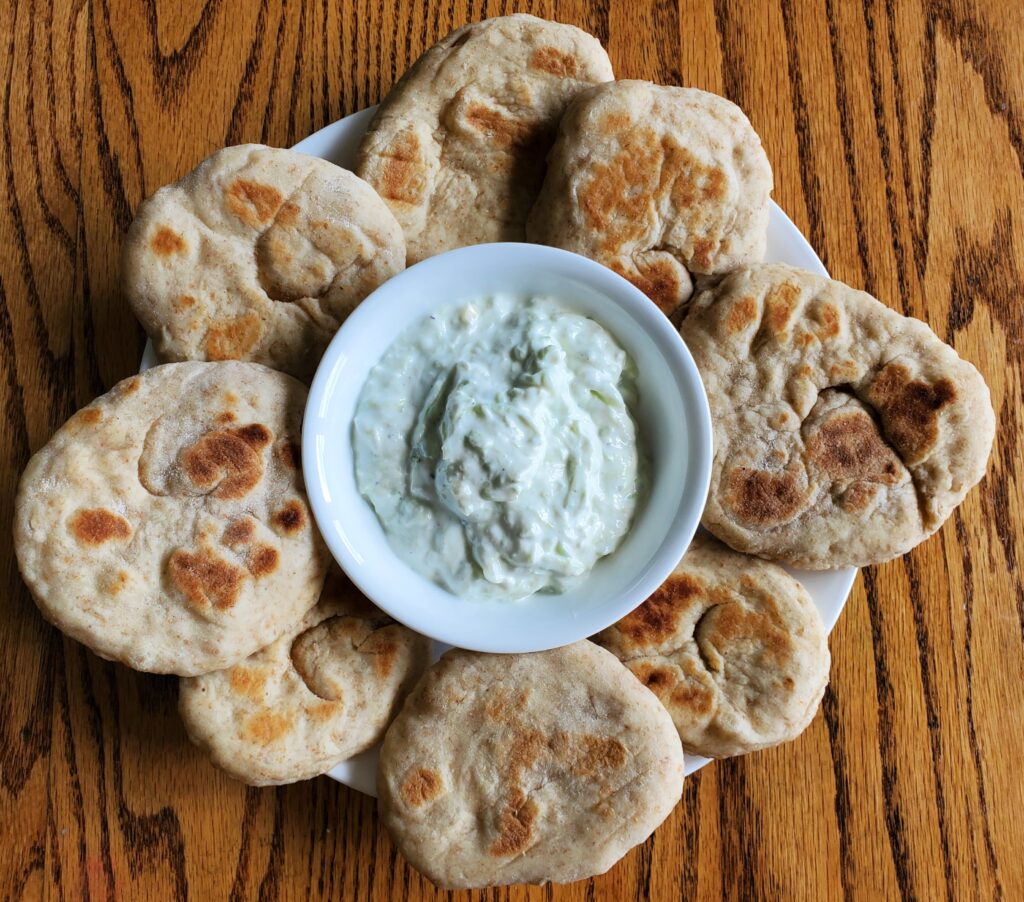
What can you use mini pita bread for?
Mini Pita bread is great for dipping
Try serving the mini pita bread with hummus or tzatziki sauce for a tasty appetizer. Find a great homemade hummus recipe and other great appetizers here.
Tzatziki and mini pitas Hummus and mini pitas
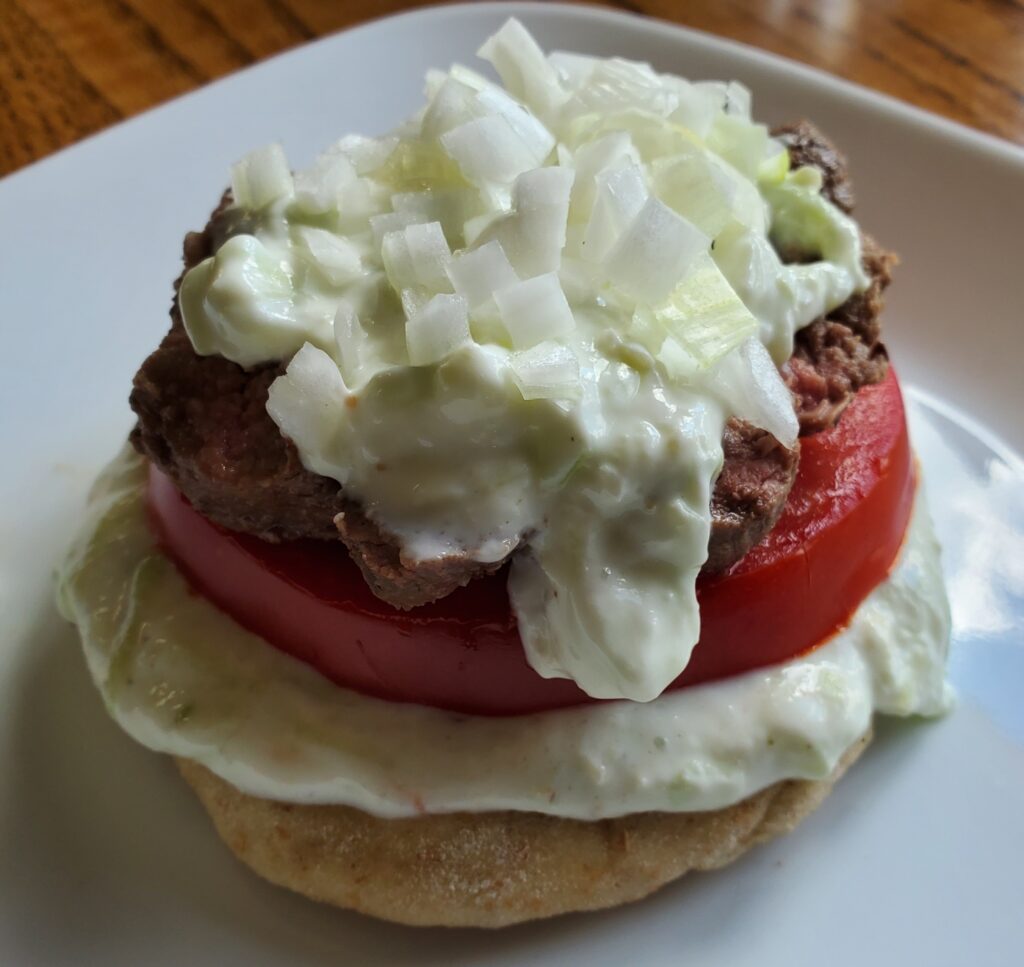
Make a mini pita sandwich
Mini pitas can be topped with sandwich toppings! You can eat them open faced or top with a second mini pita. Try a gyro sandwich on a mini pita.
Printable Recipe for Sourdough Discard Mini Pita Bread
First combine the water, sugar, salt, and yeast in a large mixing bowl. Next add the sourdough starter. Finally, mix in the flours until well combined.<br>
Form the dough into a ball. Knead it for 5 minutes. Add additional flour a couple tablespoons at a time if it is too sticky.<br>Cover the dough ball and allow it to rise in a warm spot until it has doubled in size ~ 1 hour.
Punch down the dough and cut it into 24 pieces. Roll each section into a ball, then use a rolling pin to flatten each ball into a 3-4 inch round disk (between 1/8 and 1/4 inch thick).
Heat up a non-stick pan to medium-high. Flip the disks into the pan. Cook until bubbles form ~ 2 minutes, then flip and cook for another minute or two. Remove from heat and place the mini pitas on a cooling rack. If the pitas stick, you can add a very small amount of olive oil to the pan.
NOTES
As an Amazon associate, I earn on qualified purchases.
Are you ready for some Summer fun? Time to enjoy that pool! Are you tired of Marco polo? Here are some really fun toys, games and tips to make pool time even more fun!
Disclaimer: Always have a swimming buddy or parent supervision when playing in or around water. This post may contain affiliate links. I earn commission at no additional cost to you.
Sharks and Minnows
Equipment required: none
How to play: Choose a player to be the shark. All other players are minnows. The minnows start at one end of the pool. The minnows must swim to the other side of the pool, without being tagged by the shark, to win. The shark must close his or her eyes and attempt to catch the minnows as they swim across the pool. If a minnow is tagged (caught by the shark) they are out. The minnows can climb out of the pool and walk to the other end, but they too can be caught by the shark. If the shark yells “fish out of water” when a minnow is out of the water, that minnow is out.
Variations: For younger kids, you can choose to have the shark keep his/her eyes open. You can also choose caught minnows to become additional sharks – last minnow wins.
How to play: This game is best for strong swimmers. Each player will don a mermaid tail and line up at one end of the pool. Then the players use the mermaid tails to propel them to the other end of the pool. First player to the other end wins.
Noodle Races
Big Joe Zzoodles
Equipment needed: One pool noodle per player. I suggest the Big Joe Pool Noodle or Zzoodle for kids. Our Big Joe Zzoodles have lasted 4 seasons already and they are still in good shape.
How to Play: Each player starts on one end of the pool with their noodle. Players must mount their noodle like a horse. They must keep the noodle between their legs while racing to the other side of the pool. First player to the other side of the pool wins!
The Category Game
Equipment needed: none
How to play: One player is “it.” All other players line up on deep end of the pool. The player who is “it” stands on the side of the deep end of the pool, with their back to the pool. The player who is “it” chooses a category. For example: Who is your favorite super hero? Each player chooses their favorite super hero, but keeps that information secret. The player who is “it”, starts listing super heroes. If they say Superman, and that was your hero, you must begin swimming to the other end of the pool. It’s difficult to swim quickly and quietly. If the player who is “it” hears someone swimming they can turn around and jump in to catch the other player before they reach the other end of the pool. The winner of this fun pool game is the first person to reach the other end of the pool without being caught.
Other Category Suggestions: Favorite color, favorite pizza topping, favorite ice cream flavor, favorite Taylor Swift song etc…
How to play: This fun pool game is best played while wearing goggles. Players go underwater and toss the torpedo back and forth underwater. The torpedo glides through the water up to 30 feet!
How to play: Two or more players toss the ball around without letting it touch the water. Count how many passes you can make before the ball hits the water. Try to improve your score each time you play.
Variations: To play with an odd number of people, throw the ball in a triangle, or one person can be the monkey in the middle. If the ball is dropped, the monkey takes the place of the person at fault.
Ball Tag in the Pool
Equipment needed: A soft splash ball or beach ball. If you choose a beach ball, you can get one for whatever you party theme is. For example choose a patriotic beach ball for an Independence Day party.
How to play: Ball tag is similar to regular tag, but you must tag the other players with the ball. This is why it is important to choose a soft ball. Choose a player to be “it”. They must tag another player with the ball. Players can choose to swim away or duck underwater to avoid being hit. If a player is hit, then they are “it”. The game keeps going!
Find the “invisible” water bottle game
Equipment needed: An empty clear plastic 2 Liter bottle or water bottle
How to play: Remove the label, cap, and plastic ring from the empty clear plastic bottle. Fill the bottle with pool water and allow it to sink to the bottom of the pool. The bottle will be nearly “invisible” to swimmers in the pool. Try hiding the bottle before your friends arrive. Once everyone is in the water, ask them to find it. You can play this fun pool game play too since the bottle will move around, you will not know where it is either.
Note: If the pool water is still and you are looking down into the water from outside the pool, you can see the bottle. Make sure players are inside the pool before they start hunting for the bottle.
How to play: Toss the dive toys into the pool. Wait for them to sink. All players jump in and collect dive toys. The player with the most dive toys recovered wins!
How to play: All players stand in a circle in the shallow end. The first player tosses the ball straight up in the air claps once then catches the ball. If successful, they pass the ball to the player to their left. This player tosses the ball straight up in the air claps twice and catches the ball. If successful, they pass the ball to the player to their left. Continue passing and increasing the clap requirement until someone fails. That player is out. The next player starts over at one clap. The game continues until only one player remains. The winner!
How to play: Similar to the regular game of around the world. You choose 3 locations for players to shoot from. There is not a good way to mark the locations in a pool, instead use locations near the edge of the pool. Place a toy maker at each location. Dive sticks work well for this. Players line up and one by one they attempt to shoot a hoop from each location. If successful they move to the next location. If they fail, they go to the back of the line. The goal is to successfully make a basket form all three locations.
Rubber Ducky Race
Equipment needed: One rubber ducky per player. A random assortment is best so each player knows which duck is theirs. If they are all the same, use a sharpie to number them. This way there will be no fights.
How to play: All players and ducks start at one end of the pool. Players may not touch the ducks. They can only splash their duck to move it across the pool. Players may also choose to splash, but not touch other players ducks backwards. The winner is the first duck to reach the other end of the pool. Pure chaos and tons of fun!
Equipment needed: Various pool toys: Floats, Dive Toys, underwater rings, noodles and balls.
How to play: This is a really fun pool game that boosts creativity. Use the pool toys you have available to make your own obstacle course. For example: Start by jumping in the deep end and retrieve a dive toy from the bottom of the pool. Next swim up though a ring and kick to a noodle. Climb out of the ring and ride the noodle like a horse to the end of the pool. First player to the end wins!
Note: You can add plenty of other steps to your obstacle course. Another fun one is adding rings to swim though.
Remember adult supervision is recommended when children are playing in the water.
Other Fun Games
If you have a rainy day and are in need of an indoor game, check out this post for fun family games for all ages.
As an Amazon associate, I earn from qualified purchases.
Almost 3/4 cup warm water ~105 degrees (see instructions)
1 cup sourdough discard from the refrigerator
Pizza Crust Instructions
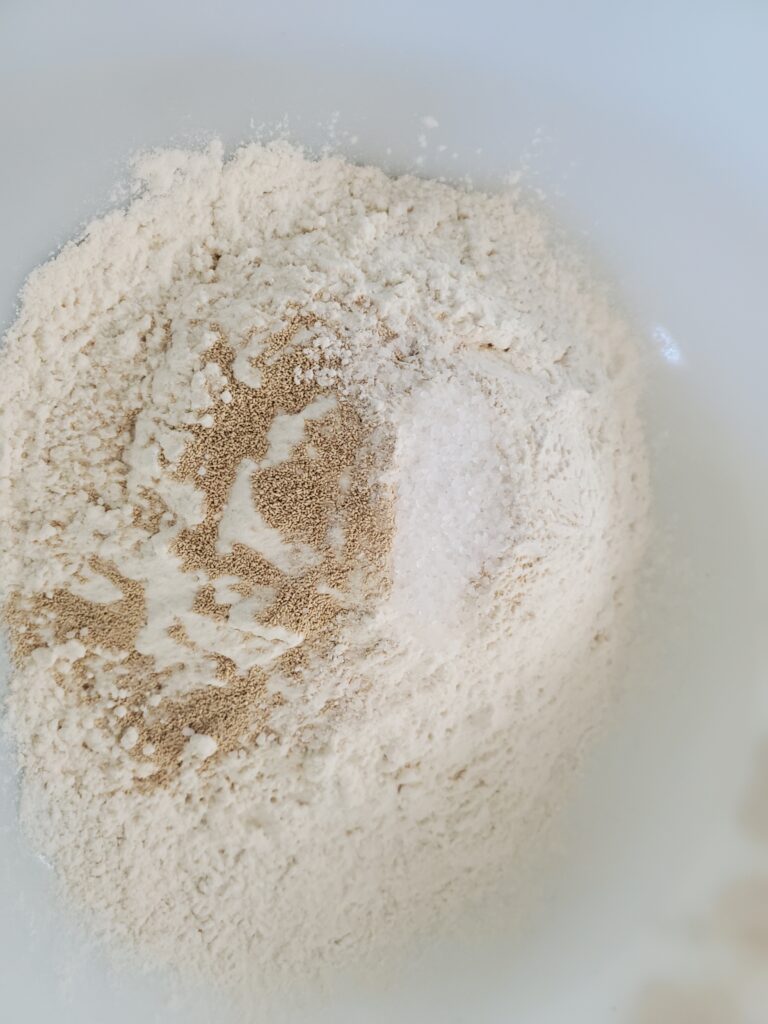
Mix the dry ingredients, flour, yeast, and salt in a mixing bowl.
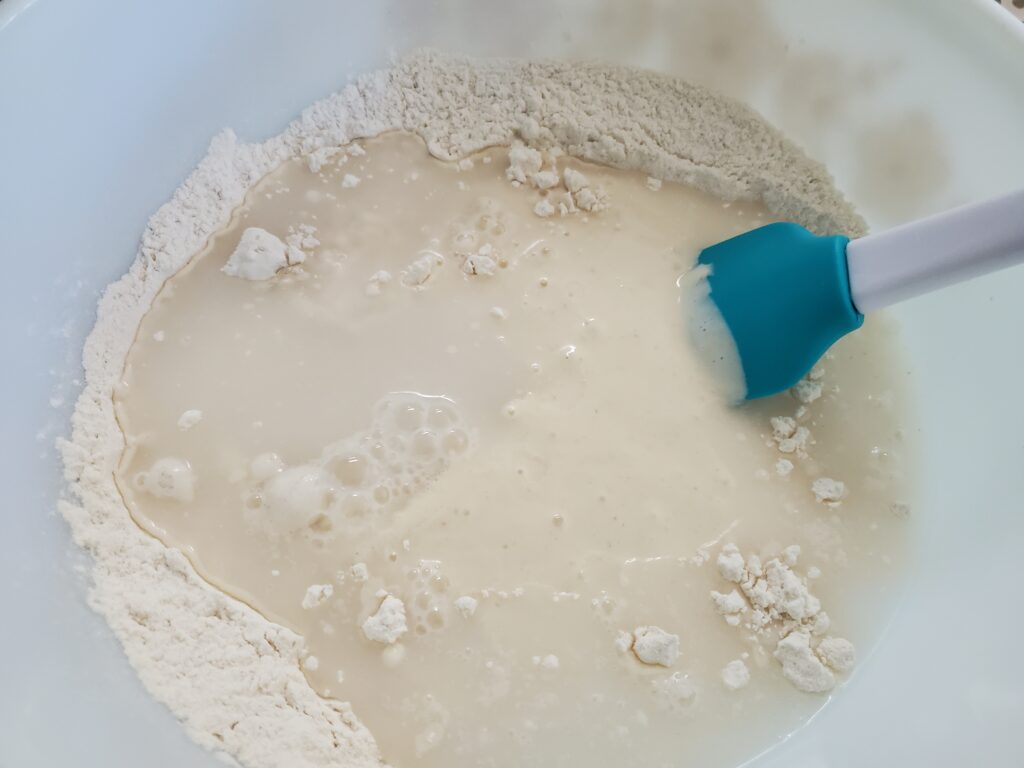
Measure 3/4 cup of warm water. Remove 2 tablespoons of the water and set aside. Add the starter and the remaining water (almost 3/4 cup) to the four mixture.
Mix until a dough ball forms.
Continue to knead the dough ball in the bowl until all flour is absorbed. If the dough ball is dry, add some of the water you set aside. Add water until all of the flour is incorporated into the dough ball and it is not overly sticky. Knead for 5-7 minutes. Alternatively you can use a mixer with a dough hook.
Dough balls before risingdough balls after rising
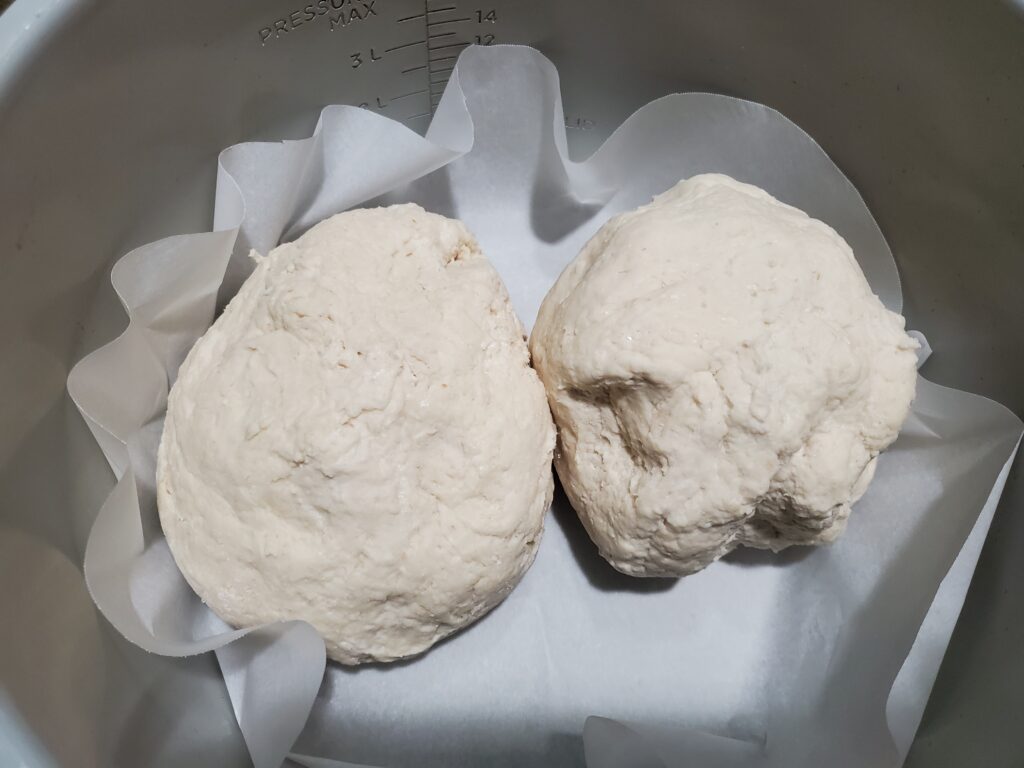
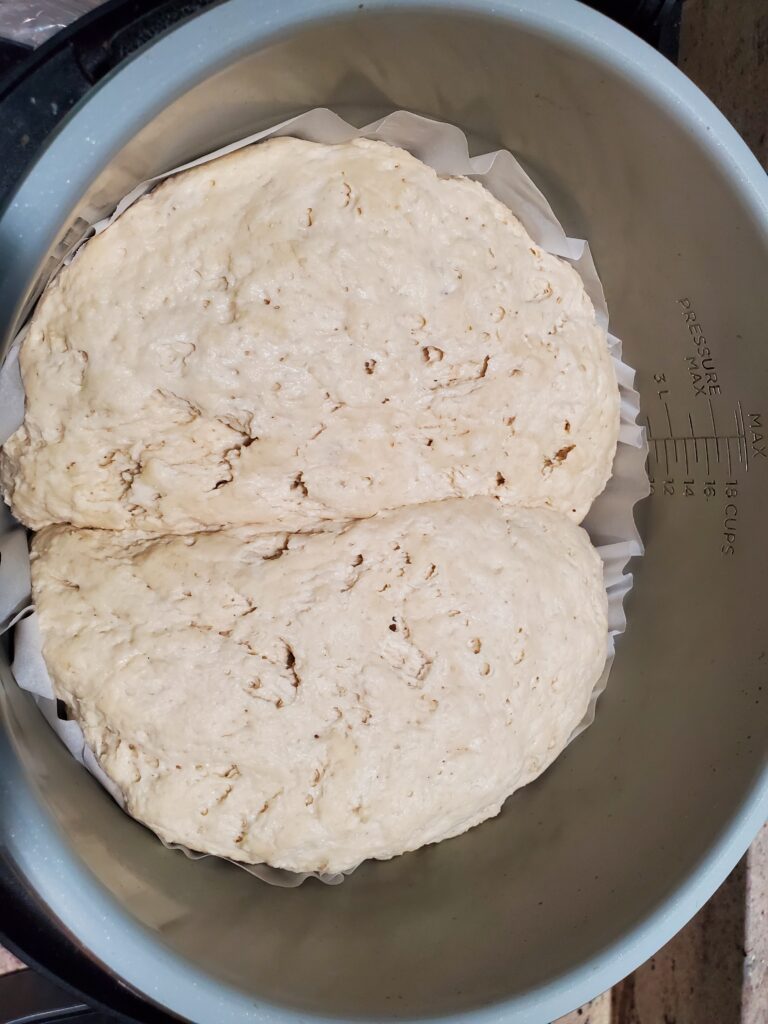
Allow your dough to rest and rise until it doubles in size. (I made a double batch) This will take ~ 2-4 hours. I prefer to put my dough into my Ninja Foodi on the proof setting at 85 degrees for 4 hours. Any proofing box will work for this step, or if your home is already warm, you can just cover it with a clean dish towel and let it rise on the counter.
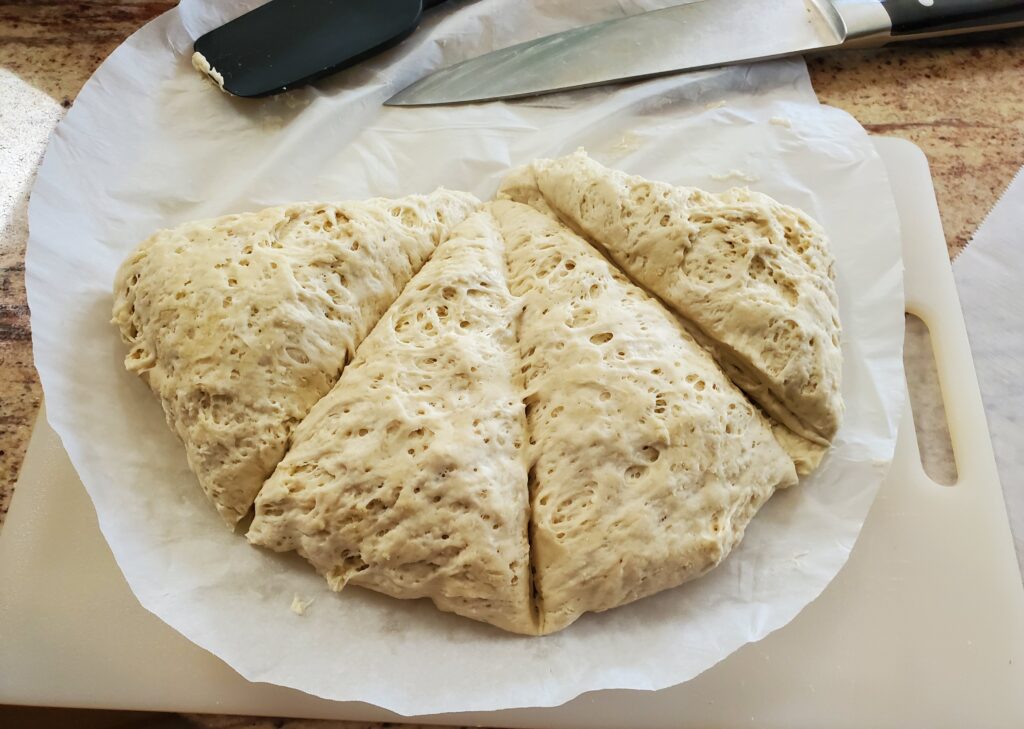
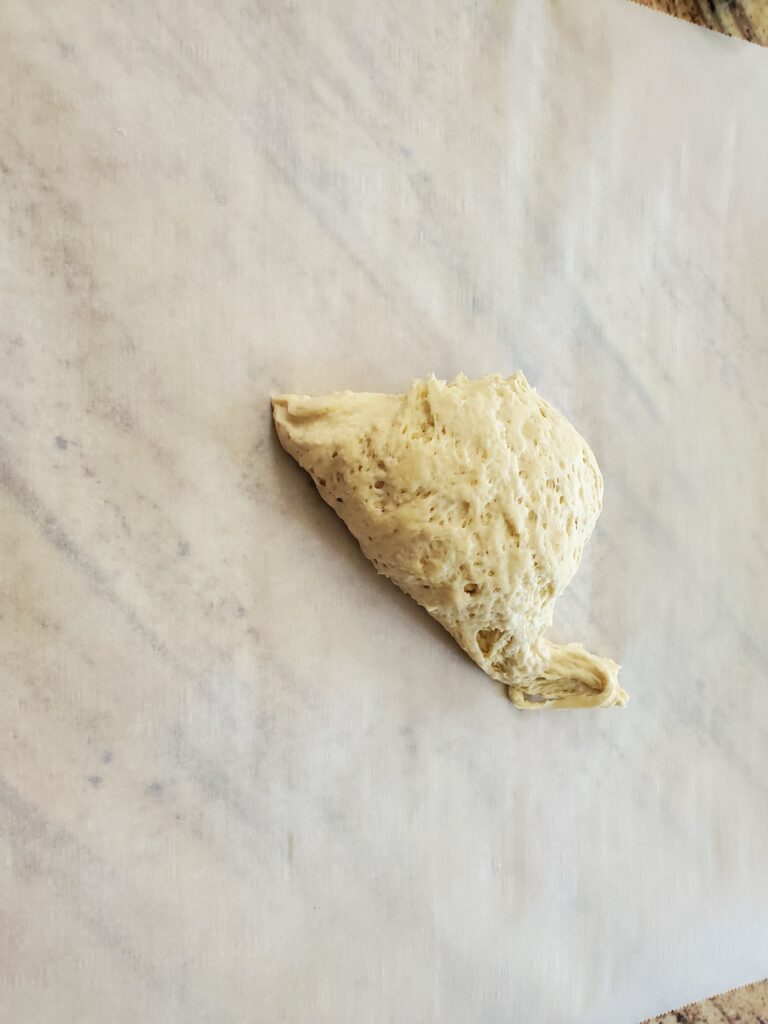
Once the dough has doubled in size remove it from the proofing box. For two 12-inch thin crust pizzas, divide the dough in half. Alternatively, cut the dough into 4 pieces for 6-inch personal pizzas.
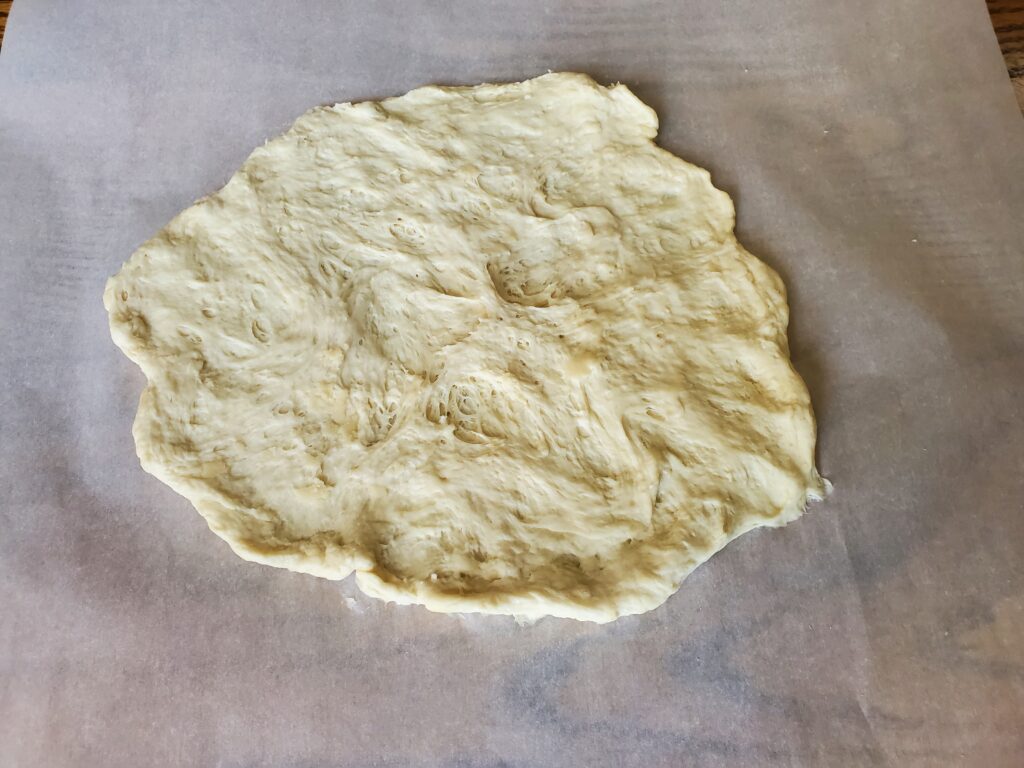
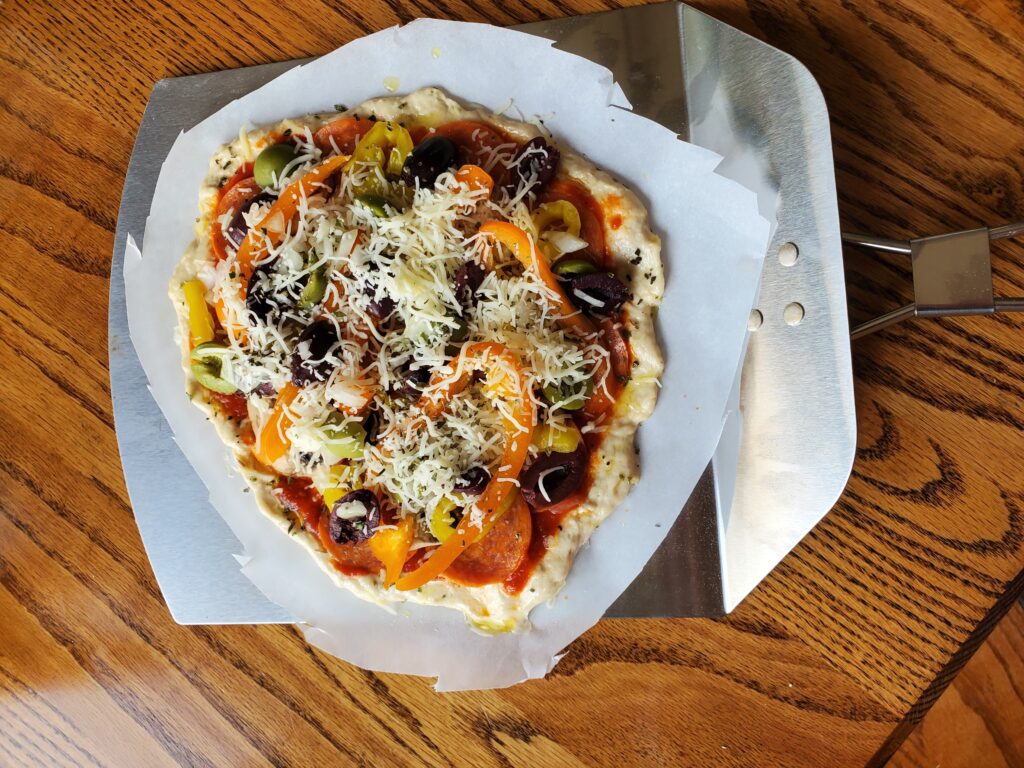
Press each dough piece out on a piece of parchment paper.
Dough ready to be pressed outdough pressed out-ready for toppings
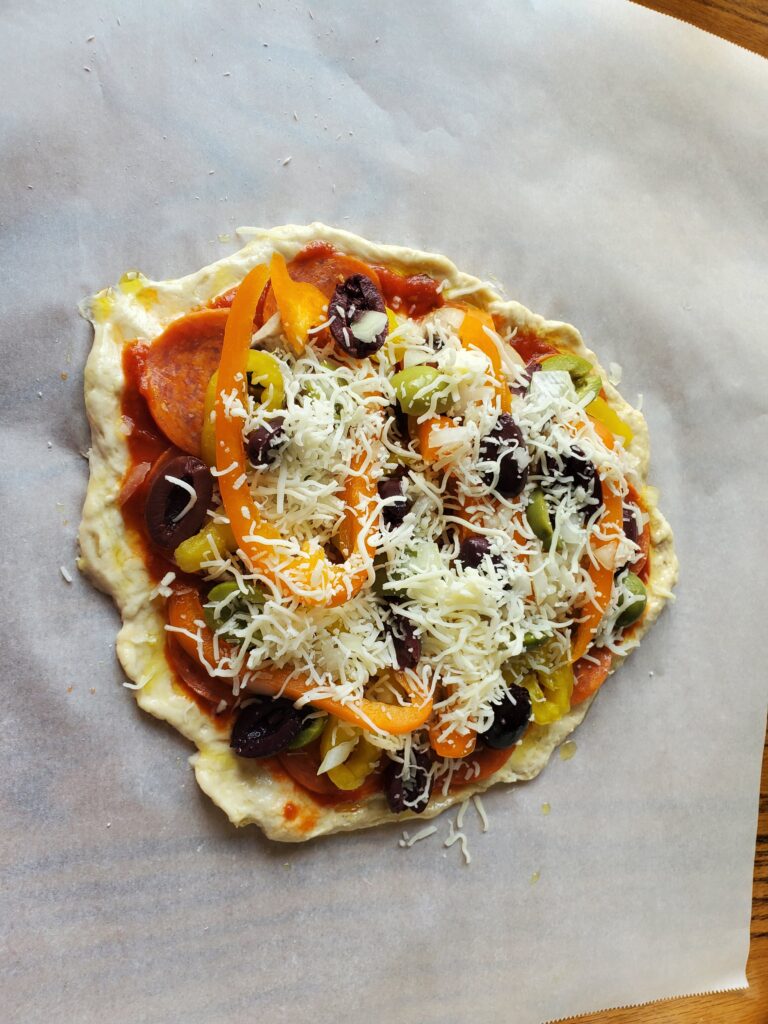
Add your sauce and toppings.
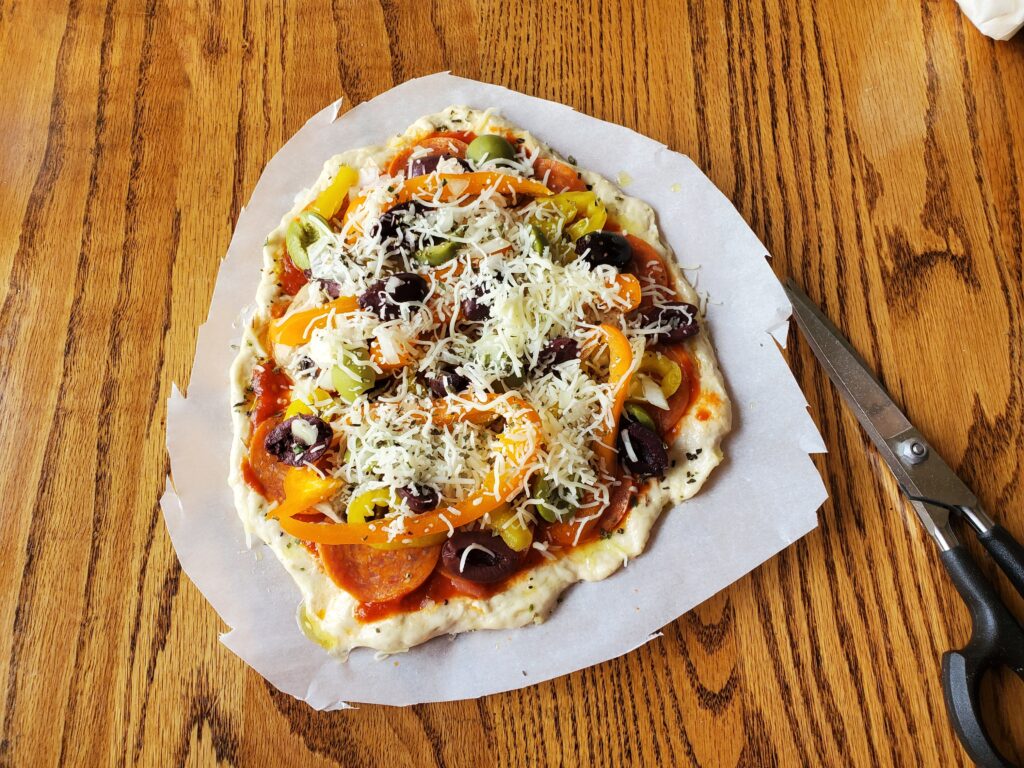
Cut the parchment paper about 1 inch around your pizza.
Baking Sourdough Discard Pizza Crust
Preheat your oven with pizza stones inside to 450 degrees F.
Use a pizza peel to transfer the pizza dough, with parchment paper underneath to the hot stones inside the oven.
Bake for 7 minutes. Use the pizza peel to remove the pizza. Transfer to a plate and slide the parchment paper off.
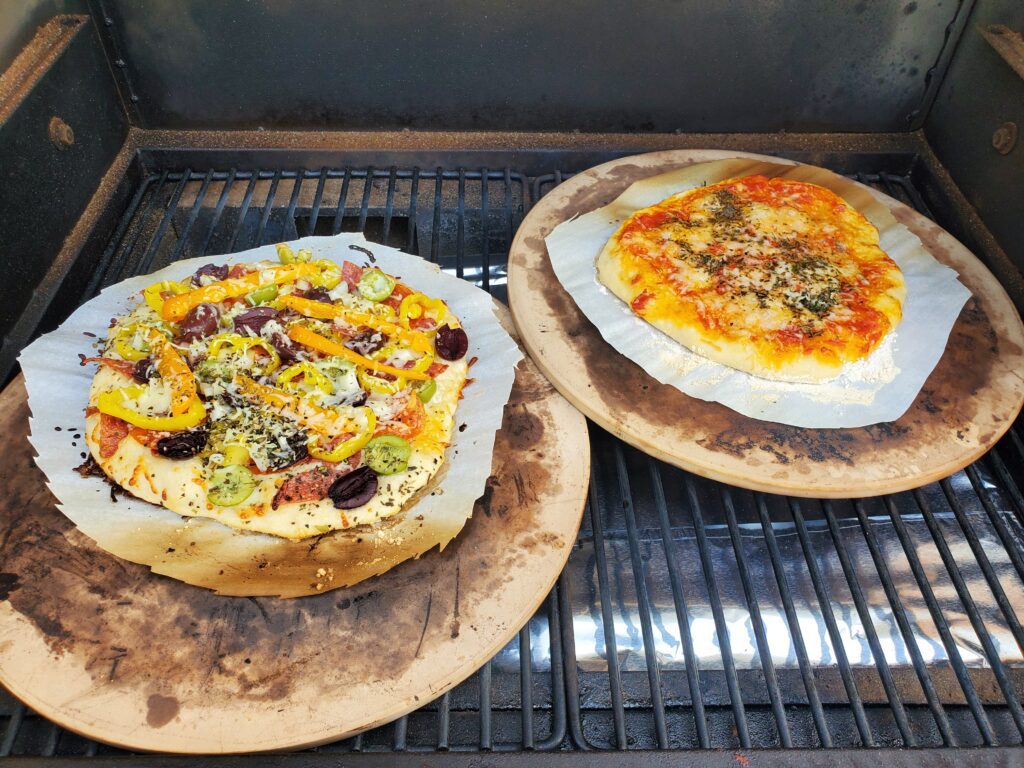
Can you bake the pizza on a Traeger?
Pizza on the Traeger
Yes you can! Just preheat your Traeger to 450 degrees with the pizza stones inside. Use the pizza peel to transfer the pizzas with the parchment paper onto the stones. Bake/smoke for 7 minutes. Use the peel to remove the pizzas and transfer them to a plate. Remove the parchment paper, slice and enjoy!
Can you make breadsticks with this dough?
Yes you can! Just press out the dough onto a piece of parchment paper. Instead of adding pizza sauce and toppings, spread garlic butter, parmesan cheese and dried basil on the dough. Bake the same as the pizza directions.
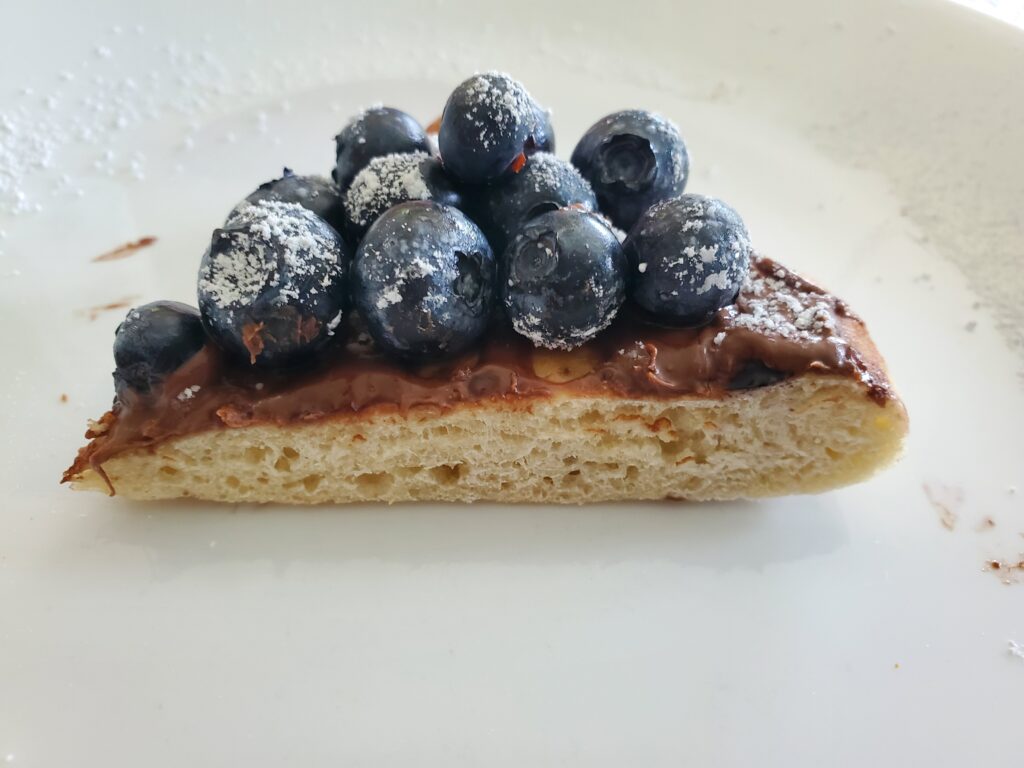
How do you make dessert pizza?
Simple, press the dough out onto a piece of parchment paper. Poke a few holes in the top of the dough with a fork. Bake the plain crust the same as the pizza instructions. Top with dessert toppings such as Nutella or cream cheese and fruit.
Almost 3/4 cup warm water ~105 degrees (see instructions)
1 cup sourdough discard from the refrigerator
DIRECTION
Mix the dry ingredients, flour, yeast, and salt in a mixing bowl. Measure 3/4 cup of warm water. Remove 2 tablespoons of the water and set aside. Add the starter and the remaining water (almost 3/4 cup) to the four mixture. Mix until a dough ball forms. Continue to knead the dough ball in the bowl until all flour is absorbed. If the dough ball is dry, add some of the water you set aside. Add water until all of the flour is incorporated into the dough ball and it is not overly sticky. Knead for 5-7 minutes. Alternatively you can use a mixer with a dough hook.
Allow your dough to rest and rise until it doubles in size. This will take ~ 2-4 hours. I prefer to put my dough into my Ninja Foodi on the proof setting at 85 degrees for 4 hours. Any proofing box will work for this step, or if your home is already warm, you can just cover it with a clean dish towel and let it rise on the counter.
Once the dough has doubled in size remove it from the proofing box. For two 12-inch thin crust pizzas, divide the dough in half. Alternatively, cut the dough into 4 pieces for 6-inch personal pizzas. Press each dough piece out on a piece of parchment paper. Add your sauce and toppings.
Cut the parchment paper about 1 inch around your pizza.<br>Preheat your oven with pizza stones inside to 450 degrees F.<br>Use a pizza peel to transfer the pizza dough, with parchment paper underneath to the hot stones inside the oven. Bake for 7 minutes. Use the pizza peel to remove the pizza. Transfer to a plate and slide the parchment paper off.
NOTES
As an Amazon Associate, I earn on qualified purchases.
The best part about making your own bread is being able to choose your own ingredients. With this recipe, you will have many choices. Many ingredients are optional and can be swapped out for other ingredients of your choice. This recipe is a combination of my 3 favorite breads, sourdough, rye, and multigrain. If you prefer whole wheat, no worries, this recipe will still work for you!
In order to consider a bread multigrain, it must have at least 2 grains. This bread contains, rye or whole wheat, flax and oats as well as many seeds. If there are any seeds you do not have or do not like, just delete or replace them. This is what makes this bread so flexible.
Disclaimer: This post may contain affiliate links. I earn commission at no additional cost to you.
What tools do you actually need to make sourdough bread?
You will need an active starter, find tips for how to start and care for your starter here
A kitchen scale. Baking sourdough is a scientific process so most recipes will list ingredients by weight. If you have a postage scale that will work too.
A proofing box or suitable alternative. I use the proof setting on my Ninja Foodie for this purpose, it’s more expensive but it also works as and air fryer, pressure cooker and more. Check out this post for more options. If your kitchen is consistently between 78 and 85 degrees then you do not need a proofing box.
Meat thermometer. This is the only way to determine if your bread is done. It’s also helpful for checking the temperature of the water you add.
Parchment paper – This will help prevent sticking and make it much easier to transfer your dough.
Multigrain Sourdough Bread Ingredients
150 Grams Active and Fed Sourdough Starter (find tips on sourdough starter here)
* Optional ingredients. Note: you still need at least 2 grains to call this bread multigrain bread.
Multigrain Sourdough Bread Instructions
Preparing ingredients and dough
Start by weighing out the oats, pumpkin seeds, sunflower seeds, and flax seeds. Place them in a cereal bowl. Cover with water ~ 100 grams or enough to cover the seeds (this will be drained off). Soak the seeds for 1 hour.
Meanwhile weigh out the remaining seeds and place them in a second cereal bowl, and set aside.
sourdough starter
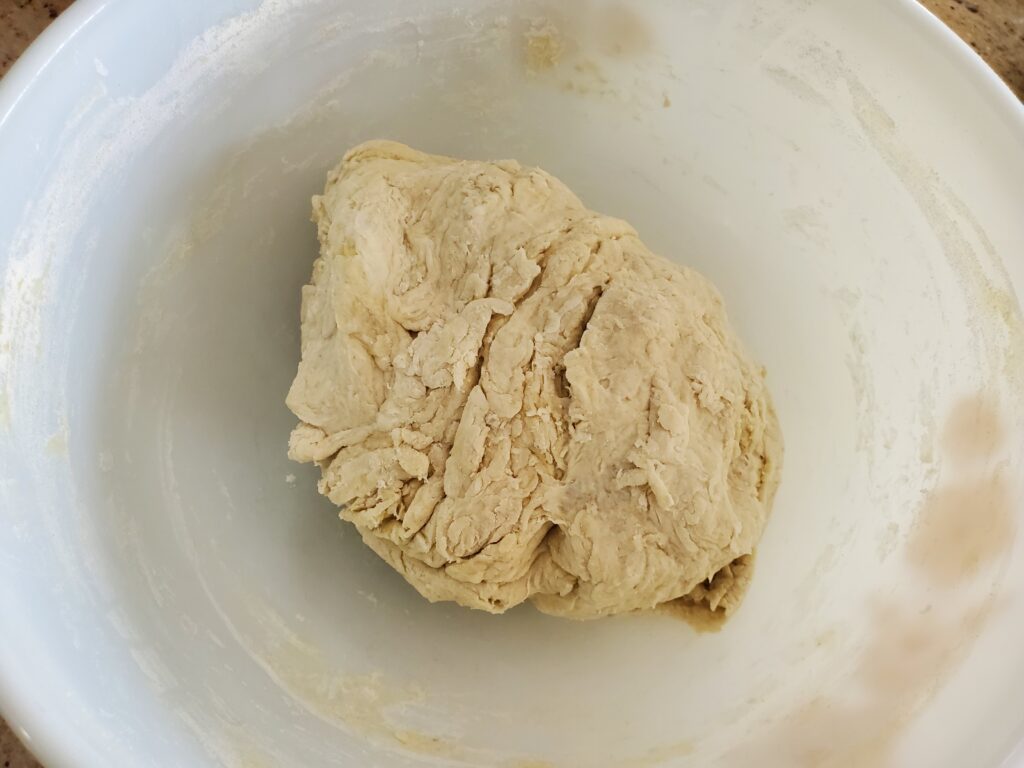
Weigh out the starter, warm water and olive oil. Mix together in a mixing bowl. Then weigh out the salt, and flours. Mix the salt and flours with the wet ingredients. You may have to use your hands or a bread scraper to incorporate all of the flour.
Resting stage
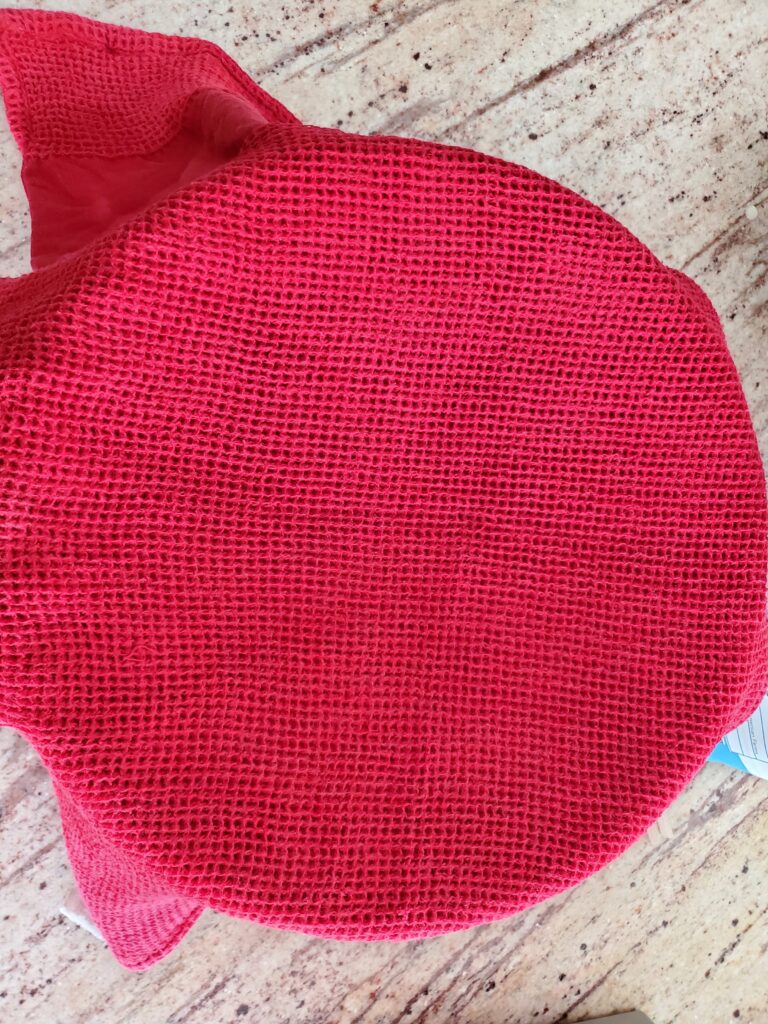
The dough will appear dry at this point, that’s okay. Cover the dough with a warm damp kitchen towel and allow it to rest for 60 minutes. The technical term for this stage is autolyze, hydrating the flour. This step is especially important when using whole wheat or rye flour.
After the oats and seeds have soaked for 1 hour, drain the water off. This is easily done with a wire strainer.
Adding the seeds to multigrain sourdough
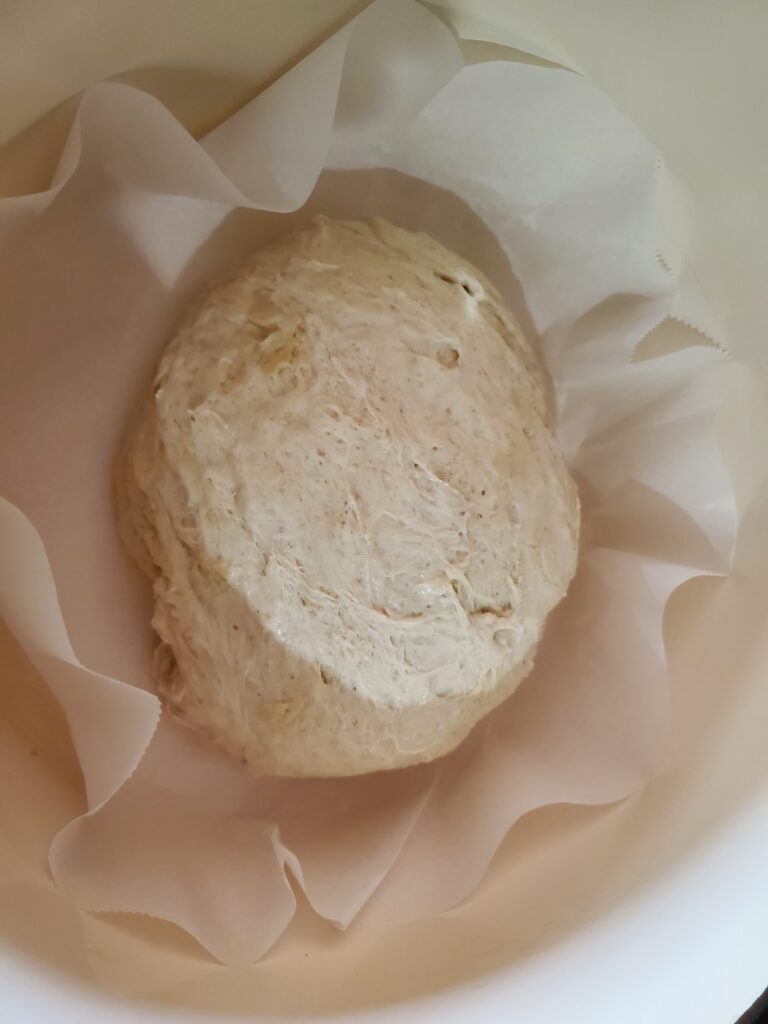
After your dough has rested for 60 minutes, press a bowl shape into your dough and add all of the wet and dry seeds. Fold the dough over the seeds several times to mix. The seeds will continue to mix during the next stage, so don’t worry if they are not fully mixed. Form you dough into a ball and use the ball to collect as many seeds as possible remaining in the bowl.
Stretching and folding
Place the ball on a sheet of parchment paper, into your proofing box or acceptable alternative. I use a Ninja Foodi on the proof setting at 85 degrees for this step. If you kitchen is warm enough, you can just place the dough in a mixing bowl for this step.
After 15-20 min, stretch and fold the dough over on itself, turn 1/4 and stretch and fold again. Continue to turn the dough 1/4 turn and do a total of 4 stretches and folds (a full circle). Wait another 15-20 min and do another set of 4 stretches and folds. Continue to stretch and fold a total of 3-4 times in the first hour. At this point your seeds should be thoroughly mixed.
Fermentation and rising
Continue to allow your dough to rise in the proofing box at 85 degrees. Check on it every hour to see if it has doubled in size. It usually takes 3-4 hours at 85 degrees, depending on how active your starter is.
Baking multigrain sourdough
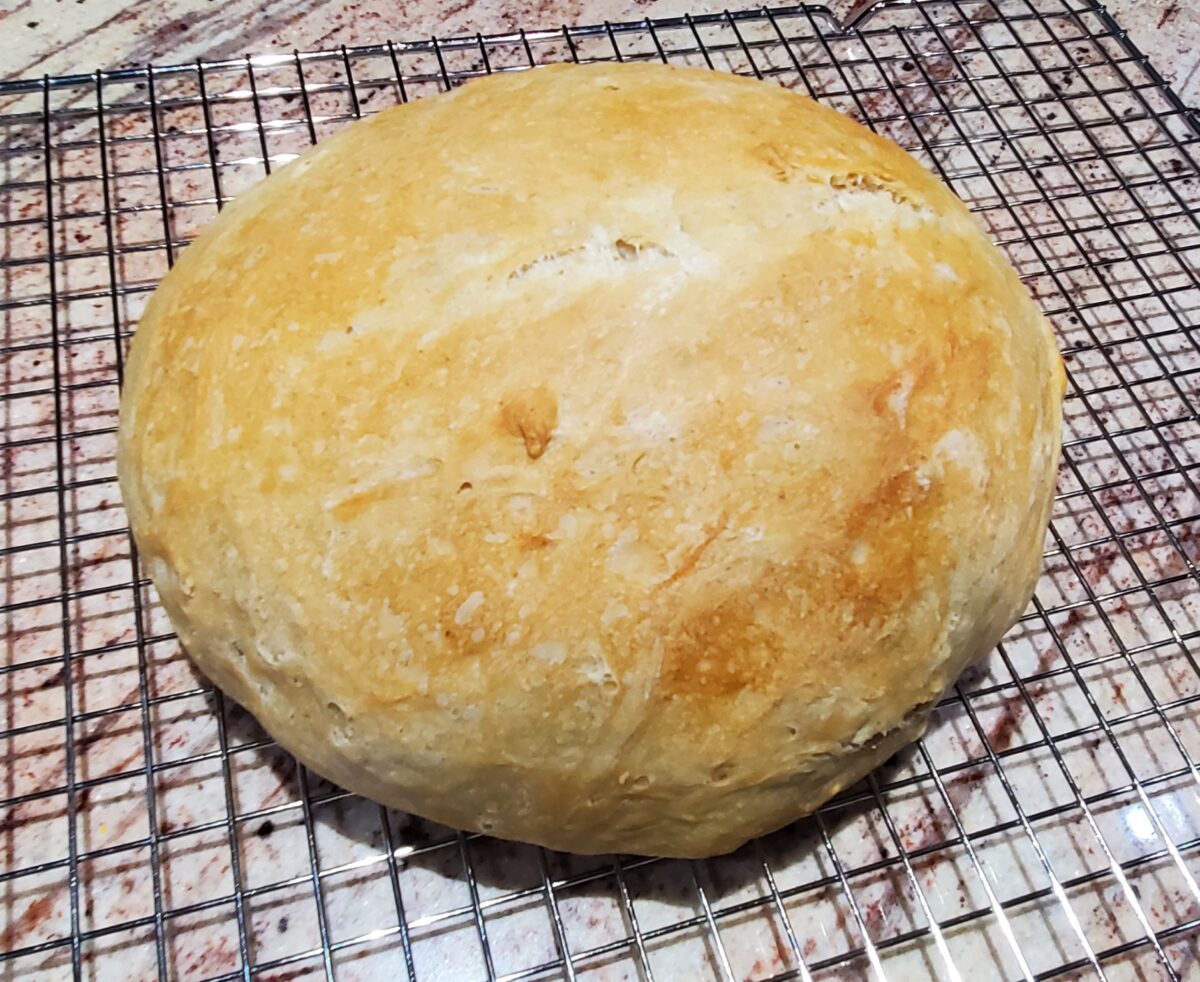
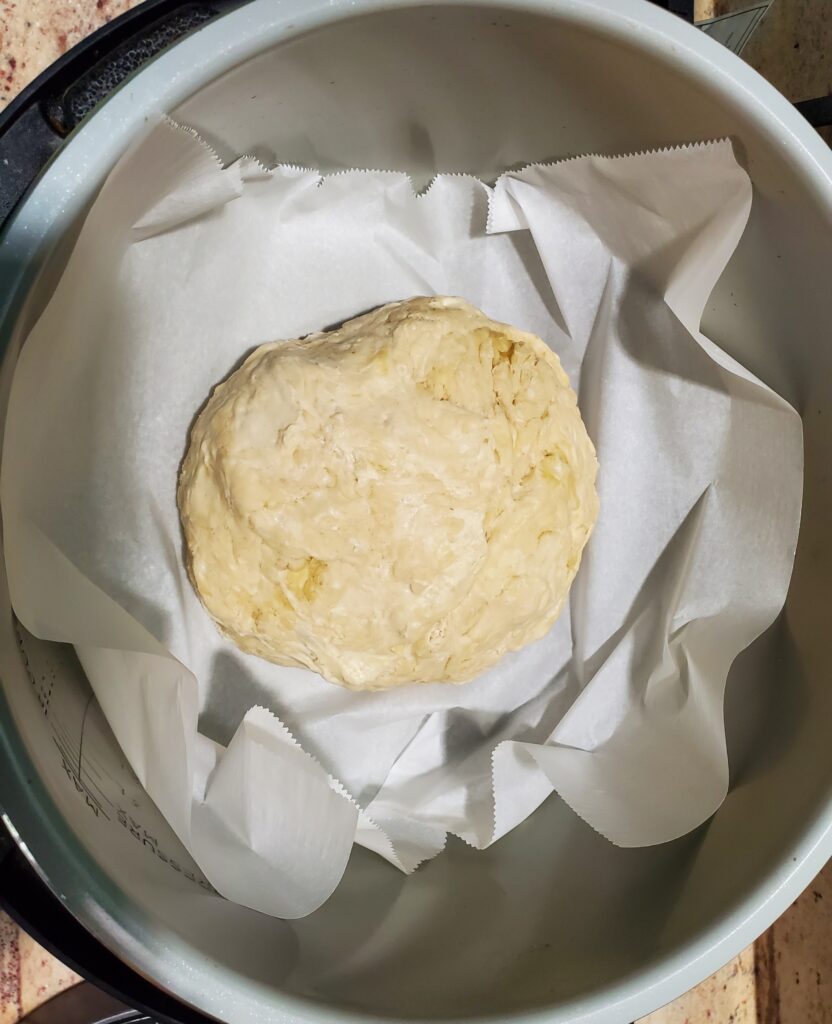
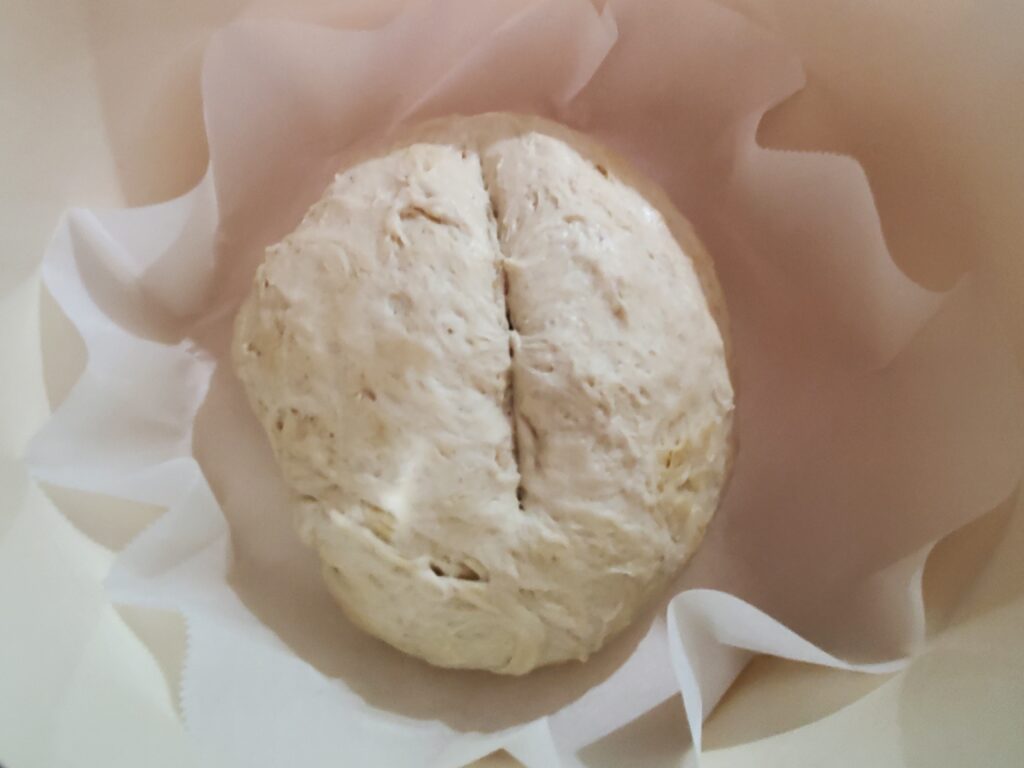
Preheat your oven to 450 degrees F. Line the inside of a Dutch oven with parchment paper. Remove the dough from the proofing box and use a dough scraper to carefully remove it from the parchment paper. Fold the edges under to create a ball.
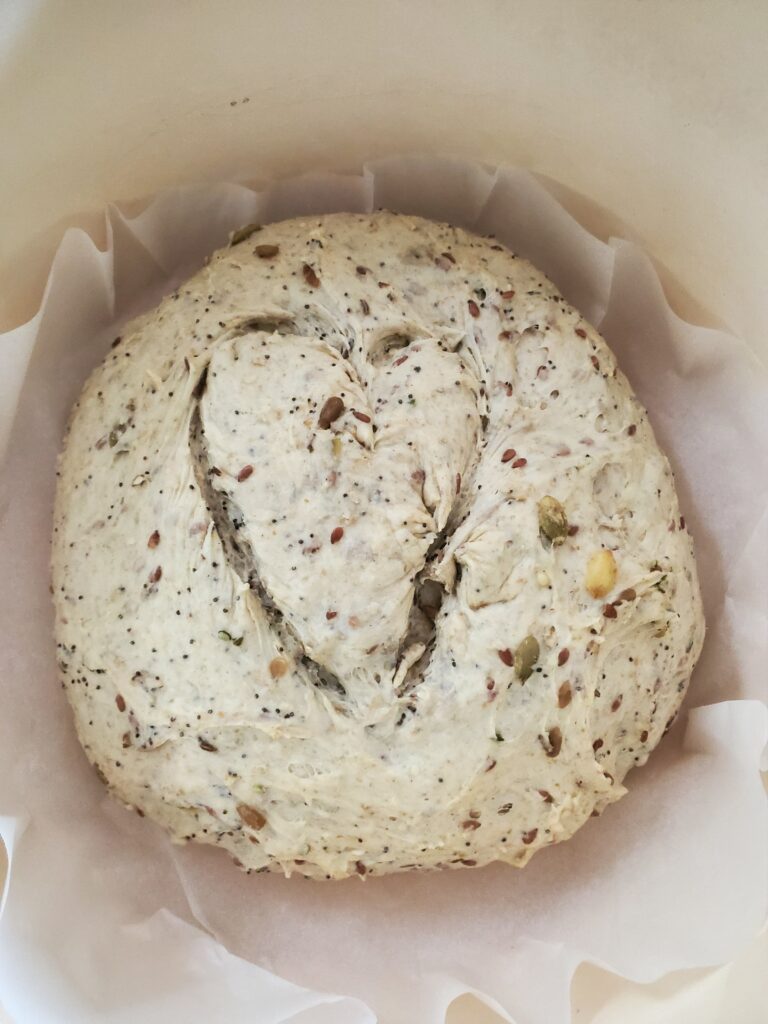
Place the dough ball seam side down into the Dutch oven. Score the top of the dough about 1/4 inch deep with a sharp knife.
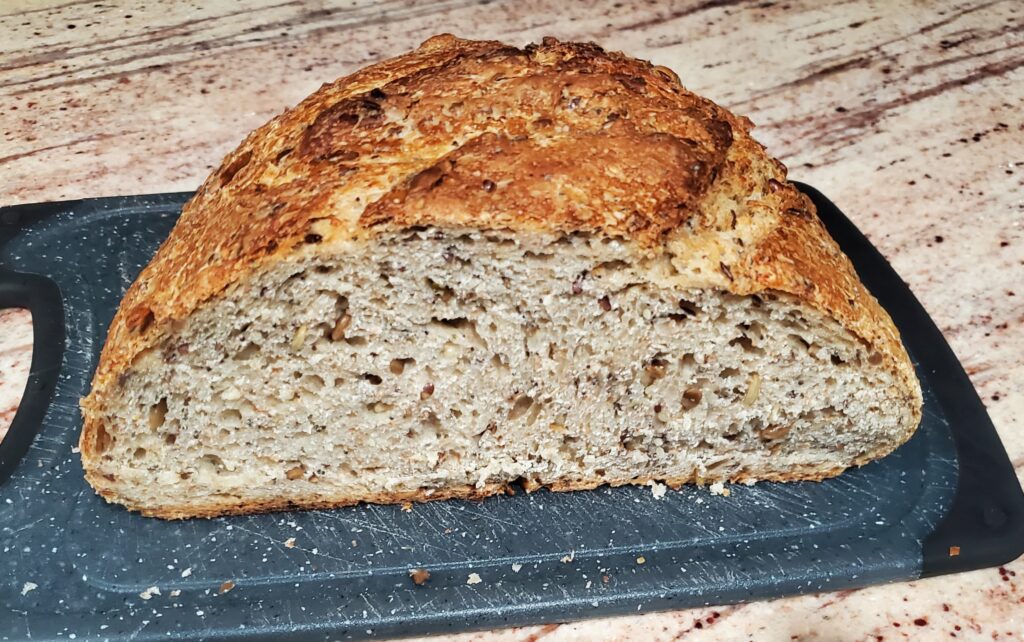
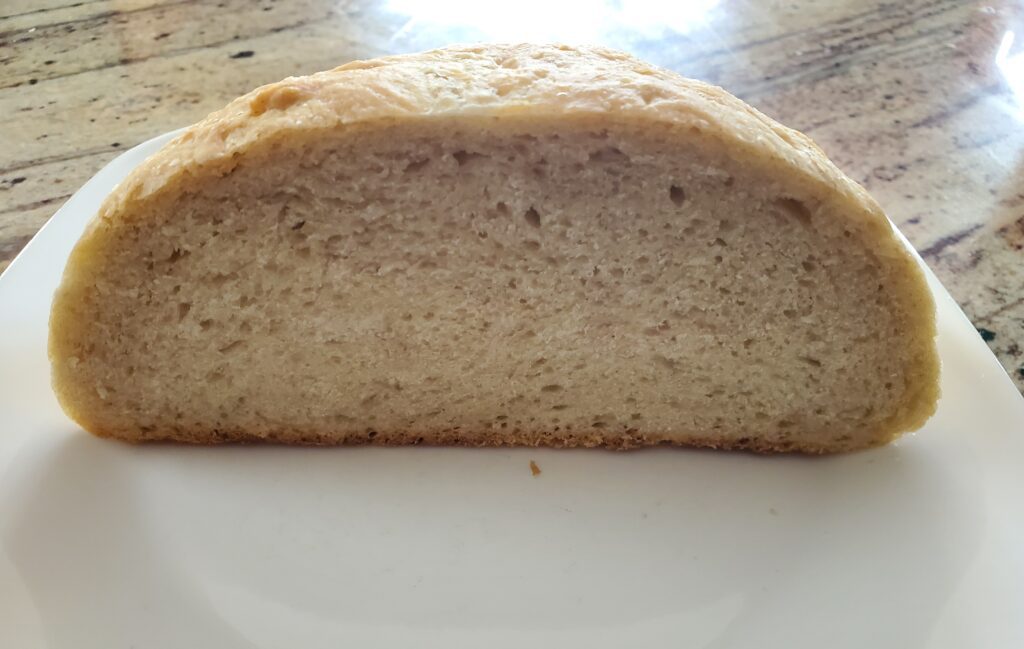
Place the lid in the Dutch oven and place it in the preheated oven. Immediately turn the oven temperature down to 400 degrees F, and bake covered for 20 minutes, remove the Dutch oven cover and place an empty sheet pan on the shelf below your Dutch oven. This will help prevent excessive browning on the bottom of your bread. Continue to bake uncovered for 30-40 minutes. Use a meat thermometer to check the temperature of your bread. It is done when the temperature reads between 205-210 degrees F.
Cooling stage
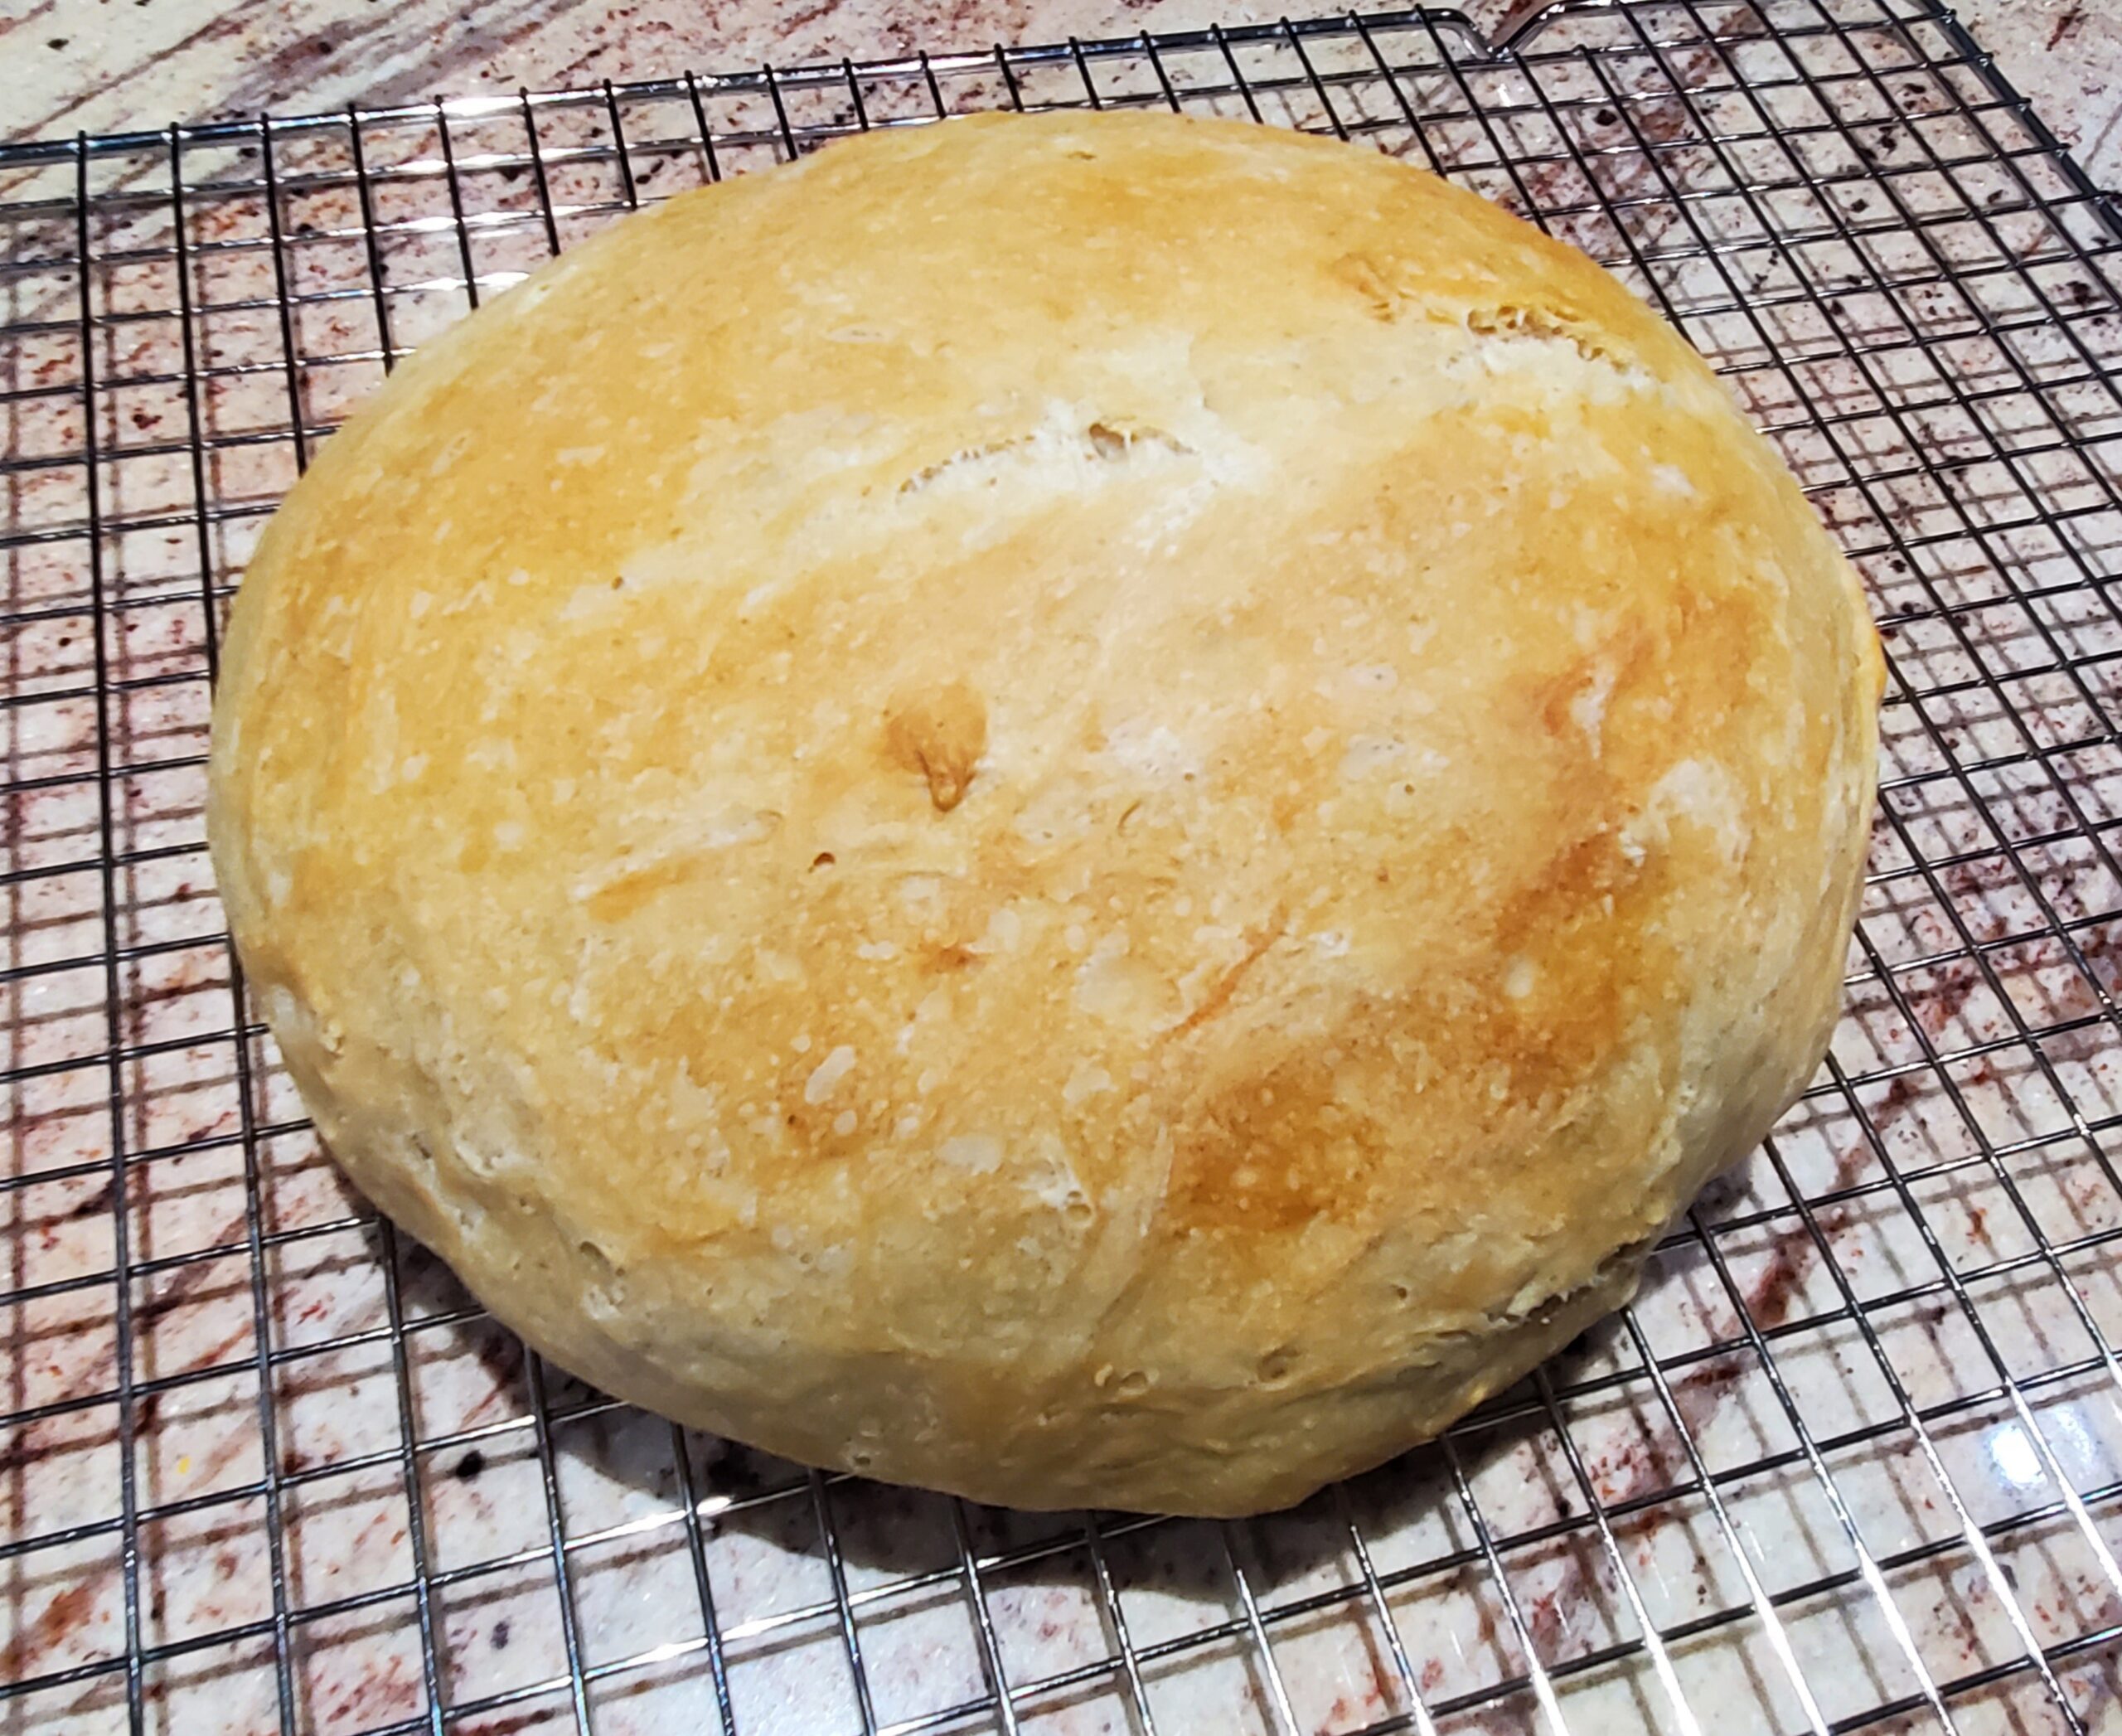
Multigrain Sourdough bread scored with a heart
When your bread is ready, remove it from the Dutch oven as soon as possible and place it on a cooling rack.
Wait until your bread is cool, at least 1 hour before slicing it. This is the most difficult step, but worth it!
Can you bake sourdough bread on a smoker?
Yes you can! I love sourdough bread so much, but I do not like to heat up my home in the Summer. I love to bake on my Traeger grill in the Summer!
How to bake sourdough bread on a Traeger pellet grill:
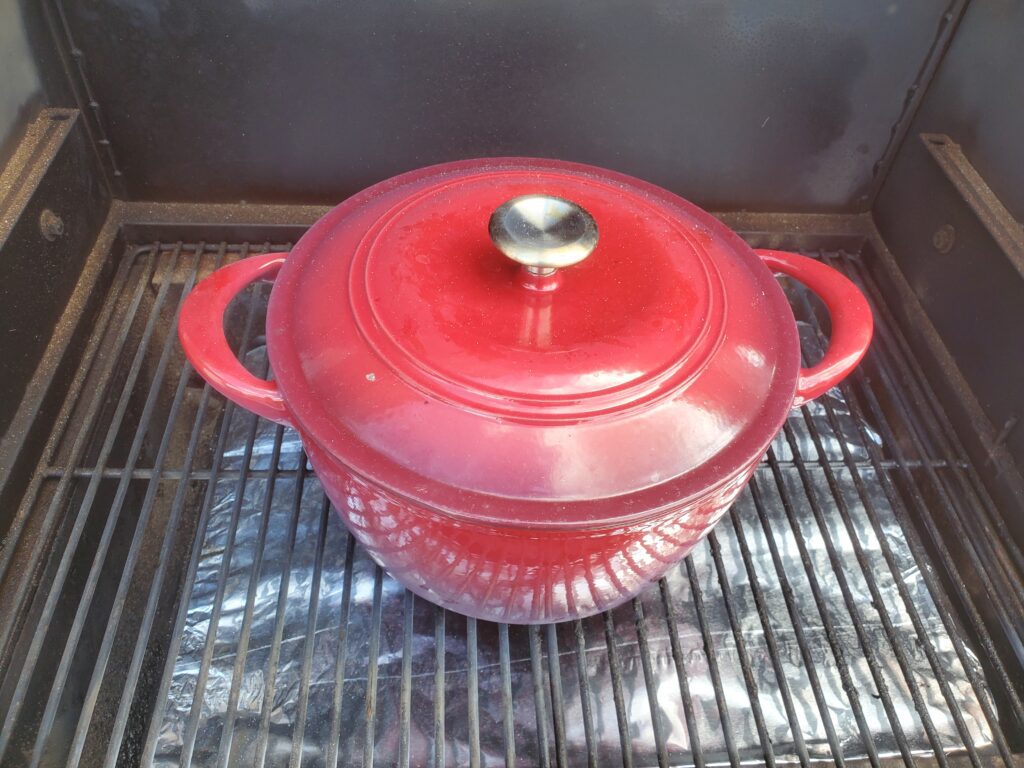
For this recipe: Remove the top rack and preheat the Traeger Silverton 620 to 450 degrees F.
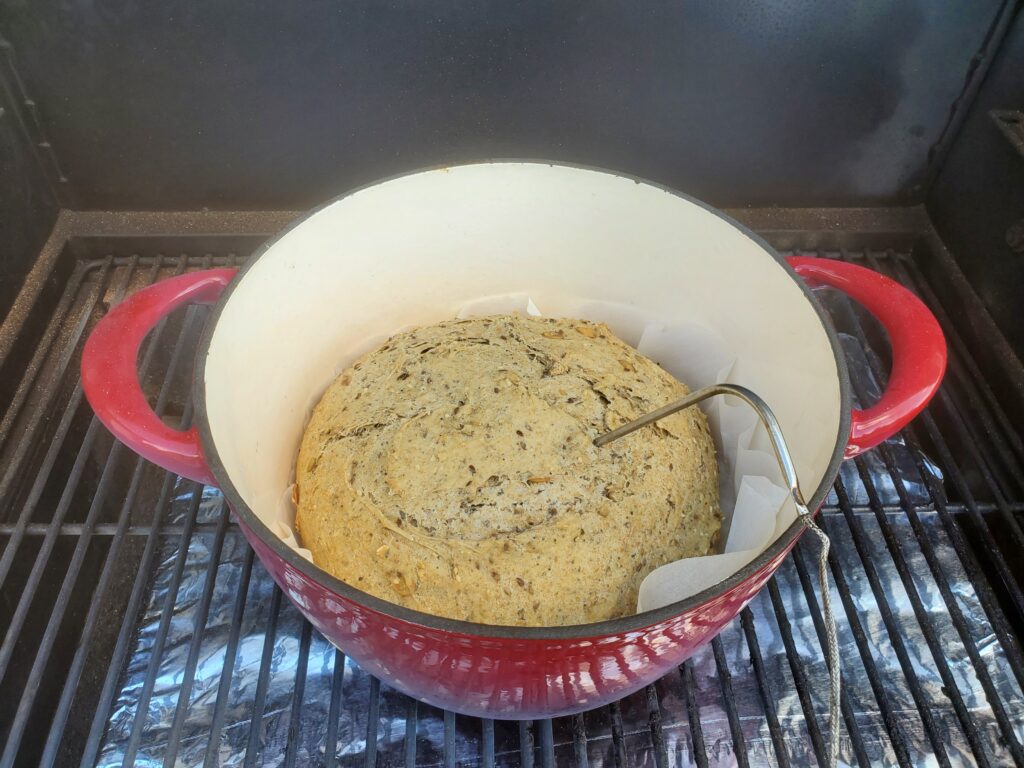
Place the dough into a parchment lined Dutch oven with lid. Quickly, put the Dutch oven on the preheated grill. Immediately turn the temperature down to 410 degrees F. Smoke/bake for 30 minutes.
Quickly remove the Dutch oven lid and place the temperature probe into the bread. Continue to smoke/bake for 30-40 additional minutes or until the probe reaches 205 degrees F.
Remove the bread from the Dutch oven as soon as possible and place on a cooling rack. Wait at last 1 hour before slicing your bread.
<strong>Preparing ingredients and dough</strong><br>Start by weighing out the oats, pumpkin seeds, sunflower seeds, and flax seeds. Place them in a cereal bowl. Cover with water ~ 100 grams or enough to cover the seeds (this will be drained off). Soak the seeds for 1 hour.<br>Meanwhile weigh out the remaining seeds and place them in a second cereal bowl, and set aside.<br>Weigh out the starter, warm water and olive oil. Mix together in a mixing bowl. Then weigh out the salt, and flours. Mix the salt and flour with the wet ingredients. You may have to use your hands or a bread scraper to incorporate all of the flour.
<strong>Resting stage</strong><br>The dough will appear dry at this point, that's okay. Cover the dough with a warm damp kitchen towel and allow it to rest for 60 minutes. The technical term for this stage is autolyze, hydrating the flour. This step is especially important when using whole wheat or rye flour.<br>After the oats and seeds have soaked for 1 hour, drain the water off. This is easily done with a wire strainer.
<strong>Adding the seeds to multigrain sourdough</strong><br>After your dough has rested for 60 minutes, press a bowl shape into your dough and add all of the wet and dry seeds. Fold the dough over the seeds several times to mix. The seeds will continue to mix during the next stage, so don't worry if they are not fully mixed. Form you dough into a ball and use the ball to collect as many seeds as possible remaining in the bowl.
<strong>Stretching and folding</strong><br>Place the ball on a sheet of parchment paper, into your proofing box or acceptable alternative. I use a Ninja Foodi on the proof setting at 85 degrees for this step. If you kitchen is warm enough, you can just place the dough in a mixing bowl for this step.<br>After 15-20 min, stretch and fold the dough over on itself, turn 1/4 and stretch and fold again. Continue to turn the dough 1/4 turn and stretch and fold again to make a complete circle of 4 folds. Repeat 3-4 times for the first hour.
<strong>Fermentation and rising</strong><br>Continue to allow your dough to rise in the proofing box at 85 degrees. Check on it every hour to see if it has doubled in size. It usually takes 3-4 hours at 85 degrees, depending on how active your starter is.
<strong>Baking multigrain sourdough</strong><br>Preheat your oven to 450 degrees F. Line the inside of a Dutch oven with parchment paper. Remove the dough from the proofing box and use a dough scraper to carefully remove it from the parchment paper. Fold the edges under to create a ball.<br>Place the dough ball seam side down into the Dutch oven. Score the top of the dough about 1/4 inch deep with a sharp knife.<br>Place the lid in the Dutch oven and place it in the preheated oven. Immediately turn the oven temperature down to 400 degrees F, and bake covered for 20 minutes, remove the Dutch oven cover and place an empty sheet pan on the shelf below your Dutch oven. This will help prevent excessive browning on the bottom of your bread. Continue to bake uncovered for 30-40 minutes. Use a meat thermometer to check the temperature of your bread. It is done when the temperature reads between 205-210 degrees F.<br>When your bread is ready, remove it from the Dutch oven as soon as possible and place it on a cooling rack.<br>Wait until your bread is cool, at least 1 hour before slicing it. This is the most difficult step, but worth it!
NOTES
As an Amazon Associate, I earn from qualified purchases.
What tools do you actually NEED to make sourdough?
You will need an active starter, find tips for how to start and care for your starter here
A kitchen scale. Baking sourdough is a scientific process so most recipes will list ingredients by weight. If you have a postage scale that will work too.
A proofing box or suitable alternative. I use the proof setting on my Ninja Foodie for this purpose, it’s more expensive but it also works as and air fryer, pressure cooker and more. Check out this post for more options. If your kitchen is consistently between 78 and 85 degrees then you do not need a proofing box.
Meat thermometer. This is the only way to determine if your bread is done. It’s also helpful for checking the temperature of the water you add.
Parchment paper – This will help prevent sticking and make it much easier to transfer your dough.
Easy Sourdough Bread Ingredients:
150 grams of active bubbly starter
250 grams warm water (80-90 degrees F)
25 grams olive oil
500 grams unbleached bread flour
10 grams sea salt or kosher salt
How to make easy sourdough
Mix the starter, warm water, and olive oil together in a mixing bowl. Then add the flour and salt. You will need to use your hands to incorporate all of the ingredients together. Continue to mix until all of the flour is absorbed. At this point the dough will appear dry, that’s okay.
Cover the dough with a warm damp kitchen towel and allow it to rest for 30 to 60 minutes. The technical term for this stage is autolyze, hydrating the flour.
After the 30-60 minute rest, quickly work the dough into a rough ball. Place the ball on parchment paper in your proofing box. I use my Ninja Foodi, set to proof at 85 degrees for this step.
After 30 min, stretch and fold the dough over on itself, turn 1/4 and stretch and fold again. Continue to turn the dough 1/4 turn and do a total of 4 stretches and folds (a full circle). Wait 30 min and do another set of 4 stretches and folds.
Continue to allow your dough to rise in the proofing box at 85 degrees. Check on it every hour to see if it has doubled in size. It usually takes 3-4 hours at 85 degrees, depending on how active your starter is.
Transfer the parchment paper and dough to the counter. Gently scrape the dough from the parchment using a silicone spatula or dough scraper. Fold the edges of the dough under to create a nice ball shape. Place the ball into a parchment lined Dutch oven and cover.
How to bake easy sourdough bread
Preheat your oven to 450 degrees F.
Use a sharp knife to make a 1/4 deep slit in the top of your dough ball.
Place the dough in the oven. Reduce the oven temperature to 400 degrees F and bake covered for 20 minutes, remove the Dutch oven cover and place an empty sheet pan on the shelf below your Dutch oven. This will help prevent excessive browning on the bottom of your bread. Continue to bake uncovered for 30-40 minutes. Use a meat thermometer to check the temperature of your bread. It is done when the temperature reads between 205-210 degrees F.
Place the fresh baked bread on a cooling rack and allow it to cool for at least an hour before slicing. This is the most difficult step, but worth it.
As an Amazon Associate I earn from qualified purchases.
Mix the starter, warm water, and olive oil together in a mixing bowl. Then add the flour and salt. You will need to use your hands to incorporate all of the ingredients together. Continue to mix until all of the flour is absorbed. At this point the dough will appear dry, that's okay.
Cover the dough with a warm damp kitchen towel and allow it to rest for 30 to 60 minutes. The technical term for this stage is autolyze, hydrating the flour. After the 30-60 minute rest, quickly work the dough into a rough ball. Place the ball on parchment paper in your proofing box.
After 30 min, stretch and fold the dough over on itself, turn 1/4 and stretch and fold again. Continue to turn the dough 1/4 turn and do a total of 4 stretches and folds (a full circle). Wait 30 min and do another set of 4 stretches and folds.<br>Continue to allow your dough to rise in the proofing box at 85 degrees. Check on it every hour to see if it has doubled in size. It usually takes 3-4 hours at 85 degrees, depending on how active your starter is.
Transfer the parchment paper and dough to the counter. Gently scrape the dough from the parchment using a silicone spatula or dough scraper. Fold the edges of the dough under to create a nice ball shape. Place the ball into a parchment lined Dutch oven and cover.
Preheat your oven to 450 degrees F. Use a sharp knife to make a 1/4 deep slit in the top of your dough ball. Place the dough in the oven. Reduce the oven temperature to 400 degrees F and bake covered for 20 minutes, remove the Dutch oven cover and place an empty sheet pan on the shelf below your Dutch oven. This will help prevent excessive browning on the bottom of your bread. Continue to bake uncovered for 30-40 minutes. Use a meat thermometer to check the temperature of your bread. It is done when the temperature reads between 205-210 degrees F.
Place the fresh baked bread on a cooling rack and allow it to cool for at least an hour before slicing.
It seems like some people have no problem baking delicious sourdough bread and others really struggle. I think I know why. I’m not a professional baker, but as a pharmacist I have extensive knowledge of microorganisms. Read on to find out why you should not give up on sourdough until you try this easy recipe. First here are some tips:
Disclaimer: This post may contain affiliate links. I earn commission at no additional cost to you.
There are only two ingredients needed to make a sourdough starter. Flour and water. The other ingredients are already there, they just need the correct environment and some time to do their thing. They already know what to do, you just have to make sure you help them, here are some tips to help you:
Which flour should you use for sourdough starter?
Generally unbleached flour is preferred for bread making because it is more dense and helps the dough hold it’s shape better. Many bakers use unbleached flour for creating and feeding their starter. Both bleached and unbleached flours contain both beneficial and harmful microorganisms. Bleaching flour does not kill microorganisms. These microorganisms are everywhere. Whole grain wheat or rye flours are particularly beneficial for making a new starter, because they contain more of the beneficial microorganisms you need for a new starter. If you are not a rye or whole wheat bread fan, that’s ok. Due to the small amount of remaining rye or whole wheat flour, you will hardly notice it is there in your final product. Once your starter is mature, you can feed it any mixture of flours you prefer.
Can you use tap water for sourdough starter?
It’s best to use filtered water for your sourdough starter. If you live in a city that uses chlorine in the water, you could kill off some of the beneficial yeast and bacteria in your starter.
Another thing to consider about the water you use is temperature. The beneficial yeast and bacteria in your starter prefer 80-85 degrees. Too cold and they will slow down their fermentation, too hot and you could kill them. Use a meat thermometer to check the temperature of the water before you add it. Make sure it is between 80 and 85 degrees F.
What is the best environment for a sourdough starter?
Starter prefers temperatures between 78 and 85 degrees F. Not a comfortable room temperature. It will still work between 60 and 120 degrees, but anytime it is outside of it’s preferred temperature it will not be as effective and therefore, take longer. This is why you will often see a huge fermentation time range on recipes. This range is not an option, it depends on your environment. If your home is 68 degrees and the recipe says ferment for 4-12 hours, you will probably need to ferment closer to 12 hours than 4 hours. This could be why you some new bakers struggle to be successful.
Also avoid direct sunlight. It might be tempting to warm up your starter in the sunshine on a warm day. Although your starter will love the heat it will not thrive in the sunlight, and you may kill off some of your beneficial yeast. Starter prefers warm and dark!
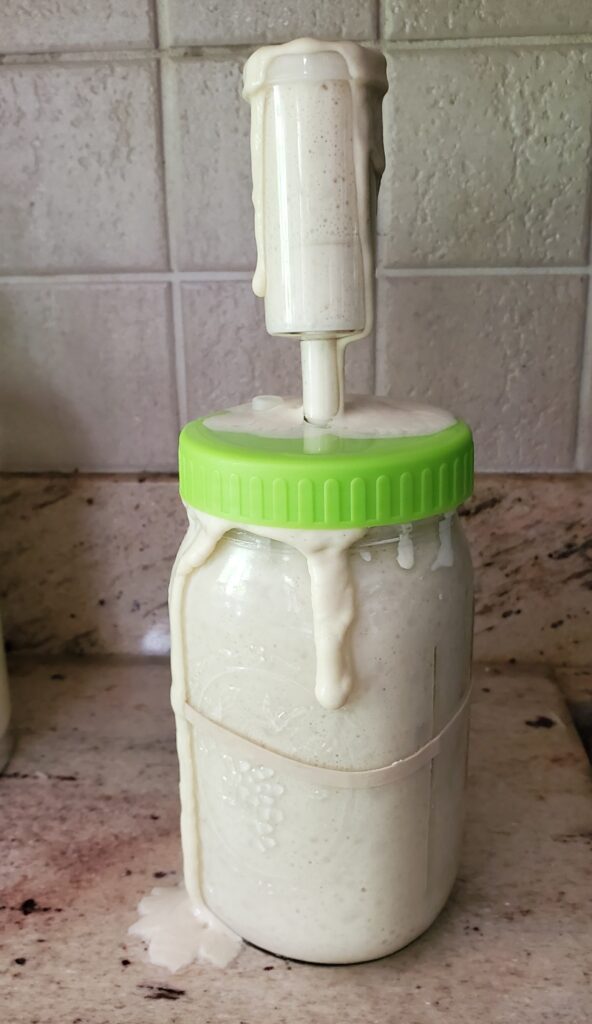
This is what happened to my sourdough starter when the weather finally warmed up in Michigan. Not ideal, but my fermentation cap did allow for the starter to flow out.
How to create the best environment for your starter
If you live in a warm climate, this may be easy. Remember starter needs a warm dark environment. 78-85 degrees is best. There are plenty of things you can try if you live in a cold climate.
A Proofing Box
An inexpensive proofing box, this box will provide the perfect temperature for your starter and for fermenting and proofing your bread. It will help reduce the time it takes to make your bread. It will take the guess work out of timing and make your life as a sourdough baker easier. The only problem with this investment is it really is just a single use item. Another gadget with no other uses.
Oven light
Put your starter in a TURNED OFF oven with the light on. The light will provide heat and the oven itself is insulated. If you use this method you should monitor the temperature with a meat thermometer, because believe it or not, it could get too hot in your oven using this method. At least the meat thermometer is a good investment because it is very useful for other things as well.
Microwave
Put your starter in a TURNED OFF microwave along with a second jar filled with hot water. The hot water serves as the heat source, the microwave is an insulated box. Since the water will eventually cool, there is no danger of over heating your starter.
Seed Mat
Place your starter on a seed mat. If you already own one, you probably only use it a few weeks a year. If not, it is less expensive than other options and it does help provide the perfect temperature for your starter and for fermenting and proofing your bread. As an added bonus, you can still use it for seed starting!
Higher location
Place your starter in your highest cabinet or on the second floor of your home. It can be a few degrees warmer in high places, because we all know heat rises.
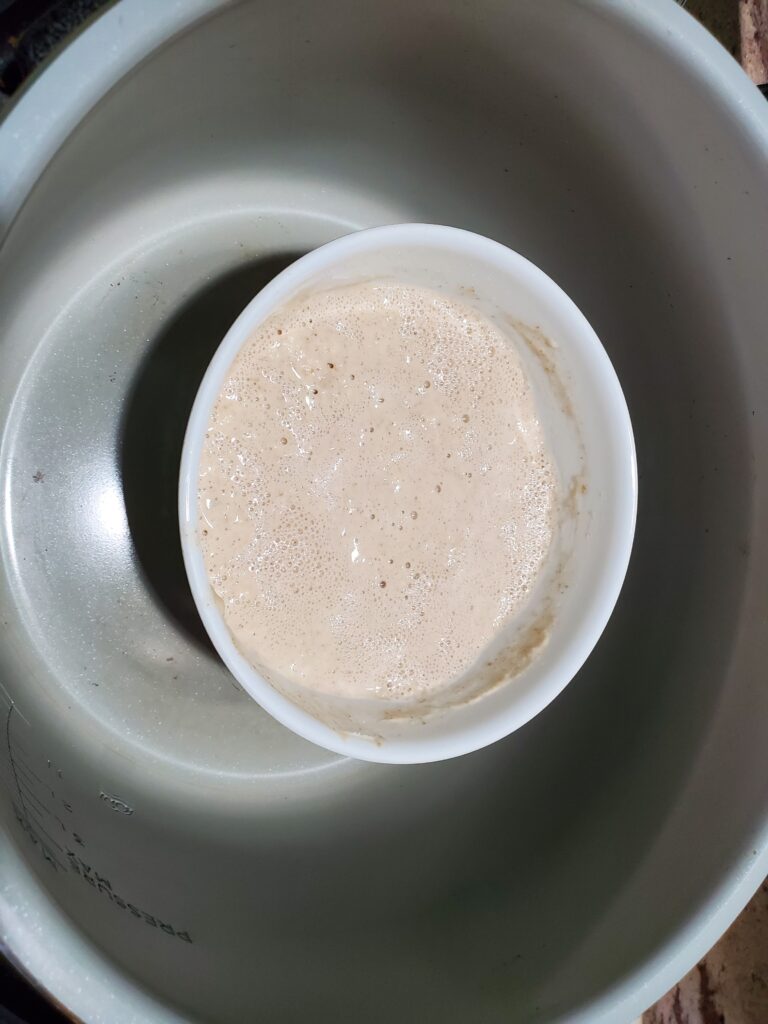
Ninja
My personal favorite option is to use the proof setting on a Ninja Foodi or Ninja Combi. These combination Air Fryer, countertop cookers have proof settings and can be used for many other things.
Sourdough starter in a Ninja Foodi on Proof setting
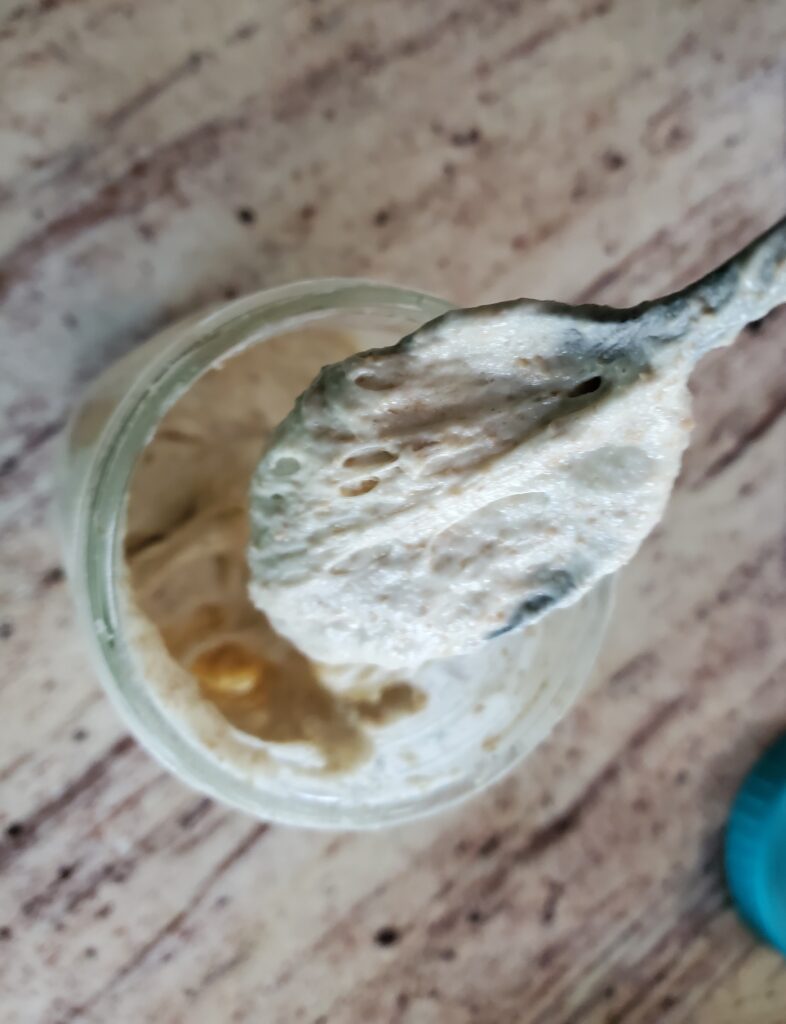
How do I know my starter is ready to use?
If you make your own starter from scratch it will need a least a week to be ready to use. If you try to bake bread earlier than one week you will likely not be successful. You need a mature and active starter to bake bread.
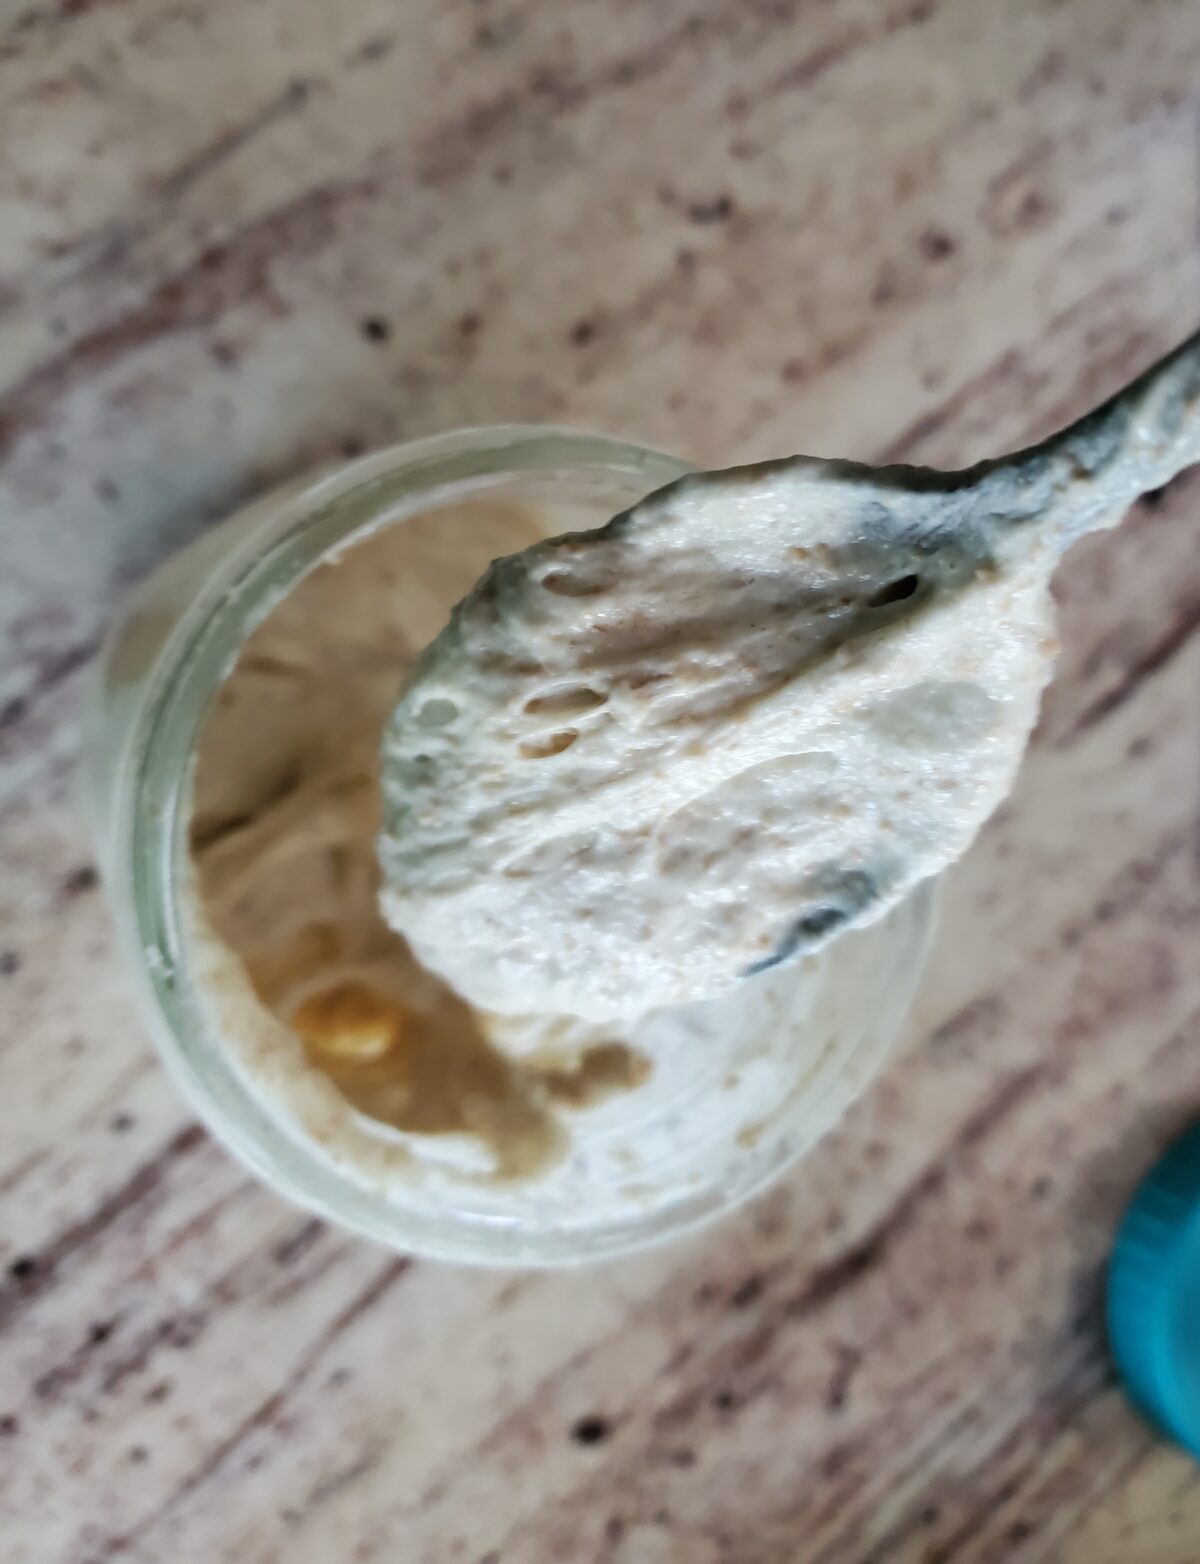
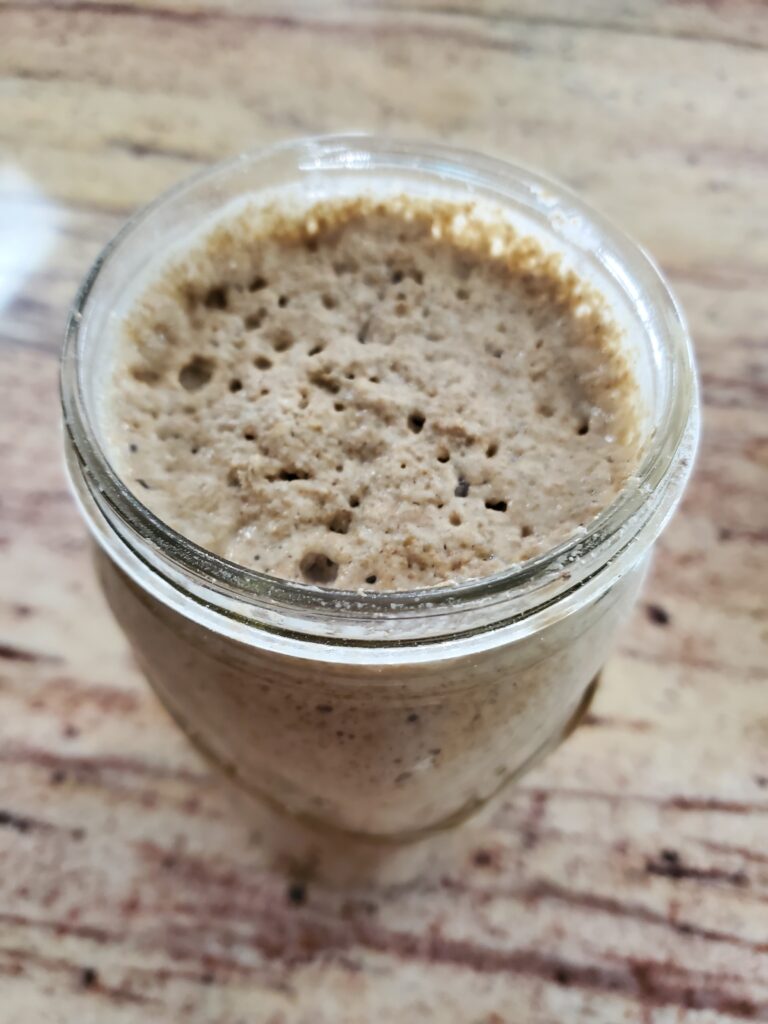
A mature starter will rise and fall predictably when fed. It will be bubbly and spongy.
Mature sourdough Starter
How to make a starter:
Sourdough starter from scratch:
Day 1: Mix 1/4 cup of filtered warm water (80-85 degrees F) with 1/3 cup of whole grain wheat or rye flour. Allow it to sit on the counter in a jar with plenty of space. Cover the jar with a loose fitting lid or cloth.
Day 2: Mix the starter. Add 1/4 cup of filtered warm water (80-85 degrees F) and 1/3 cup of whole grain wheat or rye flour to the jar. Cover the jar with a loose fitting lid or cloth.
Day 3: Mix the starter. Remove and discard half. (Note: During the first week of your starters “life” the discard will not be suitable for baking. It can still be composted.) Add 1/4 cup of filtered warm water (80-85 degrees F) and 1/3 cup of whole grain wheat or rye flour to the jar. Cover the jar with a loose fitting lid or cloth.
Day 4: Mix the starter. Remove and discard half. Add 1/4 cup of filtered warm water (80-85 degrees F) and 1/3 cup of flour (any combination of whole grain and bread or all-purpose flour) to the jar. Cover the jar with a loose fitting lid or cloth. Repeat this process in the evening for 2 total feedings on day 4.
Day 5 to 7: Continue repeating day 4. As long as your starter is bubbly and spongy, you can switch to any flour you wish to use for feedings.
Day 8 and on: Your starter should be mature at this point, so you can start to save your discard. Put the discard into a clean jar, with some space for additional discard, and place it in the refrigerator. It’s ok to put a lid on it. There are many uses for this discard. More on that later.
Purchase a packet of sourdough starter
You can purchase a packet of sourdough starter either dried or active. If you purchase the dried starter you will still be waiting about a week before you can bake. If you purchase active starter, you will need to feed it right away!
Get Sourdough starter from a friend or bakery
If you receive a sourdough starter from a friend, or purchase from a local bakery, you will already have a mature starter and can begin preparing it for baking right away. This is the least expensive, easiest and fastest way to get started with sourdough baking.
How to prepare your starter for baking
Once you have a mature starter you are ready to bake. Give your starter a one or two good feedings the day before you bake. This is a great time to bulk up your starter to make sure you have enough available for your recipe.
To bulk up you starter, add more flour and water than you would for a regular feeding, but keep the same ratio of flour and water. For example, I usually discard down to 1/2 cup of starter and feed with 1/2 cup of water and 2/3 cup of flour. If I want to bulk up my starter prior to baking, I’ll discard down to 1 cup of starter and add 1 cup of water and 1 1/3 cups of flour. I usually feed mine the morning of a bake too. Before baking I feed my starter, and put it in my Ninja Foodi on proof set to 85 degrees for 1-2 hours before I bake.
How to care for a mature starter:
If you bake frequently, you can keep your starter on the counter and feed it once or twice daily. For the daily feedings: discard all but 1/2 cup of starter, feed with 2/3 cup flour of your choice and 1/2 cup filtered warm water (80-85 degrees F). If you bake less than weekly, you can keep your starter refrigerated. Take your starter out and feed it at least once weekly. For the weekly feedings, remove it from the refrigerator, allow it to warm to room temp, then feed it. For this weekly feeding, discard all but 1/2 cup of starter, feed with 2/3 cup flour of your choice and 1/2 cup filtered warm water (80-85 degrees F). Provide it with a nice warm dark environment for about 24 hours. If you don’t plan to bake, put it back in the refrigerator.
It’s also important to change the jar weekly or as needed if it overflows or the top becomes crusty. Just transfer your starter to a clean jar and wash the old one for next time you need a clean jar.
What is sourdough discard?
Discard is the leftover starter you remove before each feeding. If you never discard, the starter will become so large it will not be manageable. With each feeding you are at least doubling the volume. This is why it’s important to discard. The discard can be saved in the refrigerator and used for baking with sourdough discard recipes. It’s best to use up you discard in 2 weeks. Any remaining discard can be composted. Try this tasty sourdough discard pizza crust, or these sourdough discard mini pitas.
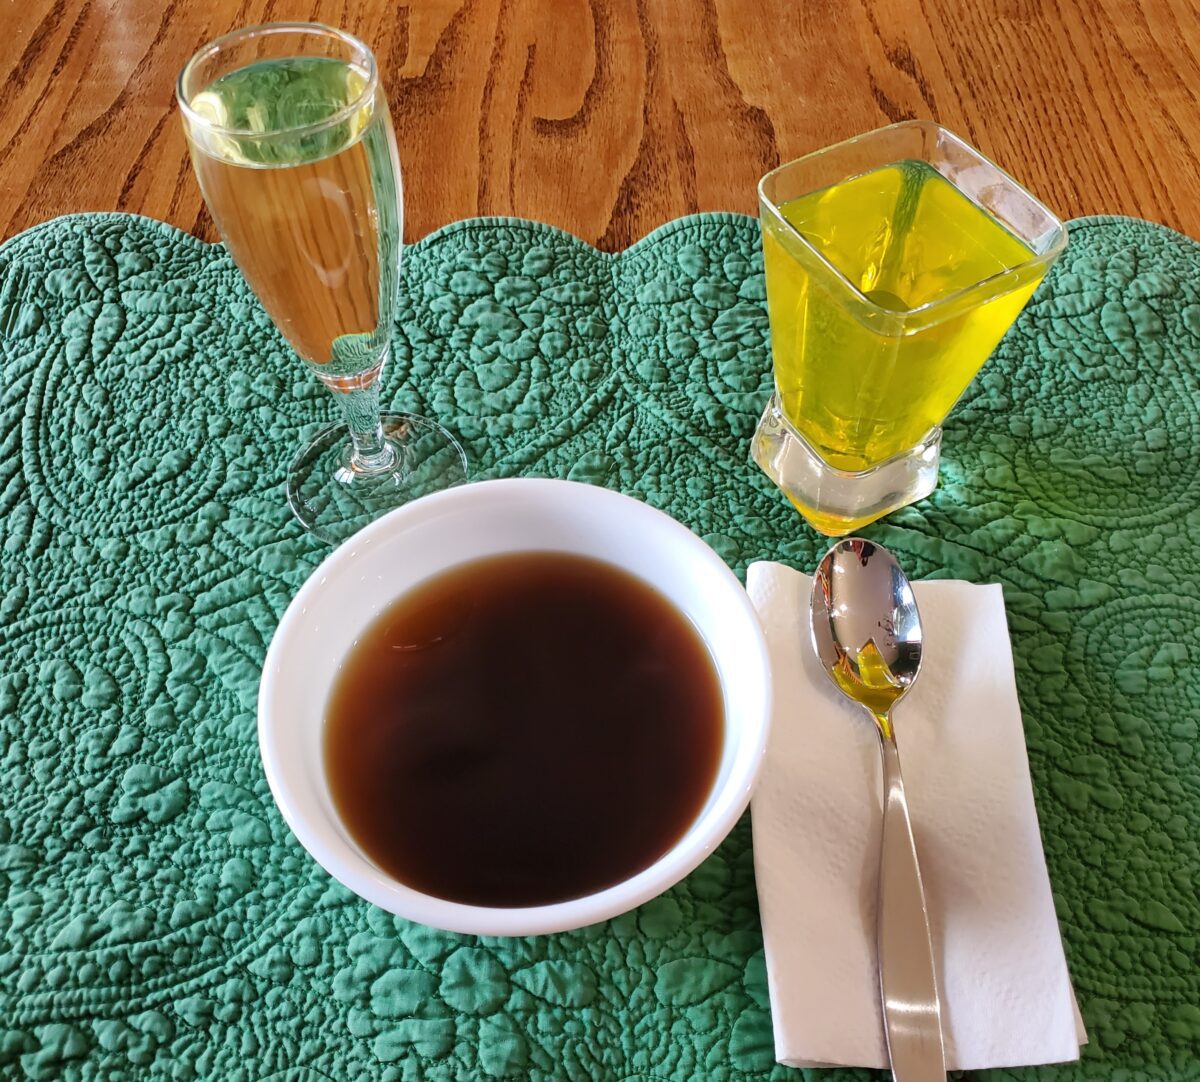
Apple Juice, Beef Consommé and Lemon Jell-O, a fancy clear liquid dinner.
Congratulations for choosing to get the only cancer screening exam that is actually preventative! Here you will learn some tips and tricks from a pharmacist, who has been through it. I hope to help you make your colonoscopy prep as easy and comfortable as possible. This information is not intended to replace your doctors instructions. These colonoscopy prep tips are merely a supplement to your doctor’s instructions. If we differ in any way, please follow your doctor’s instructions first.
Disclaimer: This post may contain affiliate links. I earn commission at no additional cost to you.Always follow your doctor’s advice first. This information is intended to be a helpful supplement.
Colonoscopy Prep Timeline
This post contains valuable colonoscopy prep timeline tips for all of the following colonoscopy prep steps:
Make your colonoscopy appointment
Choose your prep
Pick up your prep
Read you doctor’s instructions
Pick up other needed items
Find out what to do about your current medications
Eat a low fiber diet
Transition to a liquid diet
Transition to a clear liquid diet
Confirm appointment time and prep instructions
Start your prep
Go to your appointment
Post colonoscopy tips
Tips for making your colonoscopy appointment
Things to consider before making you appointment:
Who will drive you to your appointment?
You will need to have a driver for your appointment. Make sure you have both your schedule and your driver’s schedule available when you make your appointment. You will need to start your prep the night before your appointment, so make sure you do not have any plans for the evening before your appointment. After your appointment you will not be able to stay home alone, so make sure you have someone available to stay with you after your test. You should be able to return to work the following day, as long as your doctor says you are able to.
Insurance coverage
Before you make your appointment you should check with your health insurance company to find out where your should go for your test. Also, ask which prep they will cover. There are multiple preps available, best to find out which one is covered by your insurance before you make the appointment. When you make the appointment you may be offered more than one prep option. Be prepared!
Timing of your appointment
Colonoscopy appointment timing tips based on when you have to start your prep.
You will likely have to start your prep 4 hours before you appointment time. If you schedule an early morning appointment, you will have to wake up 4 hours before that time to begin your prep. Keep that in mind when choosing a time.
You will be on a clear liquid diet on the day of your appointment. If you choose an afternoon appointment you will be able to sleep in, but you will be very hungry. Keep this in mind when choosing a time. I think the best time for a colonoscopy appointment is between 10:00 and 12:00. That way you wake up between 6:00 and 8:00, and you will only be on the clear liquid diet in the morning.
Choose your prep
This decision is ultimately made by your doctor, although your doctor may give you some options. Here are some things to consider if you are given an option:
Cost of the prep
If cost is a concern, contact your insurance provider to determine which prep they will cover. There is a very big difference in cost of the available preps.
Volume and flavor of the prep
Four common colonoscopy preps:
NOTE: Follow the directions provided by your doctor. These directions are just sample directions to give you an idea of what to expect. The goal here is to help you make a decision about the prep you want to try.
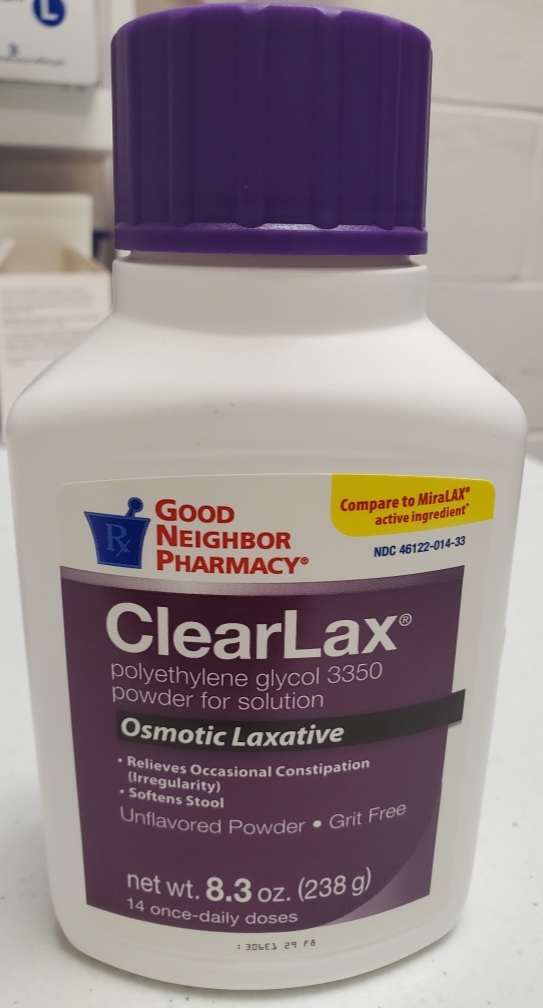
Gatorade (not red or purple)+ MiraLAX prep
MiraLAX generic
This prep is very tasty. Patients love it. If you like Gatorade the prep will be tasty. This prep may not be allowed by your doctor. It also may not be covered by insurance since MiraLAX is over-the-counter. It is not very expensive so that may not be a concern. Find the MiraLAX generic here. You will likely be required to consume 32 ounces of the prep (MiraLAX mixed with Gatorade) followed by 32 ounces of any clear liquid. This will be repeated again in the morning.
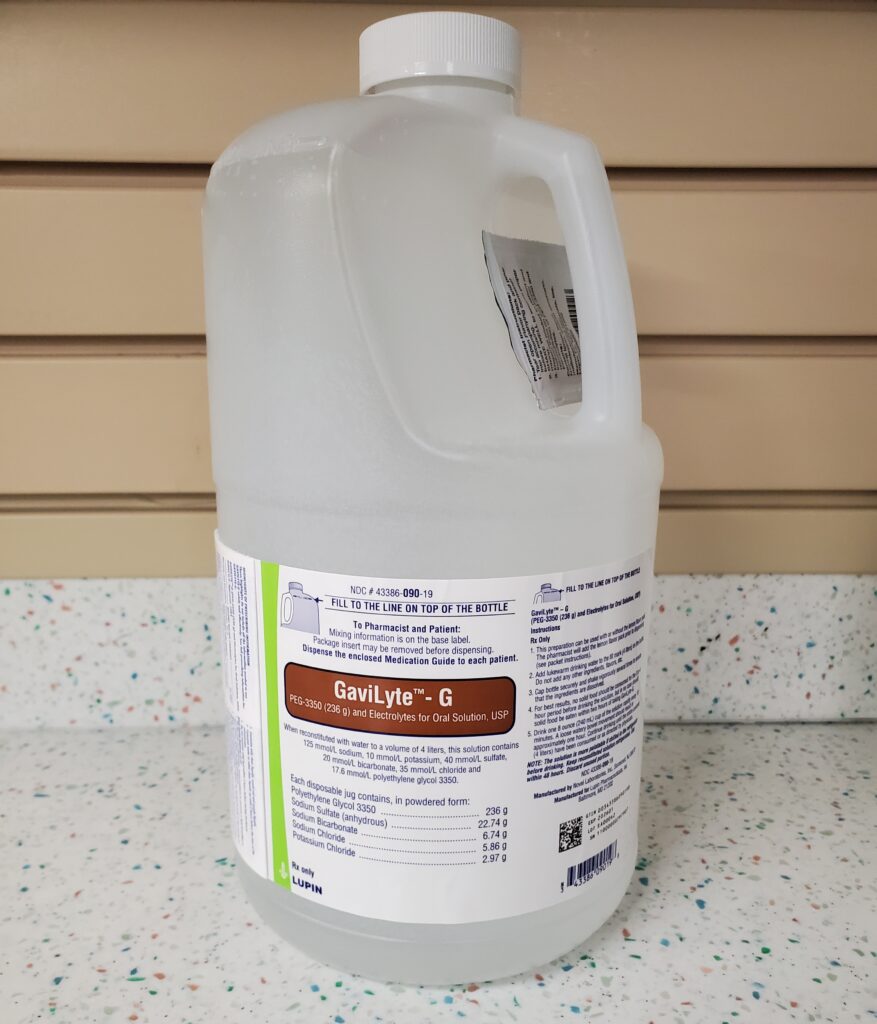
GoLytely or GaviLye-G
GaviLyte-G
This is the least expensive option because it is most likely to be covered in full by your insurance. It will require you to consume 4 liters (~1 gallon of gross tasting liquid) likely in two 2 liter servings. You may also have to follow this with more clear liquid of your choice. Don’t worry, I have some tips to help. Remember, it’s worth it for your health.
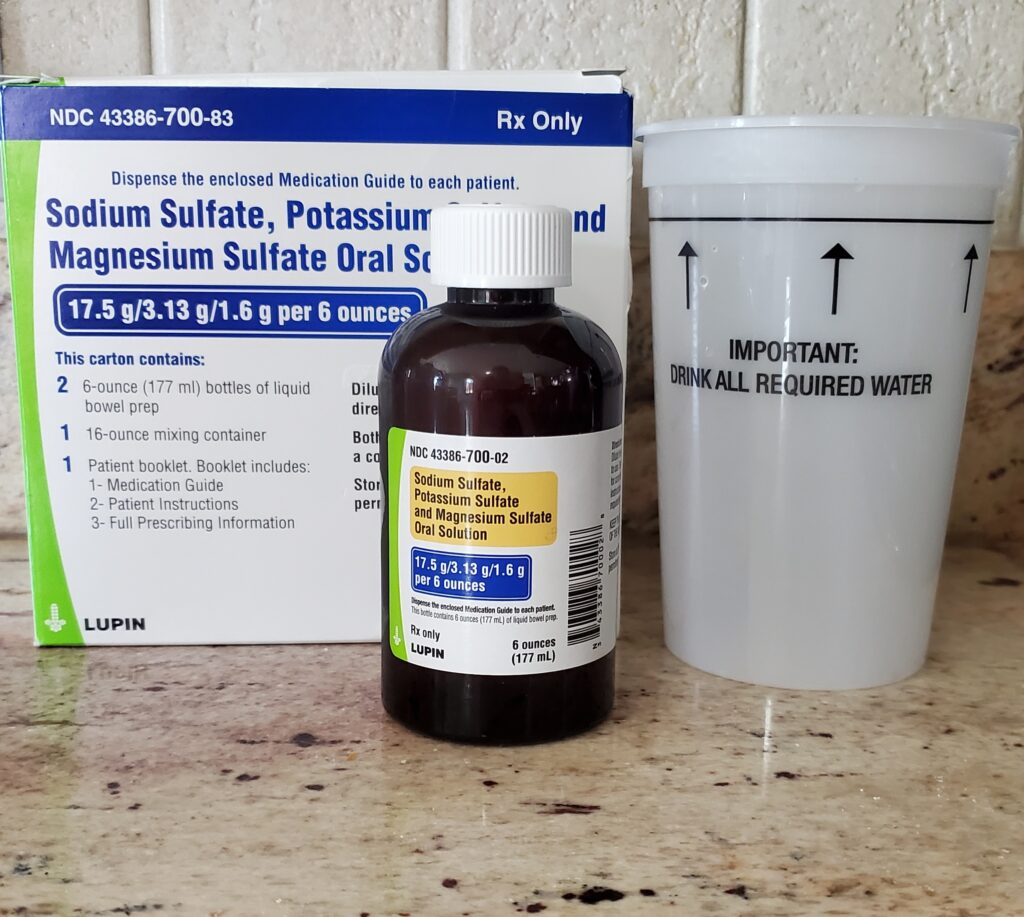
Suprep
SuPrep Generic
This prep requires a reduced volume of gross tasting liquid when compared to the GoLytely. You will be required to consume 16 ounces of the prep, followed by 32 ounces of water. This process will be repeated in the morning. This prep is covered by most insurance companies, if not covered by yours you can use this coupon.
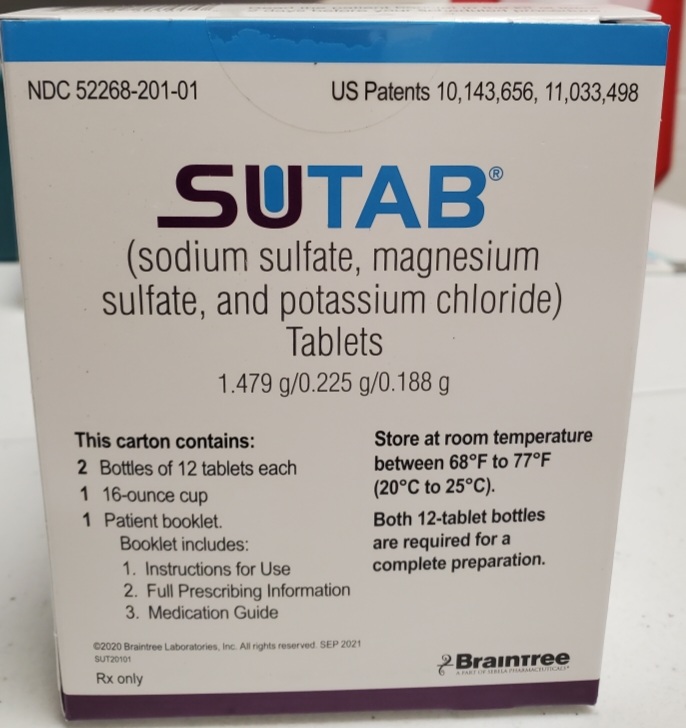
SuTab
SuTab
This prep does not require any gross tasting liquid. Instead you have to swallow 12 tablets with 16 ounces of water, then another 16 ounces of water 60 min later and another 16 ounces 30 min after that. Much more tolerable if you can swallow tablets. The only problem is that it is very expensive and not covered by many insurance companies. If you still want this option you can check out this offer to see if you qualify for a coupon.
Other Medications you may need
Your doctor may also want you to pick up other medications for your prep. The most common are Dulcolax (a laxative) and simethicone (anti-gas medication). You will likely need only 4 tablets of each. You may be able to find a pharmacy that will sell you only the 4 tabs you need. I suggest you call first. This could save you some money. I suggest you look into this option ahead of time. If you can’t find a pharmacy to sell you only 4 tabs, you can find the generic Dulcolax tablets here, and simethicone tablets here. Make sure the simethicone tablets you buy do not have red color, and do not take with food as the package directions suggest, instead follow the directions provided by your doctor.
Read your doctor’s instructions
Once you make your appointment and choose your prep, your doctor should send you some instructions. Make sure you read through them when you get them. Note the timeline. It is very important to read over these instructions to make sure you stop any supplements you make be taking and make arrangements for any medications you doctor wants you to stop taking.
When to pick-up your prep
You should plan to pick up your prep at least 2 weeks before your appointment. This will give you time to troubleshoot any problems that could happen. Maybe you were wrong about the amount your insurance will cover and want to choose a different prep. If you plan to pick up your prep 2 weeks in advance you will be able to contact your doctor for a new prescription and still have your prep in time for your procedure. This will also help if for some reason your pharmacy is out of your prep or maybe the prep you chose will end up being backordered, you never know. Just take my advice, pick it up early and be prepared!
Items to pick up 2 weeks before your colonoscopy
Your prep, as discussed in the previous section.
Other meds required for your prep, check your instructions. Most likely you will need Dulcolax and Simethicone
Ointment to protect your sore bottom from excessive wiping. The least expensive options are: generic Vaseline, or zinc oxide ointment. Zinc oxide is the active ingredient in many diaper rash ointments, like Desitin and Boudreaux’s Butt Paste which are also great options. If you do not have this near your toilet when you start your prep, you will be sorry!
Premium Toilet Paper -Now is not the time for cheap toilet paper. You should be prepared to pamper you bottom with the best. Try Cottonelle Premium Comfort, this should make you more comfortable.
Flushable wipes – There will be a lot of mess to clean up. So why not make your life easier with some flushable wipes. You can can even use Preparation H medicated wipes to help sooth your sore bottom. Dude wipes also come in medicated and regular options. Both are great options for colonoscopy prep clean up, even if you are not a dude. Honestly I preferred the regular Dude wipes, and I’m not a dude!
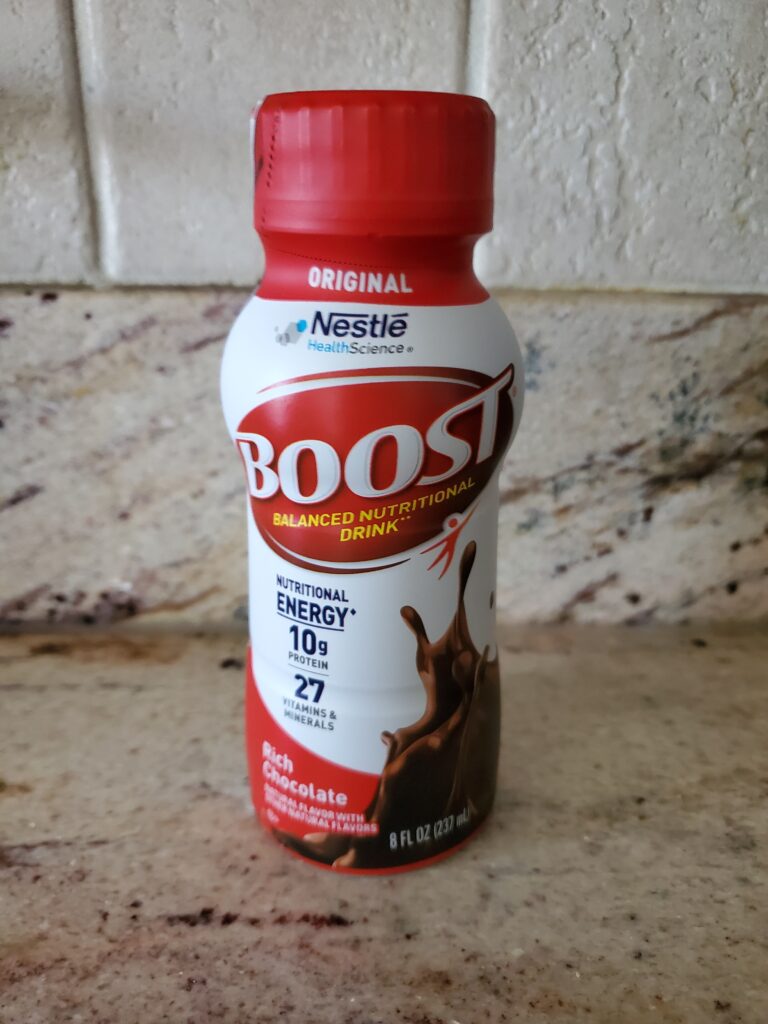
Boost or other protein shakes, with no added fiber. More on this later.
Clear liquids: You will need to go on a clear liquid diet the day before your colonoscopy. So stock up on Jell-O, chicken broth or bone broth, hard candy/popsicles (not red or purple), and clear juice like apple, white grape and white cranberry.
Cough Drops with menthol, also not red. If you end up having to prep with GoLytely, SuPrep, or any other gross tasting prep, menthol cough drops can help mask the flavor, making the prep easier and more palatable. Try lemon, ginger or honey flavor.
Low fiber foods. More on this later.
Find out which medications need to be discontinued or stopped prior to your colonoscopy
Once again: READ THE INSTRUCTIONS FROM YOUR DOCTOR. This is very important especially if you are taking blood thinners or you are diabetic. It could also be important if you have a seizure disorder. It may be important even if you are just taking a multiple vitamin. Find out which medications your doctor wants you to take and which ones will need to be held during your prep. If you are diabetic you may require adjustments to your usual medications due to changes in your diet.
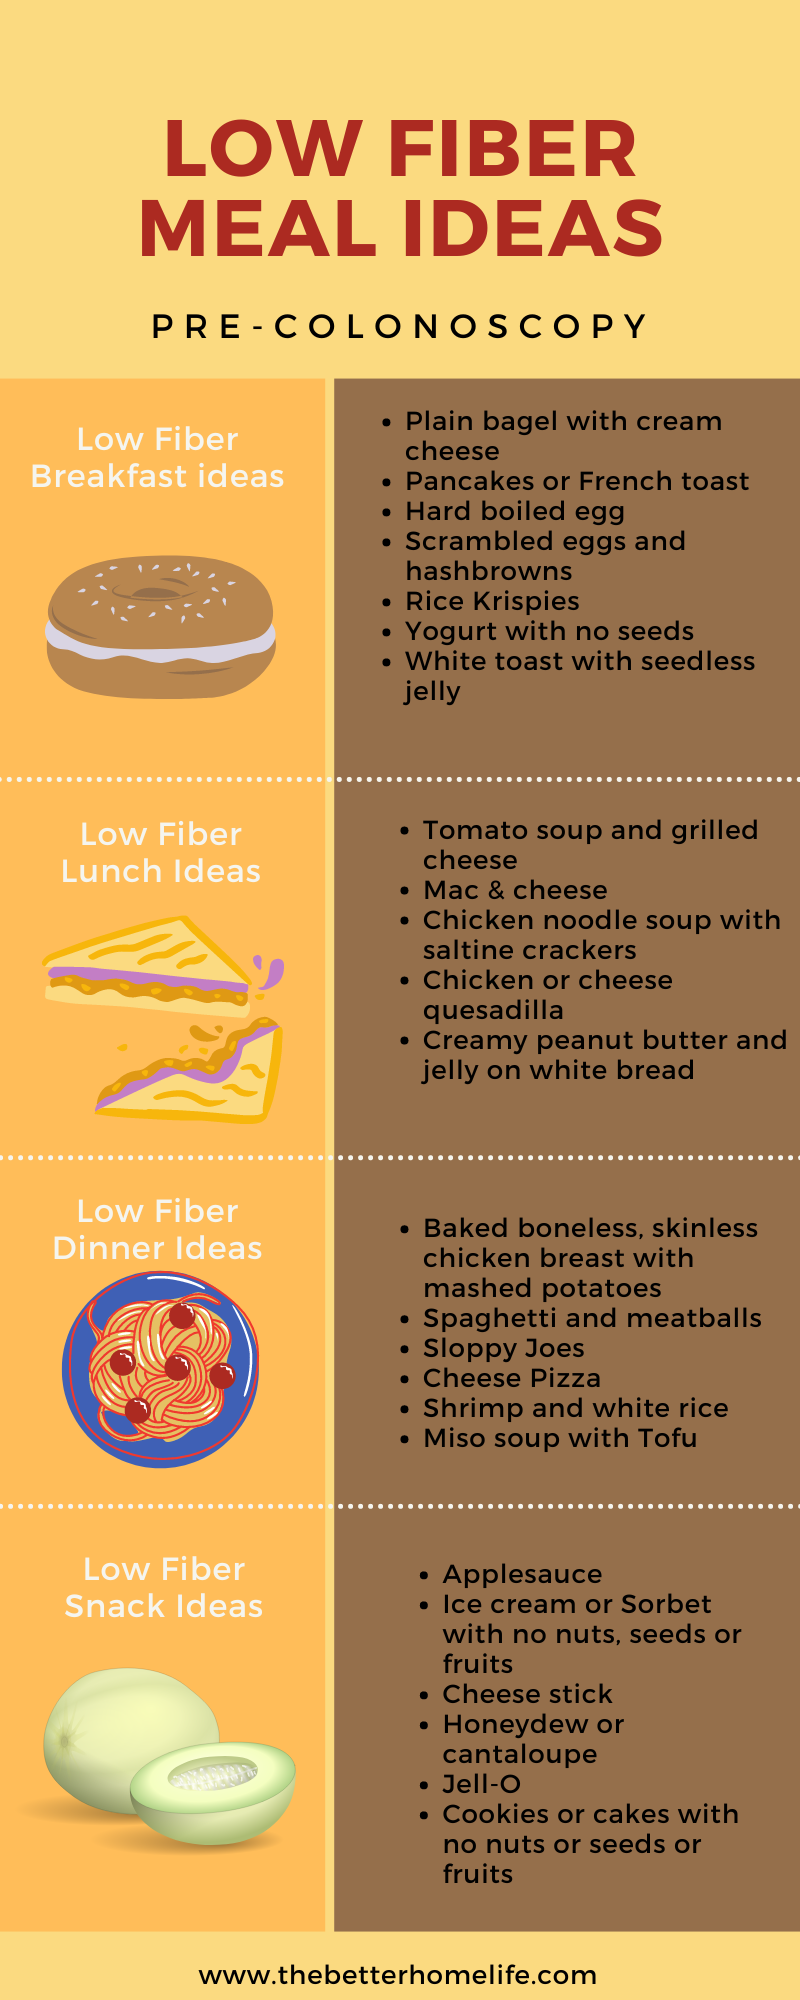
Your doctor may request that you go on a low fiber diet 3-5 days prior to your test. This is important to follow for two reasons: The low fiber diet will make the prep easier and more comfortable for you, because there will be less bulk to pass. Also, the low fiber foods will clear easier making it less likely that food residue will block your doctor from seeing a polyp. Both good reasons for following your doctor’s advice. Please read your doctor’s specific instructions for your low fiber diet. Most doctor’s will want you to avoid whole grains, oats, most fruits and vegetables, beans, tough meat with gristle, nuts and seeds. Here are some meal suggestions for low fiber meals and snacks:
Pre-colonoscopy Low fiber breakfast ideas:
Hard boiled eggs
Plain bagel with cream cheese
Yogurt-avoid berry flavors or any fruit with seeds -choose vanilla, honey, plain or peach.
Pancakes or French toast with maple syrup, honey or seedless jelly
White toast with peanut butter or seedless jelly
Scrambled eggs with hashbrowns
Rice Krispies
Low Fiber pre-colonoscopy Lunch ideas:
Macaroni and cheese
Tomato soup with a grilled cheese sandwich on white bread
Cheese or chicken quesadilla made with flour tortillas
Chicken noodle soup with saltine crackers
Peanut butter and jelly on white bread
Low Fiber pre-colonoscopy Dinner ideas:
Baked boneless skinless chicken breast with mashed potatoes
Sloppy Joes
Spaghetti and meatballs
Cheese Pizza
Shrimp with white rice
Miso soup with tofu
Pre-colonoscopy Low Fiber Snack ideas:
Applesauce
Cheese sticks
Jello
Ice cream or sorbet without seeds or nuts
Cookies and cakes with no seeds, nuts or fruits
Ripe Honeydew melon or cantaloupe
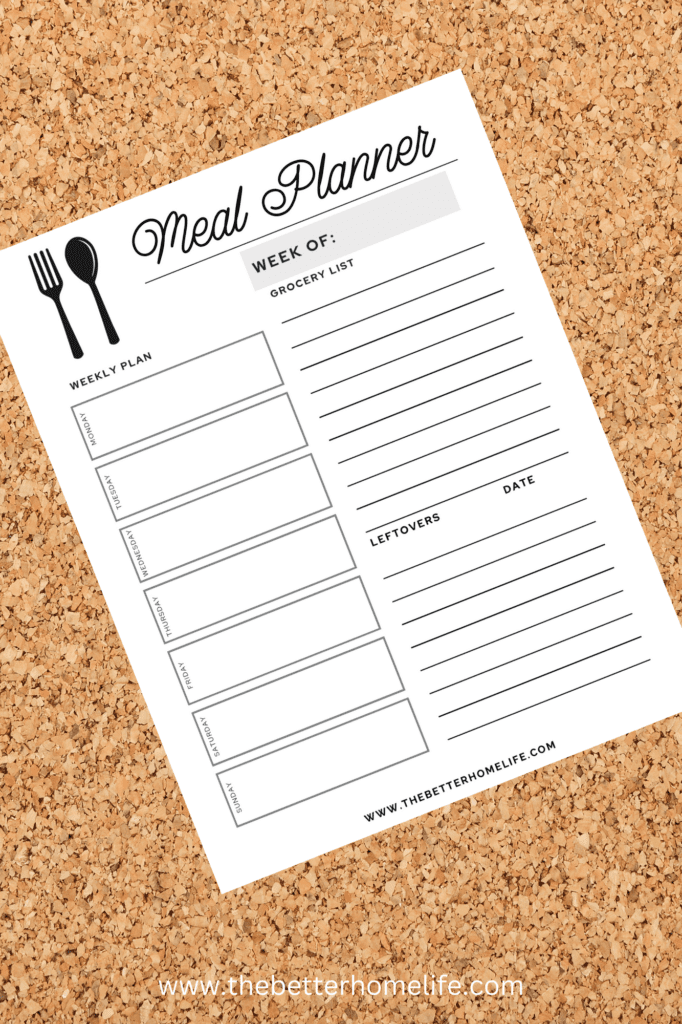
Handy Meal Planner
Pick up this handy meal planner to help you plan your low fiber meals. It also has a grocery list on the side to help you plan for all your pre-colonoscopy meals.
Read the instructions from your doctor. You may have to go on a liquid or clear liquid diet when you wake up the day before your appointment. There is a difference.
If you are placed on a liquid diet you may be able to have Boost or other protein shakes, with no added fiber, in addition to any clear liquid. The reason I suggest Boost is because I did small taste test with some co-workers. It was blinded, so we did not know which one was which. We tested Ensure, Boost, Premier, Kate Farms and Fair life. All chocolate flavors. Boost was the clear favorite, find it here!
Clear liquids are any liquid that you can see through, and have no pulp or other solids at room temperature. However, Jell-O and popsicles are also allowed as long as they are not red or purple. Your doctor may also limit orange and/or blue. Here are some examples of clear liquids:
Chicken, vegetable or beef broth or bouillon
Bone broth
Beef Consommé
Apple, white grape, or white cranberry juice
Jell-O
Popsicles
Sports drinks: Gatorade or Power aid
Coke, Pepsi, 7-Up, Sprite or other sodas
Water
Pedialyte, Prime, or liquid IV
Hard candy
Coffee black or with sugar-no milk or cream
Tea-except red herbal teas
Coconut water
Apple Juice, Beef Consommé and Lemon Jell-O, a fancy clear liquid dinner.
Tips for starting your colonoscopy prep:
Make sure you have the following items within reach of your toilet if possible. Listed in order of importance!
Water or another clear liquid- both would be preferred.
Something to keep you occupied, e.g.: a book to read, smart phone games or activities. Plan to be on the toilet for 30 to 60 min.
Tips to help with colonoscopy prep flavor and nausea: Prepare your prep early if possible and refrigerate it. A cold prep will taste better. Each prep has specific instructions for when it will expire after mixing. Read the instructions for your prep. If your prep has a gross taste I recommend Cough Drops with menthol to mask the taste and using a straw to help you consume it faster. If the prep makes you nauseous drinking a few sips of regular cola can help.
Make sure you stay hydrated during your prep. You will lose a lot of fluid during your prep, so the more clear liquid you can consume, the better!
Benefits of staying hydrated during your colonoscopy prep:
You will need to have an IV placed to administer your sedation for the prep. It is much easier to place an IV in a hydrated patient. Use this to motive you to drink more fluids. More fluids = Less pokes!
Hydration will make you feel better. Check out this post for some hydration tips.
Women of childbearing age: your doctor will ask you to provide a urine sample for a pregnancy test before your procedure. This will be much easier if you are hydrated. Bottoms up!
Tips for appointment day
Read your doctor’s instructions again
Confirm your driver. Make sure your driver has some activities to keep them busy in the waiting room.
Set your alarm to start your second round of prep
Only take the medications approved by your doctor
Stop all fluids at the time designated by your doctor
Leave home in time to make it to your appointment
Post Colonoscopy Tips
Have someone stay home with you
Do not drive, operate heavy machinery, or make any legal decisions for the rest of the day or until your doctor suggests. You may not even remember the drive home.
Eat small light meals, however, try to incorporate some fiber into your diet. This is not the best time for a Big Mac or a Big salad.
Continue to stay hydrated.
Thank your driver and pat yourself on the back. You did it! Congrats!