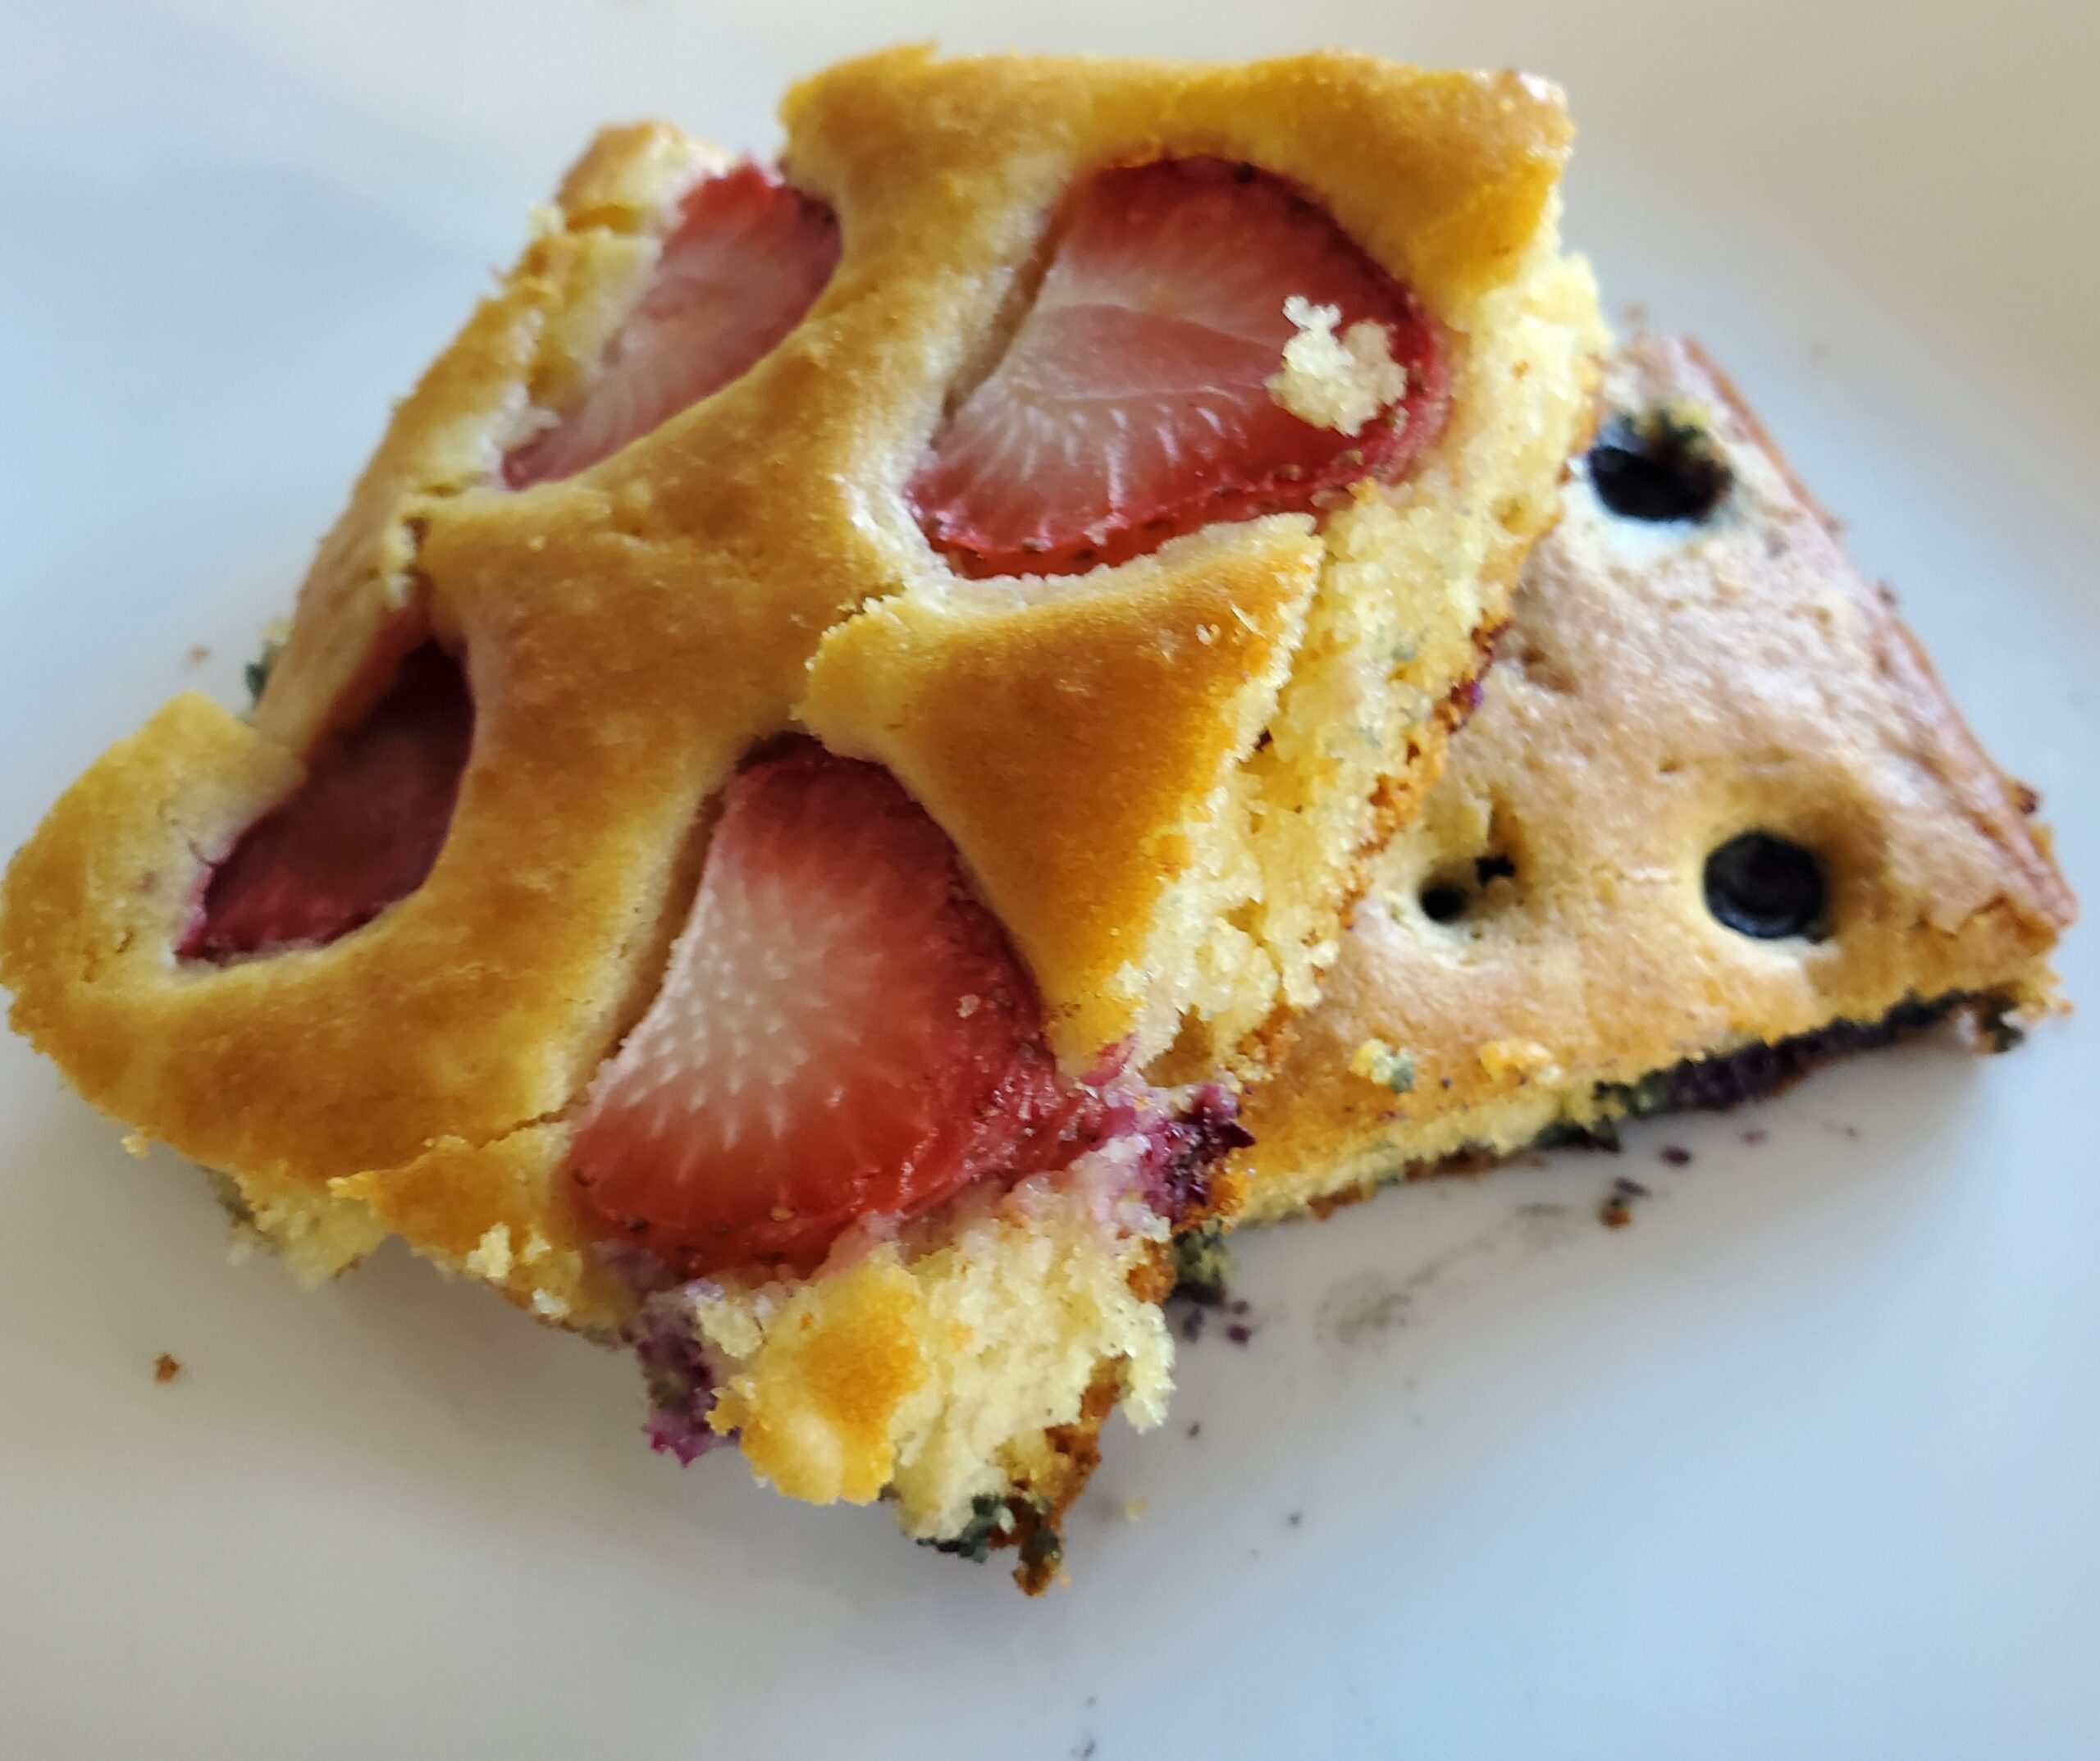
Sheet pan pancakes are a quick and easy way to feed a crowd in the morning without having to stand by the stove for hours. They also make great leftover breakfast for easy weekday mornings. This sourdough sheet pan pancake recipe is also great for using up some extra discard. This recipe can also be used to make regular sourdough discard pancakes and waffles.
Sourdough discard – If you don’t have sourdough discard you can replace it with 1/2 cup of all-purpose flour and 1/2 cup of buttermilk or milk.
Sourdough discard sheet pan pancake ingredients
2 Cups All-purpose flour
1 teaspoon baking soda
1 teaspoon baking powder
1 teaspoon sea salt
3 tablespoons sugar
1 cup sourdough discard
1 and 1/2 cups milk
1 teaspoon pure vanilla extract
4 tablespoons butter, melted
2 large eggs
1/2 cup fresh blueberries, washed and patted dry
5-6 fresh strawberries, washed patted dry, and sliced
1 banana, peeled and sliced
1/4 cup of chocolate chips
Sheet Pan Pancake Directions
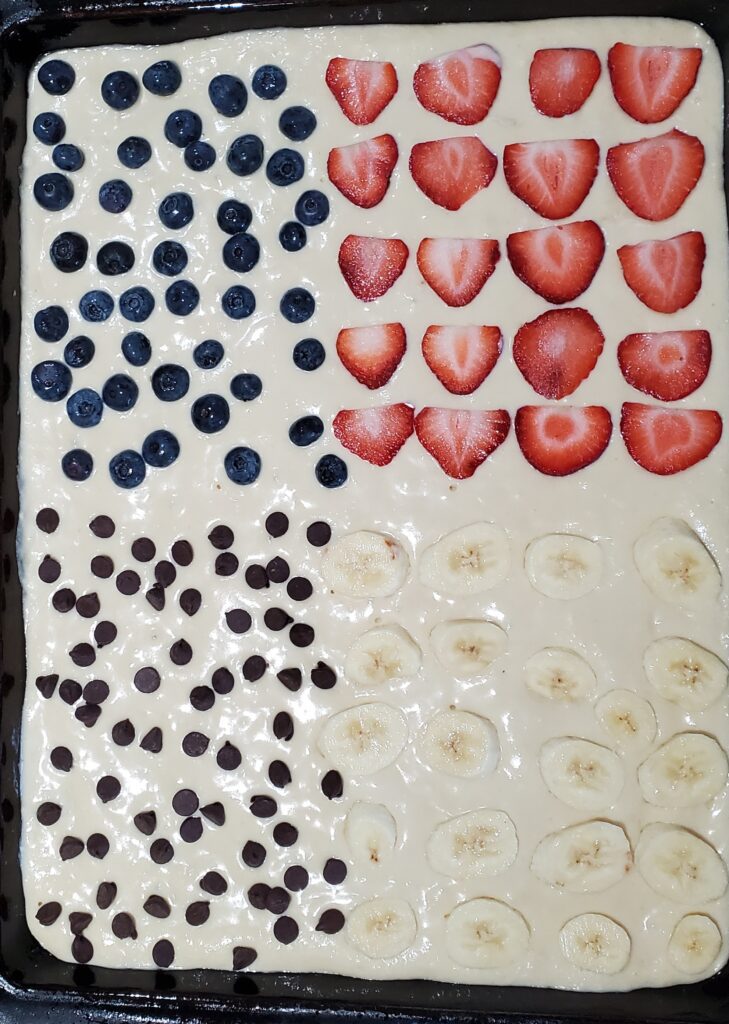
Mix all of the dry ingredients (flour, baking soda, baking powder, salt and sugar) in a bowl. Crack the eggs and whisk them a bit before adding. Add the discard, milk, vanilla, melted butter and eggs to the dry ingredients and mix well. It’s ok if the batter is a little lumpy. Pour the batter on a greased or parchment lined 18 x 13 inch sheet pan. Allow the batter to sit for 20-30 minutes before baking.
Meanwhile, prepare your fruit. Make sure your fruit is patted dry.
Add the chocolate chips and fruit to the top of the batter.
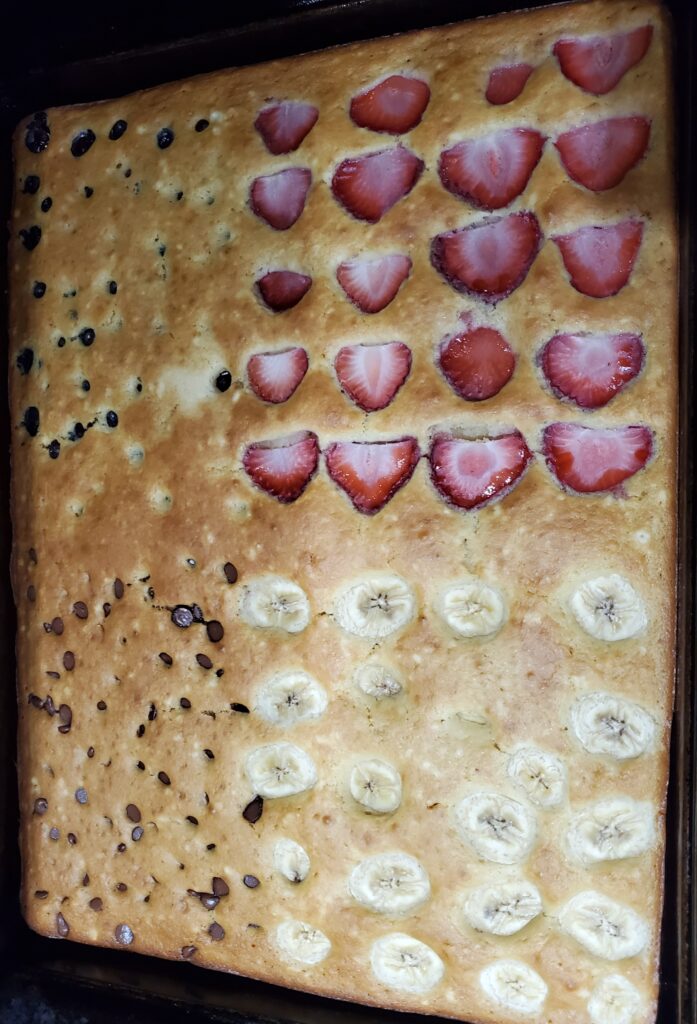
Preheat the oven to 425 degrees F. Bake for 15-18 minutes or until the top is golden brown. Wait 1-2 minutes before slicing.
Sheet pan pancake mix-in and topping ideas
Mix-ins:
Fresh blueberries
Fresh strawberries
Fresh raspberries
Fresh black berries
Bananas
Chocolate chips, or any chip e.g. white chocolate, butterscotch etc..
Fresh thin apple slices, with cinnamon
Cinnamon and brown sugar
Nuts e.g. walnuts, pecans, cashews
Toppings:
Maple syrup
Powdered sugar
Strawberry syrup
Whipped cream
Nutella
Jam
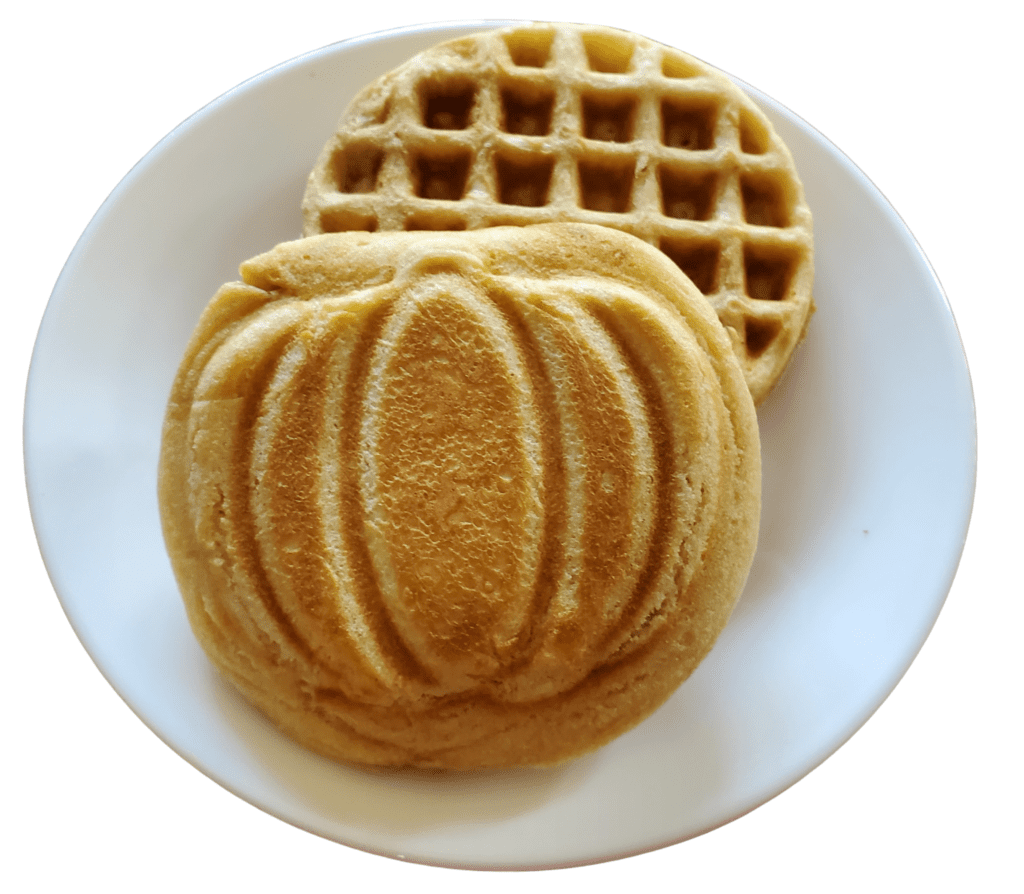
Can you use this recipe to make regular pancakes or waffles?
Yes you can use this same recipe to make sourdough pancakes and waffles.
Find this cute pumpkin waffle maker here. These mini waffles fit perfectly in a standard toaster and make a quick and easy breakfast. Just make the waffles on the weekend and you will be ready for a busy week.
5-6 fresh strawberries, washed patted dry, and sliced
1 banana, peeled and sliced
1/4 cup of chocolate chips
DIRECTION
Mix all of the dry ingredients (flour, baking soda, baking powder, salt and sugar) in a bowl. Crack the eggs and whisk them a bit before adding. Add the discard, milk, vanilla, melted butter and eggs to the dry ingredients and mix well. It's ok if the batter is a little lumpy. Pour the batter on a greased or parchment lined 18 x 13 inch sheet pan. Allow the batter to sit for 20-30 minutes before baking.
Meanwhile, prepare your fruit. Make sure your fruit is patted dry.<br>Add the chocolate chips and fruit to the top of the batter.
Preheat the oven to 425 degrees F. Bake for 15-18 minutes or until the top is golden brown. Wait 1-2 minutes before slicing.
NOTES
As an Amazon associate, I earn on qualified purchases.
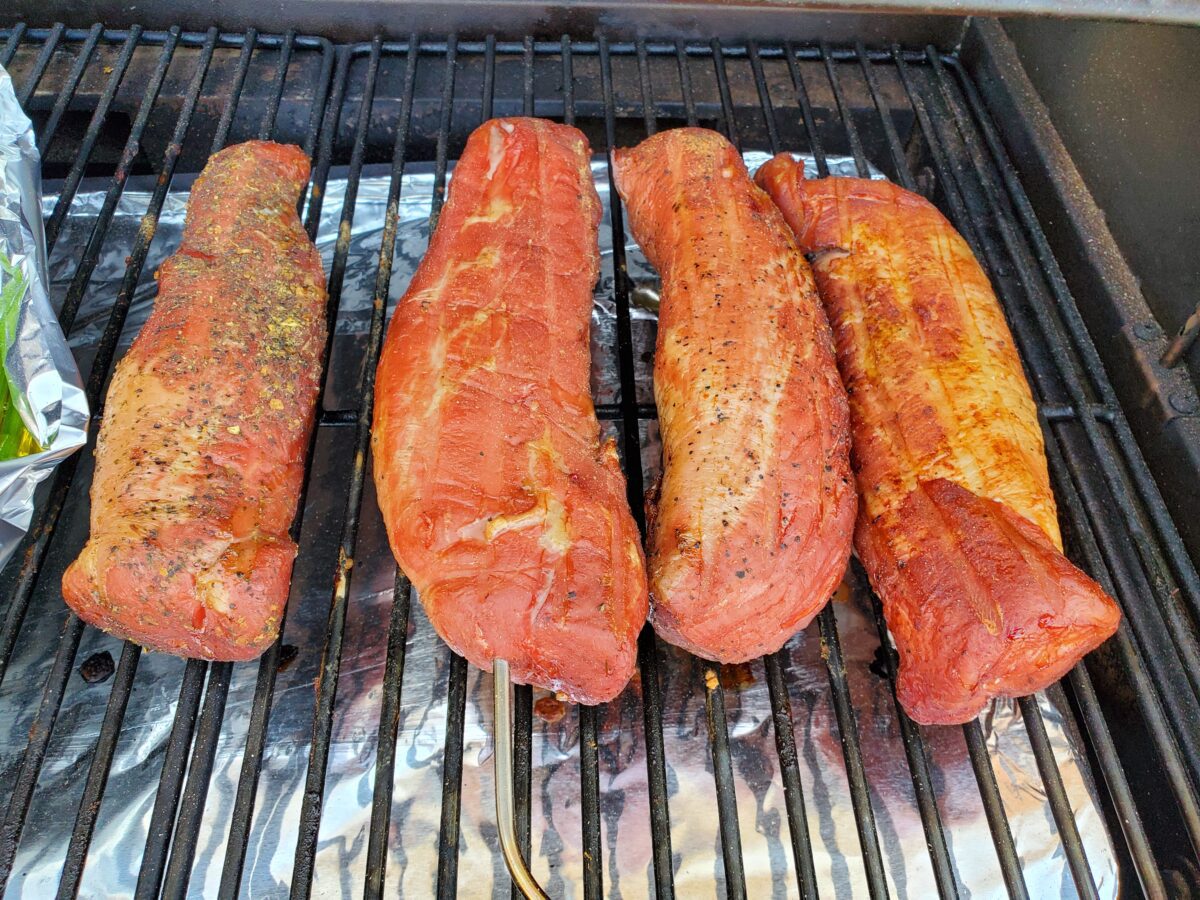
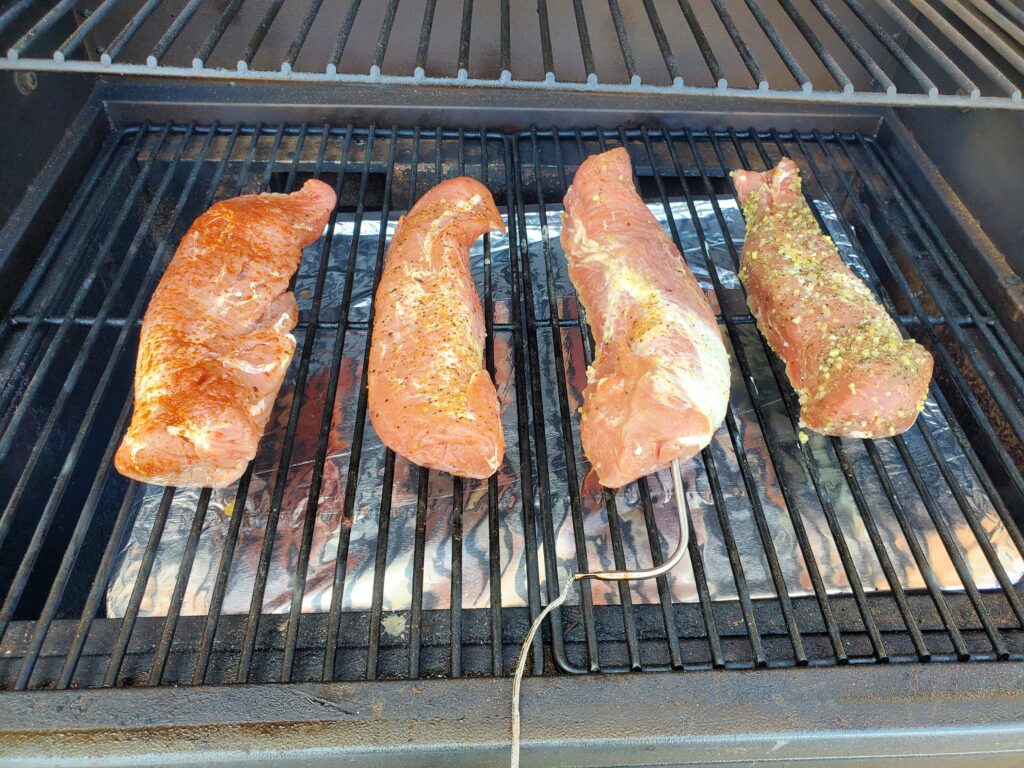
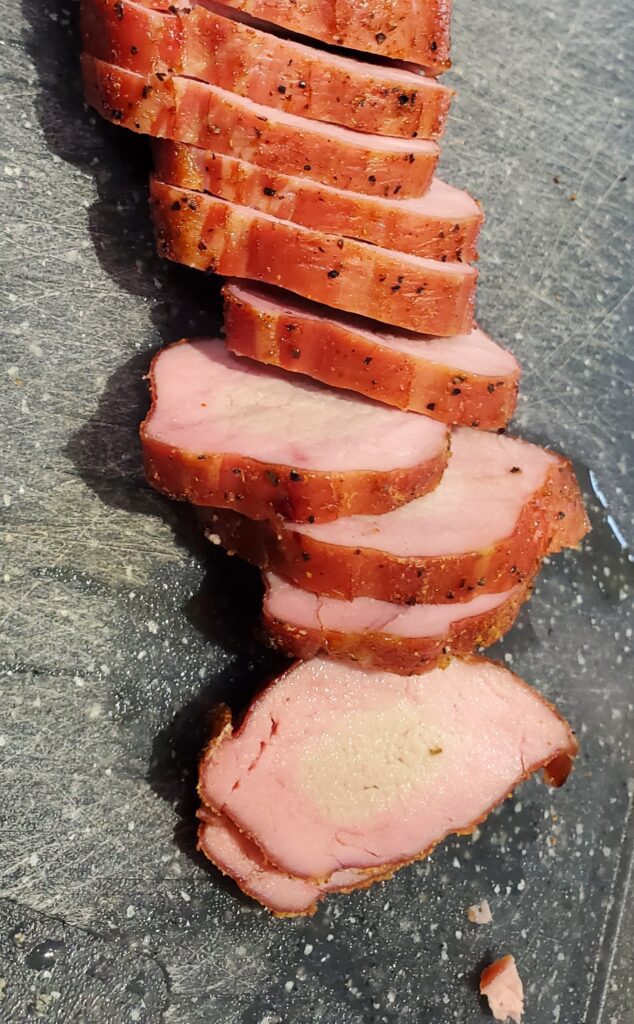
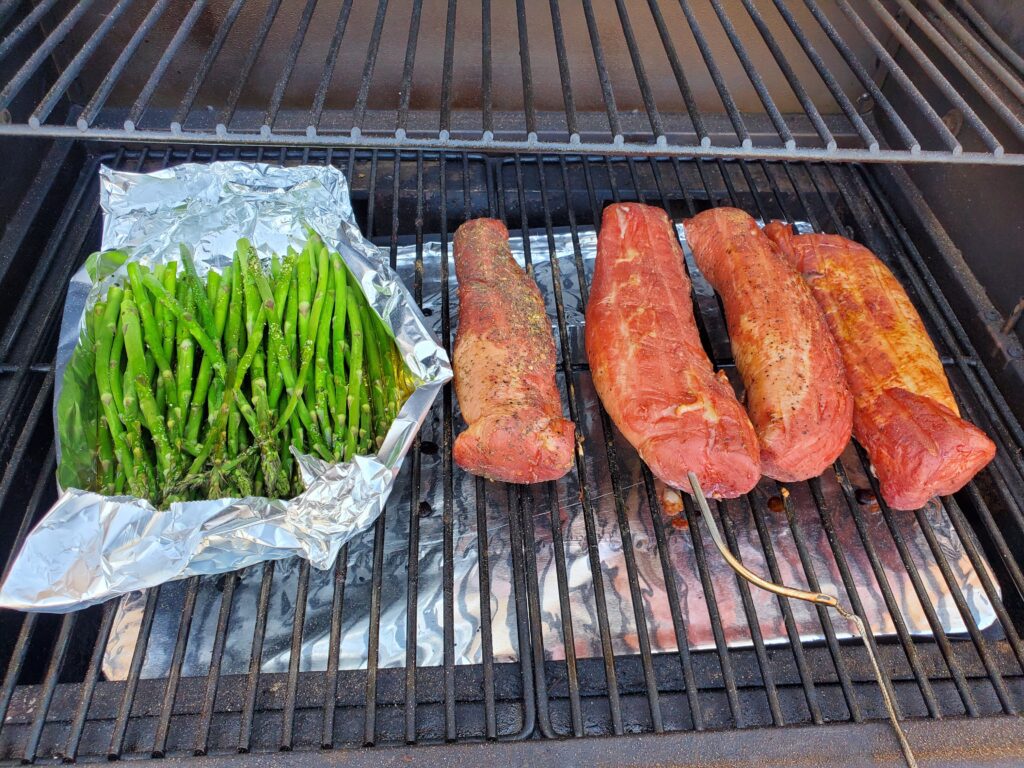
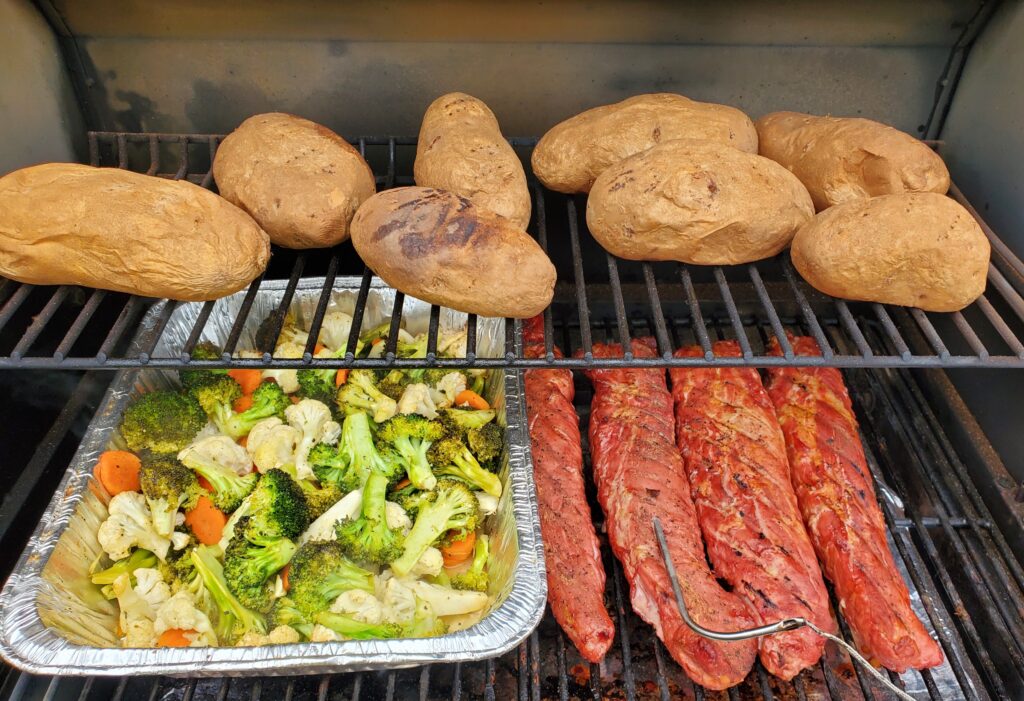
Smoked Pork tenderloin is so easy. It’s easy to prepare, and simple to smoke. Add a couple of tasty sides and you have one of the easiest family dinners possible. Many side dishes can be smoked at the same temperature along with your pork tenderloin. Here’s how:
Disclaimer: This post may contain affiliate links. I earn commission at no additional cost to you.
Preheat your Traeger to 225 degrees F. Place the seasoned pork tenderloins on the Traeger. Place a meat thermometer in the center of the largest tenderloin.
Smoke for 1.5 – 2 hours for 145 degrees. Smoke for 2 – 2.5 hours for 160 degrees. The smoke time varies depending on the size of your tenderloins and the weather.
How to smoke vegetables and potatoes on the Traeger
Smoke up some veggies along with your pork tenderloin. You can smoke most veggies at the same temperature as the pork tenderloin. Just add them after the first 1-1.5 hours of smoking.
Baked potatoes need to be smoked at 400 degrees for ~ 1 hour depending on the size of the potato. If you want to serve them with your smoked pork tenderloin, put the potatoes on first at 400 degrees for 30-40 minutes, then turn the heat down to 225 add the pork. The potatoes will finish cooking at the lower temperature over the longer time. I usually add a few extra potatoes and use the leftover smoked potatoes to make potato salad. Find the best potato salad recipe here.
This sourdough discard strawberry shortcake is to die for! So flaky and delicious. The perfect mix of sweet and sour. You will not want to make it any other way. Included below you will find directions for making the shortcakes, strawberry topping, and homemade whipped cream. You can also use Redi whip if you prefer. As always, I do not like to turn on the oven in the summer, so I’ve included directions for baking the shortcakes on the Traeger.
Disclaimer: This post may contain affiliate links. I earn commission at no additional cost to you.
1/3 cup sourdough starter discard (straight from the fridge)
1/3 cup milk
Shortcake directions
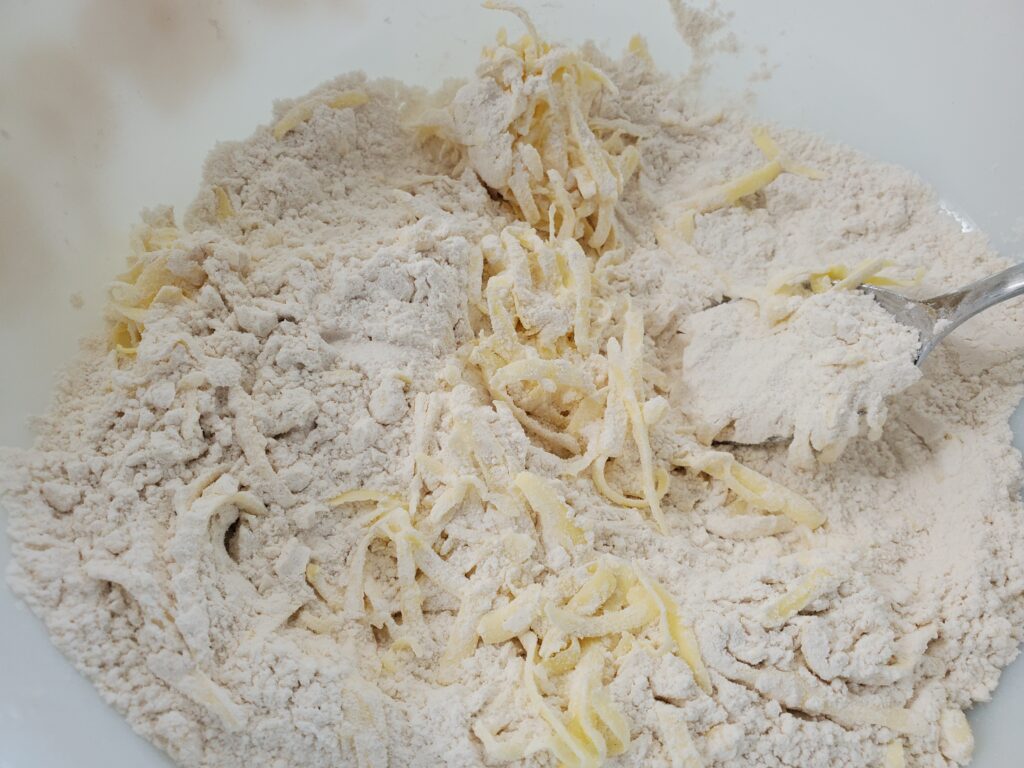
Mix the flour, baking powder, salt and sugar in a mixing bowl. Use a cheese grater to grate approximately half of the butter into the flour mixture. Tip: use the butter wrapper to hold onto one end of the butter while grating. Mix the grated butter into the flour mixture.
Melt the other half of the butter. Add the discard, milk and melted butter to the dry ingredients and mix until dough forms.
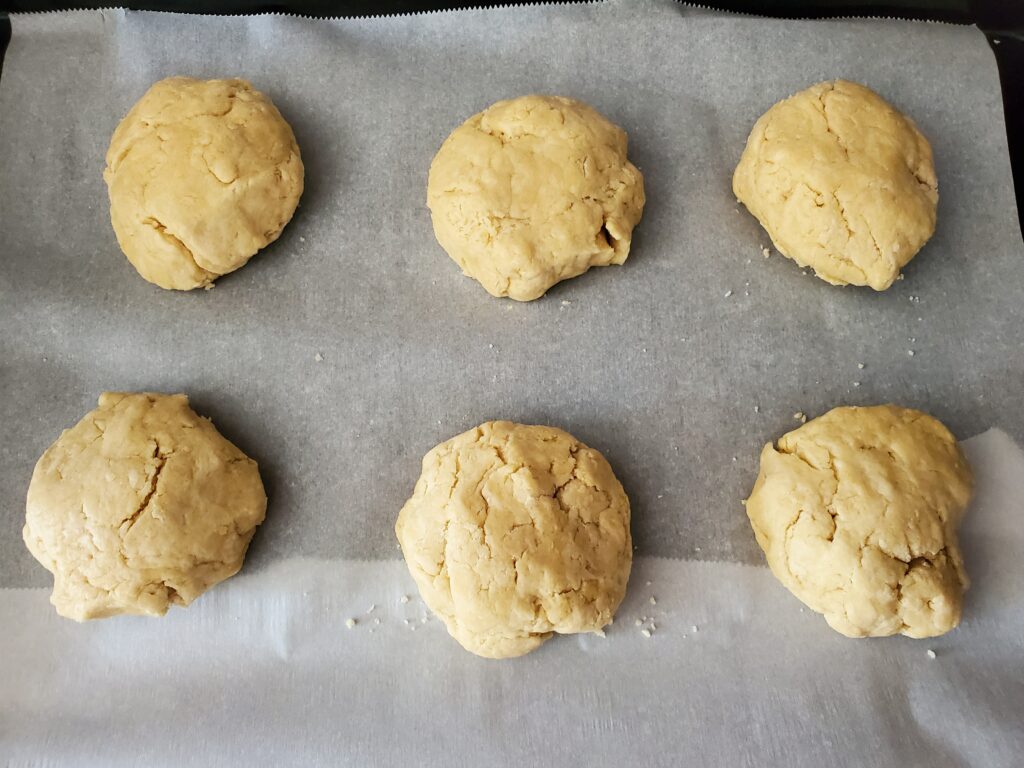
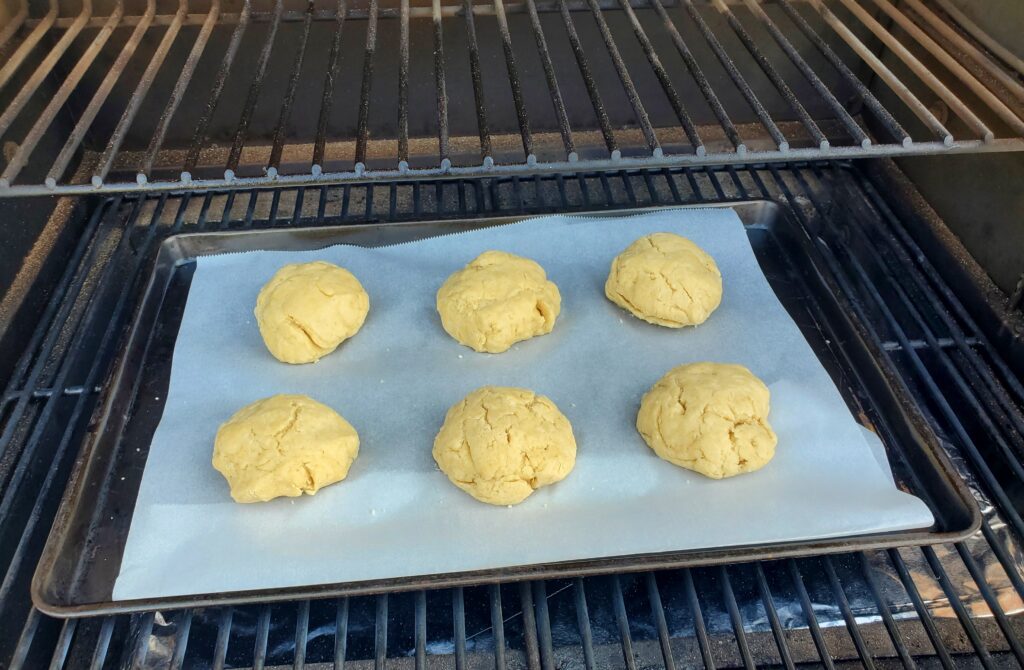
Shape the dough into 6 shortcakes. Place the cakes on a parchment lined cookie sheet.
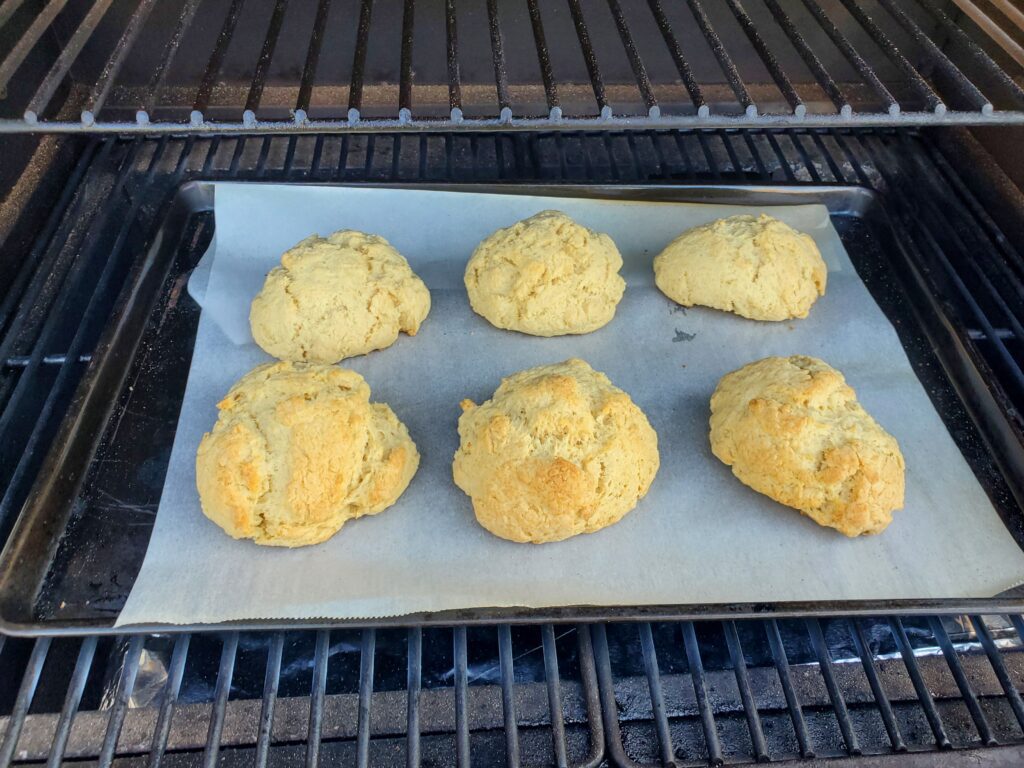
Preheat the oven to 425 degrees F. Bake the cakes for 17-18 minutes or until lightly browned.
Allow the shortcakes to cool if desired.
Strawberry Topping Ingredients:
2 pounds fresh strawberries
1/4 cup sugar
Strawberry topping directions:
Wash the strawberries, and remove the stems. Slice the strawberries into bite size pieces. Place the berries in a bowl. Add the sugar and mix. This mixture can be added to the shortcakes right away, or if you prefer softer strawberries with more syrup, wait a couple of hours before serving.
Homemade whipped cream ingredients
2 cups heavy cream or whipping cream
1/2 cup powdered sugar
1 teaspoon vanilla
Homemade whipped cream directions
Mix the ingredients together in a bowl. Whip with a hand held mixer or stand mixer with a whisk attachment until peaks begin to form about 3-4 minutes. Do not over whip!
Homemade whipped cream is best used right away, although it can be stored for up to 24 hours in the refrigerator. If you choose to pipe your whipped topping onto the strawberry shortcake, I recommend the Wilton 8B tip. Otherwise, it tastes great if you just spoon it on!
How to assemble the strawberry shortcakes
Cut the shortcake in half. Place the bottom half in a bowl, layer with strawberries, then whipped cream then the top half then whipped cream then more strawberries. Yummy!
Can you bake strawberry shortcake on the Traeger?
Yes you can! Preheat the Traeger to 425 degrees F. Place the parchment lined cookie sheet with shortcakes on the Traeger. Bake/smoke for 17-18 minuets or until lightly browned.
Shortcakes on the TraegerShortcakes baked on the Traeger.
As an Amazon Associate, I earn on qualified purchases.
Recipe By Kristin
Course: Dessert
Cusine:American
Difficulty:Easy
Servings
6 minutes
Preparing Time
5 minutes
Cooking Time
18 minutes
Calories
kcal
INGREDIENTS
2 cups All-Purpose flour
1 Tablespoon baking powder
1/2 teaspoon salt
3 tablespoon sugar
1/2 cup (1 stick) of cold butter
1/3 cup sourdough starter discard (straight from the fridge)
1/3 cup milk
Strawberry topping
Whipped cream
DIRECTION
Mix the flour, baking powder, salt and sugar in a mixing bowl. Use a cheese grater to grate approximately half of the butter into the flour mixture. Tip: use the butter wrapper to hold onto one end of the butter while grating. Mix the grated butter into the flour mixture. Melt the other half of the butter. Add the discard, milk and melted butter to the dry ingredients and mix until dough forms.<br>
Shape the dough into 6 shortcakes. Place the cakes on a parchment lined cookie sheet.
Preheat the oven to 425 degrees F. Bake the cakes for 17-18 minutes or until lightly browned. <br>Allow the shortcakes to cool, if desired.
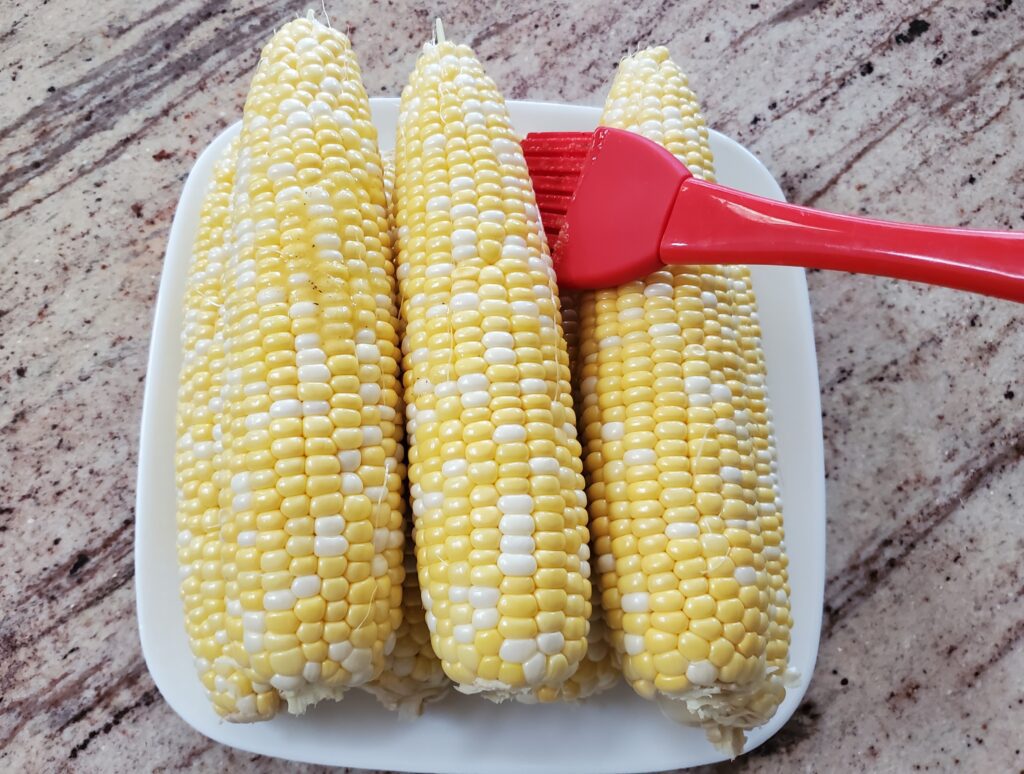
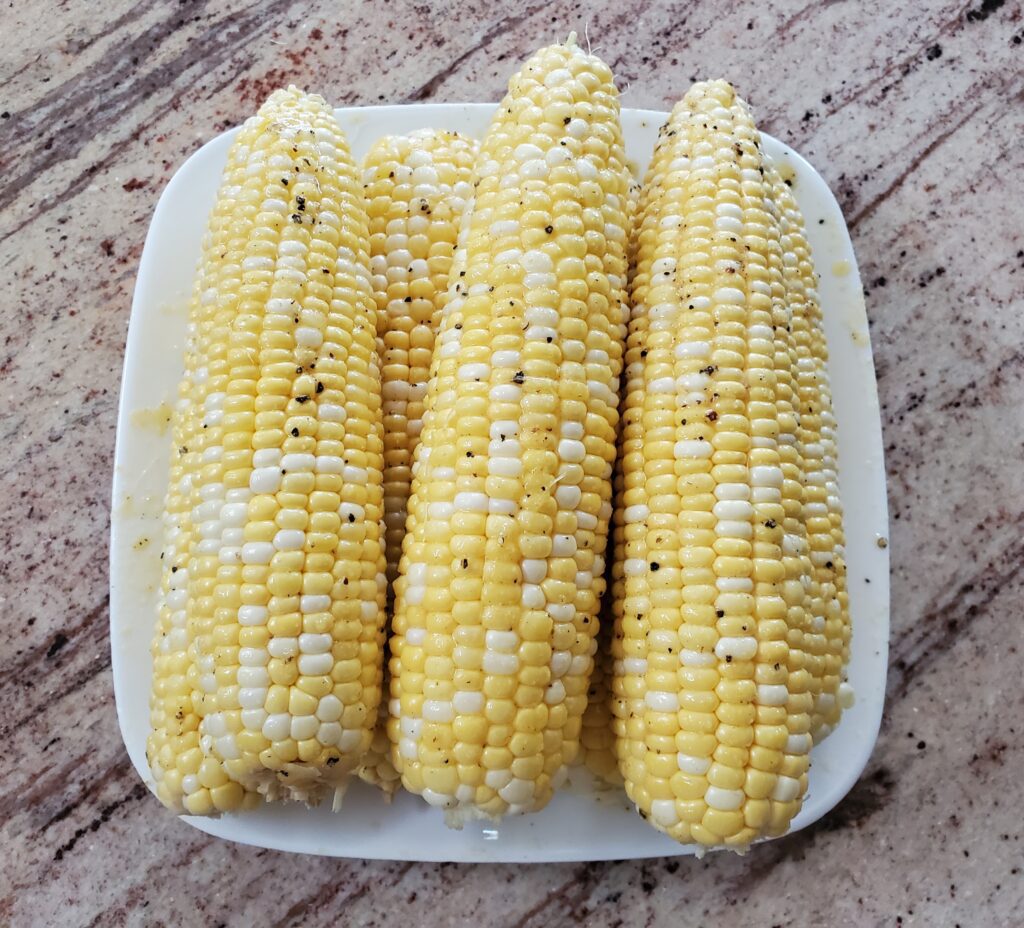
Melt the butter and add the seasonings to the melted butter. Mix well.
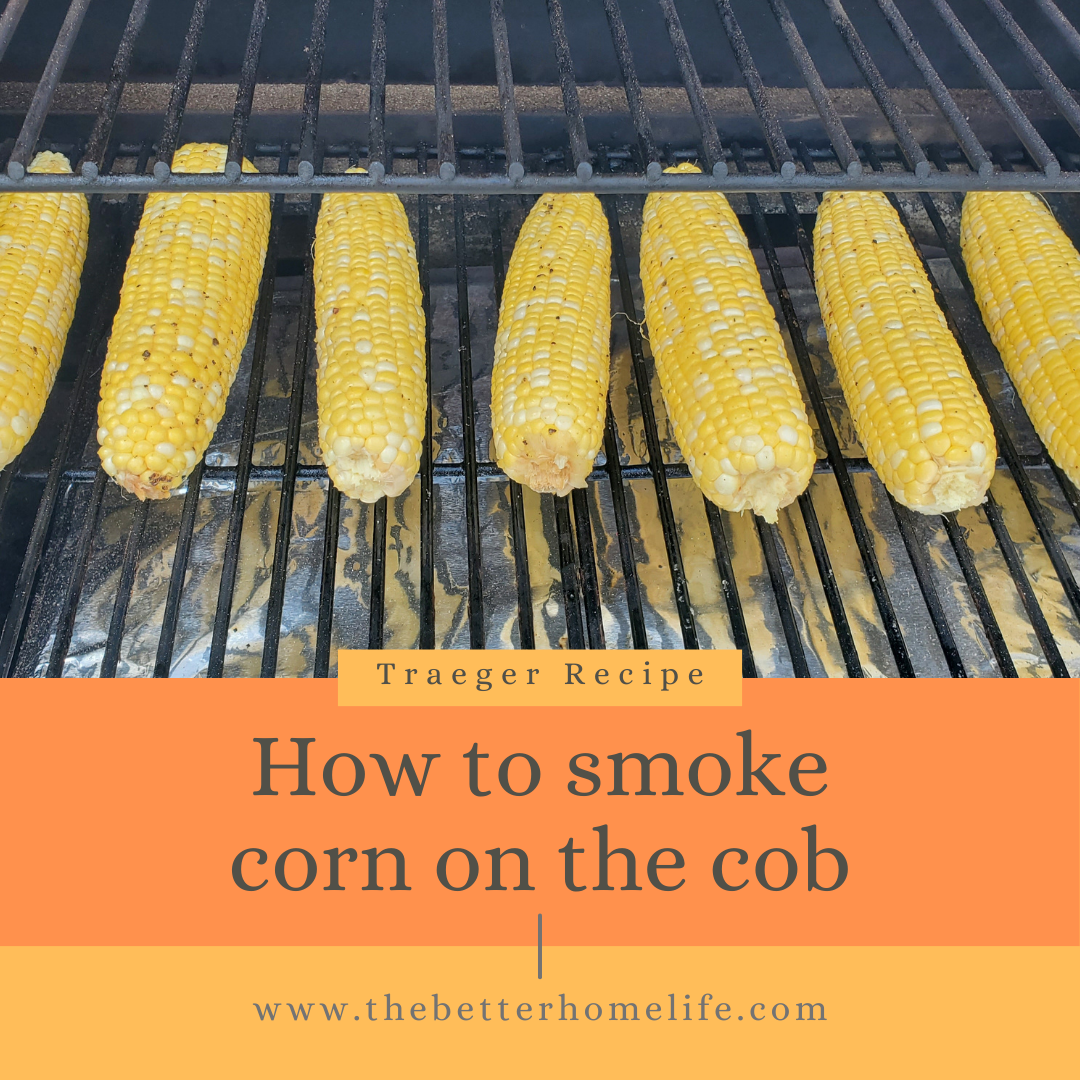
Use a silicone brush to coat the corn cobs with the seasoned butter.
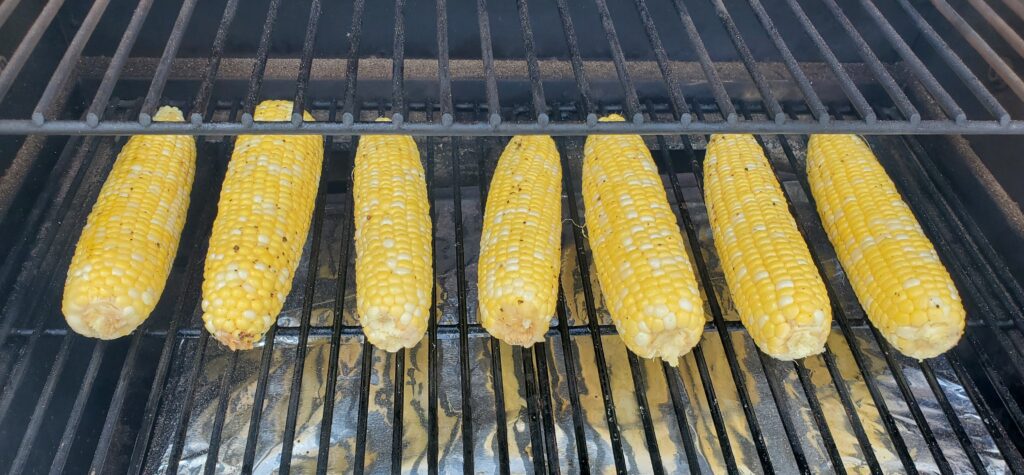
Preheat the smoker to 225 degrees F. Place the corn cobs on the grill. After 25 minutes flip the cobs. Continue to smoke for another 50 minutes. The total smoke time is 1 hour and 15 minutes.
Use tongs to remove the corn from the smoker. Allow them to cool for at least 1 minute before eating.
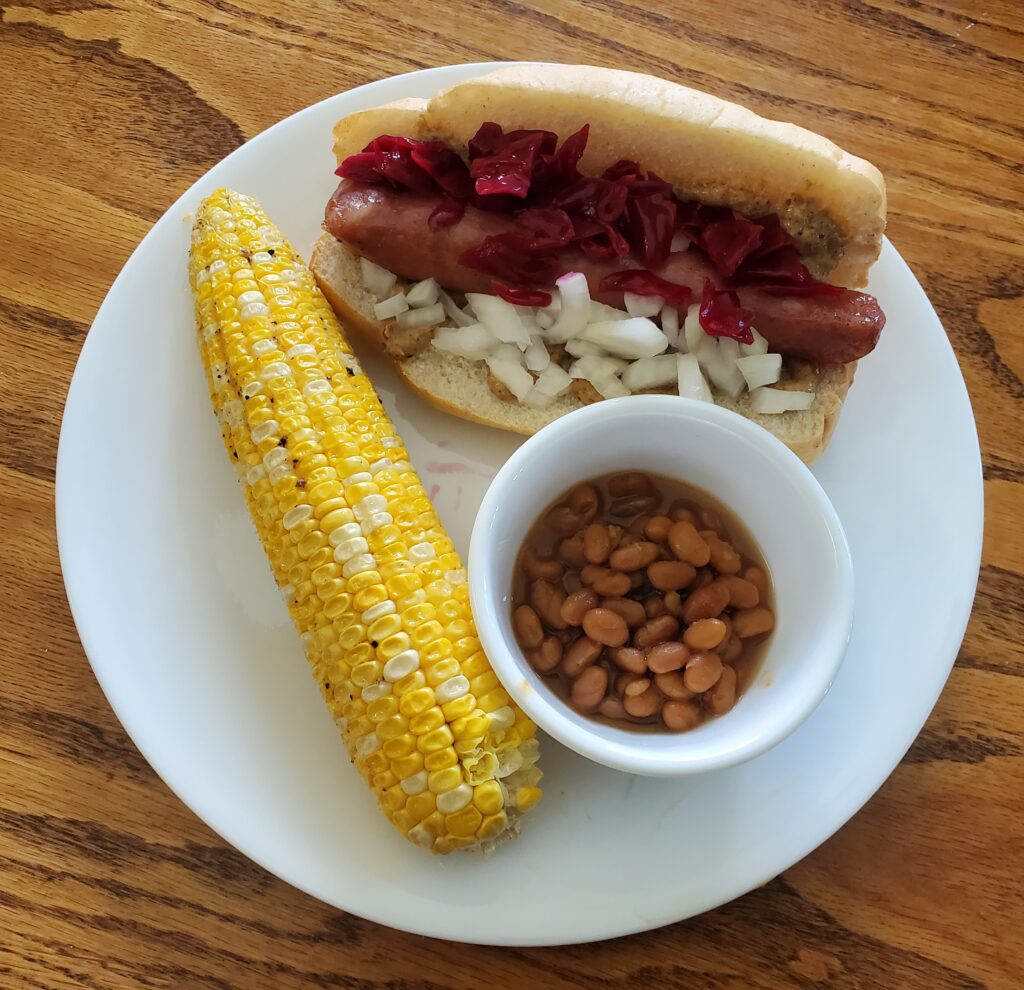
What goes great with smoked corn on the cob?
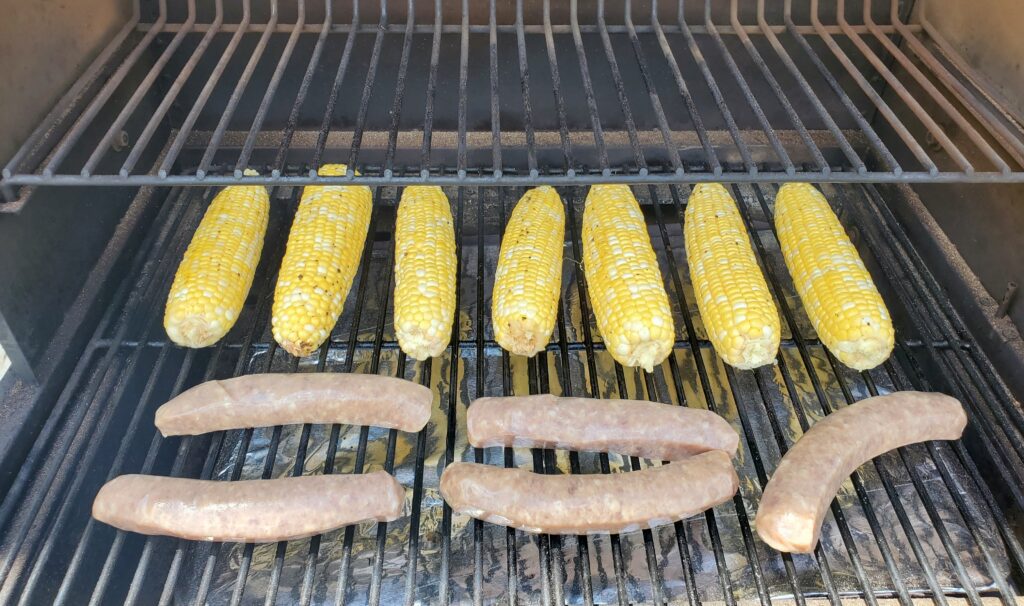
Honestly any summer grilled or smoked meat would be perfect for a side of corn on the cob! Smoked sausage pairs really well with smoked corn on the cob because it smokes for almost the same amount of time at the same temperature! If you are smoking a larger meat that needs more space the corn can smoke on the top shelf. Try it with these tasty ribs.
Try adding this smoked corn to smoked succotash! Just cut the corn from the cob and mix it in instead of using canned corn. Four corn cobs is approximately equal to one can of corn. A perfect side for any smoked meat.
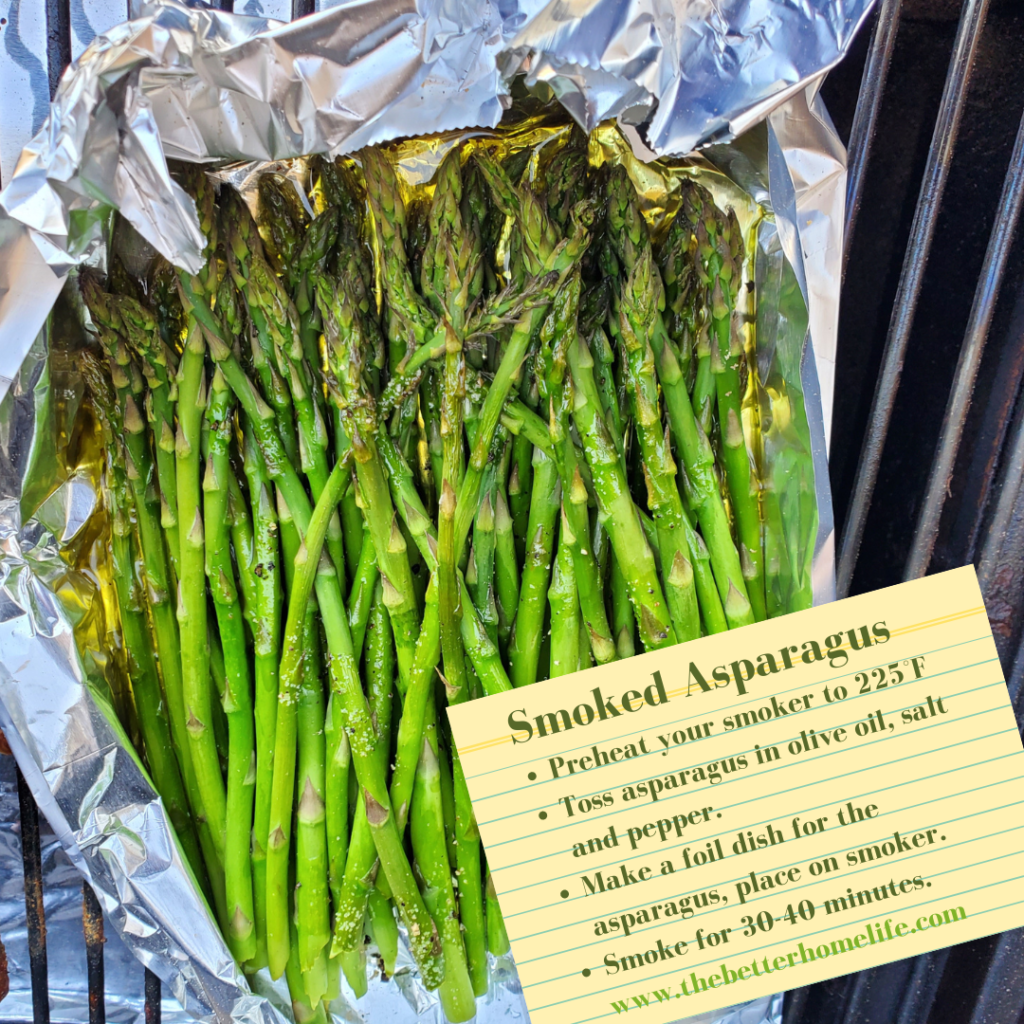
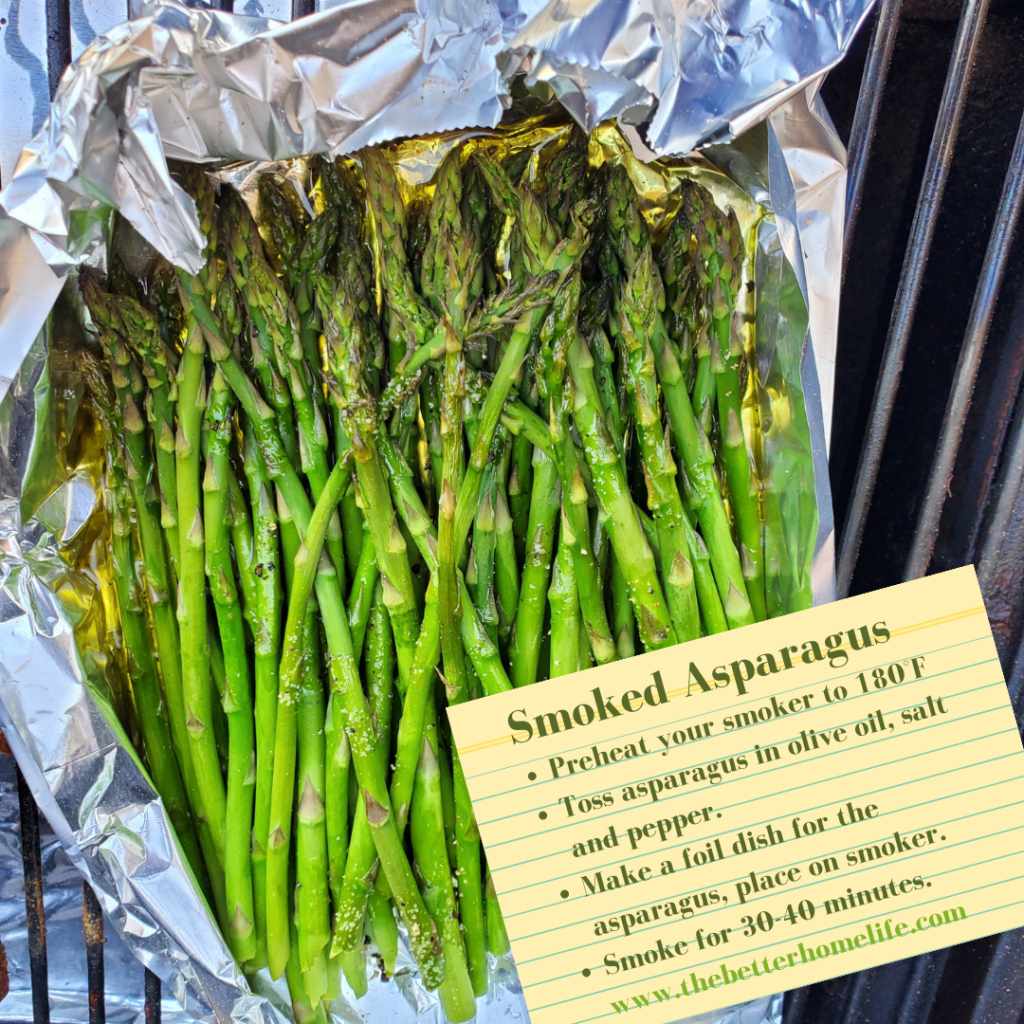
Many vegetables are great smoked. Try this amazing smoked asparagus.
Melt the butter and add the seasonings to the melted butter. Mix well. Use a silicone brush to coat the corn cobs with the seasoned butter.
Preheat the smoker to 225 degrees F. Place the corn cobs on the grill. After 25 minutes flip the cobs. Continue to smoke for another 50 minutes. The total smoke time is 1 hour and 15 minutes.
Use tongs to remove the corn from the smoker. Allow them to cool for at least 1 minute before eating.
NOTES
As an Amazon Associate, I earn from qualified purchases.
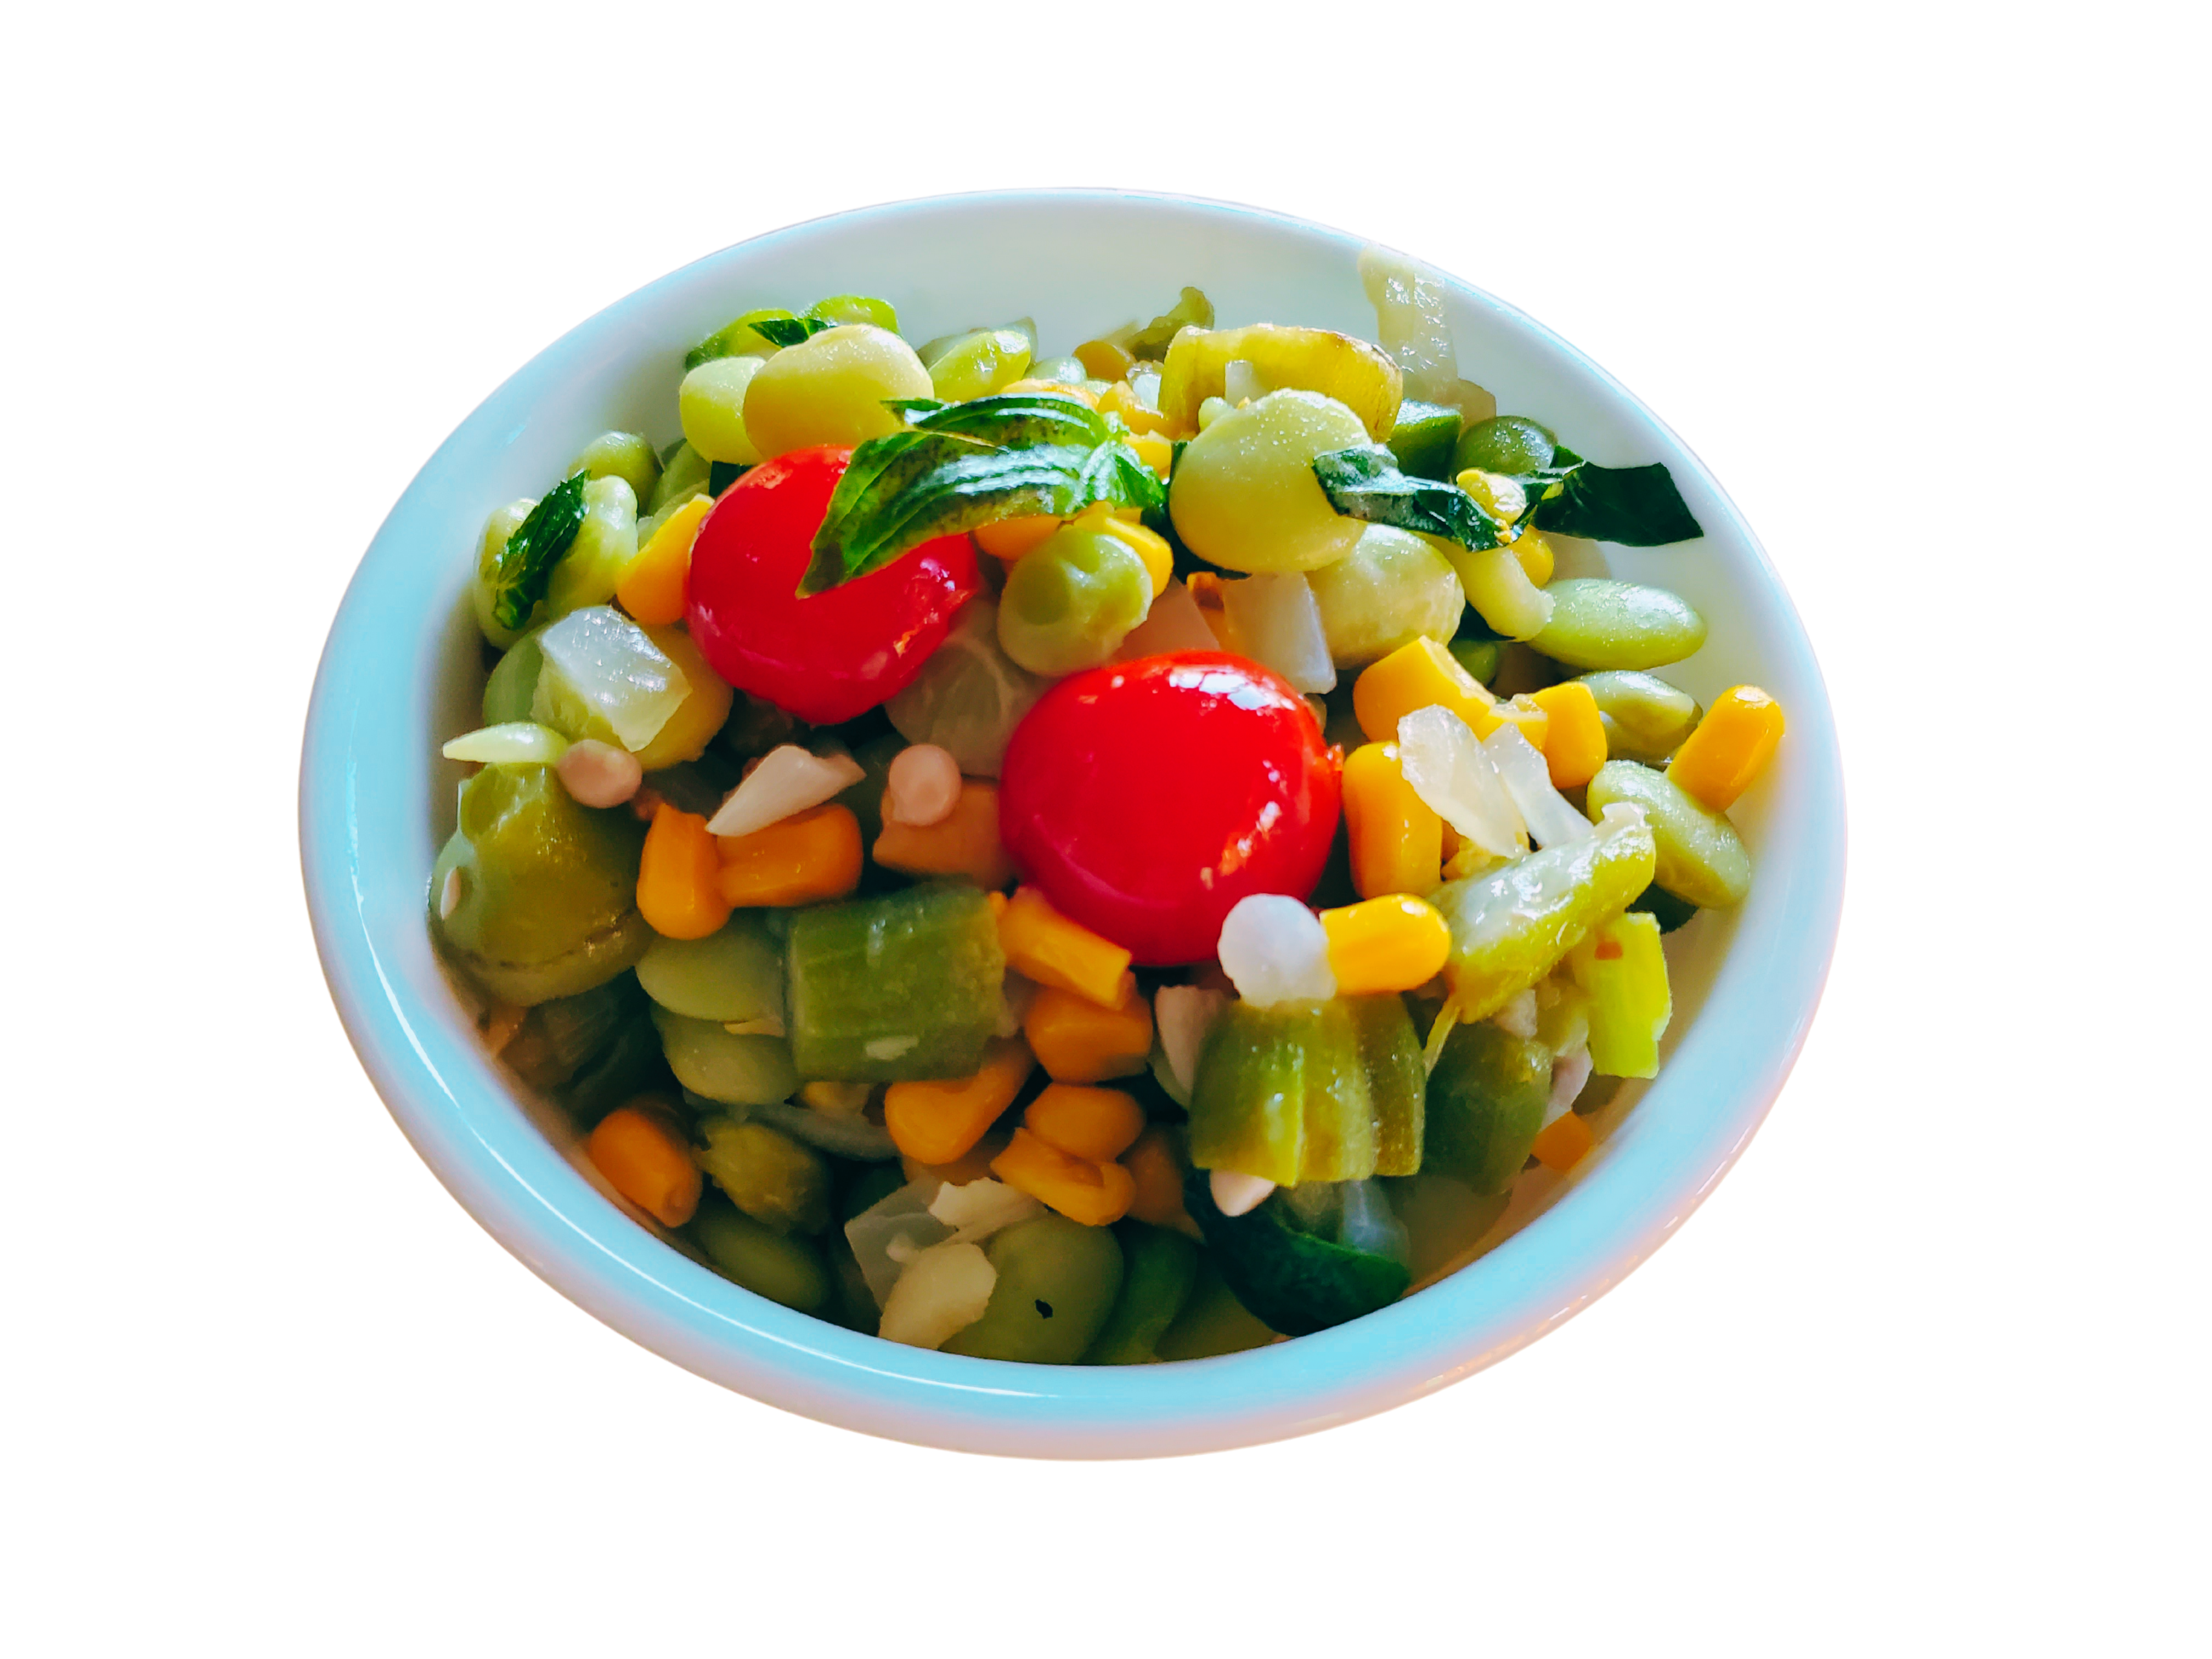
2 – 15 ounce cans of sweet corn, drained (or corn from 8 smoked cobs)
1/2 teaspoon fresh ground pepper
4 tablespoons butter
1 pint cherry tomatoes, halved
1/4 cup thinly sliced fresh basil
Directions:
Place the lima beans in a saucepan, add enough water to cover. Bring to a boil. Reduce heat to low and simmer until tender ~ 8-10 minutes. Drain and set aside.
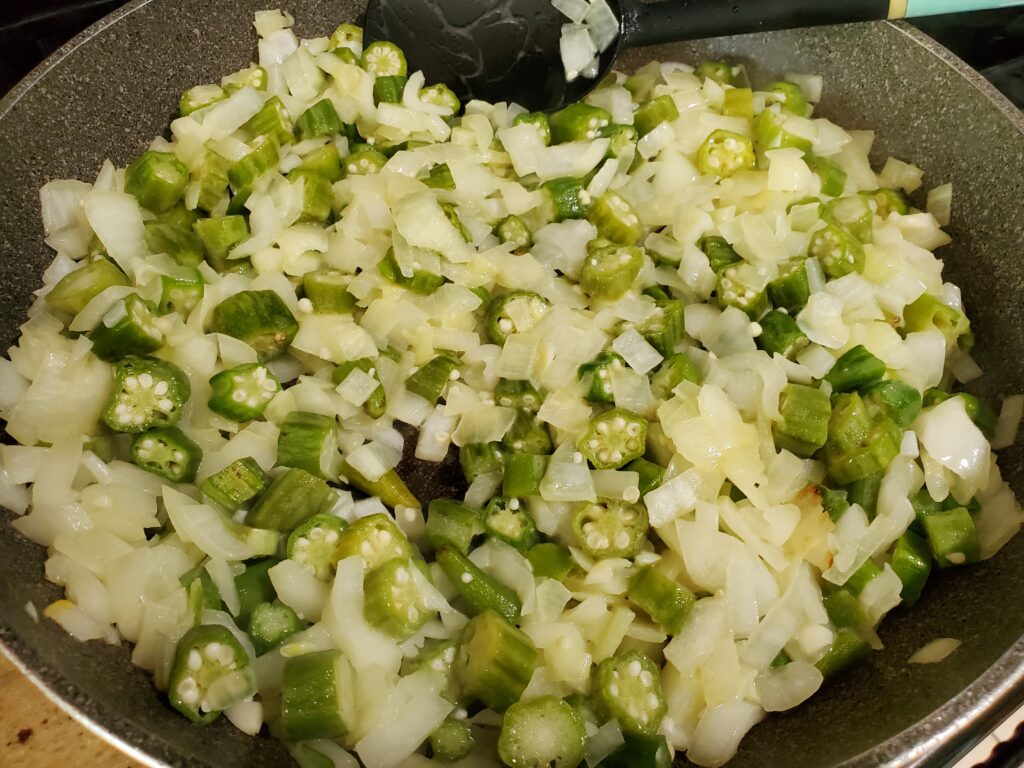
Meanwhile, sauté the onions and okra in a skillet with 2 tablespoons of the butter until tender. Remove from heat. Stir in the corn, lima beans, remaining butter and pepper.
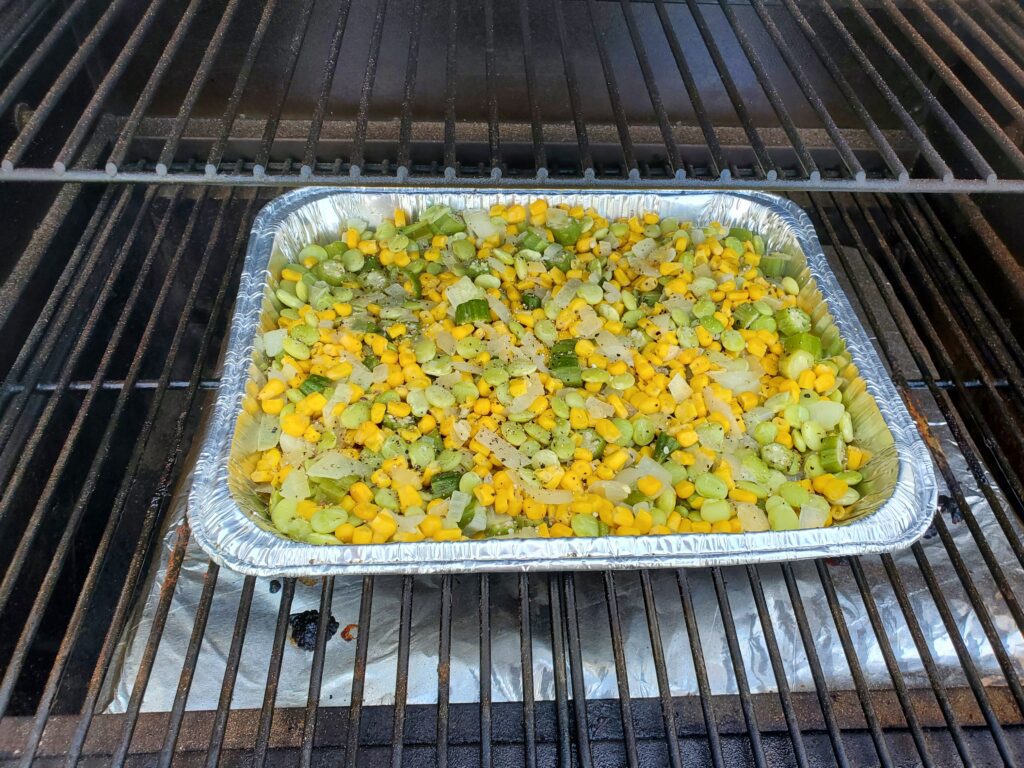
Place the mixture in a foil pan and put it on the Traeger at 225 degrees F for about 60 min.
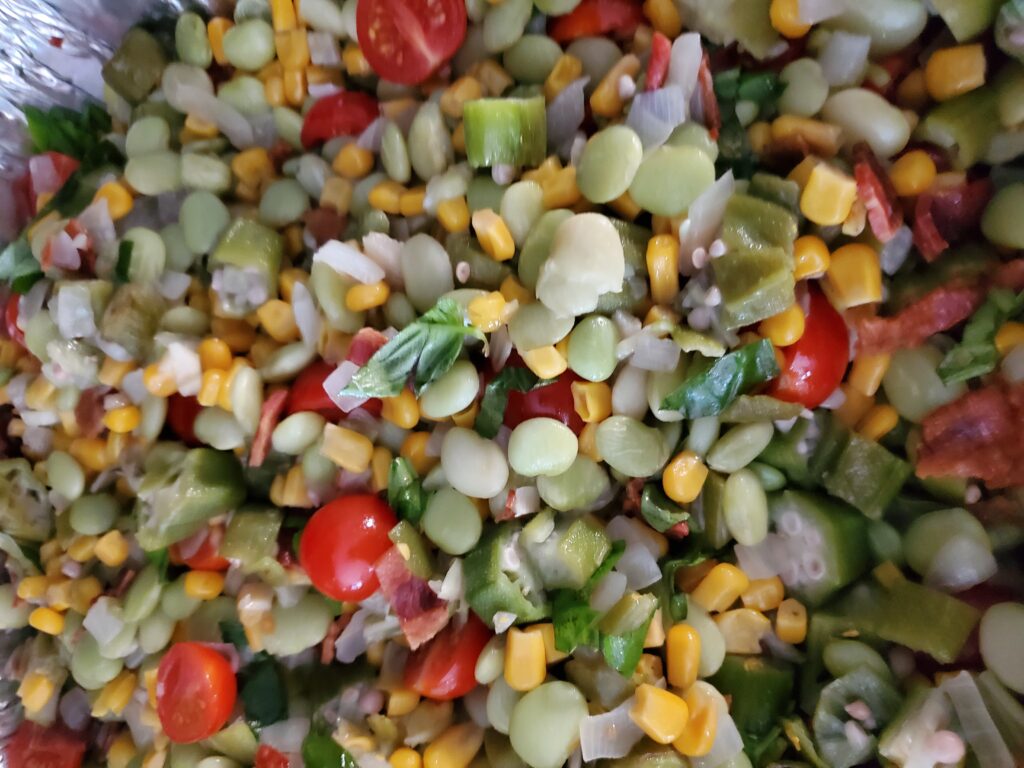
When ready to serve, remove from heat and stir in the cooked bacon, tomatoes, and fresh basil.
Note: When you smoke the succotash, you are essentially just adding smoky flavor and heat. The temperature and time can be adjusted. This is part of the reason why this is such a great side for smoked meat. You can add this side for the last hour of smoking at any temperature between 180-225 degrees F. Alternatively you can smoke this side while your meat rests. If you want to warm it faster you can smoke ate 350 degrees F for about 20 minutes.
Can you prepare Smoked Succotash ahead of time?
Yes, you can! You can prepare it the night before. Refrigerate overnight, but bring it to room temp before smoking it. If you want to heat it straight from the fridge, you will need to increase the temperature and cooking time. From cold, smoke at 350 degrees F for 30 min. No matter how you choose to smoke it, wait to stir in the tomatoes, basil and cooked bacon until ready to serve.
Does smoked succotash make good leftovers?
It sure does! So great my daughter eats it for breakfast. I mean, why not? It does have bacon!
What goes great with Smoked Succotash?
Smoked succotash is a great summer side for burgers and brats! Try it with Smoked Ribs, brisket or pulled pork!
Place the lima beans in a saucepan, add enough water to cover. Bring to a boil. Reduce heat to low and simmer until tender ~ 8-10 minutes. Drain and set aside.
Meanwhile, sauté the onions and okra in a skillet with 2 tablespoons of the butter until tender. Remove from heat.
Stir in the corn, lima beans, remaining butter and pepper.
Place the mixture in a foil pan and put it on the Traeger at 225 degrees F for about 60 min.
When ready to serve, remove from heat and stir in the cooked bacon, tomatoes, and fresh basil.
NOTES
As an Amazon associate I earn form qualified purchases.
This easy stuffed pepper recipe is a great meal to prepare ahead or bake right away. I usually make it when peppers are on sale, which is usually in the summer. I don’t like to heat up my house with the oven in the summer so, I’ve included directions for smoked stuffed peppers. These stuffed peppers also make great leftovers for packed lunches and this meal is freezable. Basically the prefect family meal!
Disclaimer: This post may contain affiliate links. I earn commission from qualified purchases at no additional cost to you.
Best pepper characteristics for making stuffed peppers
similar in shape and size
level bottom, so they stand up straight
tall and thin vs. short and fat – to fit in the baking dish better
4 bumps on the bottom rather than 3, because the stand up better on their own
Choose peppers with 4 bumps on the bottom.
Stuffed Pepper Ingredients:
8 bell peppers, any color
1 pound ground beef
1 package of taco seasoning + water needed per package directions
1 cup rice, cooked according to package directions (~ 2 cups cooked)
1 medium onion, diced
2-3 garlic cloves, minced or grated
1 15.5 ounce can black beans, drained and rinsed
1 14.5 ounce can of fire roasted diced tomatoes
1 4 ounce can of diced green chilis
1 cup shredded cheddar cheese
fresh cilantro for garnish
How to make stuffed peppers
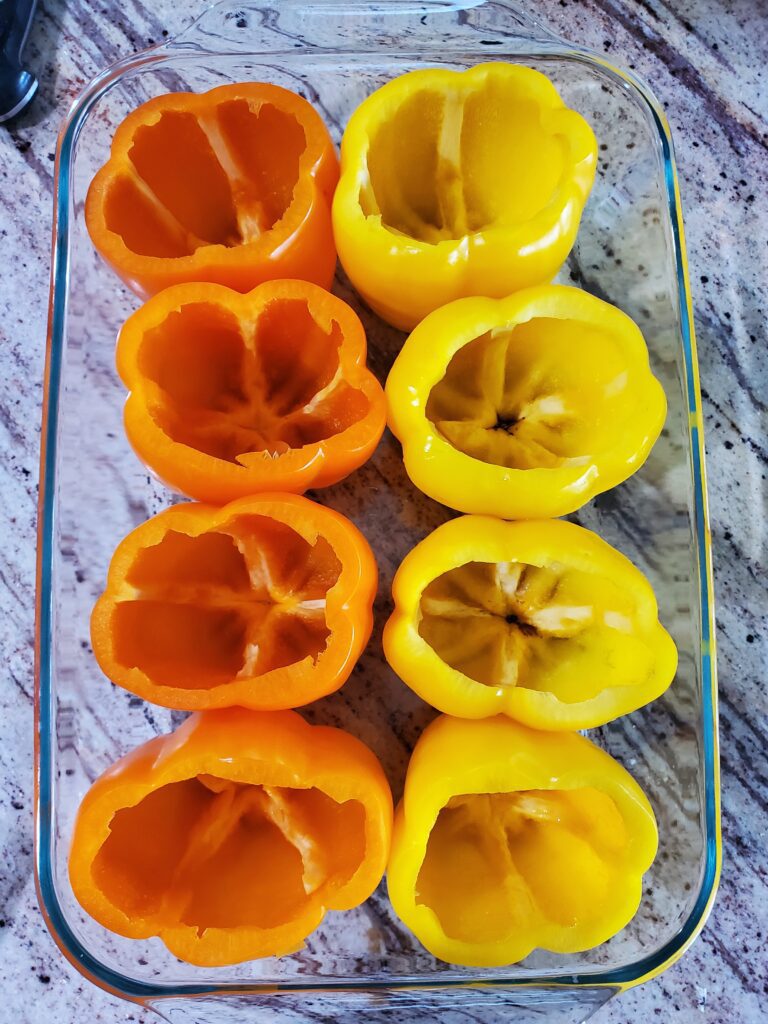
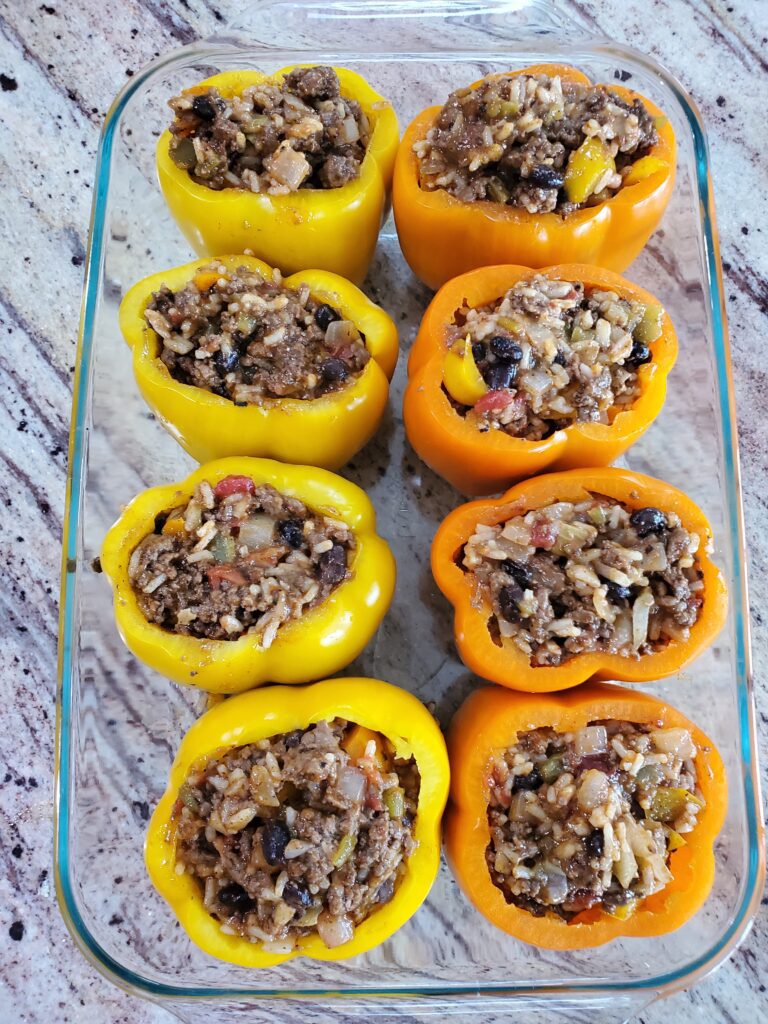
Cut the tops off the peppers. Remove the stems, but keep the remaining flesh from the top. Remove any remaining seeds and as much pith as possible. Place the pepper bottoms in a Pyrex deep 9×13 inch baking dish and dice up the tops.
Prepare the rice according to package directions. Set aside.
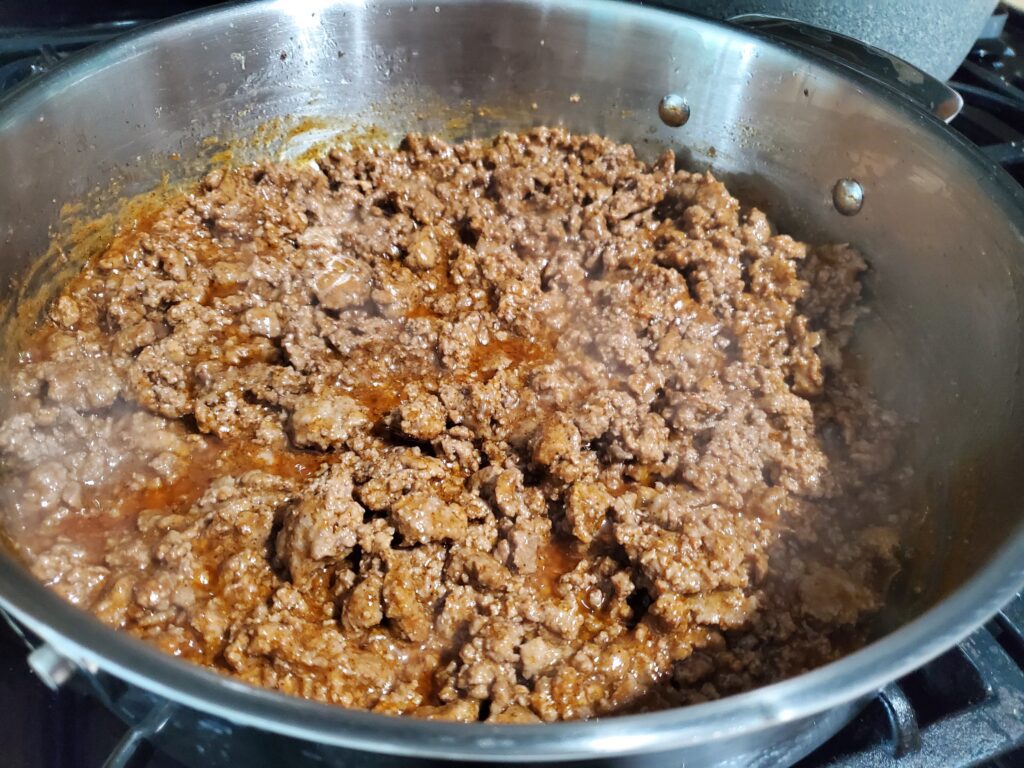
Brown the ground beef, drain and add the taco seasoning according to package directions. Set aside.
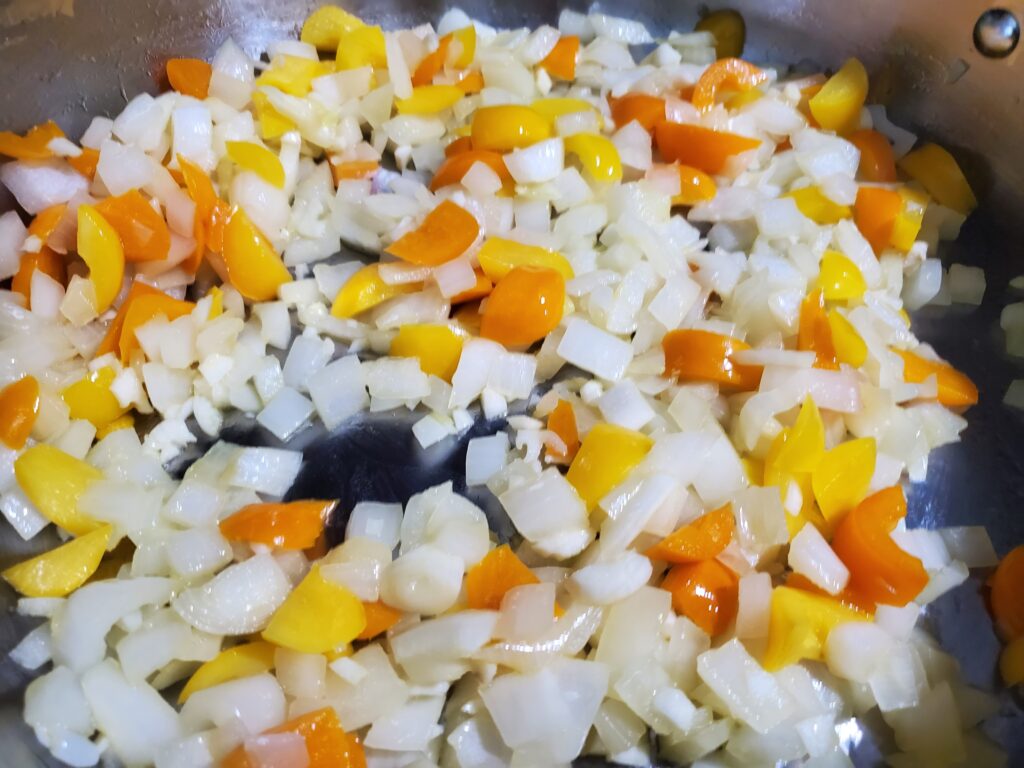
Sauté the onions and diced pepper tops until softened, add the garlic, and sauté for another minute.
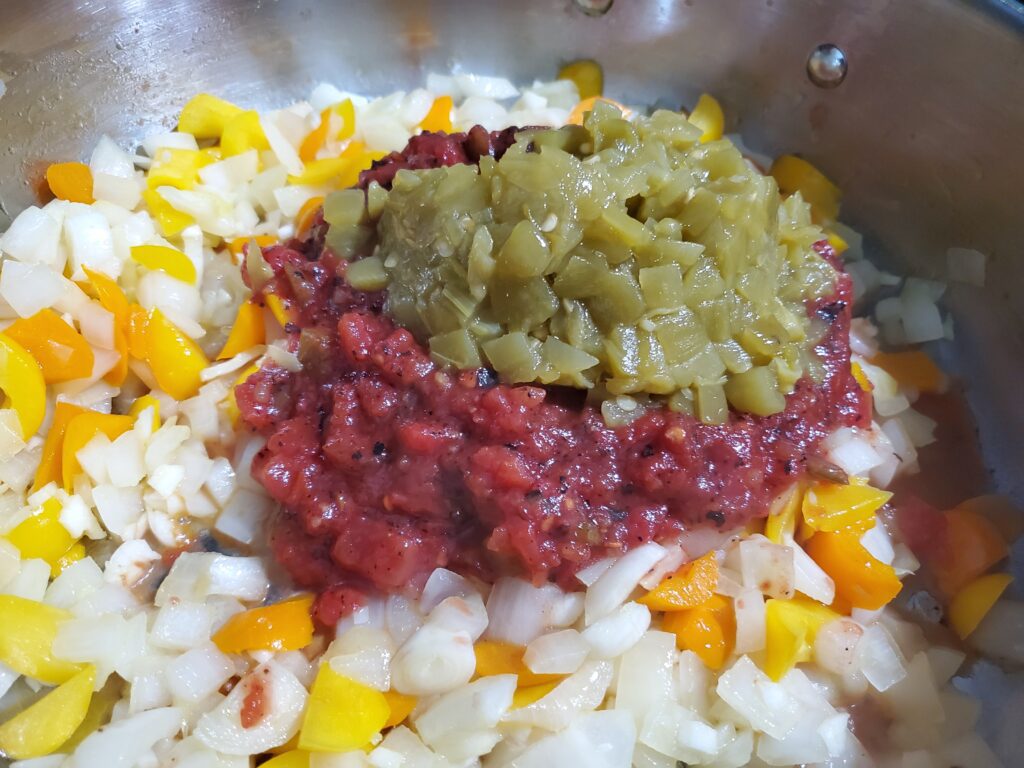
Add the tomatoes and green chilis, mix until well combined.
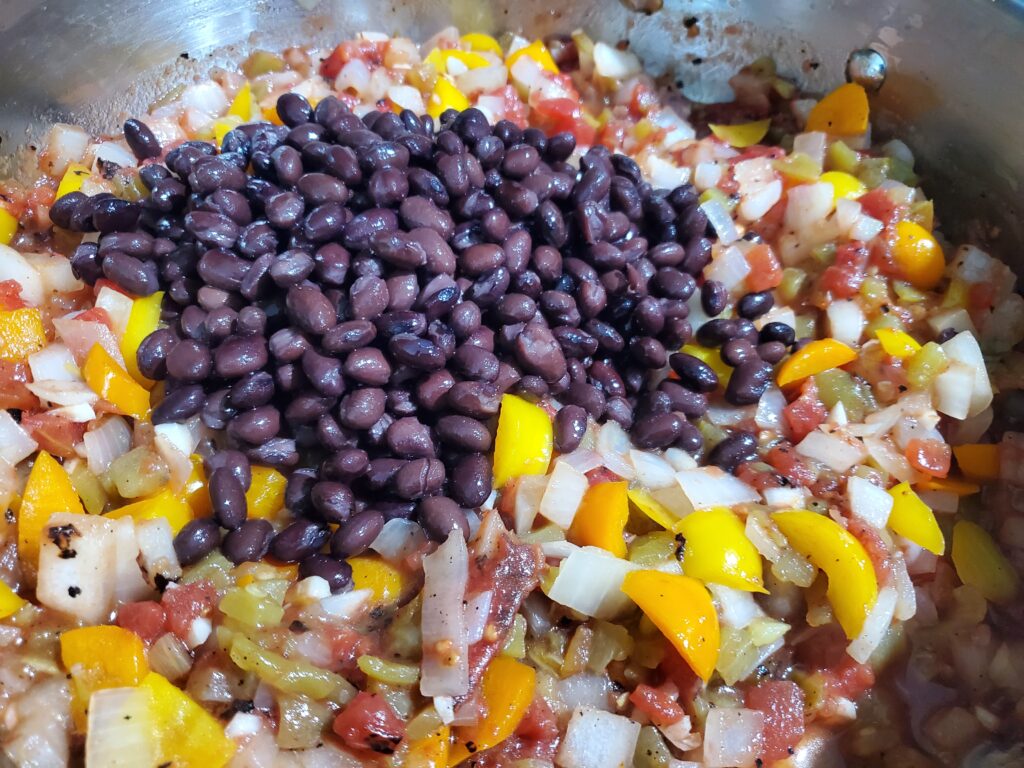
Add the black beans and mix.
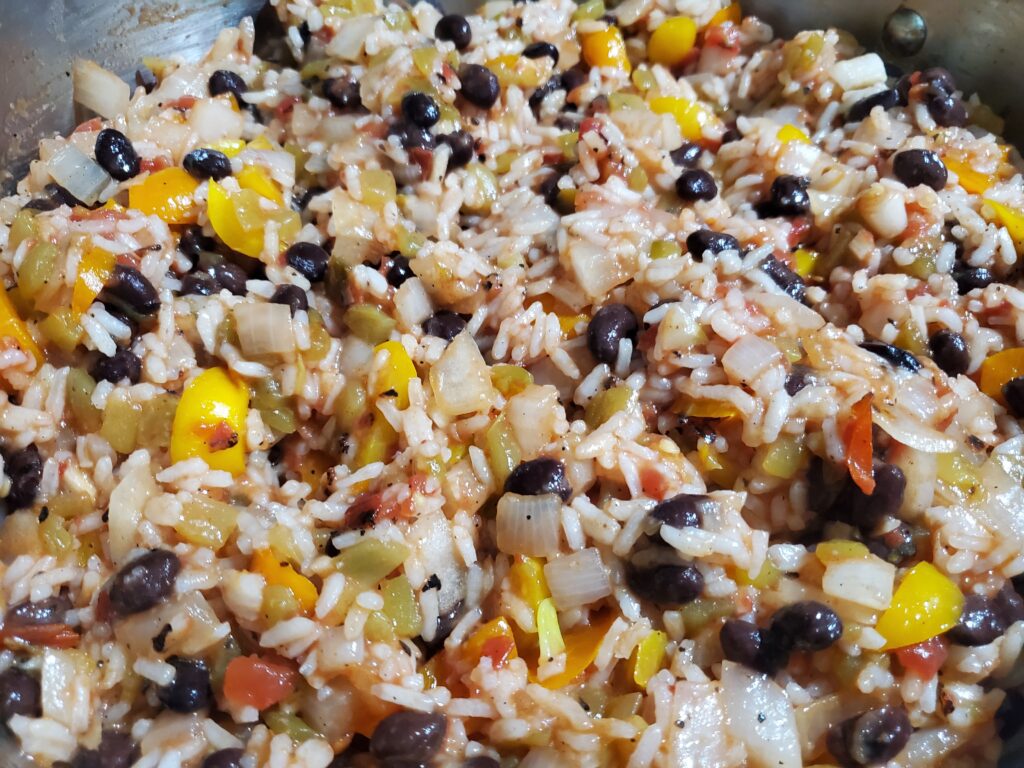
Finally add the cooked rice and mix until well combined.
Remove from heat and mix in the taco meat.
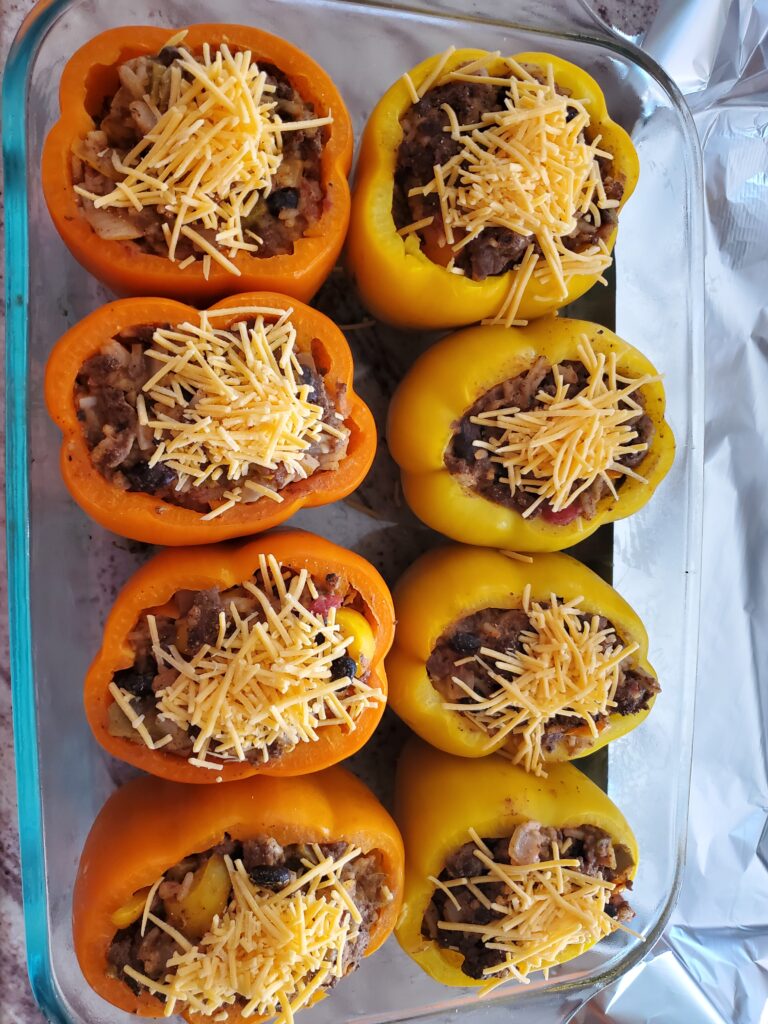
Stuff this mixture into the pepper bottoms.
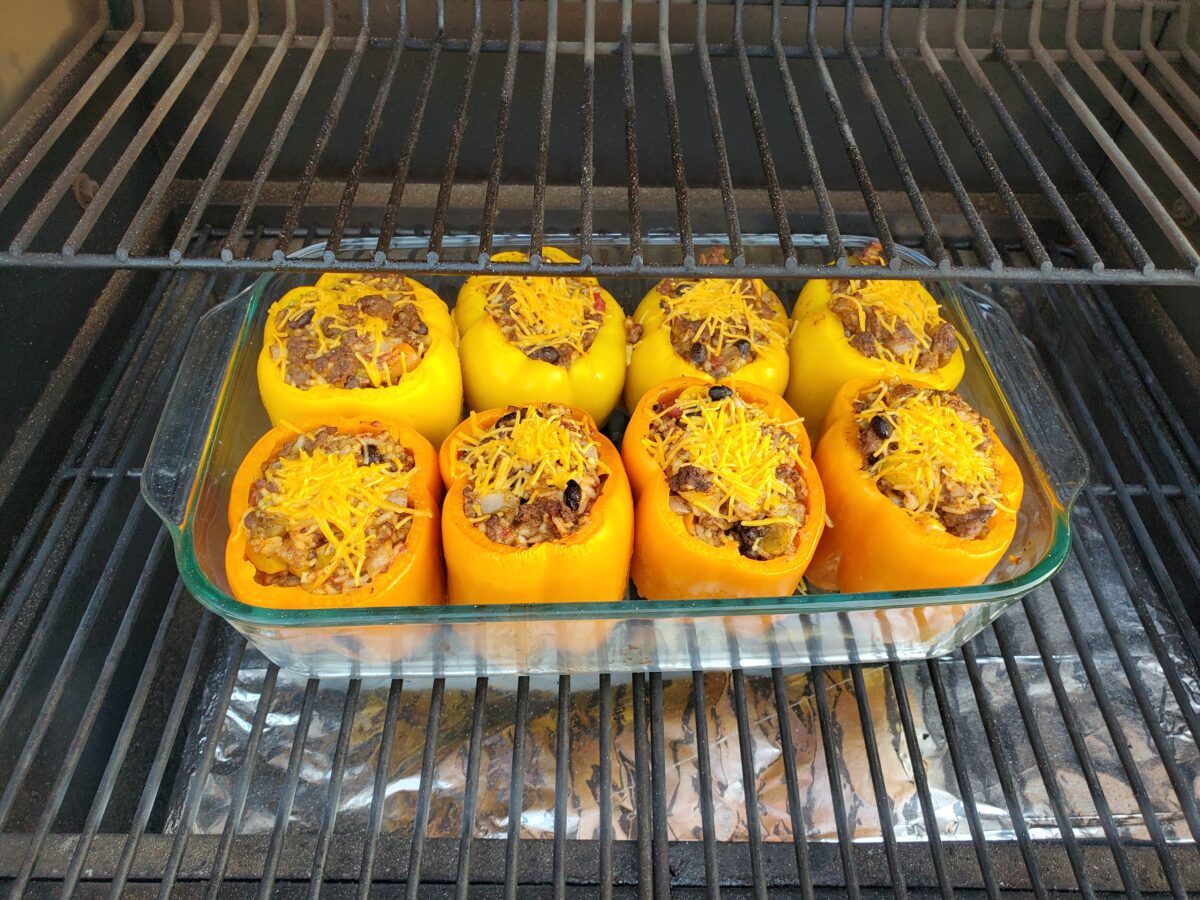
Top with shredded cheese. Pour about 3/4 cup of water into the bottom of the baking dish. Just enough to cover the bottom of the dish.
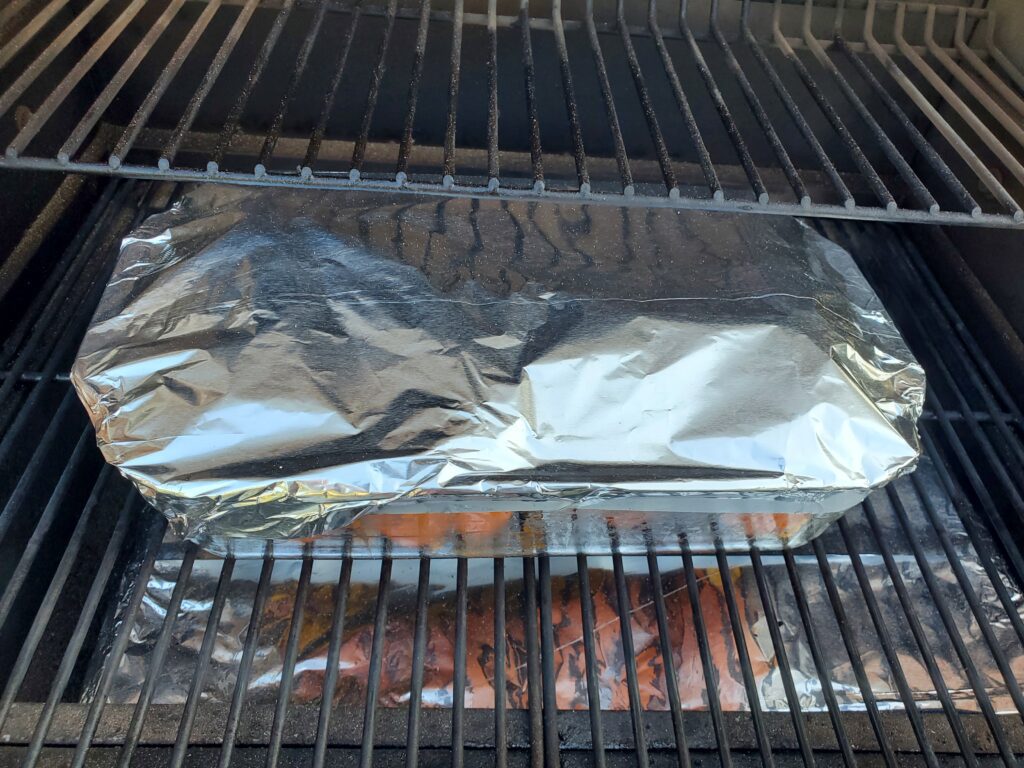
Cover with aluminum foil.
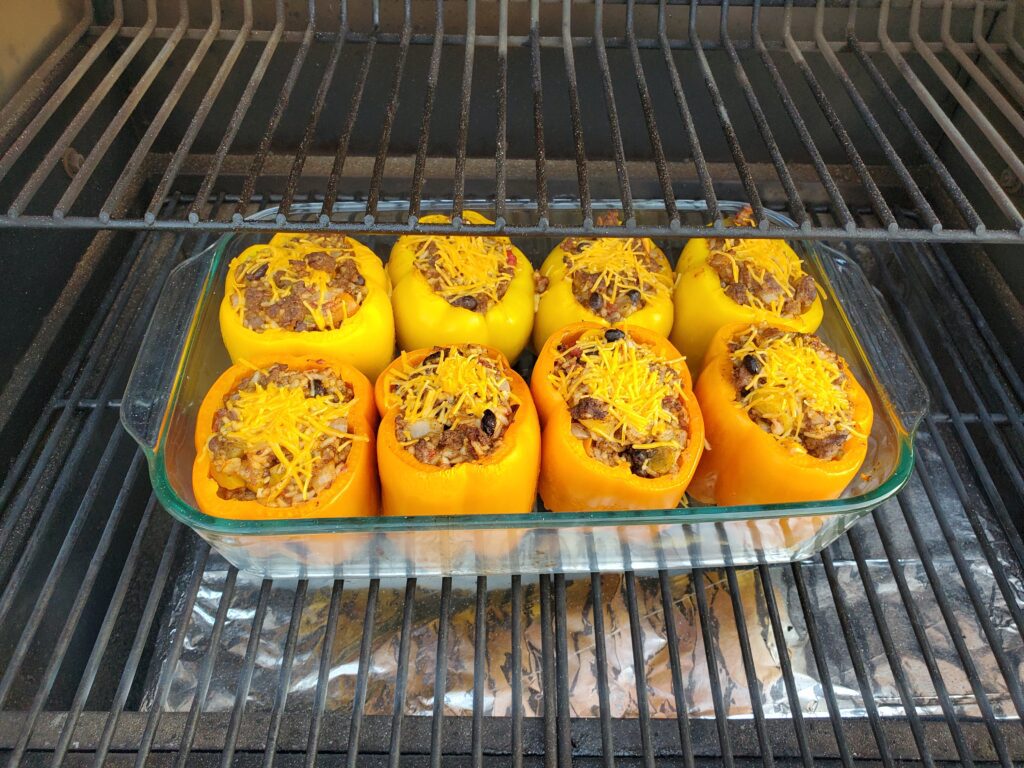
Smoke/bake covered 30 minSmoke bake uncovered 10 min
Preheat the Traeger or Oven to 400 degrees F. Bake/smoke covered for 30 min. Remove the foil and continue to bake/smoke for another 10 minutes or until the cheese is melted.
Garnish with fresh cilantro.
Are smoked stuffed peppers good re-heated?
Yes, stuffed peppers make a great leftover meal. They are perfect for packed lunches too. They fit perfectly into a mug Pop-in for easy reheating!
As ama Amazon Associate, I earn on qualified purchases.
More Great smoked meals:
Try this amazing smoked Shepherd’s Pie. This recipe includes both directions for baking and smoking the pie.
1 package of taco seasoning + water needed per package directions
1 cup rice, cooked according to package directions (~ 2 cups cooked)
1 medium onion, diced
2-3 garlic cloves, minced or grated
1 15.5 ounce can black beans, drained and rinsed
1 14.5 ounce can of fire roasted diced tomatoes
1 4 ounce can of diced green chilis
1 cup shredded cheddar cheese
fresh cilantro for garnish
DIRECTION
Cut the tops off the peppers. Remove the stems, but keep the remaining flesh from the top. Remove any remaining seeds and as much pith as possible. Place the pepper bottoms in a baking dish and dice up the tops.
Prepare the rice according to package directions. Set aside.
Brown the ground beef, drain and add the taco seasoning according to package directions. Set aside.
Sauté the onions and diced pepper tops until softened, add the garlic, and sauté for another minute.<br>
Add the tomatoes and green chilis, mix until well combined. Add the black beans and mix. Finally add the cooked rice and mix until well combined.
Remove from heat and mix in the taco meat.<br>Stuff this mixture into the pepper bottoms. Top with shredded cheese.
Pour about 3/4 cup of water into the bottom of the baking dish. Just enough to cover the bottom of the dish.
Cover with foil.
Preheat the Traeger or Oven to 400 degrees F. Bake/smoke covered for 30 min. Remove the foil and continue to bake/smoke for another 10 minutes or until the cheese is melted.
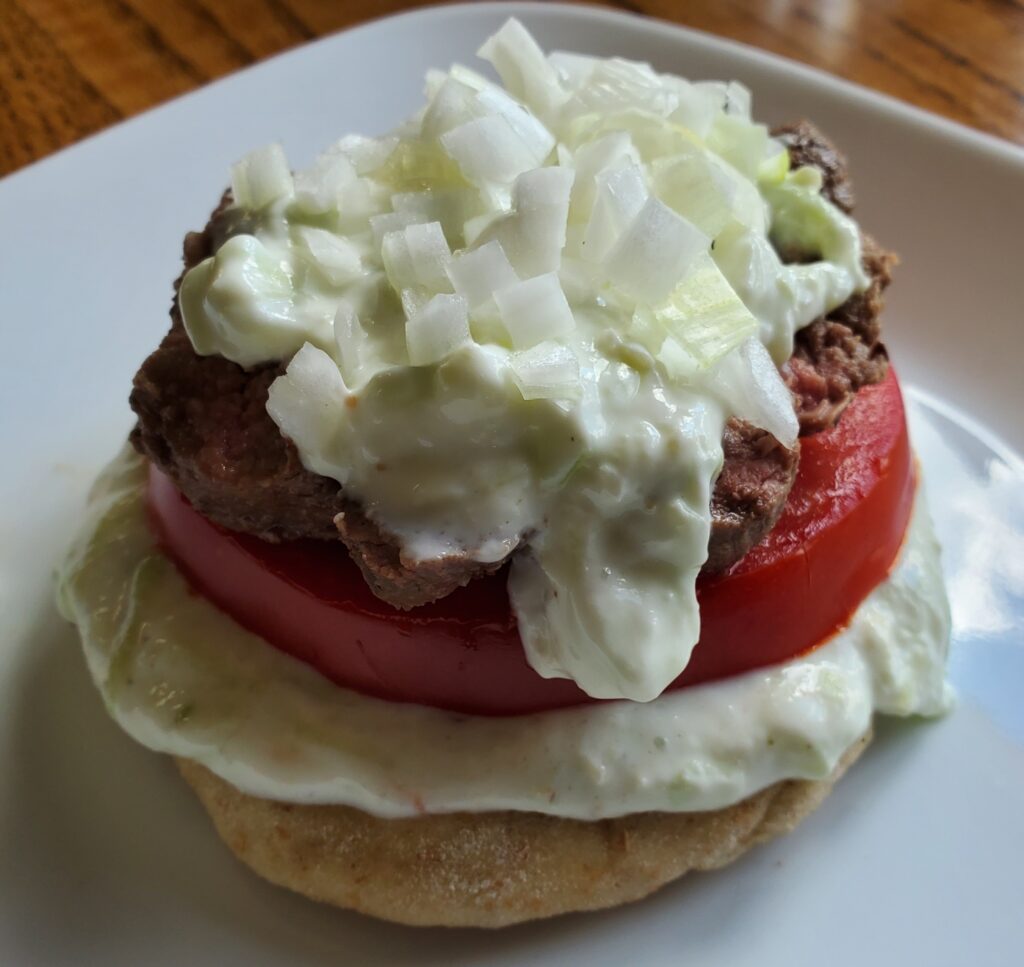
If you enjoy sourdough bread baking you must have tons of discard waiting to be used up. This sourdough discard mini pita bread recipe is a great way to use up that discard. Mini pita bread is great for dipping! It’s great paired with hummus or tzatziki sauce. Kids love them for making mini pita sandwiches. Perfect for bento boxes or other packed lunches.
Disclaimer: This post may contain affiliate links. I earn commission on qualified purchases at no additional cost to you.
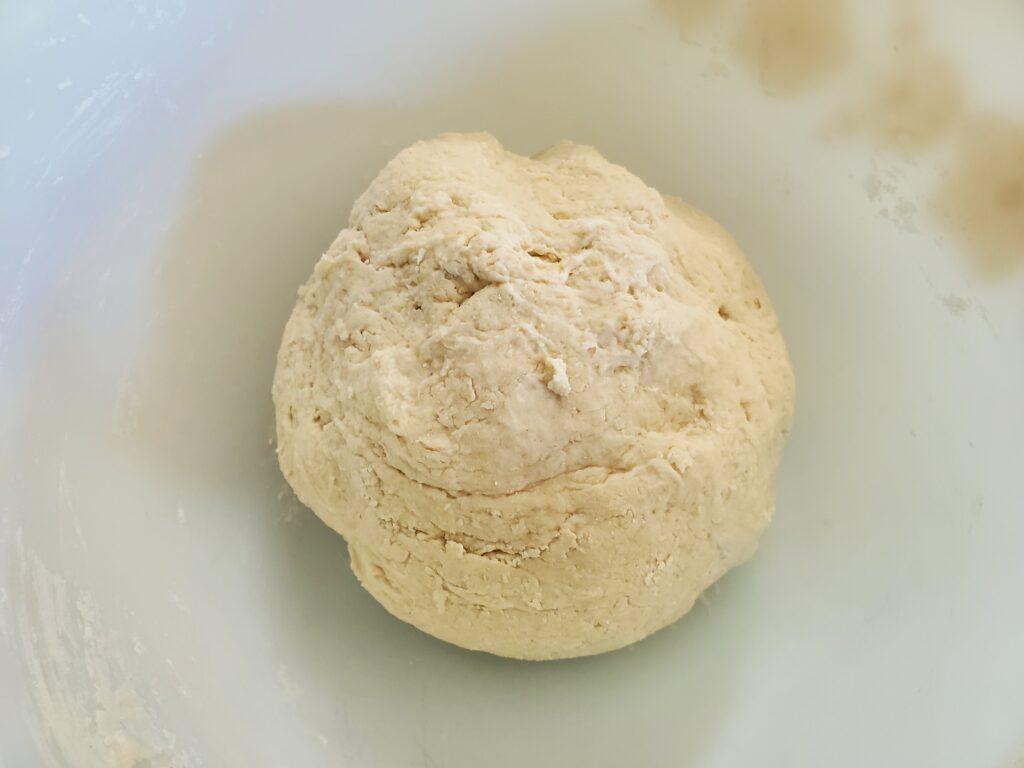
First combine the water, sugar, salt, and yeast in a large mixing bowl. Next add the sourdough starter. Finally, mix in the flours until well combined.
Form the dough into a ball. Knead it for 5 minutes. Add additional flour a couple tablespoons at a time if it is too sticky.
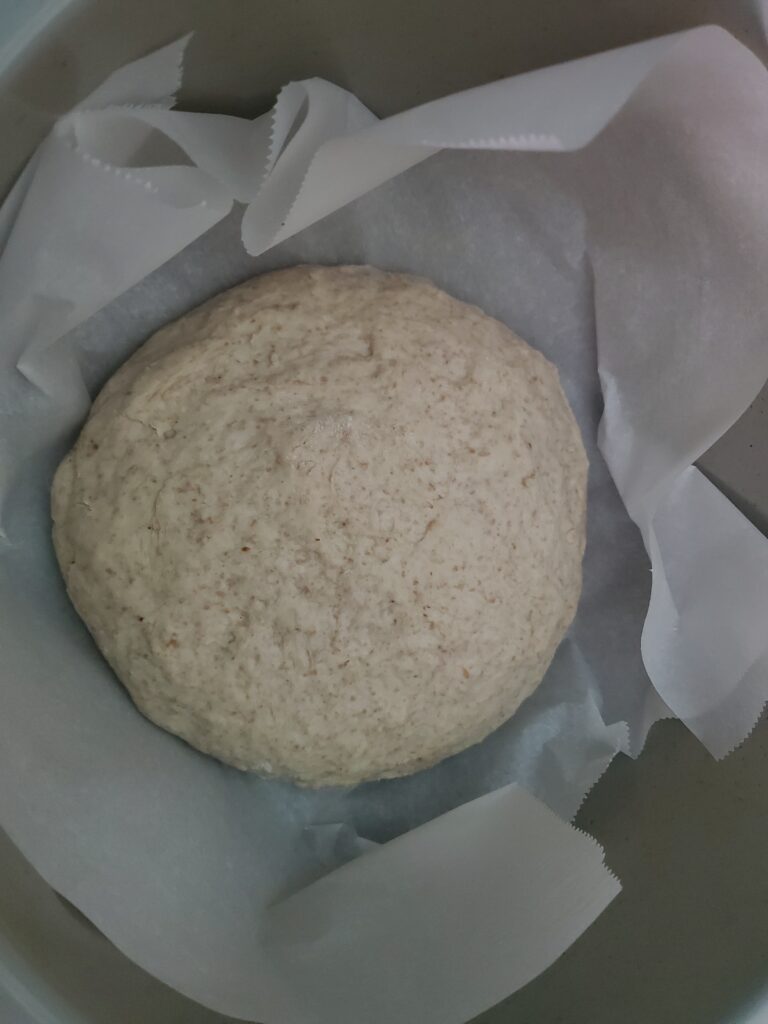
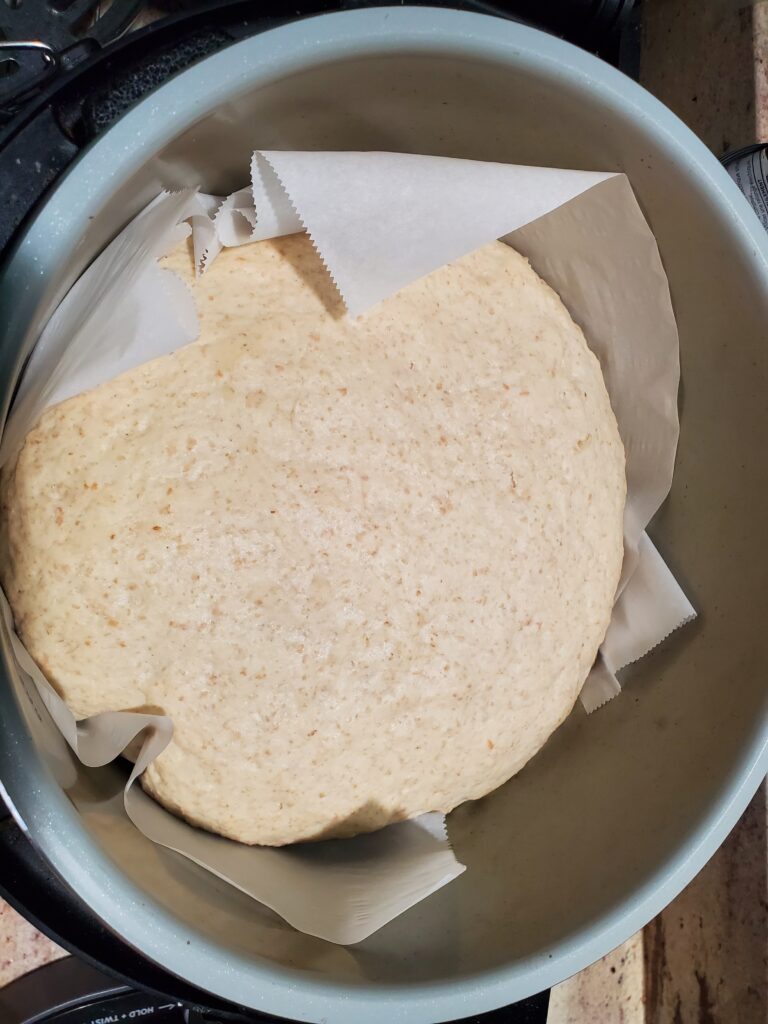
Cover the dough ball and allow it to rise in a warm spot until it has doubled in size ~ 1 hour. I usually use my Ninja Foodi on the Proof setting set to 90 degrees for this step.
Before risingAfter rising
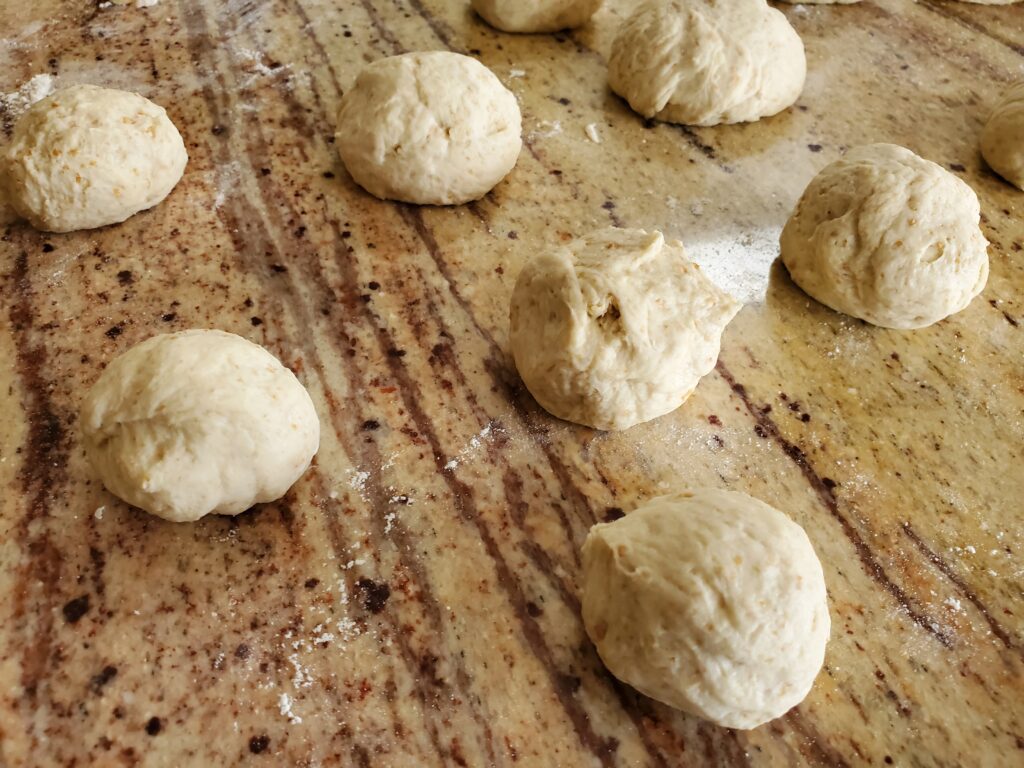
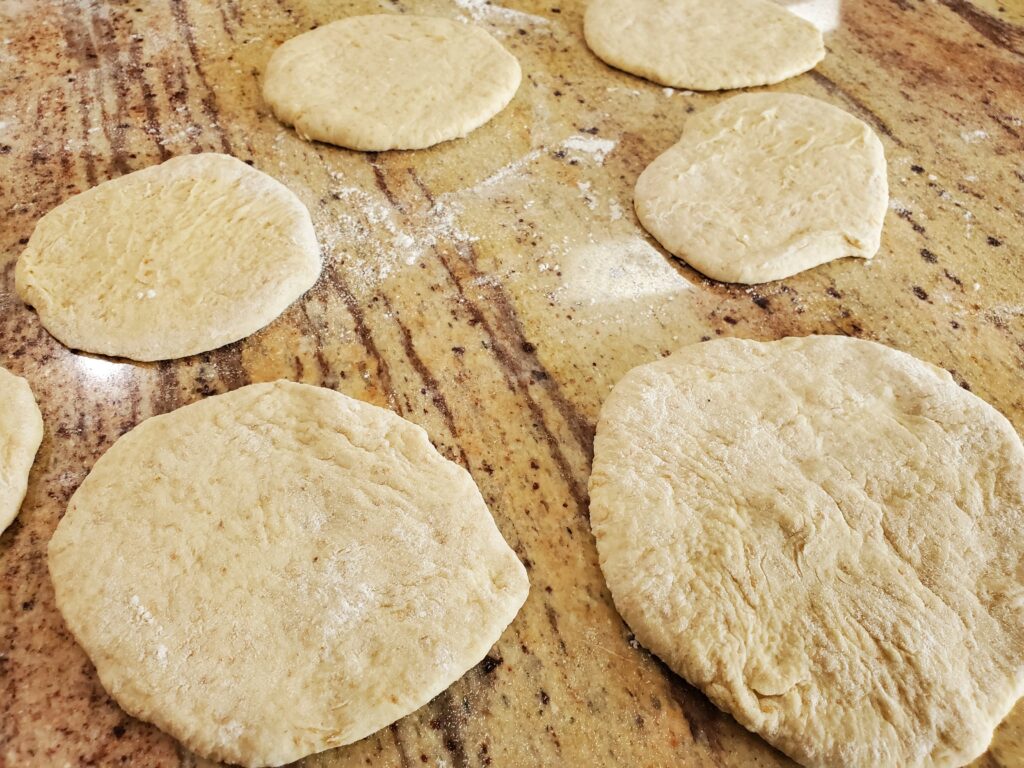
Punch down the dough and cut it into 24 pieces. Roll each section into a ball, then use a rolling pin to flatten each ball into a 3-4 inch round disk (between 1/8 and 1/4 inch thick).
Dough ballsDough disks
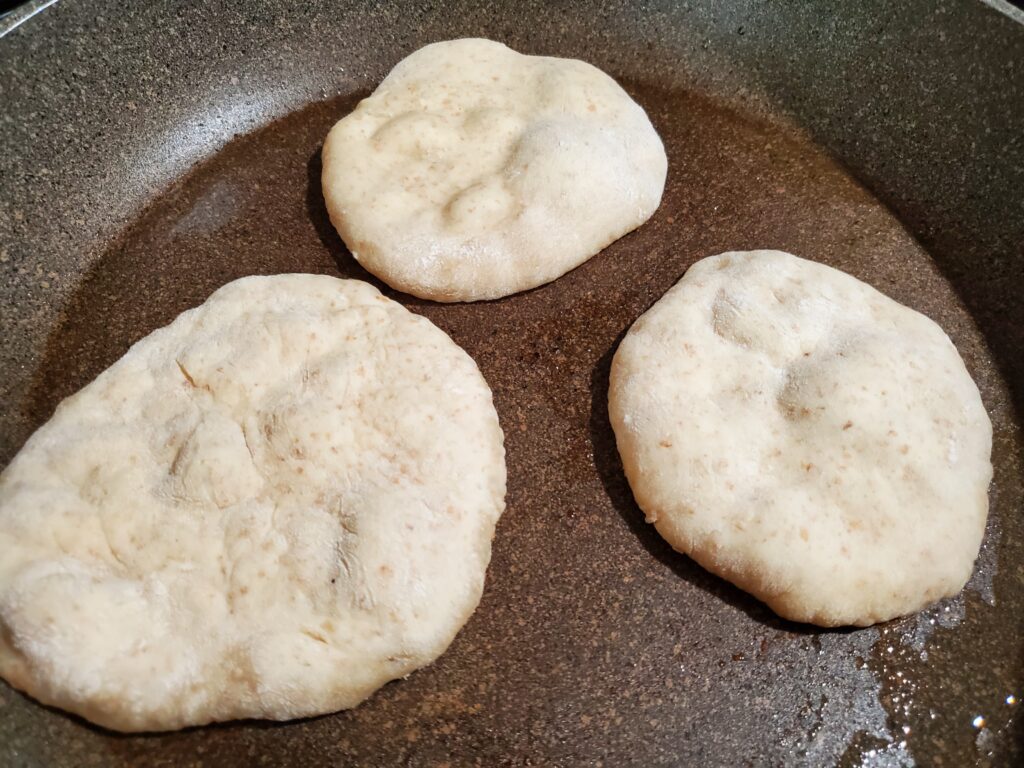
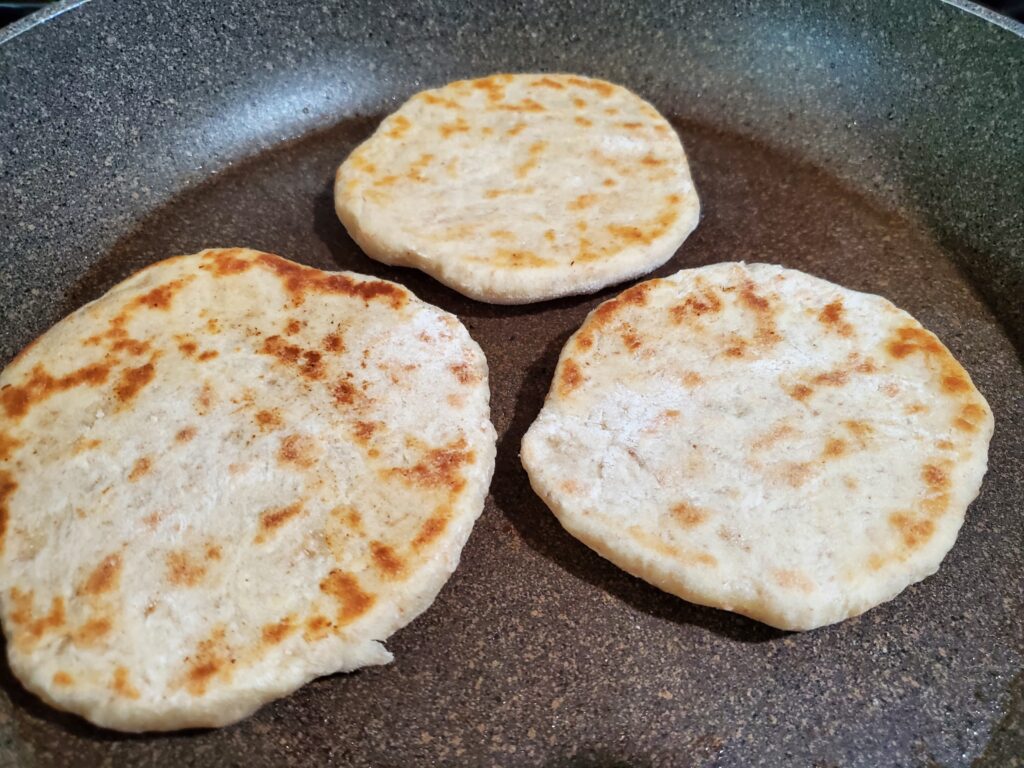
Heat up a non-stick pan to medium-high. Flip the disks into the pan. Cook until bubbles form ~ 2 minutes, then flip and cook for another minute or two.
Wait for bubblesFlip and cook another 1-2 min.
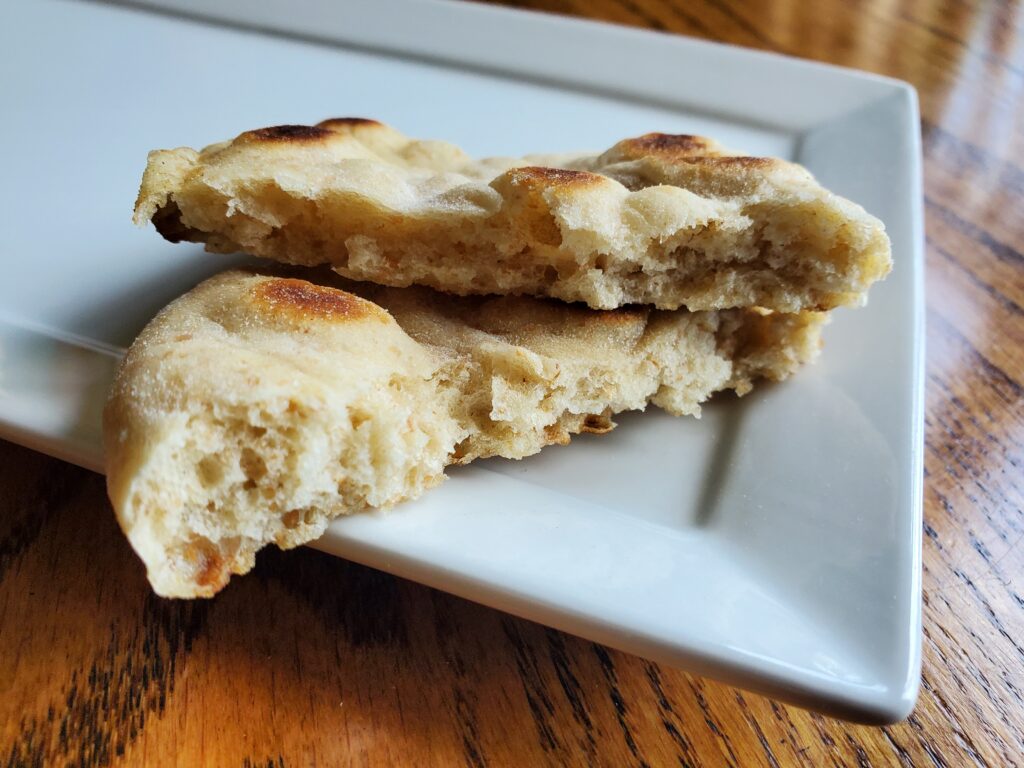
Remove from heat and place the mini pitas on a cooling rack. If the pitas stick, you can add a very small amount of olive oil to the pan.
So fluffy and delicious!
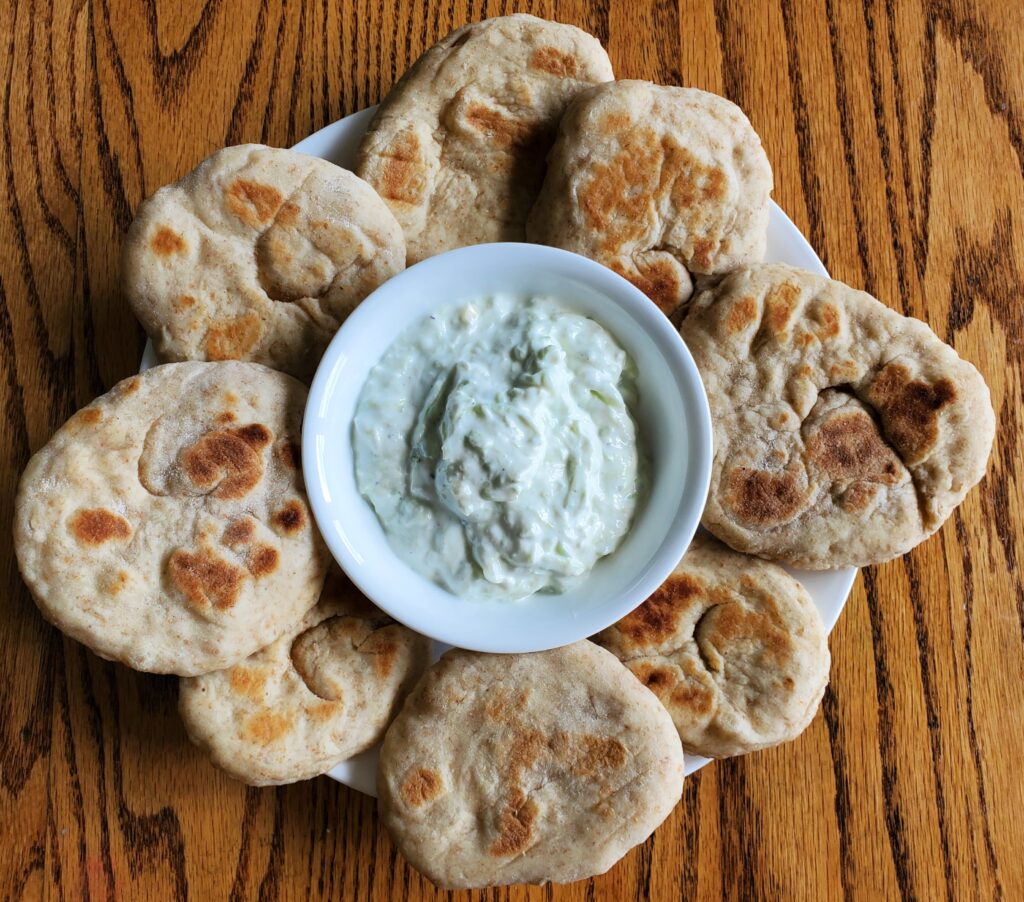
What can you use mini pita bread for?
Mini Pita bread is great for dipping
Try serving the mini pita bread with hummus or tzatziki sauce for a tasty appetizer. Find a great homemade hummus recipe and other great appetizers here.
Tzatziki and mini pitas Hummus and mini pitas
Make a mini pita sandwich
Mini pitas can be topped with sandwich toppings! You can eat them open faced or top with a second mini pita. Try a gyro sandwich on a mini pita.
Printable Recipe for Sourdough Discard Mini Pita Bread
First combine the water, sugar, salt, and yeast in a large mixing bowl. Next add the sourdough starter. Finally, mix in the flours until well combined.<br>
Form the dough into a ball. Knead it for 5 minutes. Add additional flour a couple tablespoons at a time if it is too sticky.<br>Cover the dough ball and allow it to rise in a warm spot until it has doubled in size ~ 1 hour.
Punch down the dough and cut it into 24 pieces. Roll each section into a ball, then use a rolling pin to flatten each ball into a 3-4 inch round disk (between 1/8 and 1/4 inch thick).
Heat up a non-stick pan to medium-high. Flip the disks into the pan. Cook until bubbles form ~ 2 minutes, then flip and cook for another minute or two. Remove from heat and place the mini pitas on a cooling rack. If the pitas stick, you can add a very small amount of olive oil to the pan.
NOTES
As an Amazon associate, I earn on qualified purchases.
Almost 3/4 cup warm water ~105 degrees (see instructions)
1 cup sourdough discard from the refrigerator
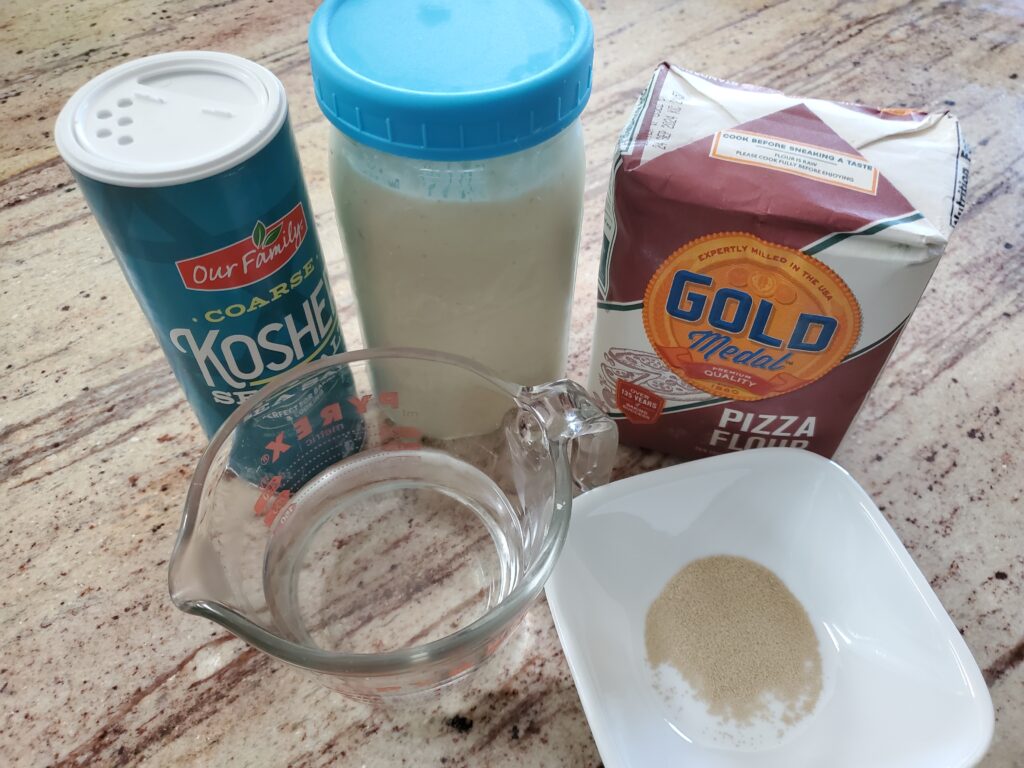
Pizza Crust Instructions
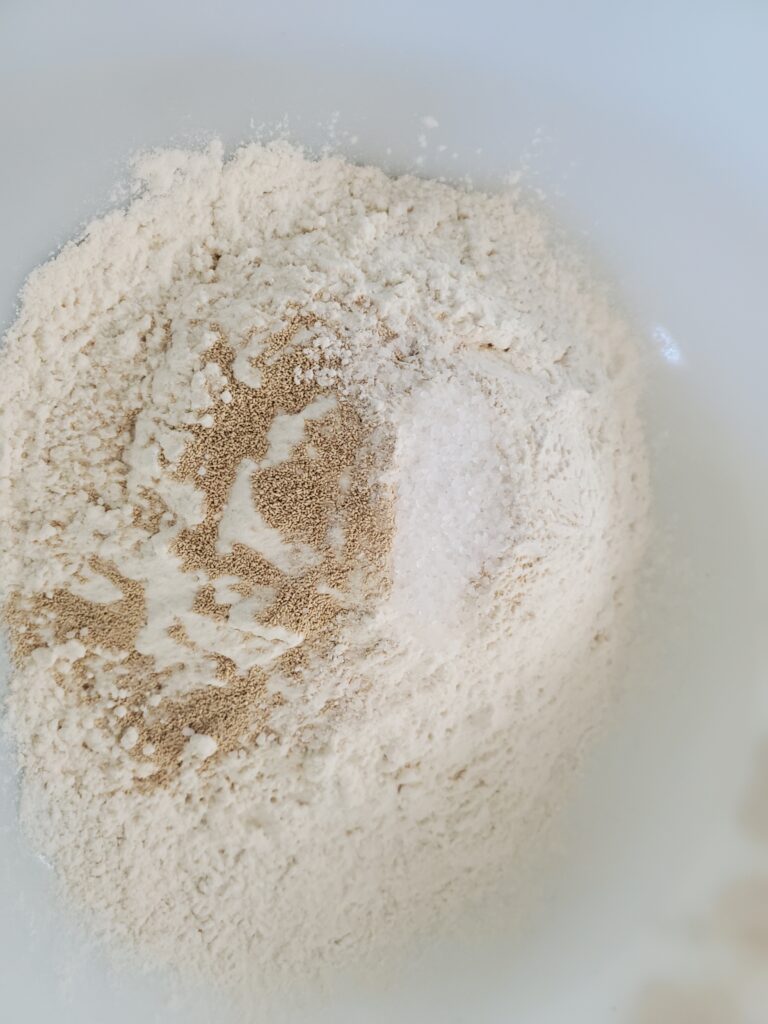
Mix the dry ingredients, flour, yeast, and salt in a mixing bowl.
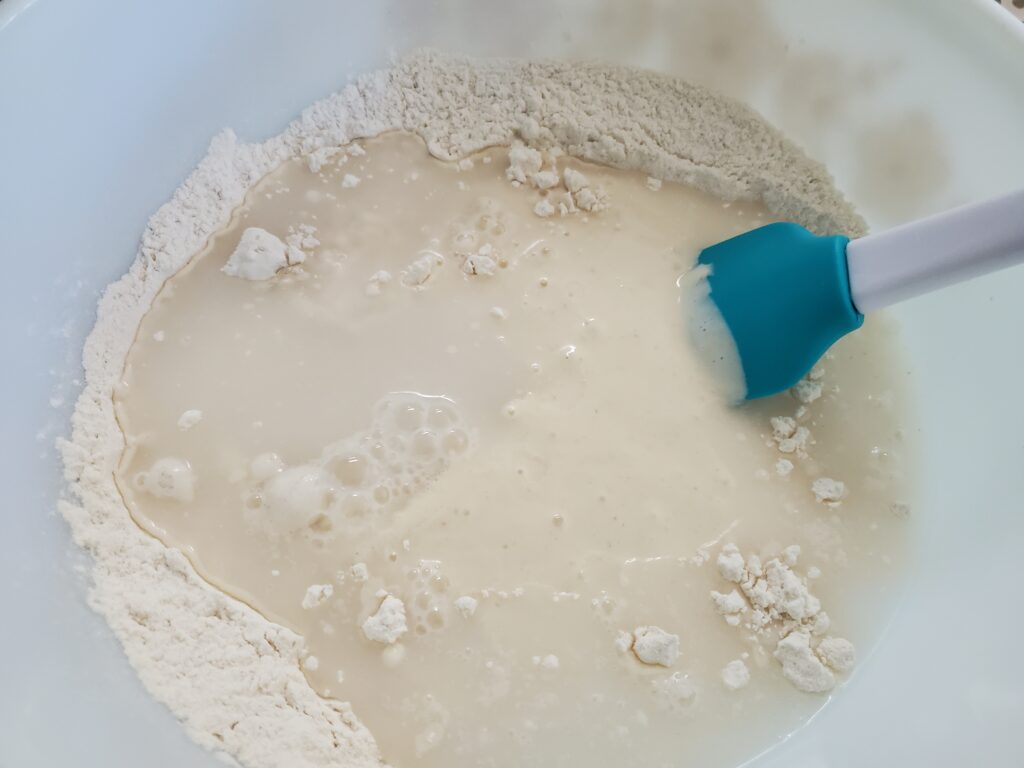
Measure 3/4 cup of warm water. Remove 2 tablespoons of the water and set aside. Add the starter and the remaining water (almost 3/4 cup) to the four mixture.
Mix until a dough ball forms.
Continue to knead the dough ball in the bowl until all flour is absorbed. If the dough ball is dry, add some of the water you set aside. Add water until all of the flour is incorporated into the dough ball and it is not overly sticky. Knead for 5-7 minutes. Alternatively you can use a mixer with a dough hook.
Dough balls before risingdough balls after rising
Allow your dough to rest and rise until it doubles in size. (I made a double batch) This will take ~ 2-4 hours. I prefer to put my dough into my Ninja Foodi on the proof setting at 85 degrees for 4 hours. Any proofing box will work for this step, or if your home is already warm, you can just cover it with a clean dish towel and let it rise on the counter.
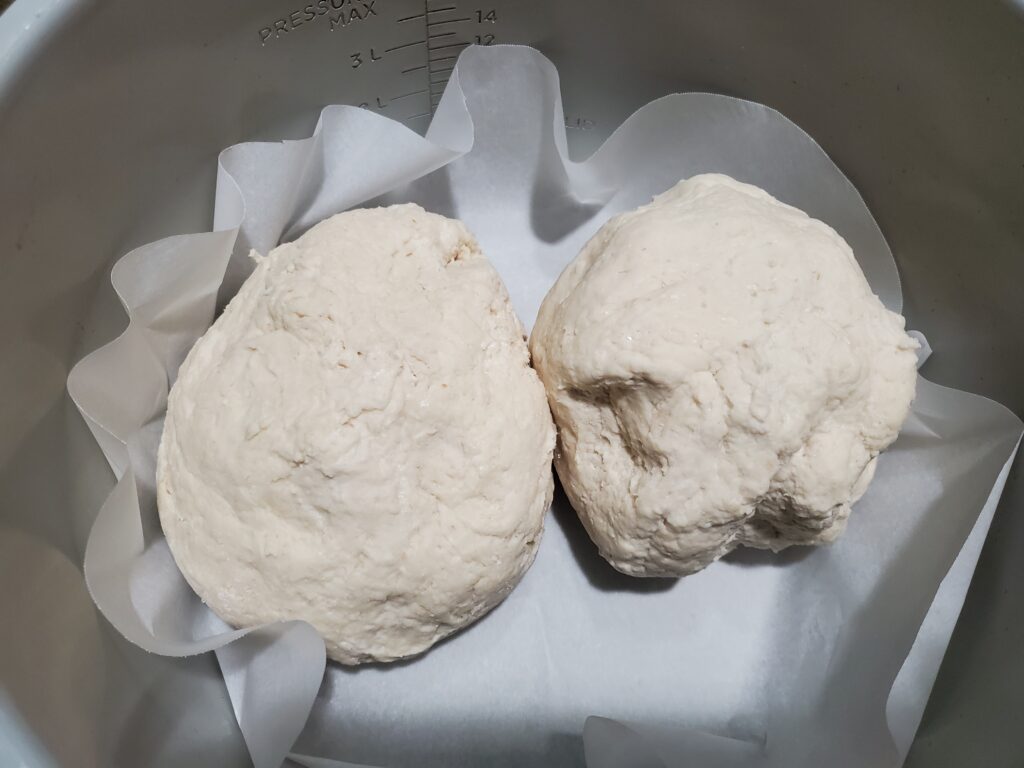
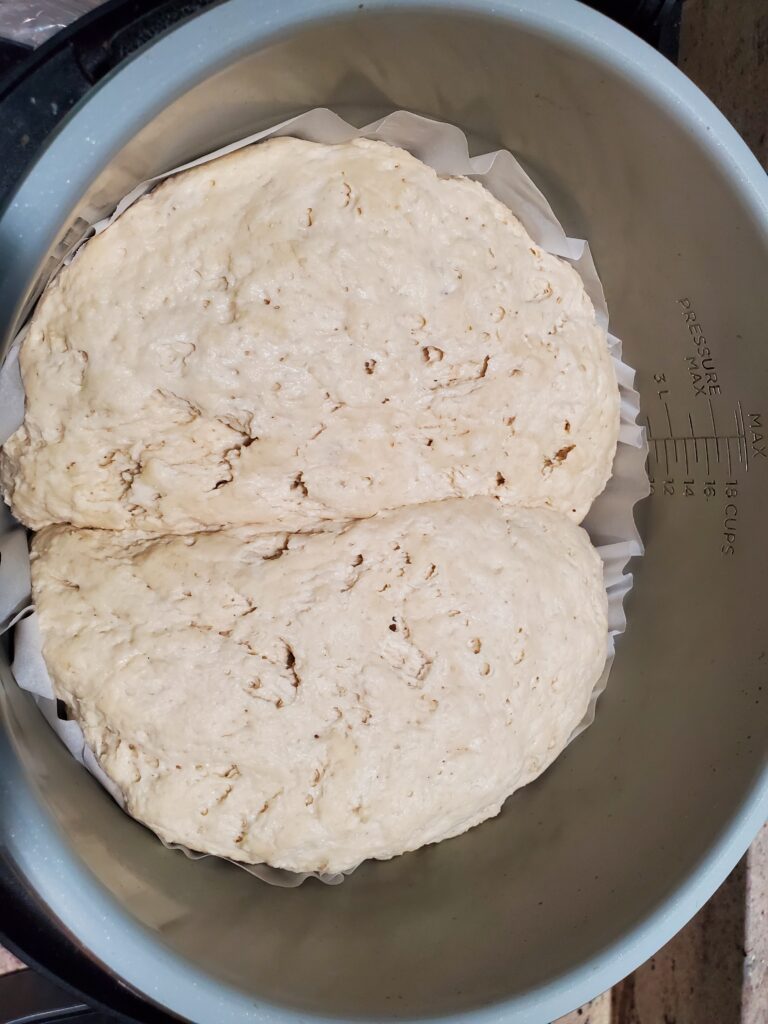
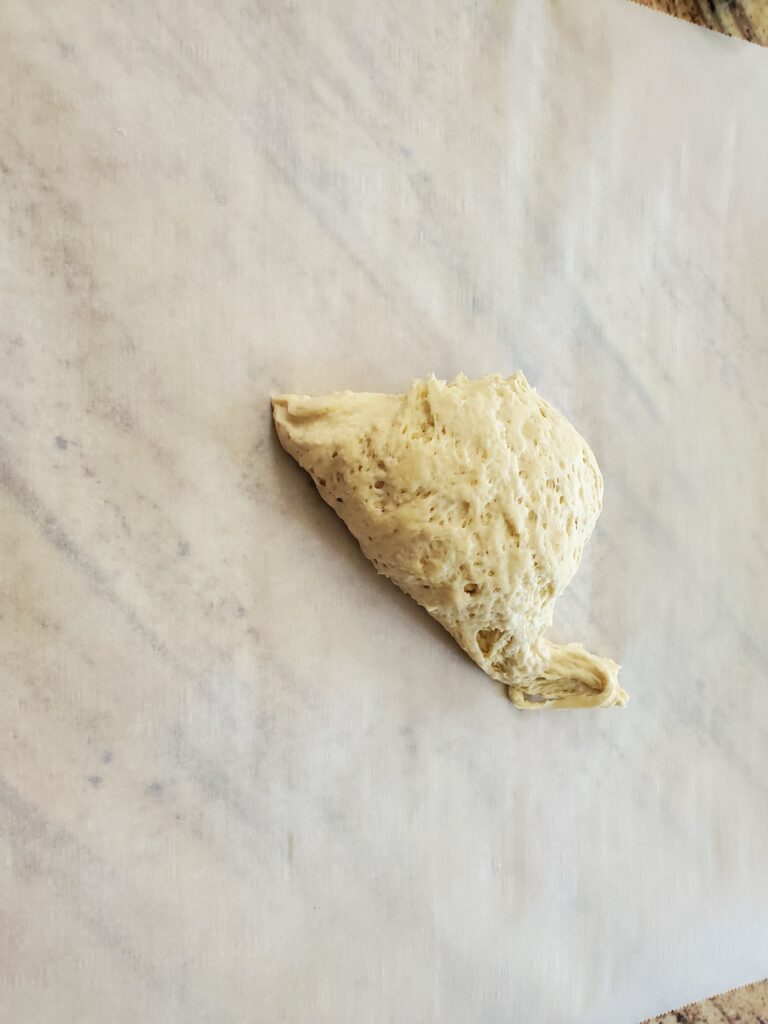
Once the dough has doubled in size remove it from the proofing box. For two 12-inch thin crust pizzas, divide the dough in half. Alternatively, cut the dough into 4 pieces for 6-inch personal pizzas.
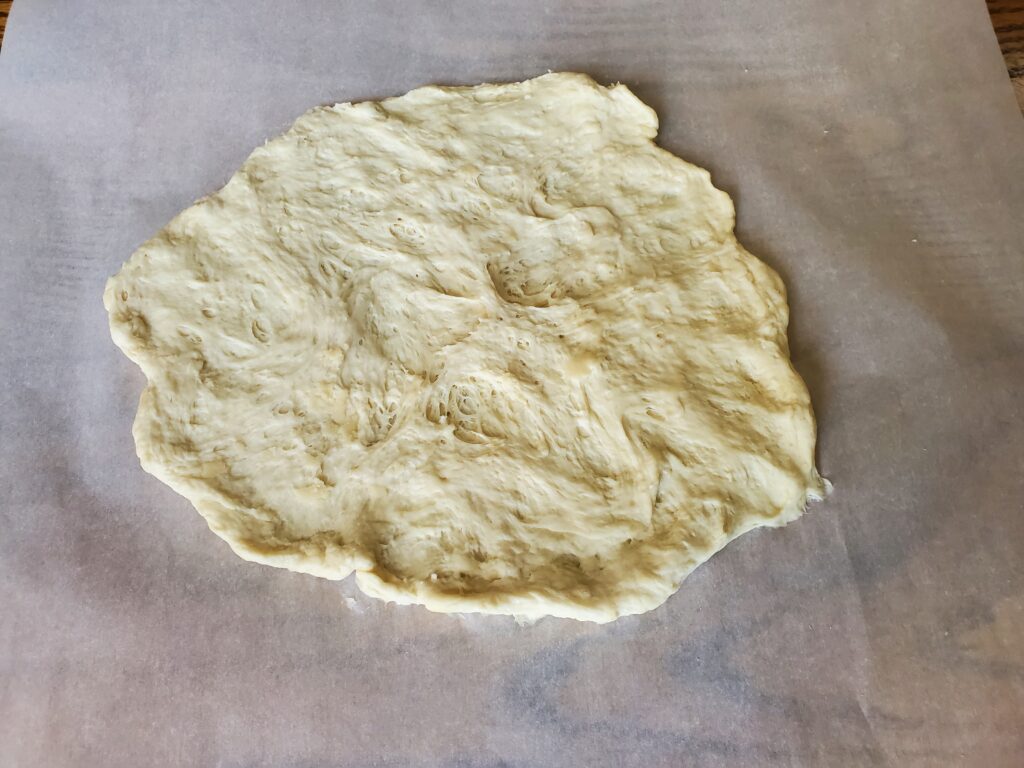
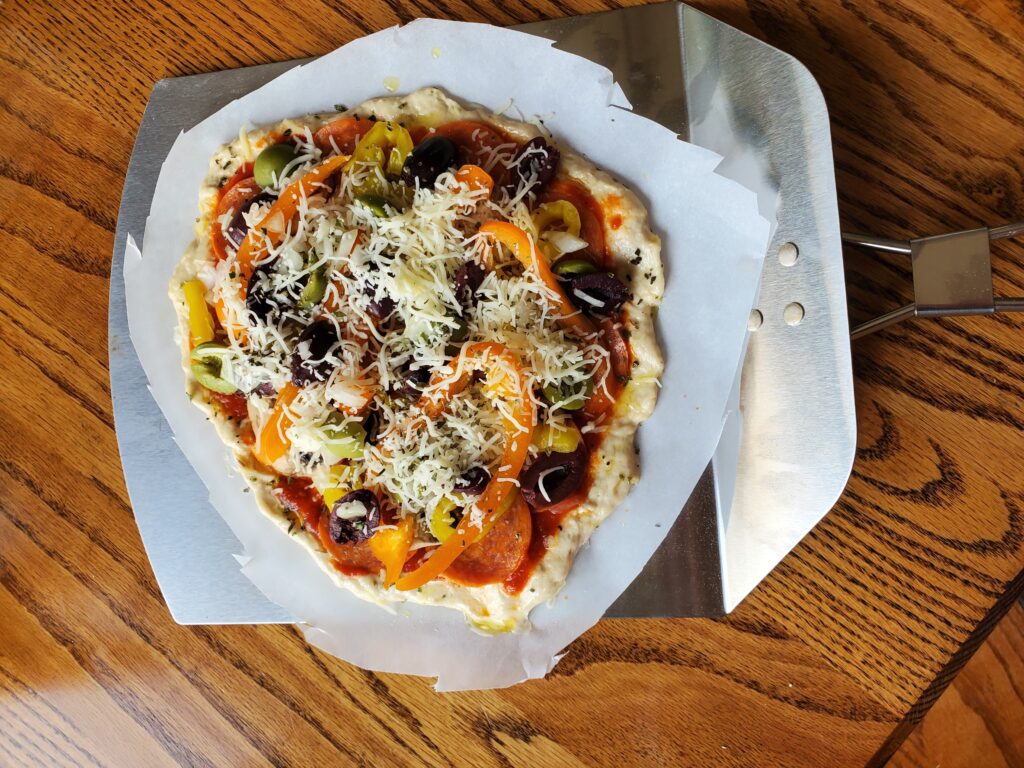
Press each dough piece out on a piece of parchment paper.
Dough ready to be pressed outdough pressed out-ready for toppings
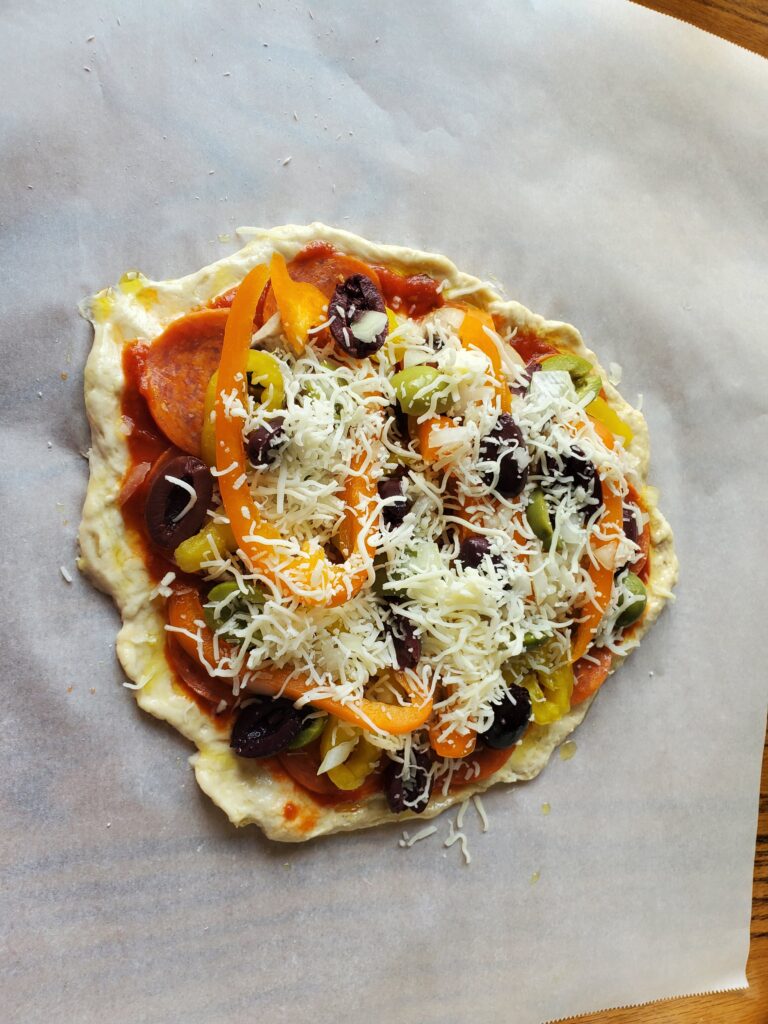
Add your sauce and toppings.
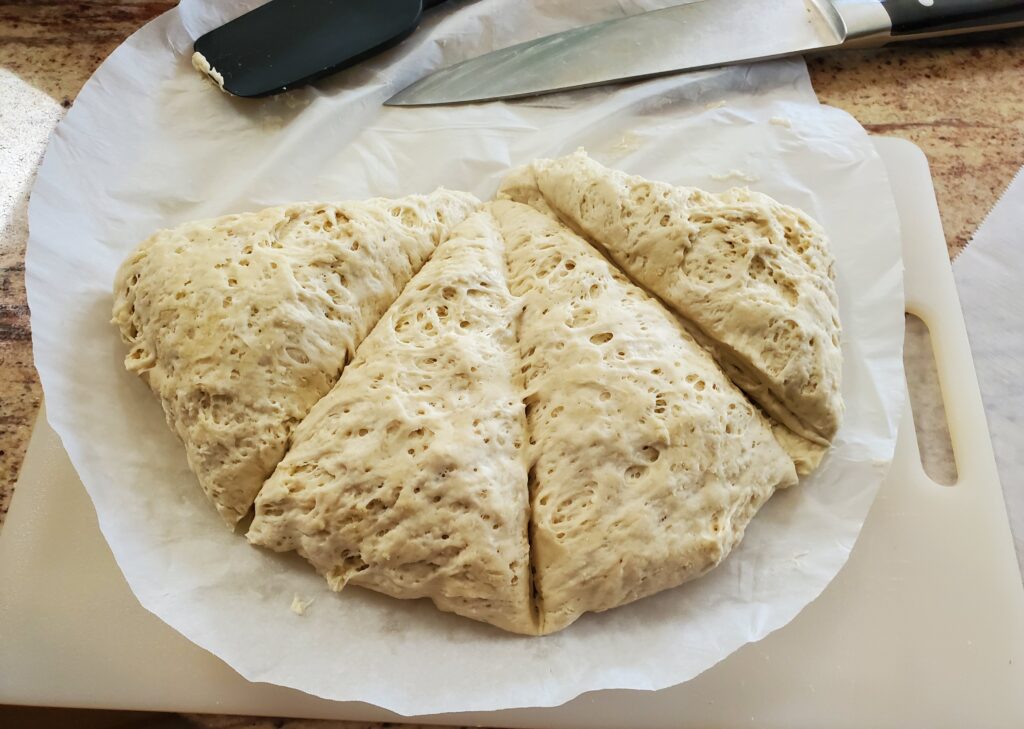
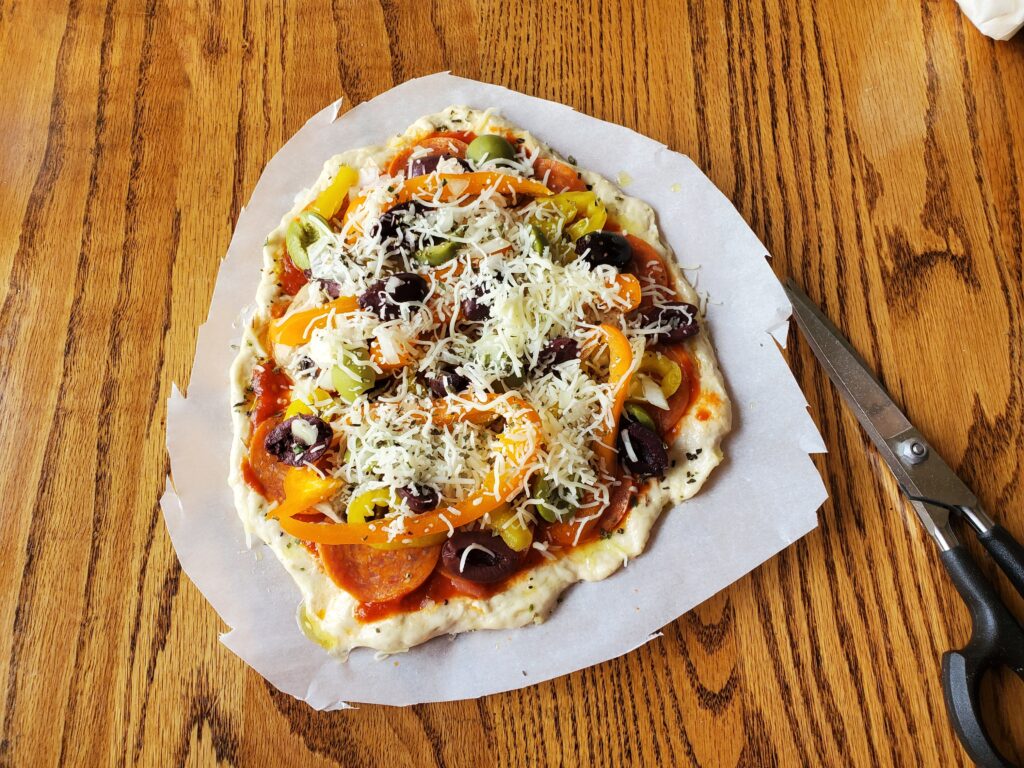
Cut the parchment paper about 1 inch around your pizza.
Baking Sourdough Discard Pizza Crust
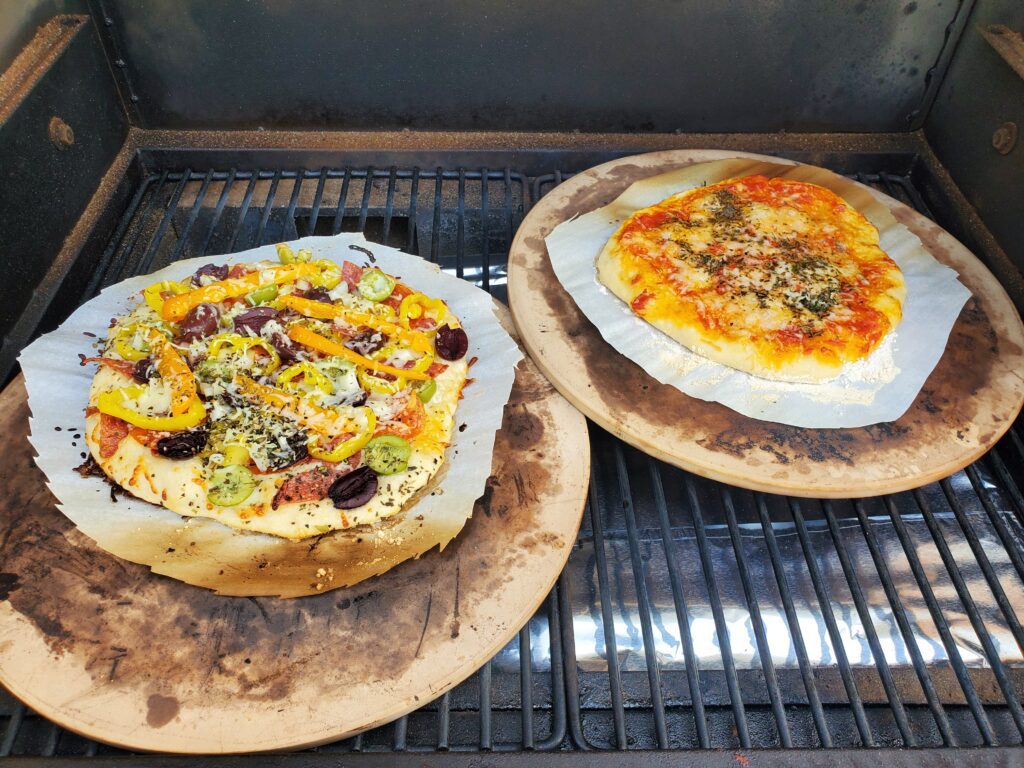
Preheat your oven with pizza stones inside to 450 degrees F.
Use a pizza peel to transfer the pizza dough, with parchment paper underneath to the hot stones inside the oven.
Bake for 7 minutes. Use the pizza peel to remove the pizza. Transfer to a plate and slide the parchment paper off.
Can you bake the pizza on a Traeger?
Pizza on the Traeger
Yes you can! Just preheat your Traeger to 450 degrees with the pizza stones inside. Use the pizza peel to transfer the pizzas with the parchment paper onto the stones. Bake/smoke for 7 minutes. Use the peel to remove the pizzas and transfer them to a plate. Remove the parchment paper, slice and enjoy!
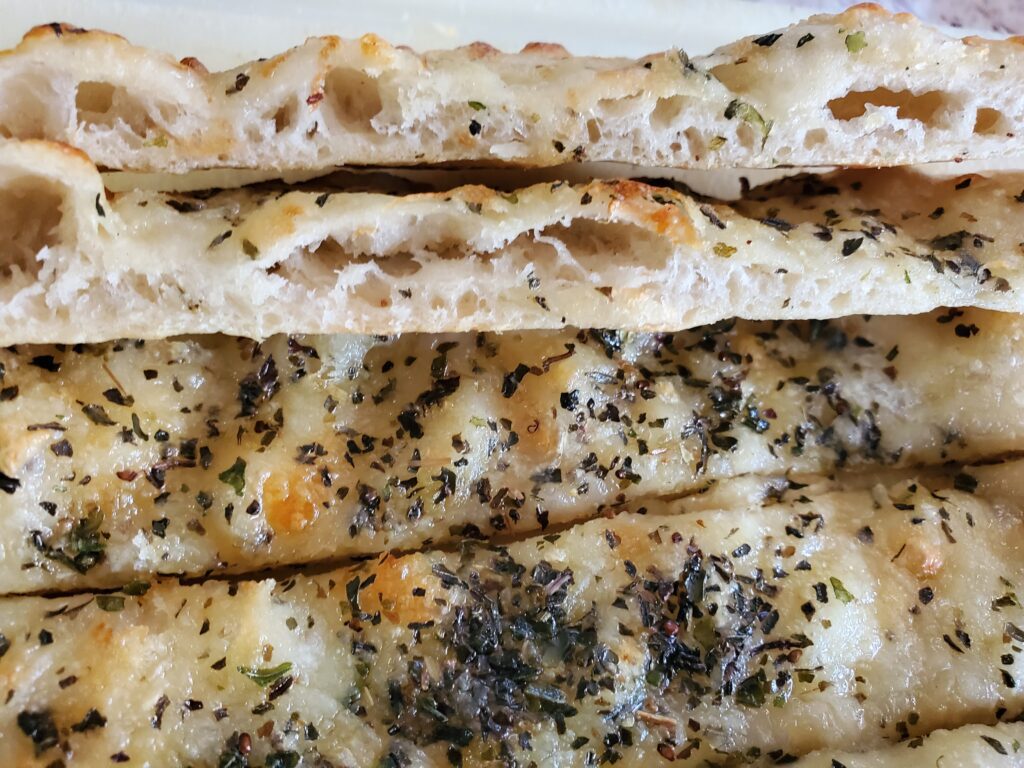
Can you make breadsticks with this dough?
Yes you can! Just press out the dough onto a piece of parchment paper. Instead of adding pizza sauce and toppings, spread garlic butter, parmesan cheese and dried basil on the dough. Bake the same as the pizza directions.
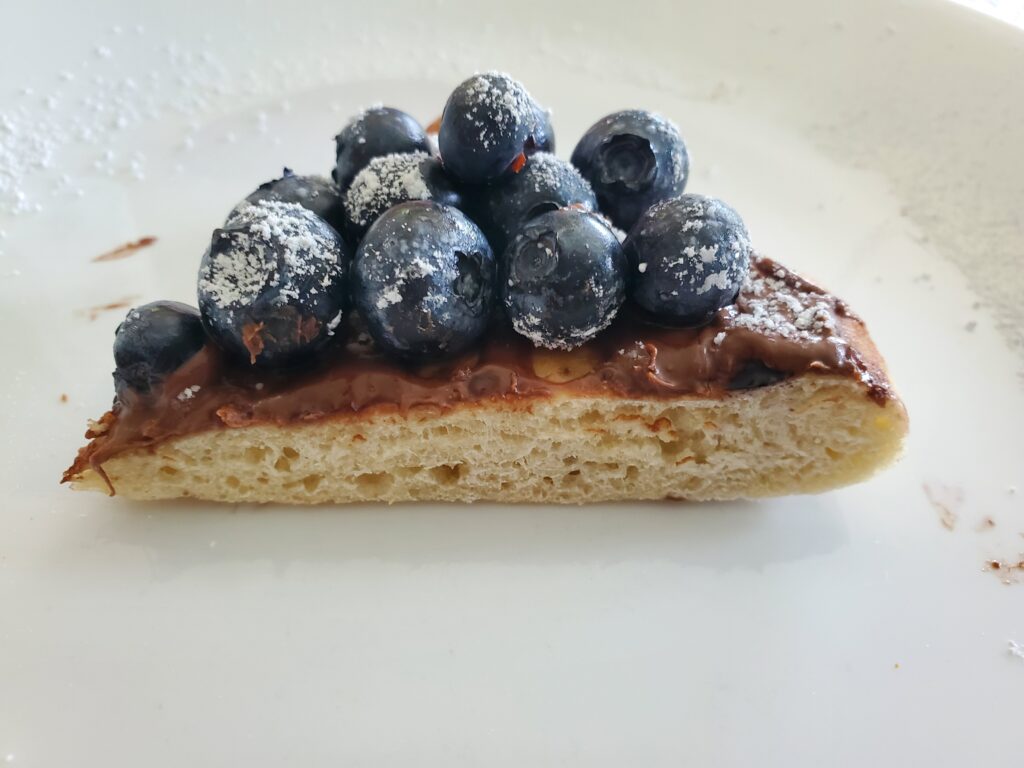
How do you make dessert pizza?
Simple, press the dough out onto a piece of parchment paper. Poke a few holes in the top of the dough with a fork. Bake the plain crust the same as the pizza instructions. Top with dessert toppings such as Nutella or cream cheese and fruit.
Almost 3/4 cup warm water ~105 degrees (see instructions)
1 cup sourdough discard from the refrigerator
DIRECTION
Mix the dry ingredients, flour, yeast, and salt in a mixing bowl. Measure 3/4 cup of warm water. Remove 2 tablespoons of the water and set aside. Add the starter and the remaining water (almost 3/4 cup) to the four mixture. Mix until a dough ball forms. Continue to knead the dough ball in the bowl until all flour is absorbed. If the dough ball is dry, add some of the water you set aside. Add water until all of the flour is incorporated into the dough ball and it is not overly sticky. Knead for 5-7 minutes. Alternatively you can use a mixer with a dough hook.
Allow your dough to rest and rise until it doubles in size. This will take ~ 2-4 hours. I prefer to put my dough into my Ninja Foodi on the proof setting at 85 degrees for 4 hours. Any proofing box will work for this step, or if your home is already warm, you can just cover it with a clean dish towel and let it rise on the counter.
Once the dough has doubled in size remove it from the proofing box. For two 12-inch thin crust pizzas, divide the dough in half. Alternatively, cut the dough into 4 pieces for 6-inch personal pizzas. Press each dough piece out on a piece of parchment paper. Add your sauce and toppings.
Cut the parchment paper about 1 inch around your pizza.<br>Preheat your oven with pizza stones inside to 450 degrees F.<br>Use a pizza peel to transfer the pizza dough, with parchment paper underneath to the hot stones inside the oven. Bake for 7 minutes. Use the pizza peel to remove the pizza. Transfer to a plate and slide the parchment paper off.
NOTES
As an Amazon Associate, I earn on qualified purchases.
The best part about making your own bread is being able to choose your own ingredients. With this recipe, you will have many choices. Many ingredients are optional and can be swapped out for other ingredients of your choice. This recipe is a combination of my 3 favorite breads, sourdough, rye, and multigrain. If you prefer whole wheat, no worries, this recipe will still work for you!
In order to consider a bread multigrain, it must have at least 2 grains. This bread contains, rye or whole wheat, flax and oats as well as many seeds. If there are any seeds you do not have or do not like, just delete or replace them. This is what makes this bread so flexible.
Disclaimer: This post may contain affiliate links. I earn commission at no additional cost to you.
What tools do you actually need to make sourdough bread?
You will need an active starter, find tips for how to start and care for your starter here
A kitchen scale. Baking sourdough is a scientific process so most recipes will list ingredients by weight. If you have a postage scale that will work too.
A proofing box or suitable alternative. I use the proof setting on my Ninja Foodie for this purpose, it’s more expensive but it also works as and air fryer, pressure cooker and more. Check out this post for more options. If your kitchen is consistently between 78 and 85 degrees then you do not need a proofing box.
Meat thermometer. This is the only way to determine if your bread is done. It’s also helpful for checking the temperature of the water you add.
Parchment paper – This will help prevent sticking and make it much easier to transfer your dough.
Multigrain Sourdough Bread Ingredients
150 Grams Active and Fed Sourdough Starter (find tips on sourdough starter here)
* Optional ingredients. Note: you still need at least 2 grains to call this bread multigrain bread.
Multigrain Sourdough Bread Instructions
Preparing ingredients and dough
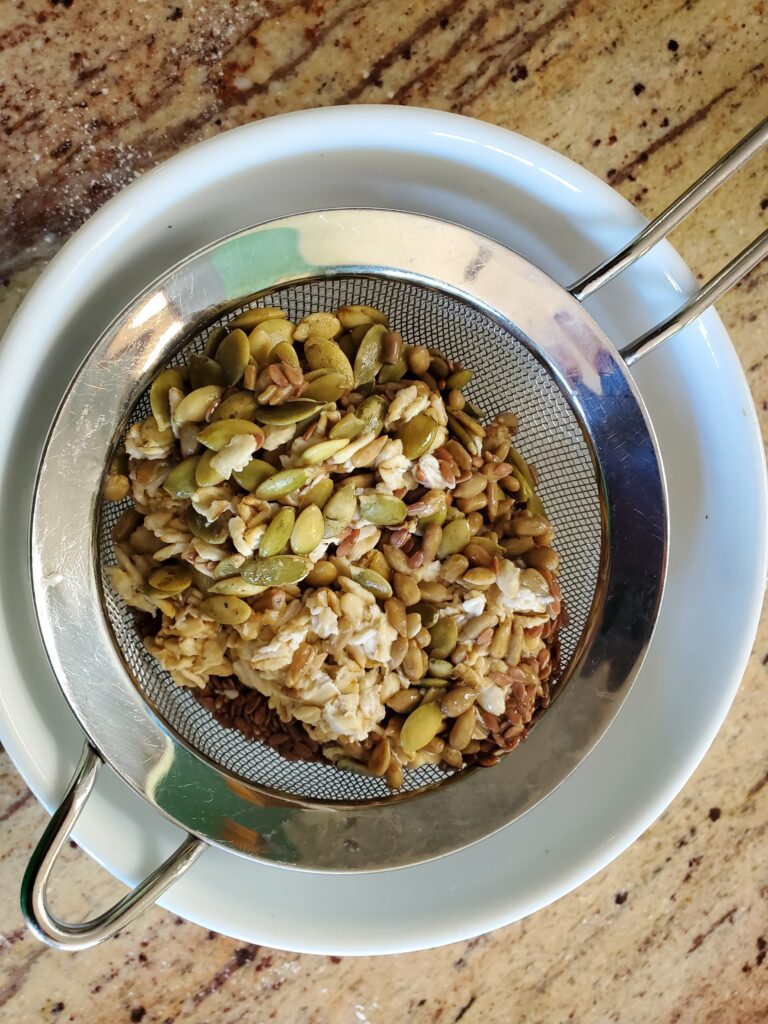
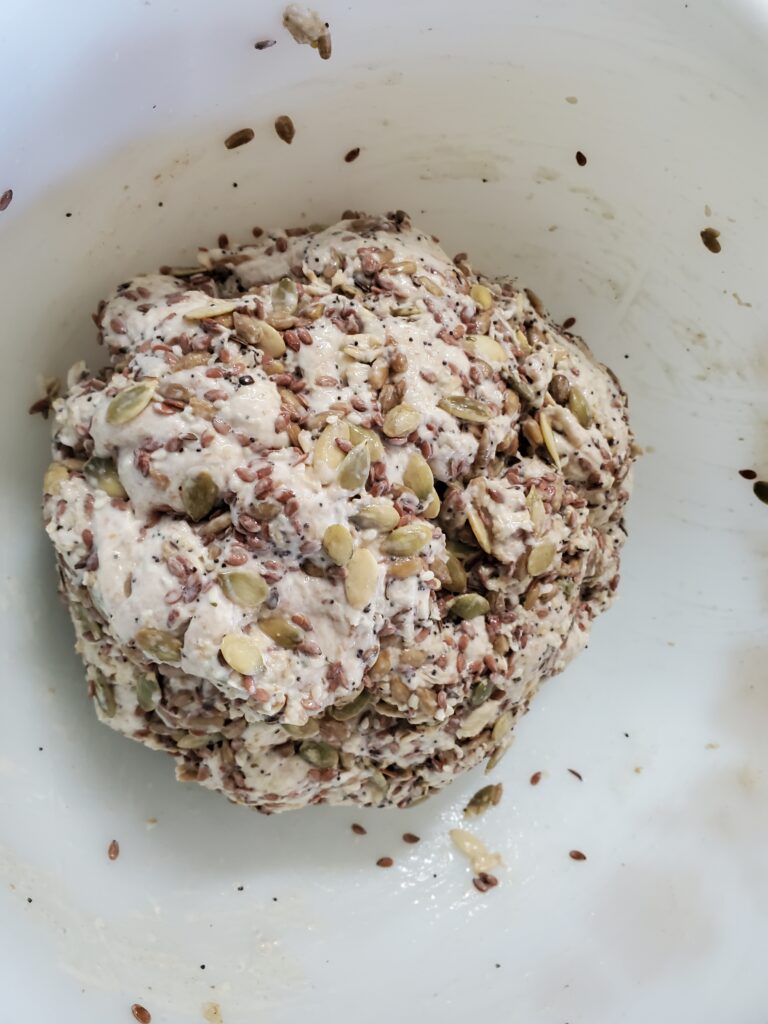
Start by weighing out the oats, pumpkin seeds, sunflower seeds, and flax seeds. Place them in a cereal bowl. Cover with water ~ 100 grams or enough to cover the seeds (this will be drained off). Soak the seeds for 1 hour.
Meanwhile weigh out the remaining seeds and place them in a second cereal bowl, and set aside.
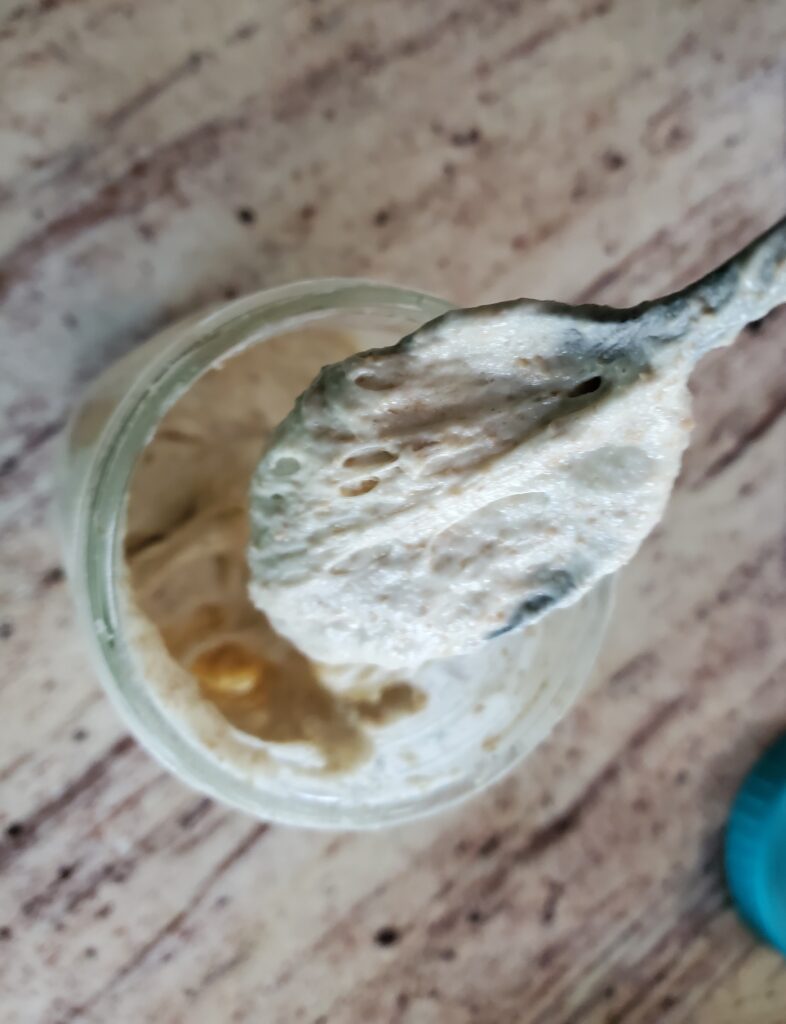
sourdough starter
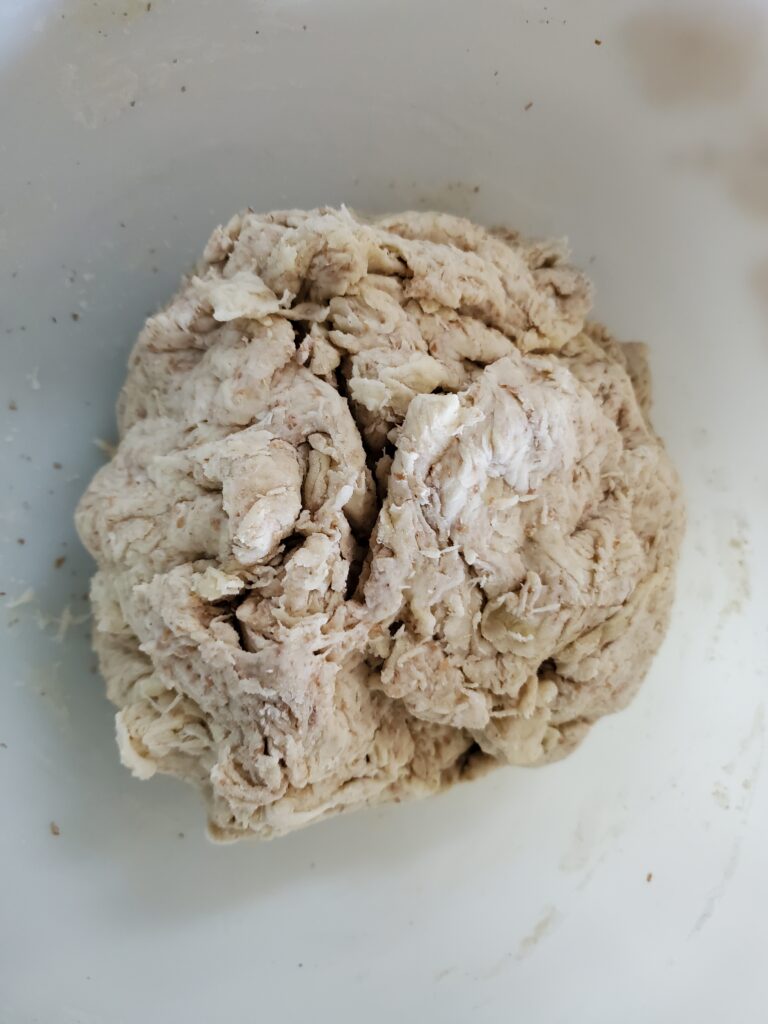
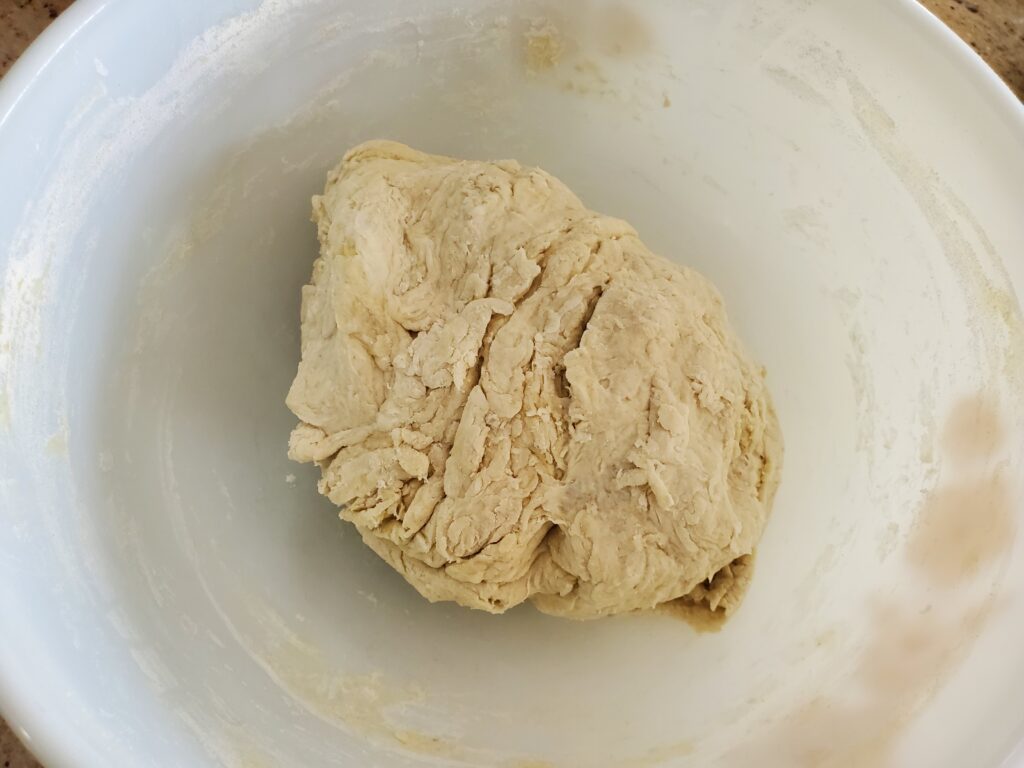
Weigh out the starter, warm water and olive oil. Mix together in a mixing bowl. Then weigh out the salt, and flours. Mix the salt and flours with the wet ingredients. You may have to use your hands or a bread scraper to incorporate all of the flour.
Resting stage
The dough will appear dry at this point, that’s okay. Cover the dough with a warm damp kitchen towel and allow it to rest for 60 minutes. The technical term for this stage is autolyze, hydrating the flour. This step is especially important when using whole wheat or rye flour.
After the oats and seeds have soaked for 1 hour, drain the water off. This is easily done with a wire strainer.
Adding the seeds to multigrain sourdough
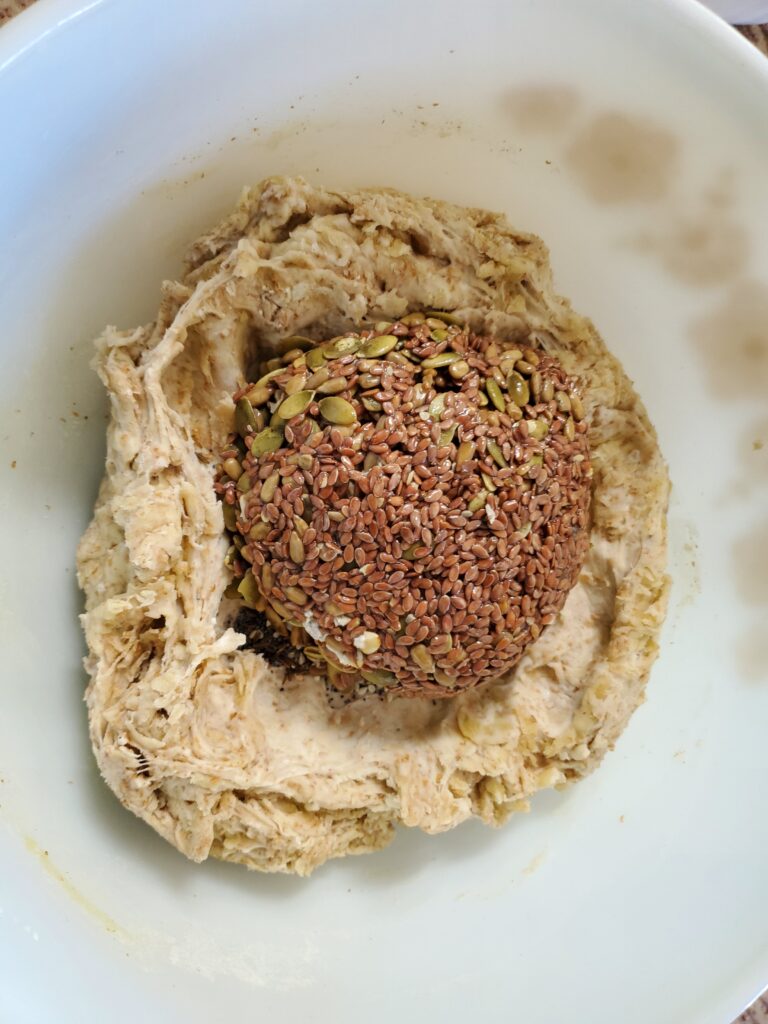
After your dough has rested for 60 minutes, press a bowl shape into your dough and add all of the wet and dry seeds. Fold the dough over the seeds several times to mix. The seeds will continue to mix during the next stage, so don’t worry if they are not fully mixed. Form you dough into a ball and use the ball to collect as many seeds as possible remaining in the bowl.
Stretching and folding
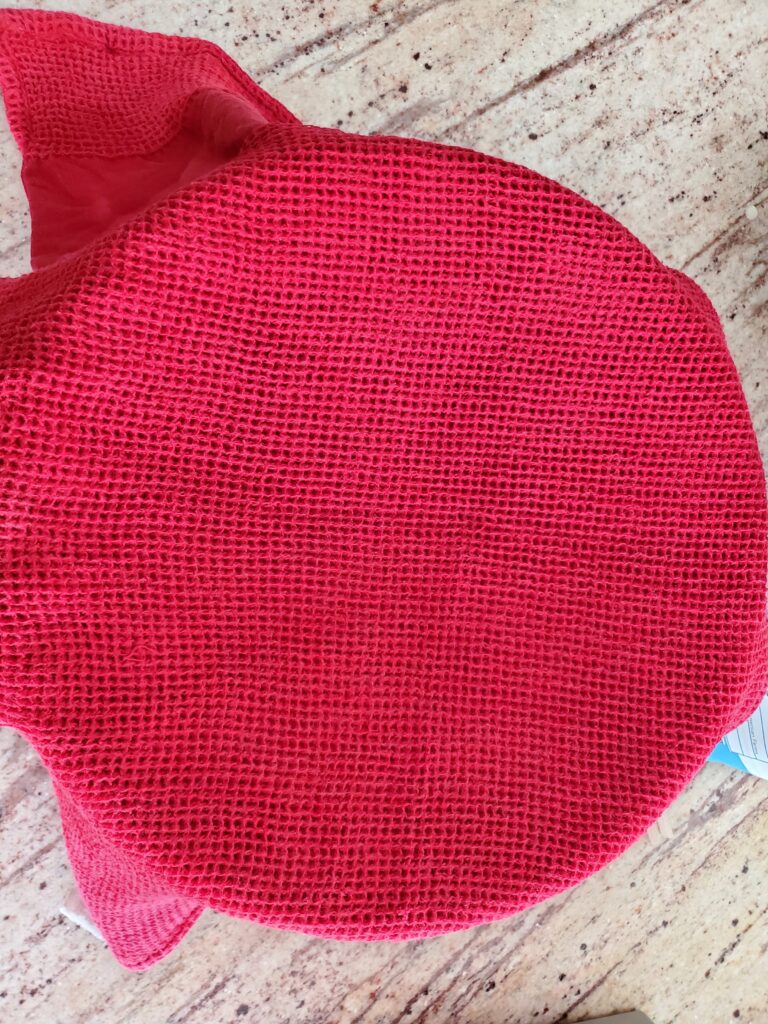
Place the ball on a sheet of parchment paper, into your proofing box or acceptable alternative. I use a Ninja Foodi on the proof setting at 85 degrees for this step. If you kitchen is warm enough, you can just place the dough in a mixing bowl for this step.
After 15-20 min, stretch and fold the dough over on itself, turn 1/4 and stretch and fold again. Continue to turn the dough 1/4 turn and do a total of 4 stretches and folds (a full circle). Wait another 15-20 min and do another set of 4 stretches and folds. Continue to stretch and fold a total of 3-4 times in the first hour. At this point your seeds should be thoroughly mixed.
Fermentation and rising
Continue to allow your dough to rise in the proofing box at 85 degrees. Check on it every hour to see if it has doubled in size. It usually takes 3-4 hours at 85 degrees, depending on how active your starter is.
Baking multigrain sourdough
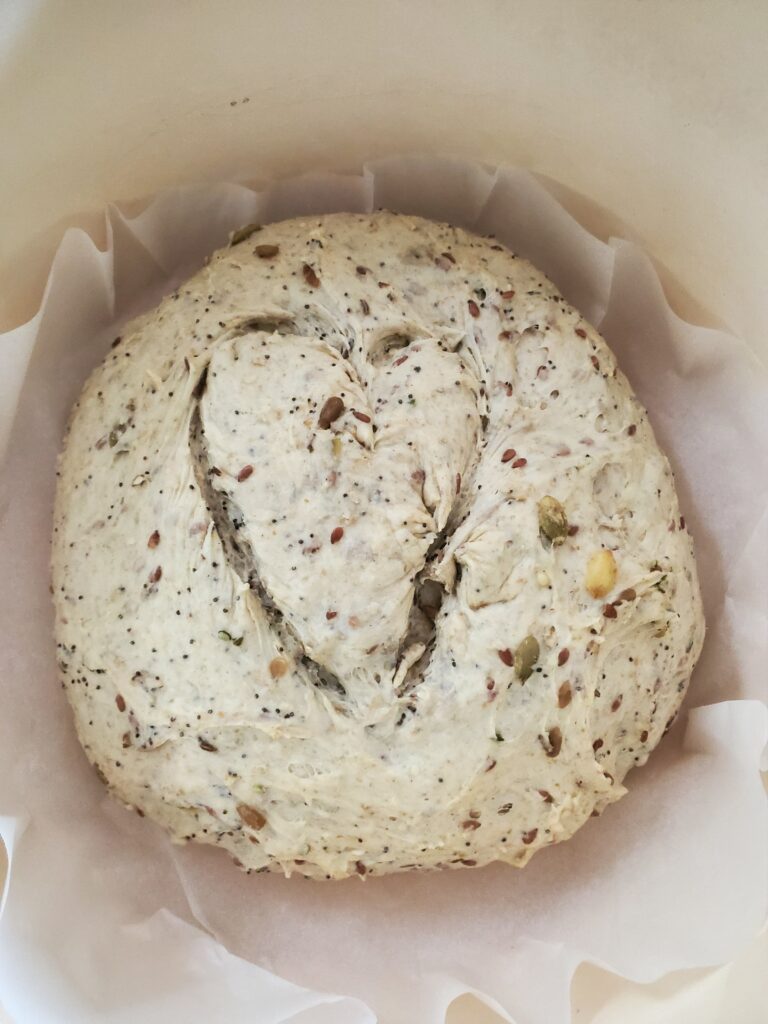
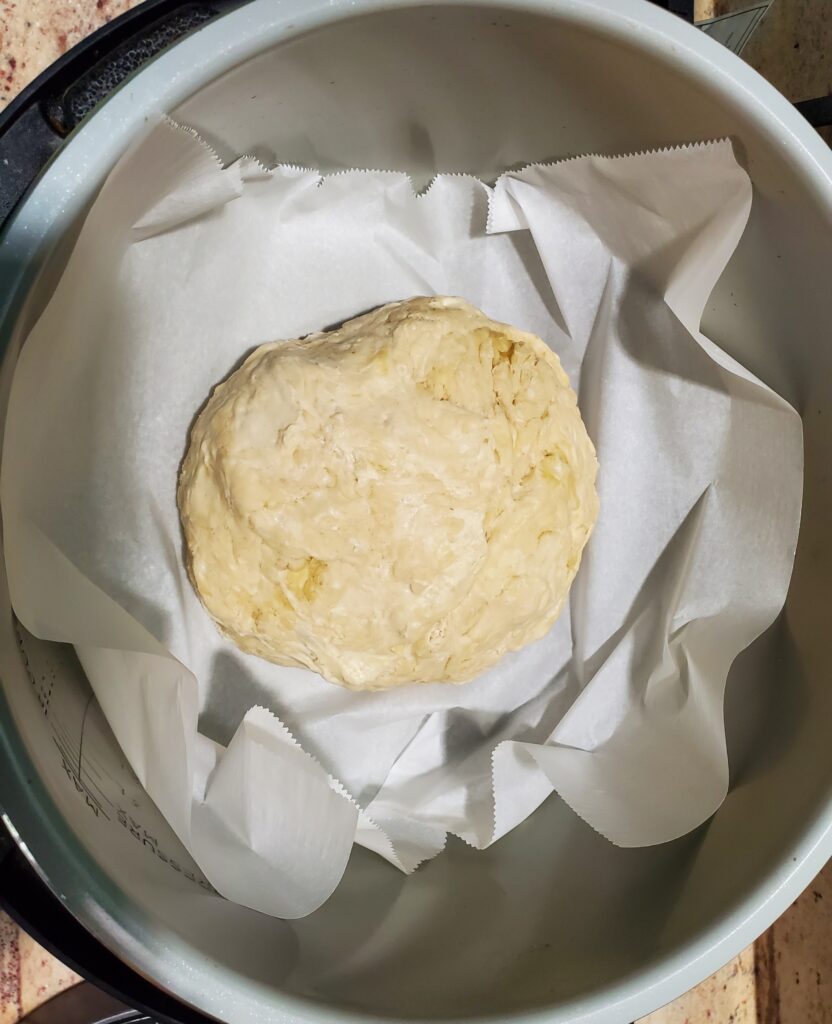
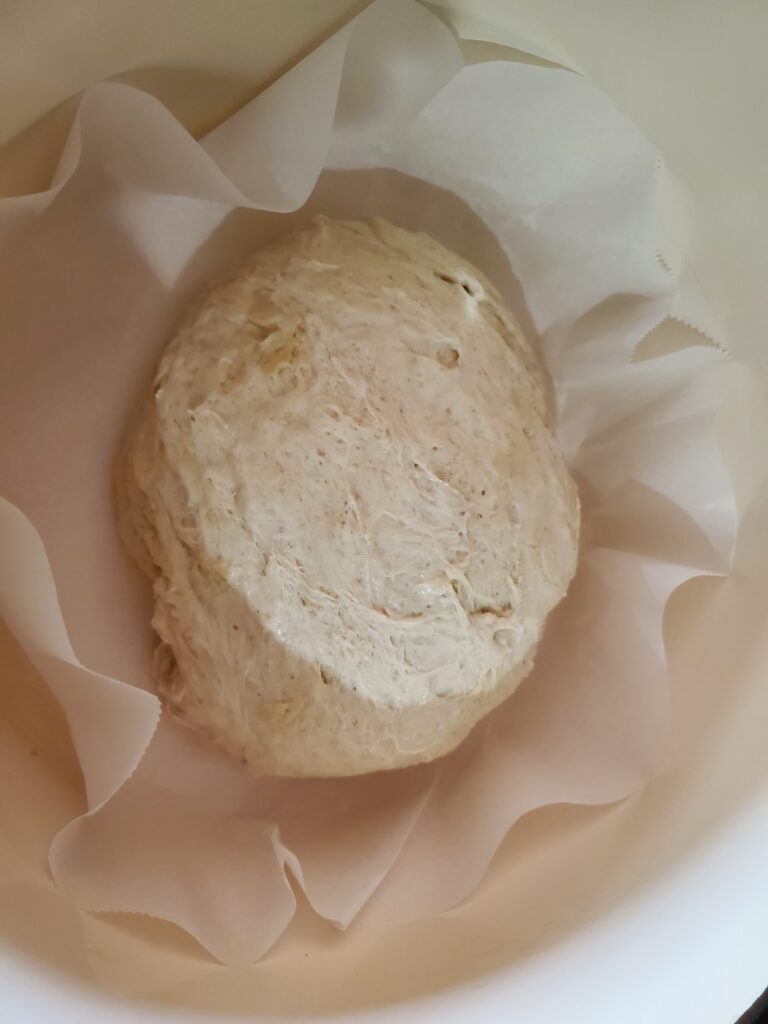
Preheat your oven to 450 degrees F. Line the inside of a Dutch oven with parchment paper. Remove the dough from the proofing box and use a dough scraper to carefully remove it from the parchment paper. Fold the edges under to create a ball.
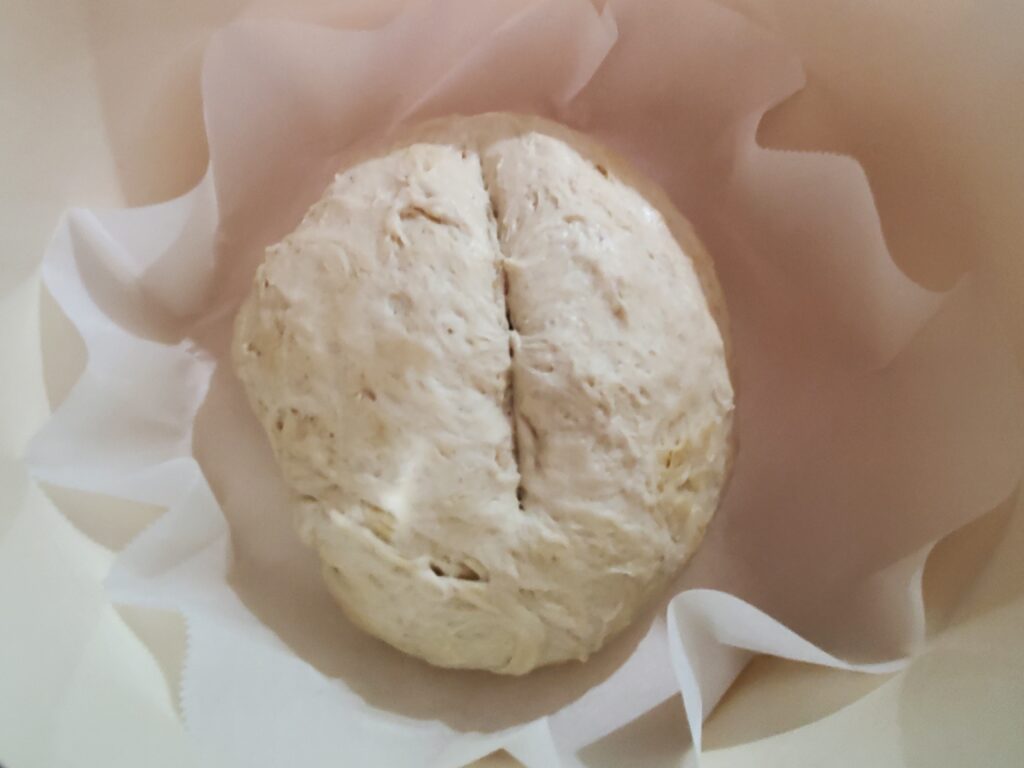
Place the dough ball seam side down into the Dutch oven. Score the top of the dough about 1/4 inch deep with a sharp knife.
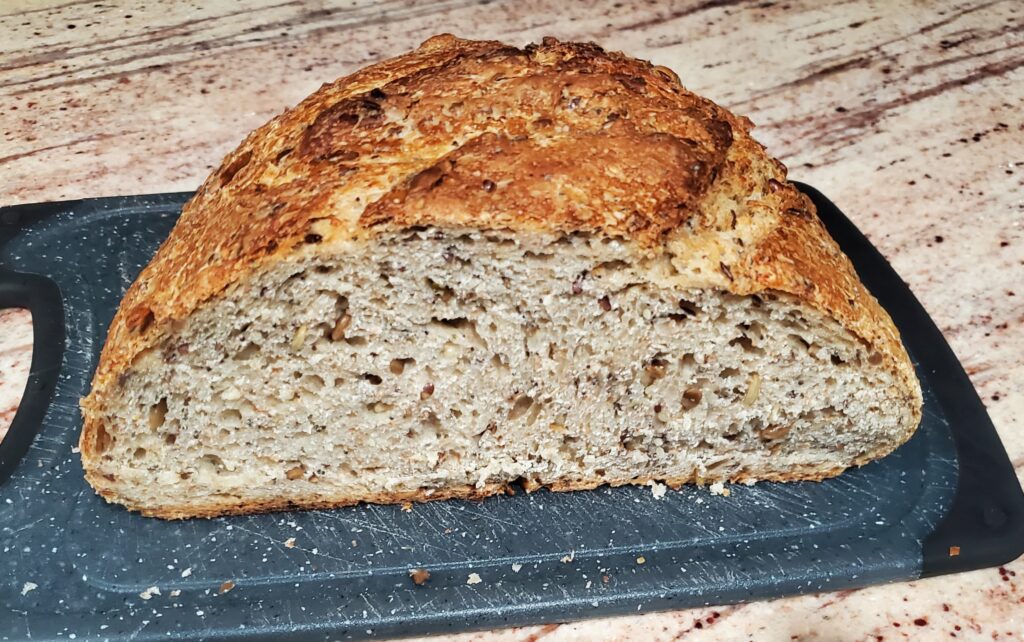
Place the lid in the Dutch oven and place it in the preheated oven. Immediately turn the oven temperature down to 400 degrees F, and bake covered for 20 minutes, remove the Dutch oven cover and place an empty sheet pan on the shelf below your Dutch oven. This will help prevent excessive browning on the bottom of your bread. Continue to bake uncovered for 30-40 minutes. Use a meat thermometer to check the temperature of your bread. It is done when the temperature reads between 205-210 degrees F.
Cooling stage
Multigrain Sourdough bread scored with a heart
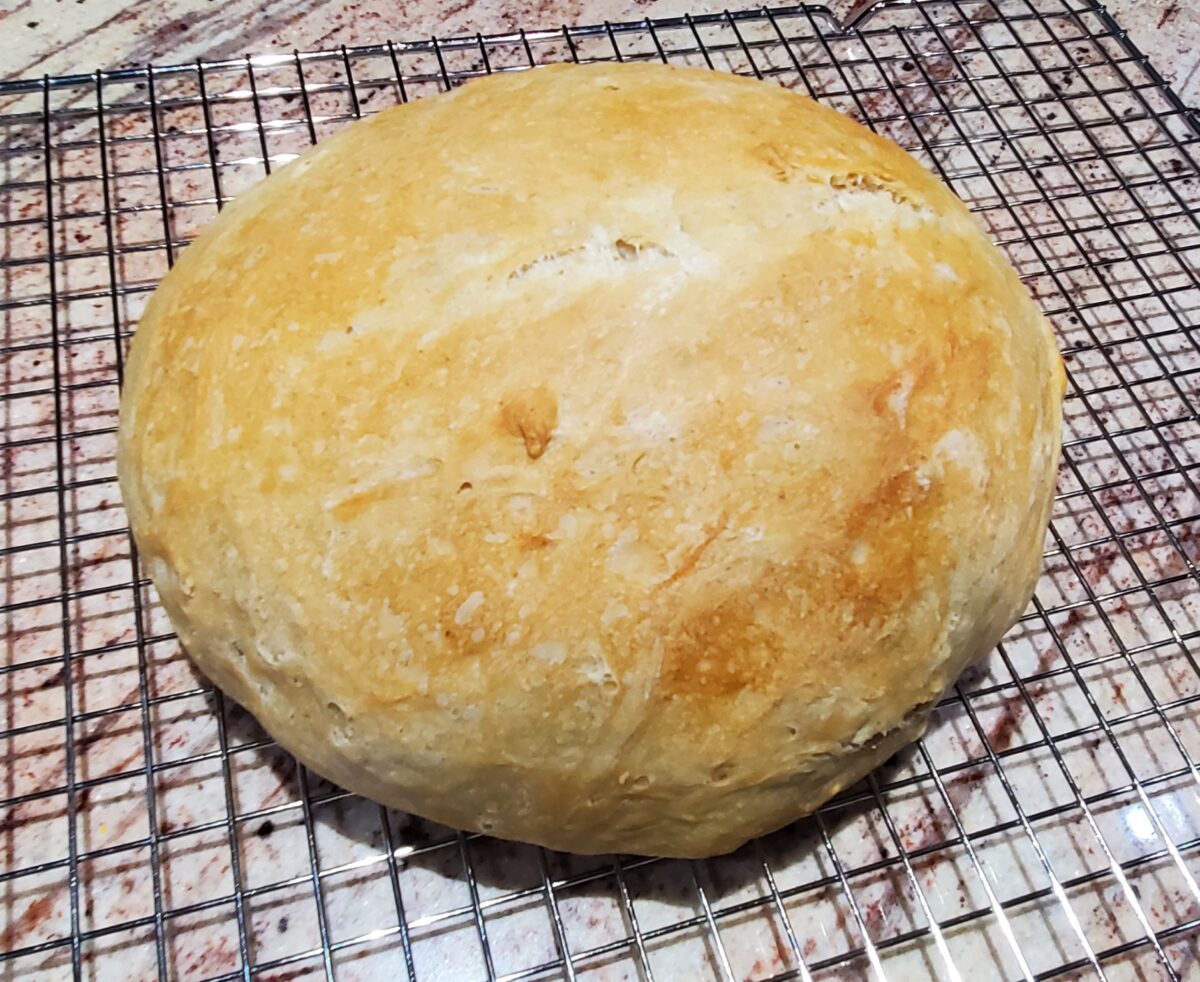
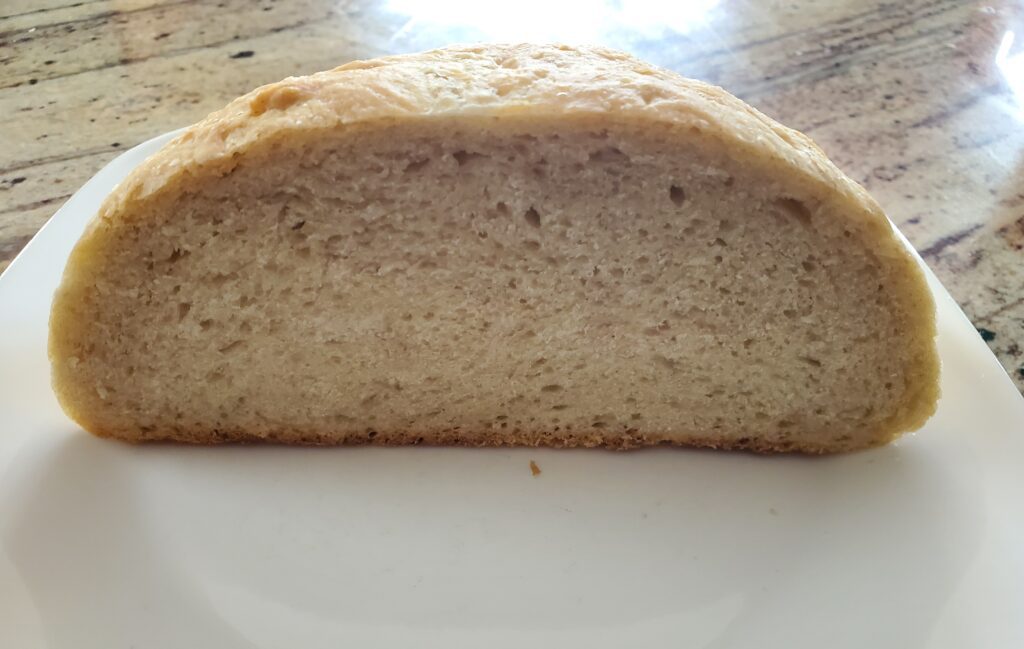
When your bread is ready, remove it from the Dutch oven as soon as possible and place it on a cooling rack.
Wait until your bread is cool, at least 1 hour before slicing it. This is the most difficult step, but worth it!
Can you bake sourdough bread on a smoker?
Yes you can! I love sourdough bread so much, but I do not like to heat up my home in the Summer. I love to bake on my Traeger grill in the Summer!
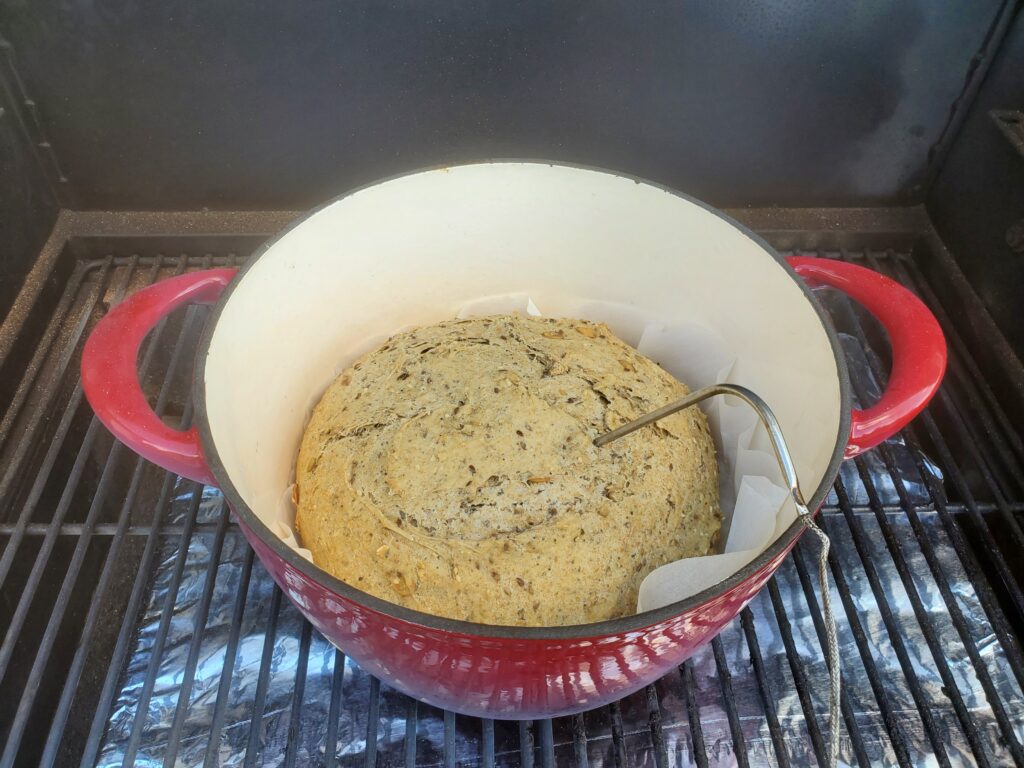
How to bake sourdough bread on a Traeger pellet grill:
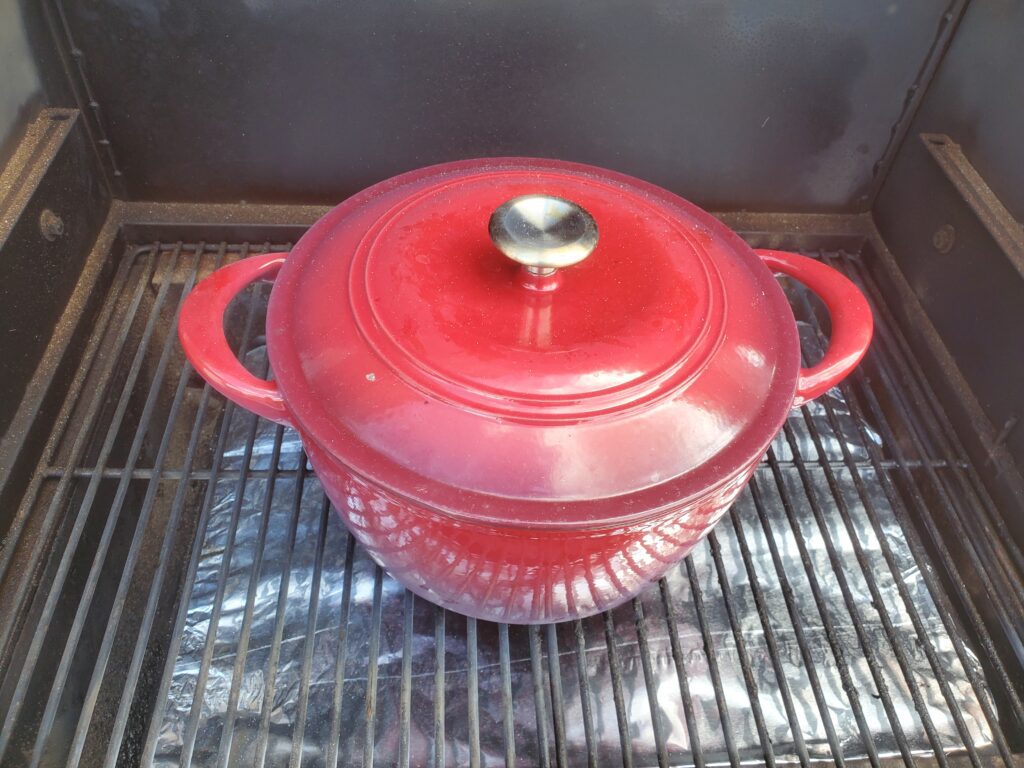
For this recipe: Remove the top rack and preheat the Traeger Silverton 620 to 450 degrees F.
Place the dough into a parchment lined Dutch oven with lid. Quickly, put the Dutch oven on the preheated grill. Immediately turn the temperature down to 410 degrees F. Smoke/bake for 30 minutes.
Quickly remove the Dutch oven lid and place the temperature probe into the bread. Continue to smoke/bake for 30-40 additional minutes or until the probe reaches 205 degrees F.
Remove the bread from the Dutch oven as soon as possible and place on a cooling rack. Wait at last 1 hour before slicing your bread.
<strong>Preparing ingredients and dough</strong><br>Start by weighing out the oats, pumpkin seeds, sunflower seeds, and flax seeds. Place them in a cereal bowl. Cover with water ~ 100 grams or enough to cover the seeds (this will be drained off). Soak the seeds for 1 hour.<br>Meanwhile weigh out the remaining seeds and place them in a second cereal bowl, and set aside.<br>Weigh out the starter, warm water and olive oil. Mix together in a mixing bowl. Then weigh out the salt, and flours. Mix the salt and flour with the wet ingredients. You may have to use your hands or a bread scraper to incorporate all of the flour.
<strong>Resting stage</strong><br>The dough will appear dry at this point, that's okay. Cover the dough with a warm damp kitchen towel and allow it to rest for 60 minutes. The technical term for this stage is autolyze, hydrating the flour. This step is especially important when using whole wheat or rye flour.<br>After the oats and seeds have soaked for 1 hour, drain the water off. This is easily done with a wire strainer.
<strong>Adding the seeds to multigrain sourdough</strong><br>After your dough has rested for 60 minutes, press a bowl shape into your dough and add all of the wet and dry seeds. Fold the dough over the seeds several times to mix. The seeds will continue to mix during the next stage, so don't worry if they are not fully mixed. Form you dough into a ball and use the ball to collect as many seeds as possible remaining in the bowl.
<strong>Stretching and folding</strong><br>Place the ball on a sheet of parchment paper, into your proofing box or acceptable alternative. I use a Ninja Foodi on the proof setting at 85 degrees for this step. If you kitchen is warm enough, you can just place the dough in a mixing bowl for this step.<br>After 15-20 min, stretch and fold the dough over on itself, turn 1/4 and stretch and fold again. Continue to turn the dough 1/4 turn and stretch and fold again to make a complete circle of 4 folds. Repeat 3-4 times for the first hour.
<strong>Fermentation and rising</strong><br>Continue to allow your dough to rise in the proofing box at 85 degrees. Check on it every hour to see if it has doubled in size. It usually takes 3-4 hours at 85 degrees, depending on how active your starter is.
<strong>Baking multigrain sourdough</strong><br>Preheat your oven to 450 degrees F. Line the inside of a Dutch oven with parchment paper. Remove the dough from the proofing box and use a dough scraper to carefully remove it from the parchment paper. Fold the edges under to create a ball.<br>Place the dough ball seam side down into the Dutch oven. Score the top of the dough about 1/4 inch deep with a sharp knife.<br>Place the lid in the Dutch oven and place it in the preheated oven. Immediately turn the oven temperature down to 400 degrees F, and bake covered for 20 minutes, remove the Dutch oven cover and place an empty sheet pan on the shelf below your Dutch oven. This will help prevent excessive browning on the bottom of your bread. Continue to bake uncovered for 30-40 minutes. Use a meat thermometer to check the temperature of your bread. It is done when the temperature reads between 205-210 degrees F.<br>When your bread is ready, remove it from the Dutch oven as soon as possible and place it on a cooling rack.<br>Wait until your bread is cool, at least 1 hour before slicing it. This is the most difficult step, but worth it!
NOTES
As an Amazon Associate, I earn from qualified purchases.
What tools do you actually NEED to make sourdough?
You will need an active starter, find tips for how to start and care for your starter here
A kitchen scale. Baking sourdough is a scientific process so most recipes will list ingredients by weight. If you have a postage scale that will work too.
A proofing box or suitable alternative. I use the proof setting on my Ninja Foodie for this purpose, it’s more expensive but it also works as and air fryer, pressure cooker and more. Check out this post for more options. If your kitchen is consistently between 78 and 85 degrees then you do not need a proofing box.
Meat thermometer. This is the only way to determine if your bread is done. It’s also helpful for checking the temperature of the water you add.
Parchment paper – This will help prevent sticking and make it much easier to transfer your dough.
Easy Sourdough Bread Ingredients:
150 grams of active bubbly starter
250 grams warm water (80-90 degrees F)
25 grams olive oil
500 grams unbleached bread flour
10 grams sea salt or kosher salt
How to make easy sourdough
Mix the starter, warm water, and olive oil together in a mixing bowl. Then add the flour and salt. You will need to use your hands to incorporate all of the ingredients together. Continue to mix until all of the flour is absorbed. At this point the dough will appear dry, that’s okay.
Cover the dough with a warm damp kitchen towel and allow it to rest for 30 to 60 minutes. The technical term for this stage is autolyze, hydrating the flour.
After the 30-60 minute rest, quickly work the dough into a rough ball. Place the ball on parchment paper in your proofing box. I use my Ninja Foodi, set to proof at 85 degrees for this step.
After 30 min, stretch and fold the dough over on itself, turn 1/4 and stretch and fold again. Continue to turn the dough 1/4 turn and do a total of 4 stretches and folds (a full circle). Wait 30 min and do another set of 4 stretches and folds.
Continue to allow your dough to rise in the proofing box at 85 degrees. Check on it every hour to see if it has doubled in size. It usually takes 3-4 hours at 85 degrees, depending on how active your starter is.
Transfer the parchment paper and dough to the counter. Gently scrape the dough from the parchment using a silicone spatula or dough scraper. Fold the edges of the dough under to create a nice ball shape. Place the ball into a parchment lined Dutch oven and cover.
How to bake easy sourdough bread
Preheat your oven to 450 degrees F.
Use a sharp knife to make a 1/4 deep slit in the top of your dough ball.
Place the dough in the oven. Reduce the oven temperature to 400 degrees F and bake covered for 20 minutes, remove the Dutch oven cover and place an empty sheet pan on the shelf below your Dutch oven. This will help prevent excessive browning on the bottom of your bread. Continue to bake uncovered for 30-40 minutes. Use a meat thermometer to check the temperature of your bread. It is done when the temperature reads between 205-210 degrees F.
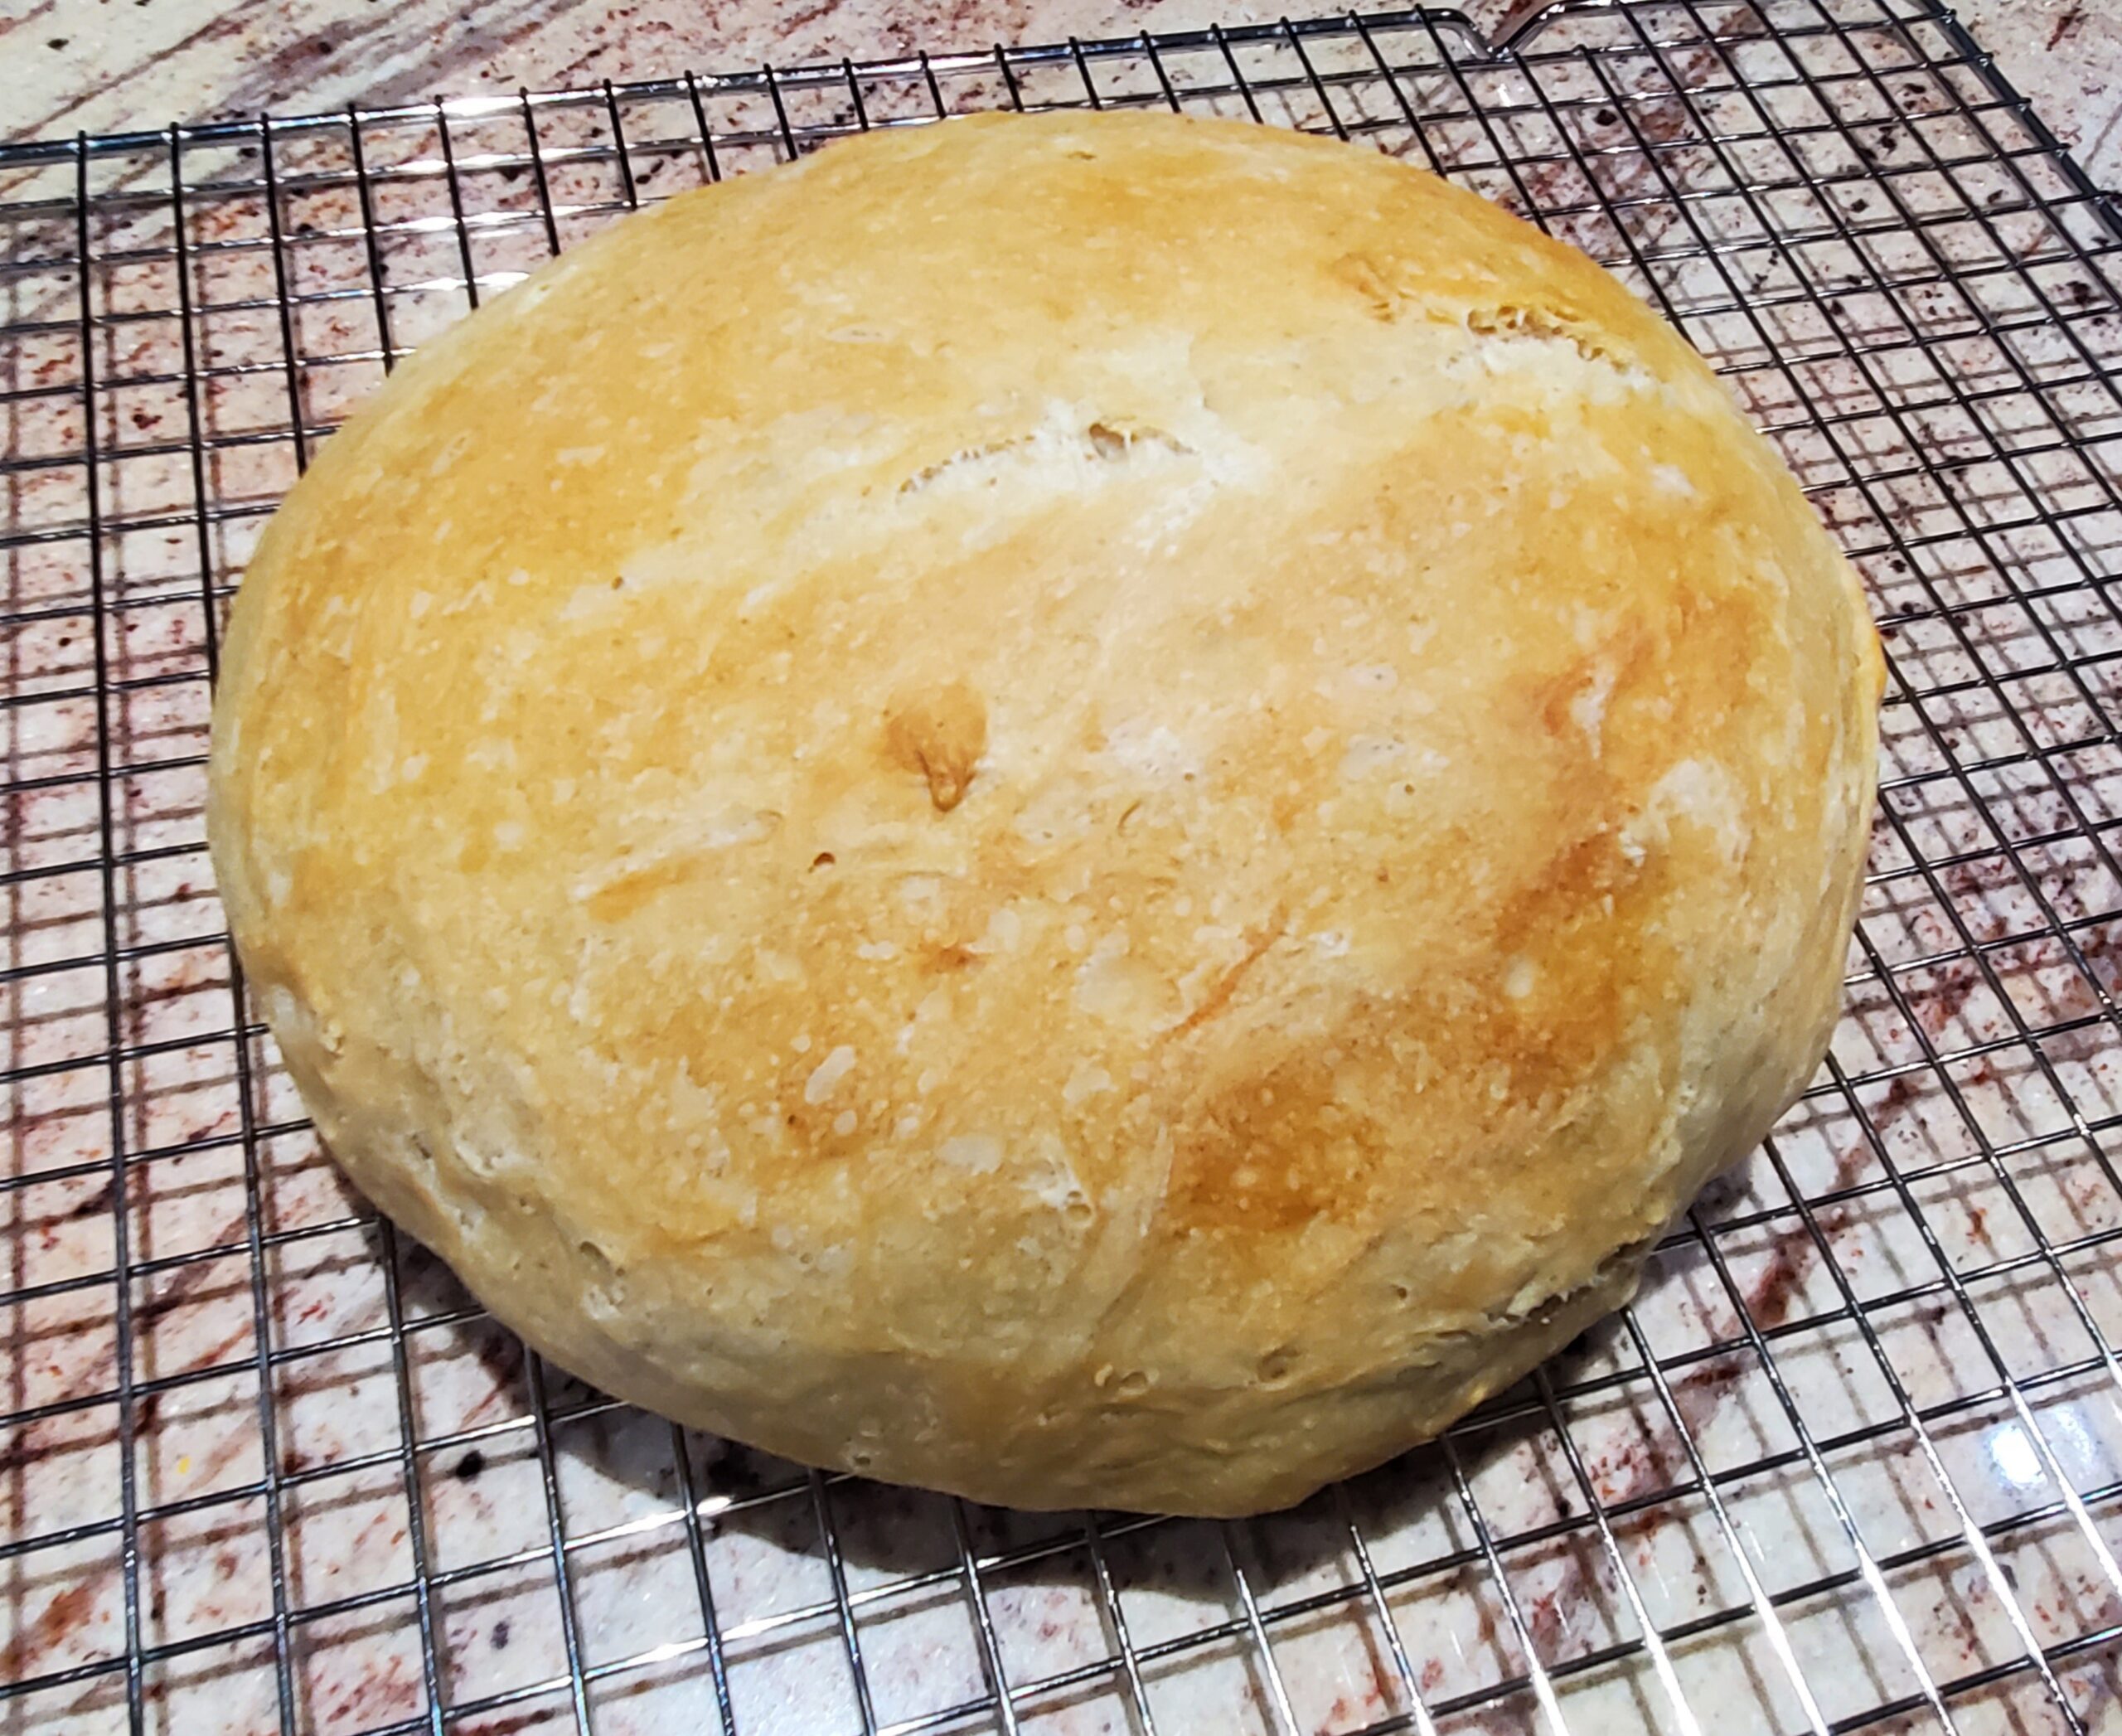
Place the fresh baked bread on a cooling rack and allow it to cool for at least an hour before slicing. This is the most difficult step, but worth it.
As an Amazon Associate I earn from qualified purchases.
Mix the starter, warm water, and olive oil together in a mixing bowl. Then add the flour and salt. You will need to use your hands to incorporate all of the ingredients together. Continue to mix until all of the flour is absorbed. At this point the dough will appear dry, that's okay.
Cover the dough with a warm damp kitchen towel and allow it to rest for 30 to 60 minutes. The technical term for this stage is autolyze, hydrating the flour. After the 30-60 minute rest, quickly work the dough into a rough ball. Place the ball on parchment paper in your proofing box.
After 30 min, stretch and fold the dough over on itself, turn 1/4 and stretch and fold again. Continue to turn the dough 1/4 turn and do a total of 4 stretches and folds (a full circle). Wait 30 min and do another set of 4 stretches and folds.<br>Continue to allow your dough to rise in the proofing box at 85 degrees. Check on it every hour to see if it has doubled in size. It usually takes 3-4 hours at 85 degrees, depending on how active your starter is.
Transfer the parchment paper and dough to the counter. Gently scrape the dough from the parchment using a silicone spatula or dough scraper. Fold the edges of the dough under to create a nice ball shape. Place the ball into a parchment lined Dutch oven and cover.
Preheat your oven to 450 degrees F. Use a sharp knife to make a 1/4 deep slit in the top of your dough ball. Place the dough in the oven. Reduce the oven temperature to 400 degrees F and bake covered for 20 minutes, remove the Dutch oven cover and place an empty sheet pan on the shelf below your Dutch oven. This will help prevent excessive browning on the bottom of your bread. Continue to bake uncovered for 30-40 minutes. Use a meat thermometer to check the temperature of your bread. It is done when the temperature reads between 205-210 degrees F.
Place the fresh baked bread on a cooling rack and allow it to cool for at least an hour before slicing.